• Mastering the art of screenshots

    Home » Forums » Newsletter and Homepage topics » Mastering the art of screenshots

    • This topic has 45 replies, 23 voices, and was last updated 8 months ago.
    Author
    Topic
    #2689556

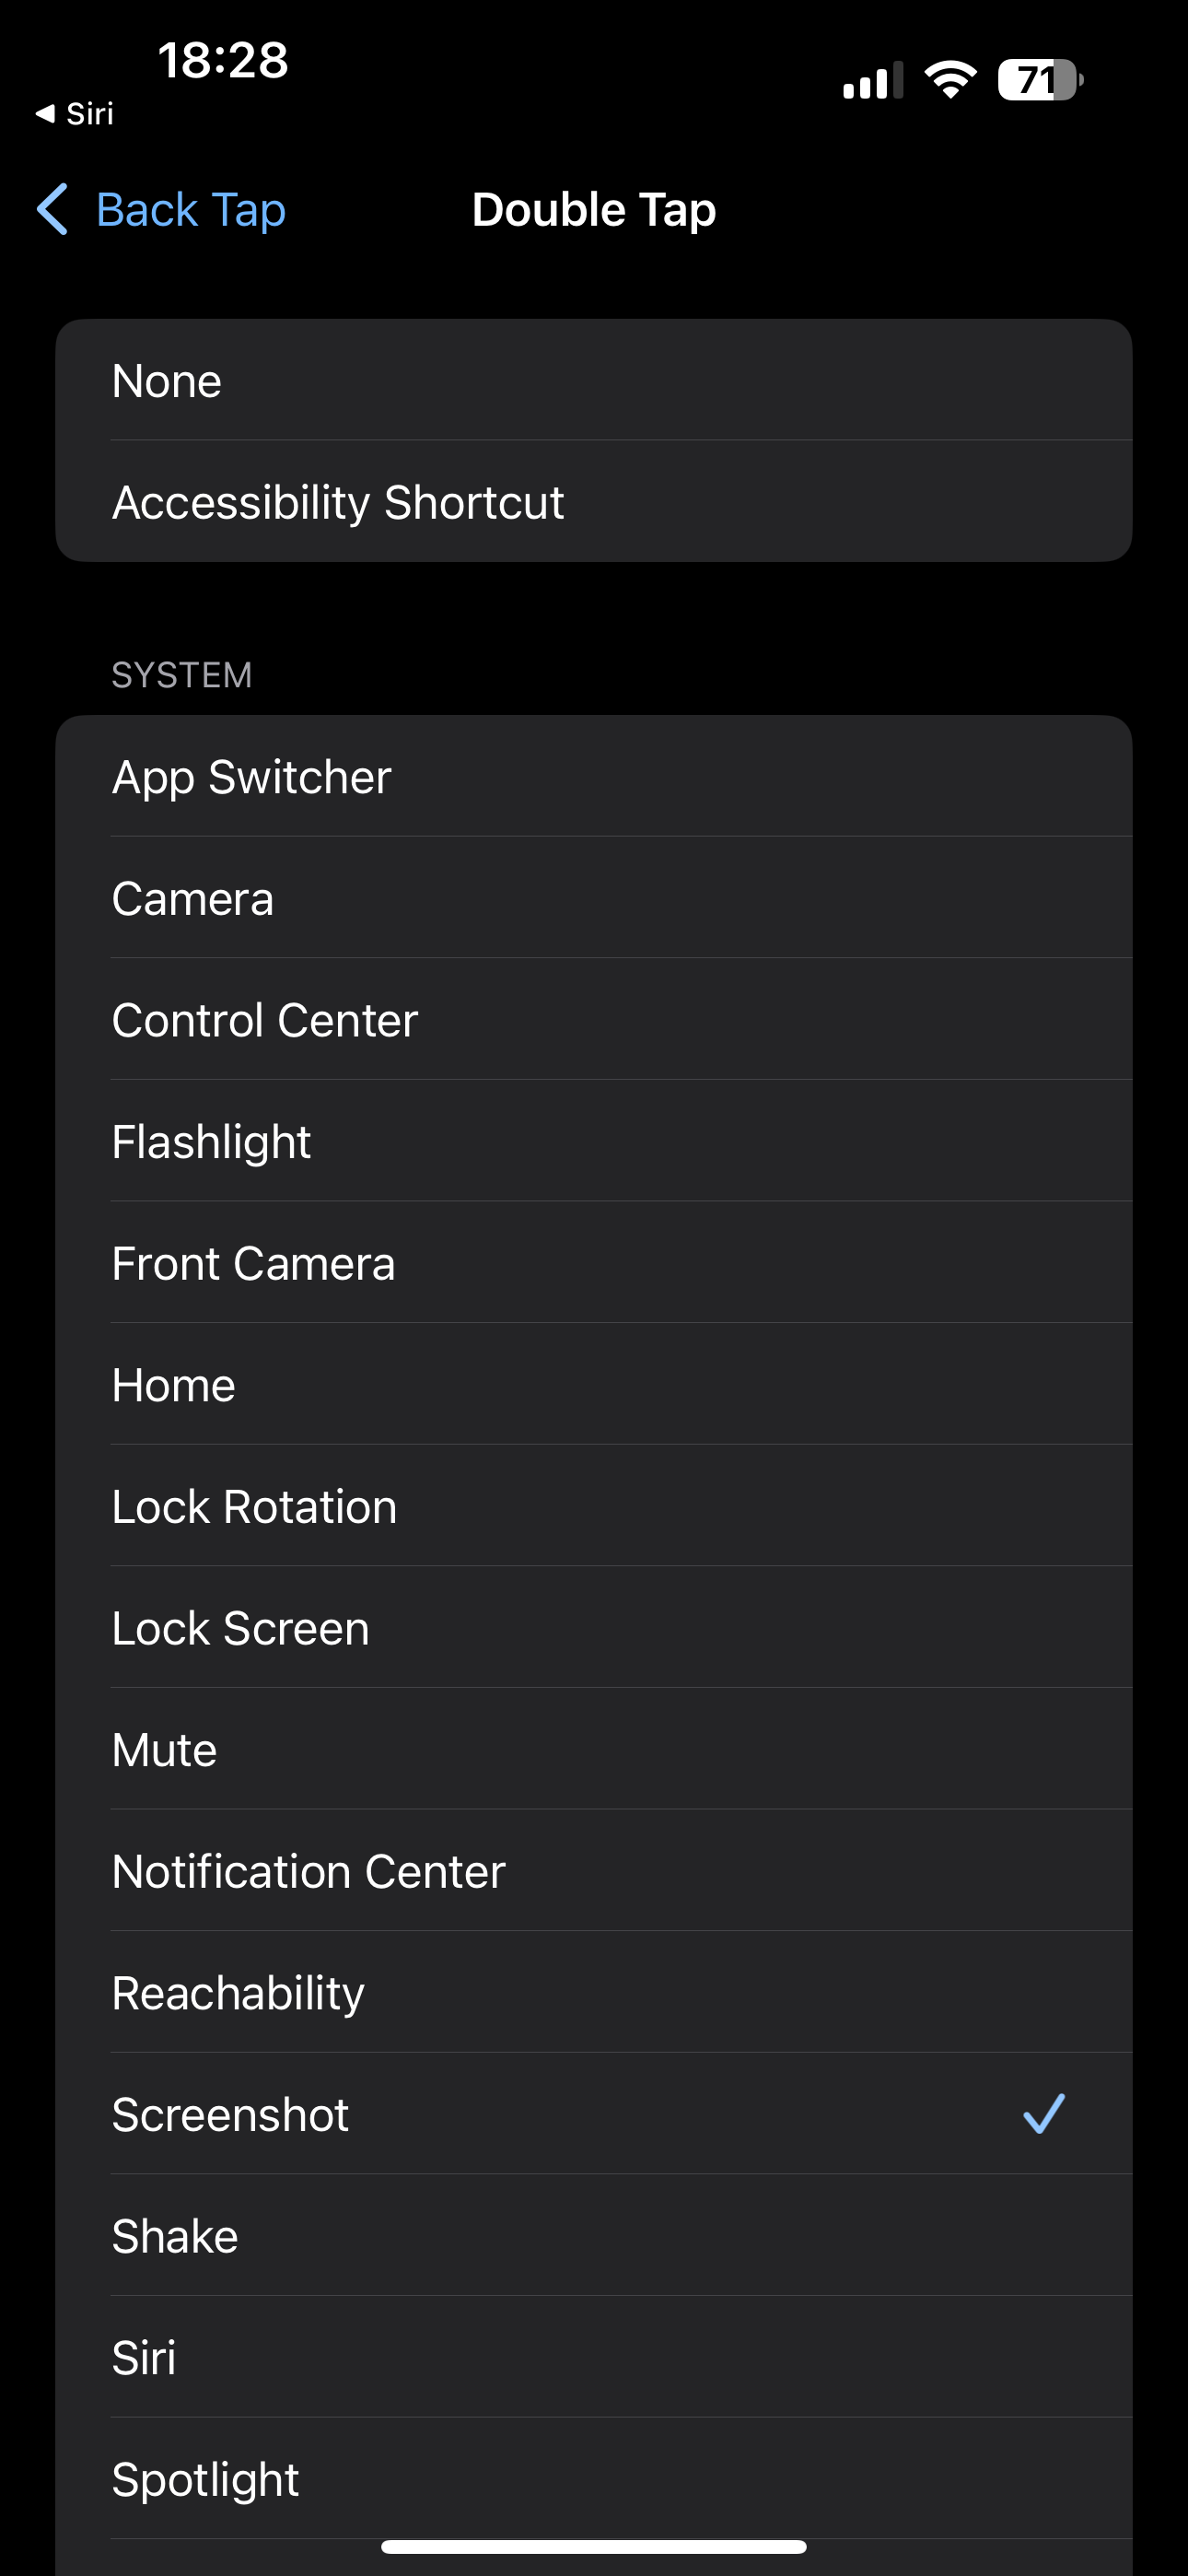
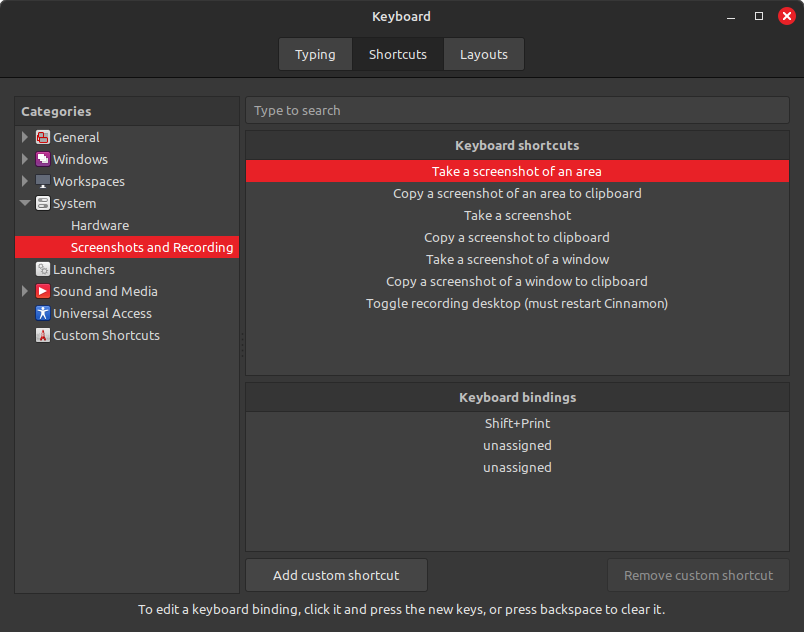
    ISSUE 21.30 • 2024-07-22 MICROSOFT 365 By Peter Deegan We should all know how to capture screen images from our devices. The ability to capture such i
    [See the full post at: Mastering the art of screenshots]

    11 users thanked author for this post.
    Viewing 28 reply threads
    Author
    Replies
    • #2689571

      Great job Peter.
      One slight addition to your instructions. On the newer iPhones there is no Home button. The screenshot is taken by pressing the up volume button of left side and the Sleep/Wake button on the right side at the same time.

      HTH, Dana:))

      3 users thanked author for this post.
      • #2689573

        D’oh … of course.  I know that but apparently my typing fingers do not.

        Thanks for the tip,

        Peter Deegan

    • #2689602

      Another free tool that I use for screen shots is Lightshot that can be found at https://app.prntscr.com/en/index.html that’s available for Windows and Mac. I like it because you define the scope of your shot and you can copy, print and/or save the shot.

      1 user thanked author for this post.
    • #2689599

      Thanks for the great article.

      I do wish you had gone into a bit more depth regarding privacy and data redaction. In fact, I’d love to see an Ask Woody article on safe redaction methods and tools.

      Getting redaction right can be tricky.

      It’s unlikely that blurring or pixelation will thwart a determined attacker.

      When modifying the screenshot image for privacy, it’s important to use a tool that actually removes the sensitive information so that it doesn’t remain in the file. Blurring, pixelation, and “swirl” can all be reversed to a surprising extent. Remember the infamous “swirl face”.

      Even covering the data with an opaque black box may not be enough. Some image editors layer the redacting black box on top of the data in such a way that the original data remains in the file.

      Here are a few relevant links

      https://matzjb.se/2015/07/26/deconstructing-swirl-face/

      https://www.wired.com/story/redact-pdf-online-privacy/

      https://www.bleepingcomputer.com/news/security/researcher-reverses-redaction-extracts-words-from-pixelated-image/

      https://arstechnica.com/information-technology/2017/02/google-brain-super-resolution-zoom-enhance/

      https://www.adobe.com/acrobat/hub/how-to-remove-redactions-pdf.html

      Larry

      3 users thanked author for this post.
      • #2689613

        The article was already overly long and I wanted to focus on the basics.  In my experience, the people who most need to take screenshots are novice / uncertain computer users .

        Redaction is a big issue, not just for screen shots but also documents, sheets and slides plus PDF’s which contain a worrying amount of info in the layers.

        I’ll suggest the topic to the Ask Woody gods (Sue and Will) and be guided by their infinite wisdom <g>.

        Thanks

        Peter Deegan

        1 user thanked author for this post.
    • #2689603

      Not enough info on screen shots I have lots a question about performing edits you showed. Please give all the steps required to do these edits

      • #2689619

        That’s a huge and broad ranging topic. Screenshot images are just like any other picture/photo.  In Windows they can be edited with the Paint app, Snipping Tool editor or any other image editor you might have on your computer.

        It depends on which app you want to use but whichever you choose has plenty of help either included or online.

        Peter Deegan

        2 users thanked author for this post.
      • #2698476

        Not enough info on screen shots I have lots a question about performing edits you showed. Please give all the steps required to do these edits.

        See my post and others related to these posts.
        https://www.askwoody.com/forums/topic/mastering-the-art-of-screenshots/#post-2698472

        -- rc primak

    • #2689612

      I do wish you had gone into a bit more depth regarding privacy and data redaction. In fact, I’d love to see an Ask Woody article on safe redaction methods and tools. Getting redaction right can be tricky. It’s unlikely that blurring or pixelation will thwart a determined attacker. When modifying the screenshot image for privacy, it’s important to use a tool that actually removes the sensitive information so that it doesn’t remain in the file. Blurring, pixelation, and “swirl” can all be reversed to a surprising extent. Remember the infamous “swirl face”. Even covering the data with an opaque black box may not be enough. Some image editors layer the redacting black box on top of the data in such a way that the original data remains in the file.

      There is very easy and simple solution to this. After you have “blurred” or whatever to the private data and added any comments you want take a screenshot of the modified screenshot. The second screen shot will have no data to extract from.

      HTH, Dana:))

      5 users thanked author for this post.
    • #2689620

      That takes care of the layering issue, but the blur / pixellation etc can still be undone in many cases. Take a look at the link about “swirl face”.

      1 user thanked author for this post.
      • #2689623

        There’s always been the need for care with blurring.  The less severe blurring options can be prone to deciphering by someone determined.

        In the article, Figure 4 uses my normal ‘high’ blur setting via Snagit.

        The default blur setting in many apps isn’t enough.

        Peter Deegan

        1 user thanked author for this post.
    • #2689624

      One slight addition to your instructions.

      The online versions of the newsletters have been updated to reflect this correction.

      2 users thanked author for this post.
    • #2689633

      While at my desk I have loved using ShareX. I put it’s icon in the system Tray and it’s fast, easy, and reliable. And free.

      Human, who sports only naturally-occurring DNA ~ oneironaut ~ broadcaster

      1 user thanked author for this post.
      • #2689706

        I have never understood why ShareX does not get more coverage.  Though I have only used SnagIt for a trial period and occasionally on others’ computers, I have not seen anything that SnagIt does that ShareX cannot.  And not only is it free, but it is also open source.

    • #2689634

      On the newer iPhones there is no Home button. The screenshot is taken by pressing the up volume button of left side and the Sleep/Wake button on the right side at the same time.

      On new iPhones screenshot can be taken by double-tap on the back.

      IMG_2539

      • #2689638

        Good point.  The double and triple tap options have to be enabled from Settings | Accessibility | Touch | Back Tap.

        Those back taps sometimes don’t work through a case but it’s certainly worth trying.

        FWIW, I use it to quickly start the Camera.

        Peter Deegan

    • #2689651

      Is there a free tool that will capture a window that scrolls horizontally?

      1 user thanked author for this post.
    • #2689655

      That takes care of the layering issue, but the blur / pixellation etc can still be undone in many cases. Take a look at the link about “swirl face”.

      I don’t use the “swirl” method. I always considered it inadequate and just plain ugly. I place the screenshot in a Word document. I insert a shape (usually a box) over the part to hide. I format the shape’s Fill with the color of the background of the area of the private data and select No line for the shape. The end results is a blank area with the same color as the rest of the background. I make a screenshot of this as the screenshot to post publicly. This is 100% foolproof and no one using any technology can detect what was blocked by the first screenshot in the second screenshot.

      HTH, Dana:))

      2 users thanked author for this post.
    • #2689656

      I’ve been using hypersnap for years, as that was used by my employer and when I retired I gravitated to software I knew.  Anyway, I had never even noticed it did OCR until your article but have found it does it well.  Thank you for the inspiration to look deeper at software I thought I knew.

    • #2689681

      Those back taps sometimes don’t work

      Mine works every time .

    • #2689722

      I need a detailed tutorial on Windows screenshots, especially on editing the screenshot.

      Mark


    • #2689726

      Hi Peter,
      Long time reader of you and other Woody-“ites” but first time commenting on one of your articles. Great btw.

      I just wanted to point out that screenshots in Linux are easy, fast, efficient and free. Also, as near as I can tell, all of these screenshot apps will do full desktops on multiple monitors, 1 monitor or app specific screenshots.
      These tools have been around way before MS came up with snipping tools for sure and always are free.

      I personalty use Spectacle on my KDE desktop.It will also do screen recording.
      This comes per-loaded on KDE desktops and is free.

      Here is a wiki URL that covers about 20 of them (briefly)for those that are interested in perusing more options screenshot tools for Linux.

      https://wiki.archlinux.org/title/Screen_capture

      I highly recommend donating to whatever developer or org created these tools yearly.
      Although most of them receive corporate donations, some of them receive only donations from their user-base and every little bit helps.
      Because I use KDE and it’s tools, I donate to KDE yearly. Just a $100 or so is enough to go a long way for them and even 5 dollars is enough.

      OK – now, back to the bit locker retrieval and unlock c: and then run
      del “C:\windows\system32\drivers\crowdstrike\c-00000291*.sys” deletion routine my life has become at work–hopefully this will end soon and NEVER happen again. I’ve never been so busy and bored at the same time in my life!

      Only 900 more to go. Should be done by Wednesday or Thursday…..sigh

      1 user thanked author for this post.
    • #2689740

      Linux releases DO have global screen shot shortcuts, though I wouldn’t be shocked if I were to find they vary across distributions.

      Here’s what I found in my Linux Mint 21.3:

      1. Shift + Print: Take a screenshot of an area
      2. Shift + Ctrl + Print: Copy a screenshot of an area to the clipboard
      3. Print: Take a screenshot
      4. Ctrl + Print: Copy a screen shot to clipboard
      5. Alt + Print: Take a screenshot of a window
      6. Ctrl + Alt + Print: Copy a screenshot of a window to clipboard
      7. Shift + Ctrl + Alt + R: Toggle recording desktop (must restart Cinnamon)

      After the screen shot is taken, #s 1, 3, and 5 bring up a dialog that offers to copy to clipboard or save to a file, while their counterparts 2, 4, and 6 just go straight to the clipboard as they say. Oh, and #s 2 and 4 are the ones that capture the entire desktop.

      These are configurable in Preferences > Keyboard, so you can change them, or even add secondary and tertiary shortcuts.

      Screenshot-from-2024-07-22-20-11-32

      In Windows, I was always a big user of Alt + Print, so it was nice that I didn’t have to learn a new one in Mint.

      2 users thanked author for this post.
    • #2689745

      I need a detailed tutorial on Windows screenshots, especially on editing the screenshot.

      The link below is instructions from MS for taking screenshots. The snip & sketch tool is not very good at editing a screenshot, especially if you want to add text to point something out.
      Use Snipping Tool to capture screenshots

      The instructions on how to edit the screenshot will depend upon what app you use to edit the screenshot. I use Word, but many users don’t have Word; but you can effectively edit a screenshot using Paint that comes installed in Windows.

      I haven’t written detailed instructions but these are the general steps to edit with Paint.

      Paste the screenshot in Paint.
      Select the box from the Shapes in the ribbon above.
      Use the mouse to draw the box around the data to hide so that the data is inside the box.
      To the right of the Shapes in the ribbon above, click Outline and select No Outline.
      To the right of the Shapes in the ribbon above, click Fill and select Solid color.
      You can use the color blocks to select a color you want.
      The data is now hidden.
      Perform a screen capture of this edited screenshot
      Select File > New to open a new paint window.
      Paste the screenshot of the edited screenshot into Paint.
      Select File>Save as and save the second screenshot as a photo (jpeg) file to post anywhere public.

      HTH, Dana:))

      3 users thanked author for this post.
    • #2689763

      I take a LOT of screenshots using a hotkey with Screenpresso (not free). It has a decent editor that includes combining multiple images.

      I’m also a long time user of FastStone Image Viewer / Editor. It also takes screenshots but the tool cannot be started with a hotkey combo. FastStone is free for home users, but I’ve donated multiple times.

      Desktop Asus TUF X299 Mark 1, CPU: Intel Core i7-7820X Skylake-X 8-Core 3.6 GHz, RAM: 32GB, GPU: Nvidia GTX 1050 Ti 4GB. Display: Four 27" 1080p screens 2 over 2 quad.

      2 users thanked author for this post.
    • #2689944

      I’m surprised no one mentioned my go-to screen capture Irfanview. I’ve used it for years with Windows prt sc and alt-prt sc, pasting the image into Irfanview and editing from there. The help is extensive with FAQs, and sections explaining the various actions available from the toolbar. It’s free, but I usually donate a few dollars with any [infrequent] update.

      For the Pixel phones, swiping up from the bottom of the screen reveals Screenshot and Select. Screenshot saves to the Files Screenshots folder on the phone, and can be Shared from there.

      2 users thanked author for this post.
      • #2698467

        For the Pixel phones, swiping up from the bottom of the screen reveals Screenshot and Select.

        That’s a fairly common way to get to Screenshot on Android phones. I have an older Moto g4 from Motorola.

        -- rc primak

    • #2690924

      Is WinSnap free? I can’t see where to download a free version – says it’s $19.95 for a download and free updates.


    • #2691092

      I’m looking for tool (free is possible) that will allow me to scroll down vertically to capture additional data below the current window?  Thank you

      1 user thanked author for this post.
    • #2691112

      I’m looking for tool (free is possible) that will allow me to scroll down vertically to capture additional data below the current window?

      For free, take a look at PIcPick. It offers a free version for home users, but some features are limited. I used in the past.

      https://picpick.app/en/

      Screenpresso has this feature, but it’s not free. It’s what I use.

      Desktop Asus TUF X299 Mark 1, CPU: Intel Core i7-7820X Skylake-X 8-Core 3.6 GHz, RAM: 32GB, GPU: Nvidia GTX 1050 Ti 4GB. Display: Four 27" 1080p screens 2 over 2 quad.

      2 users thanked author for this post.
    • #2691132

      I’m looking for tool (free is possible) that will allow me to scroll down vertically to capture additional data below the current window?  Thank you

      Most browsers come with a way to take a full page screenshot. I know Edge, Firefox, and Chrome does.

      In Chrome select the three dots on the right side and select More tools > Developer tools (or Ctrl + Shift + I ). The developer tool panel will open. Select the three dots at the top right of that panel and select Run command (or Ctrl + Shift + P). In the command run box enter screenshot. Click the Screenshot button next to Capture full size screenshot. This will cause a File Explorer window to open to save the screenshot as an image file.

      I don’t use Edge and Firefox so I don’t know their full page screenshot procedure.

      HTH, Dana:))

      1 user thanked author for this post.
      • #2691147

        Edge has Screenshot (or Ctrl+Shift+S) for a choice of Capture area or Capture full page.

        The former can be scrolled up or down and the latter includes full length.

        1 user thanked author for this post.
        • #2691151

          … Screenshot

          Before anyone asks, that quoted sequence above means that within Edge, click on the three dots (ellipsis?) in the upper right corner of Edge’s window (just below the “X” to close the browser’s window) and then select “Screenshot” from the drop-down menu that appears after clicking the three dots.

          1 user thanked author for this post.
    • #2692172

      Hi, Great article. One thing puzzles me. My snipping tool does not have the editing icons. I think I’m up to date, I’m on Windows 23H2, snapping tool version is 11.2405.32.0. I checked the Microsoft Store and no updates available. Do you know why the discrepancy? Thanks, Bob

    • #2692201

      My snipping tool does not have the editing icons. I think I’m up to date, I’m on Windows 23H2, snapping tool version is 11.2405.32.0. I checked the Microsoft Store and no updates available. Do you know why the discrepancy?

      Two things:
      1) The Snipping tool (located in the Windows\System32 folder) is different from the Snip & Sketch tool that you get from the Microsoft Store. The Snipping tool doesn’t have editing functions, but Snip & Sketch does.
      2) If you use the keyboard shortcut (WinKey + Shift + S), you will take the screenshot using the Snip & Sketch tool, but you will not see the Edit icons. In order to see and use the edit icons on a screenshot with Snip & Sketch you need to open the Snip & Sketch tool first and start the screen capture from within the tool. The screenshot will open in the tool for you to edit. After editing you need to save it.

      Type Snip in the Start Menu Search bar and you will see Snip & Sketch listed above. You will also see the Snipping tool listed.

      Personally, I think it is a lot easier to paste the screenshot into Paint and use Paint to edit the screenshot.

      Side tip: If you use the Snip & Sketch tool often you can create a shortcut to it by copying and pasting the following as the Location in creating a new shortcut.

      shell:appsFolder\Microsoft.ScreenSketch_8wekyb3d8bbwe!App

      HTH, Dana:))

      1 user thanked author for this post.
    • #2695910

      Is there a free tool that will capture a window that scrolls horizontally?

      I’m looking for tool (free is possible) that will allow me to scroll down vertically to capture additional data below the current window?  Thank you

      I take a LOT of screenshots using a hotkey with Screenpresso (not free). It has a decent editor that includes combining multiple images.

      I’m also a long time user of FastStone Image Viewer / Editor. It also takes screenshots but the tool cannot be started with a hotkey combo. FastStone is free for home users, but I’ve donated multiple times.

      FastStone Capture v 7.6 (2013) is what I have on this Windows® 7 x64 computer. It has a feature that will capture a scrolling World-Wide Web page.
      I am unsure if it is free. Visit its W-WW page.

      Important links you can use, without the monetization pitch = https://pqrs-ltd.xyz/bookmark4.html
      • #2698465

        FastStone Capture … I am unsure if it is free.

        It is not free. 30-day free trial, feature limited, don’t know about watermarking.

        -- rc primak

        1 user thanked author for this post.
    • #2696000

      FastStone Capture

      This looks good.  After using FastStone Image Viewer all these years it’s hard to believe I never noticed it they had a screen capture tool.

      Desktop Asus TUF X299 Mark 1, CPU: Intel Core i7-7820X Skylake-X 8-Core 3.6 GHz, RAM: 32GB, GPU: Nvidia GTX 1050 Ti 4GB. Display: Four 27" 1080p screens 2 over 2 quad.

      2 users thanked author for this post.
    • #2699292

      “Privacy

      Protect your privacy before sharing any image. Even if you trust the receiver, the screenshot may accidentally reach a wider audience.

      Use simple editing tools to hide or blur names, email, passwords, or other confidential info. This example shows three ways to obscure sensitive info: blur (email), line-through (passwords), overwrite with an object (bottom rows).”

      Didn’t see mentioned but with screenshots or camera photos that you are sharing, make sure to clear any location info in the EXIF.

      You can do this via the Detail tab in file Properties.  Or you can click “Remove Properties and Personal Information” in file Details|Properties.

      1 user thanked author for this post.
    • #2699295

      I’ve used HyperSnap for a long time.  It’s not a cheap product.  Used to cost $35.  Unsure what it is selling for now.

      There is some nice functionality for gluing screenshots together, which is useful for documenting a problem from start to finish in one file that is easy to send to someone.

      Go to Capture|Capture Settings|View & Edit and then click “Paste each new capture onto the current image”.  You can then choose to tile horizontally or vertically.  I rarely use horizontal.

      When done, you need to reset this setting or any future captures will keep being pasted onto the current image!

      Also, there is a toolbar named “Drawing tools” that you can pin to the side of the master app window.  This contains a plethora of tools for working with a captured mage, from a text tools, drawing lines and arrows, drawing boxes, filled or unfilled, resizing the drawing space, etc., etc.

    Viewing 28 reply threads
    Reply To: Mastering the art of screenshots

    You can use BBCodes to format your content.
    Your account can't use all available BBCodes, they will be stripped before saving.

    Your information: