
|
Patch reliability is unclear. Unless you have an immediate, pressing need to install a specific patch, don't do it. |
|
ISSUE 16.45.0 • 2019-12-09
The AskWoody Plus Newsletter
In this issue GOOGLE CHROME OS: The Chrome OS FAQ, Part II: Which Chromebook should you buy? BEST OF THE LOUNGE: Holding action: Upgrading to Win8.1 from Win7 LANGALIST: Removing bloatware and OEM mods from new machines BEST UTILITIES: Freeware Spotlight — PrivaZer GADGETS: Versatile gadget gifts for stuffing stockings large and small GOOGLE CHROME OS The Chrome OS FAQ, Part II: Which Chromebook should you buy?
In Part I of this three-part series on Google’s Chrome OS, we covered the ins and outs of Google’s Chrome OS software and the Chromebook laptops that rely on it (see AskWoody Plus issue 16.44.0, 2019-12-02). In this week’s Part II, we’ll go into greater detail on the hardware side of things — specifically, what you need to know to buy the best Chromebook for your needs. Chromebooks are no longer the generally panned, limited-utility “browsers in a box” they once were. Nowadays, a decade in, they’re versatile platform-defying systems that offer their own unique set of computing advantages. To wit: Chromebooks can run Android apps and even Linux apps alongside Chrome OS’s ever-expanding array of Web-centric utilities. They also update themselves every few weeks, seamlessly and automatically in the background. Unlike Windows and MacOS, they require virtually no maintenance — and no complicated configuration. You won’t waste energy worrying about pesky PC headaches such as driver conflicts, manual app updates, and a reliance on bloated security software just to feel safe. Chromebooks aren’t the best choice for everyone, but for a growing number of computer users, they can serve as perfectly viable and refreshingly hassle-free alternatives — or even just supplements — to Windows. Even though using a Chromebook is hassle-free, figuring out which model to buy isn’t so simple. You’ll find Chromebooks ranging from under U.S. $200 to over $1,200. Chromebook vendors include the likes of Acer, ASUS, Dell, Samsung, and even Google itself. Some devices are straightforward laptops, while others feature screens that swivel back into a “tablet” configuration — or detach entirely. Heck, you can even buy a Chromebox that’s basically a desktop computer designed to be used with the mouse, monitor, and keyboard you already own. It’s a lot to sort out. But not to worry — I’m here to help. In this FAQ, we’ll walk through all the important Chromebook considerations, and I’ll offer some specific device recommendations. Ready? How much should I pay for a Chromebook?
That’s the few-hundred-dollar question, so to speak. As is usually the case, the answer is “It depends!” Just as with purchasing a Windows system, how much you pay will hinge on widely ranging processing power, storage, screen size, external niceties, and other features. You’ll also find a fair amount of variation in form, with some devices offering touchscreens and others acting as full-fledged convertibles. I suggest considering two key questions to start:
For most people, the lowest price I’d recommend is in the mid-$200 range. Sure, you can find less-expensive Chromebooks, but the compromises you’ll be forced to live with won’t square with any cost savings. On the high end, it ultimately comes down to what you’re willing to spend. But for most power users, there’s really no reason to go much above $1,000. I just want something cheap. Which Chromebook should I get?
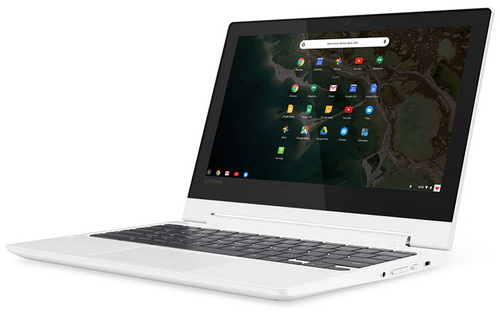
There are, of course, many options. But at this time, I’d look at the Lenovo Chromebook C340 (see Figure 1) — specifically the model with an Intel Celeron N4000, 11.6-inch screen, 4GB of RAM, and 64GB of local storage space. As we were finalizing this article, it was selling for around $260 on Lenovo’s website. (Especially during the holiday season, product prices can change often.)
The C340 doesn’t have the most sleek and elegant design, nor does it have an especially impressive display or the snappiest performance. But for the price, it’s a decent little system — perfectly suitable for basic Web-centric activity or running one or two tasks at a time. A convertible, it has a touch-enabled display that swivels fully back into a typical tablet format, which lets it take full advantage of Android apps in a natural-feeling way. What’s more, Lenovo states that the system will get ongoing software updates all the way through June of 2026, adding to its overall value. (Assuming that you’ll stop using the laptop when it’s no longer supported, you’ll basically be paying less than four bucks per month for the life of the machine.) If the C340 is too rich for you, consider the Lenovo Chromebook C330 — it’s last year’s version of the same device. Prices appear to be changing daily, but a model with 32GB of storage is currently $220; doubling the storage adds only $10 more. Just note that the system’s software support ends in June 2025. Yes, you can save a few bucks, but in the long run the newer and slightly more expensive C340 is a better value.
What if I’m looking for something in the mid-range?
If you’re comfortable spending more for a truly capable and pleasant-to-use laptop, I’d suggest ASUS’s Chromebook Flip C434-TA — ideally, the model with 8GB of RAM. It’s currently selling for about $550 on Amazon. The Flip offers a sensible combination of form and function, with a high-quality aluminum body and plenty of power under the hood. It also steps you up to a 13-inch, 1080p display that’ll look noticeably better than what’s available on lower-end systems.
The touch-enabled screen swivels back for a tablet-like experience. And this model should receive ongoing software updates for six and a half years — through June 2026. (That breaks down to just over seven bucks a month over its advisable lifespan.) All in all, it’s a spectacular buy, falling in the sweet spot for price versus value. I want the nicest Chromebook imaginable. What should I get?
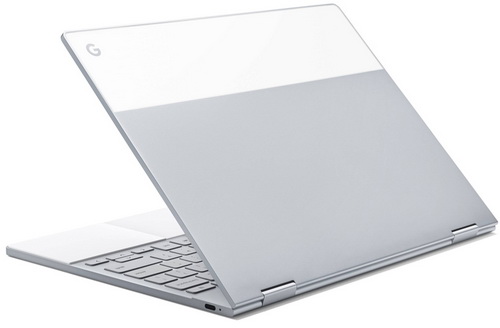
You can’t do any better than Google’s top-of-the-line Pixelbook, which typically sells for $999 from Google but is frequently available for less from third-party retailers such as Amazon ($900, as of this writing).
The Pixelbook has enough power to handle practically anything you throw at it — dozens of tabs, loads of Linux apps, heavy multitasking, you name it — without suffering a single stutter or slowdown. It’s also a pure delight to use, with a shockingly crisp high-resolution display, an eye-catching minimalist design, a thin and light body, and a premium keyboard that’ll spoil you for typing on anything else. Do you absolutely need a laptop with that level of luxury? Of course not. But if you want to ride around in the Lamborghini of the Chromebook world, well … this is it. And unlike that obscenely priced supercar, you really do get what you pay for. The most significant downside to the Pixelbook is that it’s now two years old, and that means its window for ongoing software support is shorter than that of any 2019-released Chromebook. (The device will receive updates through June of 2024.) That makes its price tag a touch tougher to swallow. If you’re of a more practical mind, consider dropping back down a bit to the ASUS Flip. It won’t match the Pixelbook for pure pleasure, but it’ll still give you a great experience. What about a Chromebox? Should I consider one of those?
Will your Chrome OS system spend its life on your desk (i.e., you don’t care about portability), attached to the monitor, keyboard, and mouse you likely already own? Then sure, consider a Chromebox. Mobility and touchscreen convenience aside, you’ll get the same basic Chrome OS experience as with a Chromebook. (That said, there’s a reason notebooks now outnumber desktop machines.) The two most commendable Chromebox choices at this point are the Acer Chromebox CX13 and the ASUS Chromebox 3. Both are small boxes that will quickly and easily connect to your current peripherals. So the most meaningful variables are processors, RAM, and storage.
Right now, the Acer CX13 Core i3 system is the better value; it comes with 8GB of RAM and 64GB of internal storage for about $500 (Amazon page). You’ll get a zippy desktop computer that’ll never feel like it’s struggling — no matter what you use it for. The comparable ASUS Chromebox 3 has an Amazon price of $470, with 8GB of RAM but only a 32GB drive. For an extra 30 bucks, it’s worth bumping up to the Acer. Both devices are scheduled to get software updates through June 2025. Do I need any accessories — or anything else?
Not really — nothing more than you’d need with other types of computers. Any Chromebook will work with your current Wi-Fi router and headphones. (Yes, astonishingly, the 3.5mm jack still lives on in this realm — hallelujah!) And any reasonably recent, Wi-Fi–connected printer should connect to your Chromebook with little to no effort (more info). Most late-model Chromebooks rely on USB-C ports for connectivity. So to use something like an Ethernet or HDMI cable, you’ll need an inexpensive adapter. I’ve had good luck with Anker’s USB C-to-Ethernet and –HDMI adapters. Chromebox devices include more-traditional USB ports, so most modern monitors, keyboards, and mice will do the trick. Both the aforementioned Acer and ASUS Chromebox models rely on HDMI video. (Note: If you use a keyboard designed for Windows, some of the specialty keys won’t have the right labels.) That pretty much covers it. You’re now ready to purchase a Chrome OS device suitable for your computing needs. So what should you do once you have your new Chromebook in hand? How do you organize your system, optimize your settings, and track down different types of apps? That’s the topic in next week’s final Chrome OS FAQ installment.
Journalist JR Raphael has covered Android and Chrome OS since their earliest days. For even more next-level Google knowledge, check out his weekly Android Intelligence newsletter. Best of the Lounge Holding action: Upgrading to Win8.1 from Win7
Pondering the possibility of replacing the soon-to-be obsolete Win7 OS with Windows 8.1 — with the hope of buying three more years of MS support before facing Win10? Plus member Razz downloaded the Win8.1 ISO from Microsoft and performed a clean install on an Acer laptop computer. But Windows’ update history showed no updates after 2014, and clicking “Check for updates” didn’t produce any newer patches. So Razz turned to the AskWoody forum for help with getting the update ball rolling again. As is often the case, Da Boss PKCano stepped up, providing expert step-by-step help for safely completing the task. Linux MVP Ascaris gives forum members a detailed presentation on backing up Linux drives with the free Veeam Agent for Linux. This could be another worthy program to add to your Linux toolbox. Security After researching anti-malware products, Plus member dmt_3904 was led to believe that running two different security suites would result in conflicts. The question for fellow Loungers: Can Windows Defender and Malwarebytes happily coexist on the same machine? The unequivocal answer is yes! Responders also provided some useful tips for ensuring AV tranquillity. Windows 10 1909 Plus member DaveBRenn likes to keep the current OS build number visible on the taskbar. But after upgrading to Win10 1909, the old build number was still displayed. MVP Rick Corbett helped diagnose the problem — and in the process answered the question of why that build number was there in the first place. Outlook Lounger WSVictor Delta is puzzled: Why would all BCC addresses in a message be viewable on his iPhone 6 — but not appear in the Outlook client at home? Fellow Loungers join in with suggestions, but the mystery remains unsolved. Do you have a clue? Linux One favorite topic for debate in the forum is which program is best for specific purposes. In this case, Plus member Charlie downloaded BleachBit for cleaning Linux systems. Is that the best choice? Or is CCleaner superior? Fellow forum members respond with their thoughts on the subject. Code Red Da Boss Kirsty shares a link to a Brian Krebs article warning of a new level of illicit credit-card scanning at gas pumps. Loungers chime in with their own experiences — and how they limit their card liability and exposure. If you’re not already a Lounge member, use the quick registration form to sign up for free. LANGALIST Removing bloatware and OEM mods from new machines
By Fred Langa New Windows PC on the way? Give it the strongest-possible start by removing nonessential software, settings, and modifications from the as-delivered factory setup. Windows 10 offers three built-in ways to do this — the relatively little-known Fresh Start tool plus two classic Reset options. Easy ways to de-bloat any PC
Along with many others this time of year, AskWoody Plus subscriber Hugh/H1K is getting a new Win10 PC.
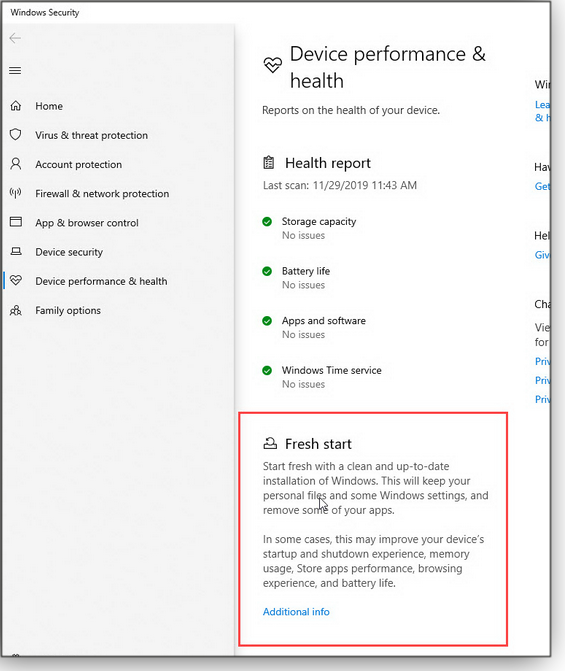
It’s a great idea to give your new PC the best-possible start — lean, error-free, and with absolutely no unwanted software or settings. Having an SSD in the mix really doesn’t change anything, Windows can recognize, use, and properly manage SSDs with no special user intervention required. Yes, Win10’s Fresh Start can help produce a streamlined initial setup — but it’s not always the best choice for this task. Fresh Start is one of Win10’s three built-in methods for generating a clean and up-to-date Windows setup. With just a few clicks, you can remove all or most OEM and third-party software — and return all or most settings to safe defaults. The three methods differ mainly in their thoroughness. Fresh Start is a close cousin to Win8/10’s now-classic Reset this PC/Keep my files tools. Both strip away non-native Windows software and settings but leave user files alone, so you won’t have to restore them from backups. (You should have backups anyway … just in case!) Fresh Start and Reset/Keep my files differ in how they’re accessed (discussed below) and in what they claim to do. For example, Reset/Keep my files says it “removes apps and settings,” while Fresh Start states that “some Windows settings will be kept.” Despite digging deep into Microsoft’s tech documentation, I could find nothing indicating whether this is actually a significant difference or just sloppy verbiage. But the safest approach is to assume that the words mean exactly what they say: Fresh Start isn’t as aggressive in removing settings as is Reset/Keep my files. It’s also worth noting that Fresh Start offers more user “hand-holding” than does Reset/keep my files. In other words, though the two utilities are functionally similar, Fresh Start seems designed to be “friendlier” to use — and perhaps less aggressive. Win10’s third built-in option is Reset/Remove everything, which unambiguously states that it “removes all your personal files, apps, and settings.” It essentially carries over nothing from a previous installation, making it the most aggressive of the built-in cleanup options. Of course, there’s a fourth option that’s not built in: reinstalling Windows from scratch using installation media on a DVD or an external flash drive. This heavy-duty approach even lets you change system-drive partitioning and formatting — something you can’t easily do from the built-in methods. It also literally ensures that not a single byte of data gets carried over from a previous setup. Which method is best?
Before you start any of the following methods, be sure to read the warning at the bottom of this article. Note that all four methods will work on any Win10 PC at any time. Choosing among them depends on what you’re trying to do. Typically, Fresh Start and Reset/Keep my files are best employed on PCs that have been in use for a while — machines that have a significant amount of user files already in place. A brand-new PC, on the other hand, is essentially empty; it has no user files, no custom user settings, and no user-added applications. So there’s really nothing to be gained by using the above two options on a new system: — there are literally no user files to keep! For routine setups of new systems, I prefer the Reset/Remove everything option, which gives Windows a truly clean start. It usually eliminates all unnecessary OEM software, modifications, and settings, leaving you with just Windows-native software and default settings. The fourth method — total reinstall via flash drive or DVD — is the heavy hitter. It’s best reserved for cases where the simpler approaches fail or you need to manually repartition/reformat the system drive. In short: For routine use, any of the built-in options — Fresh Start, Reset/Keep my files, and Reset/Remove everything — will leave you with a nicely streamlined, fully up-to-date Windows setup. Here’s how to access them. Launching Fresh Start
Microsoft’s support information for this option is scanty and way out of date — the official how-to works only on early versions of Win10! (The decline in Windows documentation quality is a story for another day.) Here’s an up-to-date method that should work in all Win10 versions: Fresh Start resides in Win10’s Settings, under Device performance & health. But you can get there more quickly by typing health into the Windows search box and then selecting Device performance & health when it’s offered. Next, on the Device performance & health page, click the Additional info link under the Fresh Start heading (see Figure 1).
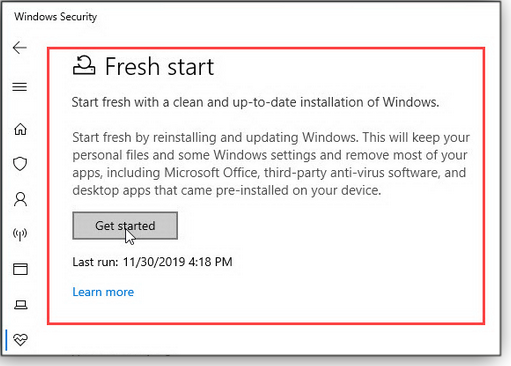
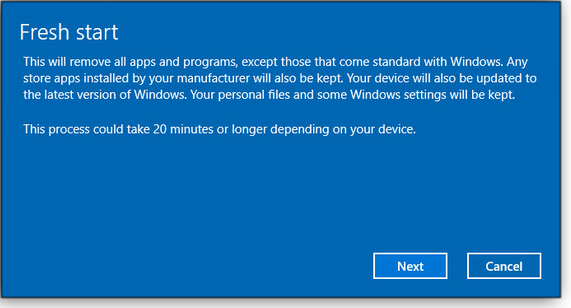
On the next screen (Figure 2), read the Fresh Start description info and select either Get started or Learn more. If you click “Get started,” another informational screen (Figure 3) will pop up. Again, read the description of what will occur. If you still want to proceed, click Next.
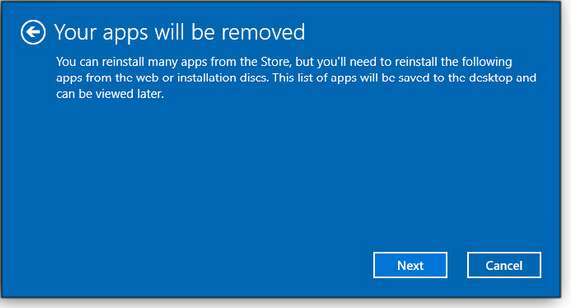
Next, Fresh Start quickly examines your PC’s software for a few seconds and then shows you which apps will be removed — if any (see Figure 4). A text-format list of affected apps is also placed on the desktop for future reference. When you click Next, you’ll get a final screen of information (see Figure 5). It’s your last chance to back out.
From there on, the process is largely automatic: just follow the on-screen prompts. Win10’s classic Reset options
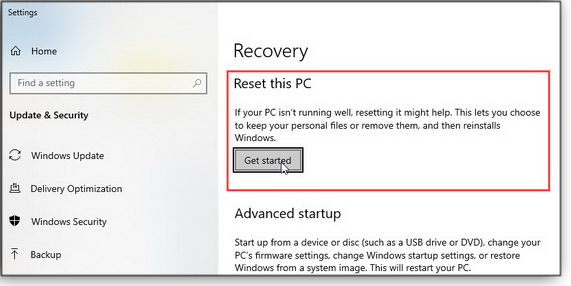
Windows’ Reset options debuted way back in Windows 8, so they’re now well documented. For example, see the following Microsoft support articles: Reinstall Windows 10, the more basic Reset or reinstall Windows 10, and Recovery options in Windows 10 (scroll down to the section on Resets). You can access both types of Win10 Reset (keep files or reset everything) by simply typing reset into the Windows search box and selecting Reset this PC when it appears. Of course, you can also navigate to Reset this PC by clicking though Settings/Update & Security/Recovery. Either way, the screen shown in Figure 6 will appear.
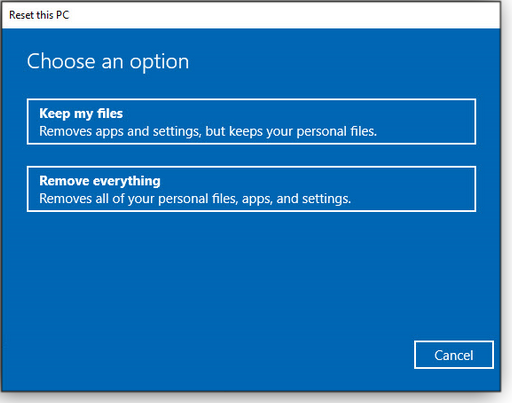
There’s less hand-holding in the Reset screens, compared to the super-cautious and somewhat chatty approach used by Fresh Start. After “Get started” is clicked, the process jumps right into the deep end of the pool: you choose between the Keep my files option — similar to, but perhaps a bit more aggressive than, Fresh Start — or the Remove everything option, which carries over virtually nothing from the previous installation. (See Figure 7.)
You’ll next see a screen similar to the one shown back in Figure 4, listing what apps will be removed. Then, with your final okay, the mostly automatic Reset process will proceed. Again, just follow the on-screen prompts. The ultimate cleanup: A bare-metal reinstall
As noted above, this option uses Windows installation media on a bootable flash drive or DVD to set up Windows fully and completely from scratch — even down to manually repartitioning and reformatting the drives, if you wish. This process has also been extensively documented, so I won’t spend time on it here. Instead, please see the detailed information in “How to clean-install a Windows 10 upgrade” (AskWoody/Windows Secrets, issue 2015-09-10). Skip down to the section “A bare-metal install ….” Or see the Microsoft documentation: “Start fresh with a clean installation of Windows 10.” But there’s one big caveat!
Before you wipe out or significantly alter the PC’s factory configuration, and before you restore your apps and user files, make a full system image of the new PC, as it was delivered. Make an archive of all drives, all partitions — everything and everywhere on that PC. (The new machine will be mostly empty, so the image shouldn’t be huge.) Store the image in a safe place, off the new machine. Having a reliable image of the initial, complete, up-and-running factory setup means you can then alter your PC with confidence, knowing that you can always get back to that known-good, first-boot state, no matter what — even if the PC’s OEM recovery options fail. (If you need a good imaging tool, there are dozens available, free and paid, as a Google search for windows+10+image+backup+software shows.) With the image safely tucked away, use the method of your choice — Fresh Start, Reset, or a full installation-media reinstall. You’ll be well on your way to giving the new machine the leanest, cleanest, and strongest possible start!
Fred Langa has been writing about tech — and, specifically, about personal computing — for as long as there have been PCs. And he is one of the founding members of the original Windows Secrets newsletter. Check out Langa.com for all Fred’s current projects. Best Utilities Freeware Spotlight — PrivaZer
There are many reasons for removing all traces of your (or another user’s) activities from a computer. But short of reformatting the system drive and other storage devices, it’s not an easy task. Maintaining privacy and security
Maybe you are preparing a previously used computer for a new employee and want to keep the system’s current user account. Or possibly you want to hide your holiday shopping activities from the kids or your spouse. Or perhaps you want to erase sensitive activity on a public or borrowed computer. Or that old machine is getting donated to a charitable organization and you don’t want to blow away Windows Whatever the reason, thoroughly removing that information is difficult because Windows PCs store user activity in numerous places — including locations you might never have thought of. To make that scrubbing task considerably easier, Goversoft offers PrivaZer, a free and comprehensive cleanup and privacy tool. (Donations gladly accepted.) The utility has been around for a long time, but frequent updates keep it current with any changes in how Windows stores your computing activities. Let’s get started by downloading the fully portable version from OlderGeeks.com. Ready? Okay, let’s fire it up! (Warning: If you’re not completely wiping a system, be sure to make a full backup before proceeding.) Walking through the PrivaZer system
The first screen gives you three options for cleaning a system. We’ll start by selecting “Adapt PrivaZer to your needs” (see Figure 1), which takes you through a detailed setup process. You can also simply jump to the main menu or use one of your previously created PrivaZer setup files.
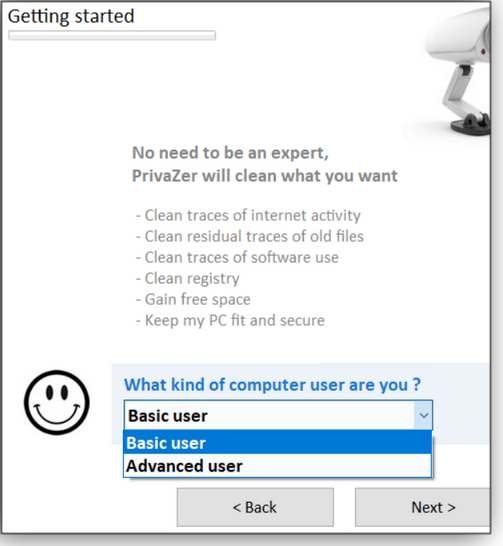
A quick clarification: In some of the subsequent screen shots, you’ll see that I’m using the “Donors Version.” I threw the Goversoft team a few bucks to get additional advanced features. In truth, the Donors version includes few extras — but the developers deserve some reward for their exceptional work. Here’s the message I received after making my contribution to the cause. “Hello Deanna, “Donors version = Automatic cleanups of Internet traces + more privacy options to protect your privacy like for shellbags + command lines + more to come. “The PrivaZer Team” Whether you choose to donate is up to you. Either version — Donors and free — are excellent! Continuing on … the next screen lets you set your PC skill level: Basic or Advanced. The default is “Basic user” (see Figure 2), but since we’re all AskWoody Plus Newsletter readers, we’ll go with Advanced.
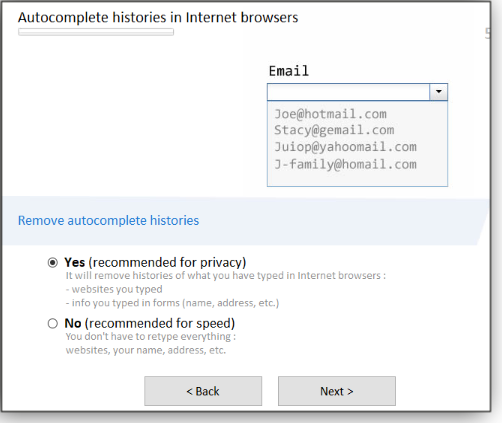
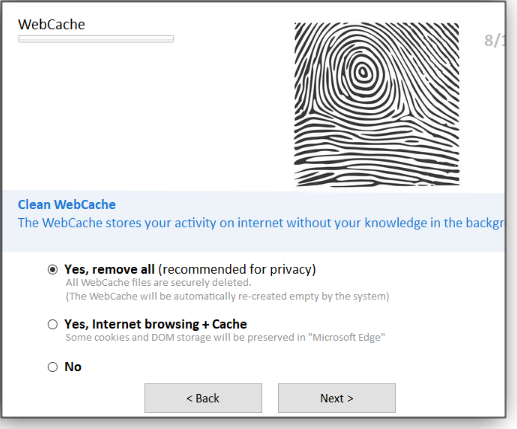
Next, PrivaZer takes you through a series of screens to define what should be removed. This task gives a good overview of the various places Windows and browsers stash information about user activities. It’s a little frightening.
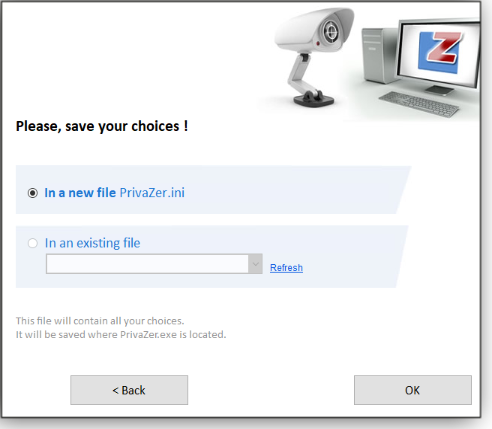
Once you’ve made your choices, PrivaZer prompts you to save your new collection of cleaning tasks to an .ini file — which you can use over and over again.
You’re now ready to run your first PrivaZer cleaning session — or return to the main menu.
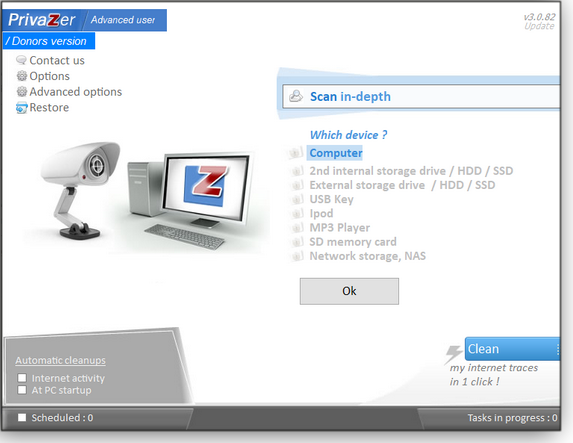
Jumping to the main menu, you’ll see numerous additional choices — most of which don’t require the “Donors Version”. You can, for example, select a variety of devices — including media players — to thoroughly clean (see Figure 19).
Clicking the drop-down box initially set to “Scan in-depth” lets you quickly select more-focused cleaning tasks, such as removing stored Internet activities data and thoroughly scrubbing the recycle bin.
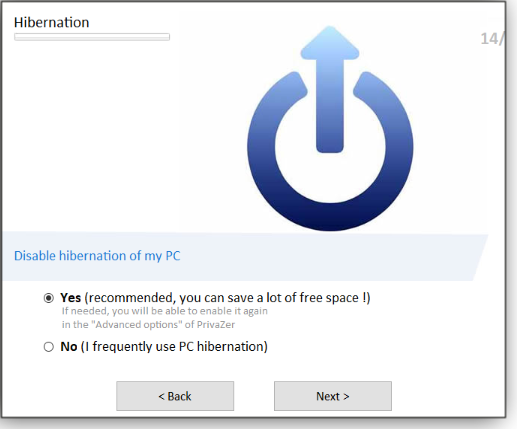
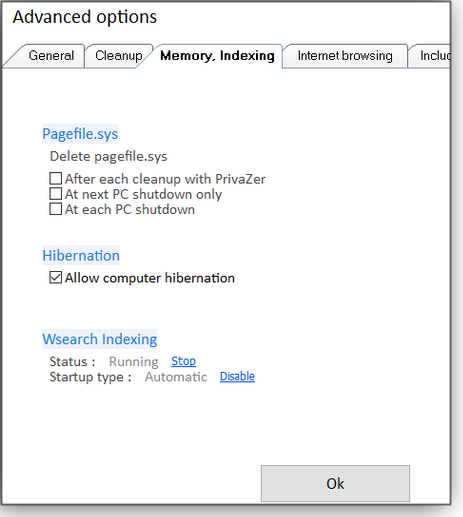
Note that clicking Options takes you to the initial setup screen similar to the one shown in Figure 1. In this case, you can either run through the configuration screens again or select a saved INI file. Clicking Advanced Options opens another layer of options and cleaning tools. You can, for instance, add PrivaZer to context menus, set the age of deleted registry backups, control when pagefile.sys is removed (Figure 21), set the depth of memory-space cleaning (see Figure 22), and much more.
There you have it — a comprehensive personal-information cleaning system. Put the portable version on your maintenance/troubleshooting thumb drive so you’ll always have it at hand when needed. (There’s an installed version that adds a few features such as a record of PrivaZer’s update history.) Happy Computing!
Deanna and Randy McElveen are celebrating 20 years in the computer business, seven years running OlderGeeks.com, and 26 years of putting up with each other. Their computer store is in a small town in the Missouri Ozarks. Believing that happy customers are always the best advertisement, they hope to do it for another 20 years. GADGETS Versatile gadget gifts for stuffing stockings large and small
Christmas stocking stuffers are usually thought of as small, whimsical, and not always practical gifts. They’re fun little extras. But throughout the year, I bookmarked a host of high- and low-tech products that are actually useful for digital denizens. You know: gadgets that will appeal to your favorite techie — or that you secretly covet for yourself. If your holiday shopping list is still incomplete, here are four items for your consideration. Let there be light: USB-rechargeable flashlight with swiveling head
How many times have you had to scrounge around for a real flashlight when trying to attach cables to that tower PC under your desk? (Using the “flashlight” mode on your smartphone can be a royal pain.) KeySmart’s small, light, and bright NanoTorch Twist has some unique features that make it stand out from the ocean of LED flashlights. Let’s start with a swiveling head that lets you redirect the light up to 90 degrees (see Figure 1). Add a magnetic end cap, and you can easily place the light right where you need it — like that hard-to-see HDMI port behind the TV.
The NanoTorch has five light modes: high, medium, and low plus strobe and, for when the stuff really hits the fan, SOS. Its “high” setting puts out a brilliant 600 lumens of light for up to an hour, and a removable pocket clip makes it easy to keep handy. Never have fresh batteries when you need them? This flashlight has a removable lithium battery that charges via USB. At first glance, the battery looks just like any standard AA. But closer inspection reveals a USB port on one end. And yes, you can replace the rechargeable with a standard AA battery when needed. The high-grade aluminum casing protects the light from water and dust, and KeySmart states it can handle temperatures from -4F to 122F. The sturdy rubber power button has a feedback “click” plus a lock to prevent accidentally turning on the light. It also remembers the last light setting you used. Of course, all this versatility doesn’t come cheap. It’s U.S. $60 at www.getkeysmart.com. Let there be blinding light — and power to spare
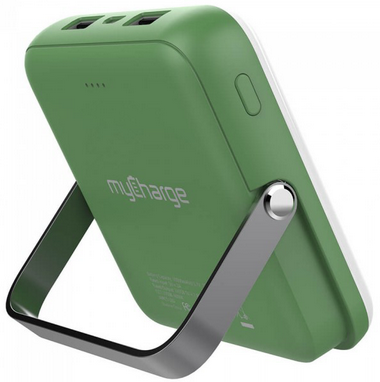
Touted as a “camping lantern,” the new myCharge Adventure PowerLumen (Figure 2) is a 10,000 mAh portable charger and high-lumen light panel. MyCharge has built its reputation on a wide array of power banks for mobile devices — from phones to tablets to high-demand items such as laptops, living-room lamps, and even fans. A gadget that provides both light and power is a natural in these uncertain times.
MyCharge might call it a “camping” light, but the PowerLumen proved its worth when I lost power in my home during the recent California wildfires. The unit’s four brightness levels top out at 500 lumens, and it can provide light for up to 41 hours. Point the blinding 20 LED lights in your face, and you will be ready to confess to every unsolved crime — it’s really that bright. And at 3.8 by 3.7 inches, it still fits nicely in your hand. Along with exceptional light, the PowerLumen sports two USB ports for recharging mobile phones and tablets — simultaneously! A fold-out, U-shaped arm on the chassis makes it easy for you to prop it upright for lighting, charging, or both. And a roadside emergency SOS setting extends its practicality. Bottom line: It’s extremely handy whether used outdoors or in. Priced at $60 on Amazon.com, it’s a great stocking stuffer. (mycharge.com) Spring into work with an ErgoErgo
Okay, so you’ll need a really big stocking for this gadget. The accordion-shaped ErgoErgo sitting stool (Figure 3) is designed to improve our posture in ways the standard desk chair never could. With your two feet placed flat on the floor, you can gently move through a wide range of positions to engage your core and relieve your lower back. The vendor claims it will even enforce deeper breathing. Anything that keeps us awake at our desks is worthwhile.
At first the ErgoErgo might seem too tall for a standard desk. But it’s designed to compress slightly when you sit, bringing it to the proper height. It will accommodate adults from five feet to around six feet, four inches tall and weighing up to 225 pounds. (There’s also a kid-sized stool.) You can also choose from nine colors. So does it work? It took me a few days to adapt to a “chair” without a back — it’s sort of yoga on a seat. And it does start conversations when people see you wobble. The ErgoErgo starts at $100 on Amazon and ergoergo.com (The stool I tested was provided by The Grommet, a site dedicated to finding innovative products for computers and other household needs.) The power and the … connectivity: This USB-C hub is nerd Nirvana
First adopted by Apple for its MacBooks, USB-C is now common on Chromebooks and rapidly finding its way onto Windows devices. With their broad capabilities for handling both power and data connections, USB-C ports are truly versatile, and it’s why they’re nearly standard on ultra-thin and ultra-light laptops. There’s just one problem: Those super-compact machines typically have just one USB-C port, making it difficult to attach multiple peripherals. That’s where USB-C hubs come to the rescue. A quick search online will reveal a legion of these devices — some with well-known brand names and many others of more obscure origins. I recently searched for a hub that included an Ethernet port, and Gecen’s HD-T07 (Figure 4) caught my eye — mostly for the price; it was just $30 on Amazon.
The HD-T07 measures just 4.5 by 1.6 by .5 inches and weighs only a few ounces, making it small and light enough to travel — or fit snugly into my stocking. Its wealth of connectivity options includes a 1Gbps Ethernet port, 1.4K HDMI port, three USB 3.0 ports, USB-C charging connector, and 4.5-watt power output. All these ports can work simultaneously, transforming one-port laptops into full desktop-like PC powerhouses. And though it was originally positioned for MacBooks, the Gecen hub works equally well on most other USB-C- and USB 3.0–equipped Windows and Chrome OS devices. There will soon be lots of new digital devices showing up in homes and businesses. Help your favorite geeks make the most of them.
Michael Lasky is a freelance writer based in Oakland, California. He has over 20 years of computer-magazine experience, most recently as senior editor at PC World. Publisher: AskWoody LLC (woody@askwoody.com); editor: Tracey Capen (editor@askwoody.com). Trademarks: Microsoft and Windows are registered trademarks of Microsoft Corporation. AskWoody, Windows Secrets Newsletter, WindowsSecrets.com, WinFind, Windows Gizmos, Security Baseline, Perimeter Scan, Wacky Web Week, the Windows Secrets Logo Design (W, S or road, and Star), and the slogan Everything Microsoft Forgot to Mention all are trademarks and service marks of AskWoody LLC. All other marks are the trademarks or service marks of their respective owners. Your email subscription:
Copyright © 2019 AskWoody LLC, All rights reserved. |

 By JR Raphael


 By Deanna McElveen
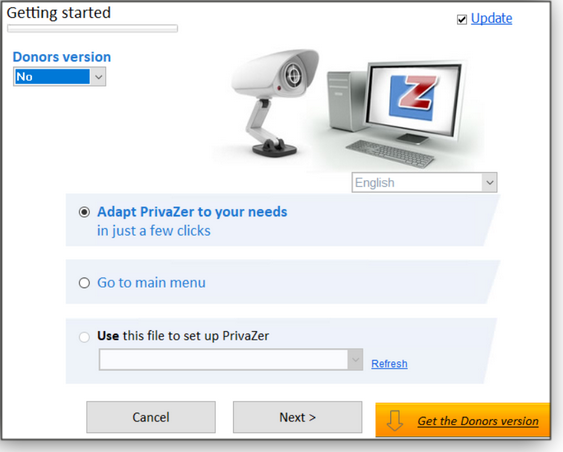


 By Michael Lasky
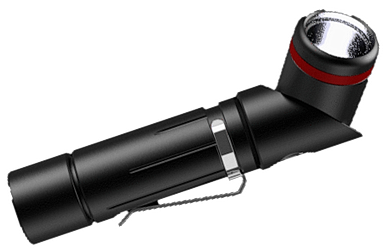


Plus Membership
Donations from Plus members keep this site going. You can identify the people who support AskWoody by the Plus badge on their avatars.
AskWoody Plus members not only get access to all of the contents of this site -- including Susan Bradley's frequently updated Patch Watch listing -- they also receive weekly AskWoody Plus Newsletters (formerly Windows Secrets Newsletter) and AskWoody Plus Alerts, emails when there are important breaking developments.
Get Plus!
Recent Topics
-
Windows 11 ad from Campaign Manager in Windows 10
by 12 hours, 33 minutes ago
-
Small desktops
by 57 seconds ago
-
Totally disable Bitlocker
by 7 hours, 25 minutes ago
-
Phishers extract Millions from HMRC accounts..
by 21 hours, 12 minutes ago
-
Windows 10 22H2 Update today (5 June) says up-to-date but last was 2025-04
by 23 hours, 4 minutes ago
-
Thoughts on Malwarebytes Scam Guard for Mobile?
by 1 day, 2 hours ago
-
Mystical Desktop
by 1 day, 2 hours ago
-
Meta and Yandex secretly tracked billions of Android users
by 7 hours, 44 minutes ago
-
MS-DEFCON 2: Do you need that update?
by 38 minutes ago
-
CD/DVD drive is no longer recognized
by 1 day, 17 hours ago
-
Windows 11 24H2 Default Apps stuck on Edge and Adobe Photoshop
by 1 day, 20 hours ago
-
North Face and Cartier customer data stolen in cyber attacks
by 1 day, 18 hours ago
-
What is wrong with simple approach?
by 1 day, 11 hours ago
-
Microsoft-Backed Builder.ai Set for Bankruptcy After Cash Seized
by 2 days, 5 hours ago
-
Location, location, location
by 20 hours, 25 minutes ago
-
Cannot get a task to run a restore point
by 2 days, 7 hours ago
-
Frustrating search behavior with Outlook
by 1 day, 22 hours ago
-
June 2025 Office non-Security Updates
by 2 days, 18 hours ago
-
Secure Boot Update Fails after KB5058405 Installed
by 20 hours, 45 minutes ago
-
Firefox Red Panda Fun Stuff
by 2 days, 18 hours ago
-
How start headers and page numbers on page 3?
by 3 days, 4 hours ago
-
Attack on LexisNexis Risk Solutions exposes data on 300k +
by 2 days, 7 hours ago
-
Windows 11 Insider Preview build 26200.5622 released to DEV
by 3 days, 13 hours ago
-
Windows 11 Insider Preview build 26120.4230 (24H2) released to BETA
by 3 days, 13 hours ago
-
MS Excel 2019 Now Prompts to Back Up With OneDrive
by 3 days, 2 hours ago
-
Firefox 139
by 2 days, 19 hours ago
-
Who knows what?
by 1 day, 21 hours ago
-
My top ten underappreciated features in Office
by 27 minutes ago
-
WAU Manager — It’s your computer, you are in charge!
by 1 day, 7 hours ago
-
Misbehaving devices
by 2 days, 9 hours ago
Remembering Woody
