
|
Patch reliability is unclear. Unless you have an immediate, pressing need to install a specific patch, don't do it. |
In this issue ♦ Microsoft OneDrive: The basics ♦ More on OneDrive, and symlinks ♦ Another OneDrive problem caused by poor documentation ♦ OneDrive’s impermanent local copies (second half of article)
ONEDRIVE SPECIAL EDITION: OneDrive!
By Will Fastie Our writers have the week off. No rest for the editor, though. We decided to publish an issue for you anyway. It turns out that our series on OneDrive got longer than we expected, with more to come. Almost immediately after Lance Whitney’s kickoff article, Fred Langa was deluged with questions about Microsoft’s complicated service. He delved into the dark corners of OneDrive and turned on the lights. The result is some of the best coverage of OneDrive around, with solid advice and help. It’s the kind of thing we want to do more of in the newsletter, not only with OneDrive but with other major components of Microsoft 365, Windows, and the newly-announced, controversial Windows 11. We decided to republish Lance’s intro and six of Fred’s LangaList columns. They are all here, in this special edition of the AskWoody Free Newsletter. And I mean they are all here. Unlike most issues of the free edition, this one contains all seven articles. The full articles, not teasers. We wanted you to see the kind of work we’re doing and plan to continue over the coming months and years. This week, you are seeing exactly what our Plus members are seeing. Why? Because we want you to become an AskWoody Plus Member with a small donation. If just one tip you pick up in one article in the newsletter saves you hours of time and frustration, isn’t that worth a couple of bucks per month? We hope you’ll agree, and we hope you’ll like this very special edition of the AskWoody Free Newsletter. Tell your friends!
ONEDRIVE — FEBRUARY 1, 2021 Microsoft OneDrive: The basics
By Lance Whitney Want to be able to back up and synchronize your files with Microsoft OneDrive but aren’t sure where to start? Here’s a primer on getting started with OneDrive. Microsoft OneDrive is an effective tool for automatically backing up and synchronizing your documents, photos, and other files. By backing up your files to OneDrive in the cloud, you can recover them in case you accidentally delete or lose them. And by synchronizing your files, you ensure that they’re accessible from any computer or device running OneDrive. OneDrive is automatically included and accessible in Windows 10 and Windows 8.1. Those of you still running Windows 7 can manually download and install it. Beyond Windows, OneDrive is available for macOS, iOS, iPadOS, and Android, so you can access it from any computer or mobile device. I use OneDrive as my primary backup and synchronization service and find it very convenient and helpful. But OneDrive can be tricky to set up and configure initially, especially if you’re not familiar with its various settings and options. Let’s look at the basics of OneDrive to see how you can get started and use it most effectively. Requirements
To use OneDrive, you’ll need a Microsoft account. If you don’t already have one, create one at the Microsoft account website. A regular Microsoft account includes 5GB of storage at no charge. If you need more, 100GB of storage is available for $1.99 per month. With a Microsoft 365 Family or Personal subscription, you receive a hefty 1TB of OneDrive storage for each person. Microsoft also offers a OneDrive for Business version, which starts at $5 per month per user and works similarly to the regular OneDrive program. Set up OneDrive
On your PC, look for the OneDrive icon in your system tray, the one that resembles a cloud. If you don’t see it, check for it in your Start menu’s list of apps or download it from Microsoft if necessary. Click the OneDrive system tray icon. The first time you do this, sign in with your Microsoft account. You’re then shown the default location of your OneDrive folder, typically a subfolder under your user folder. With certain exceptions, any folders and files you want to back up and sync will need to be moved to this OneDrive folder. At this screen, you can change the location of the OneDrive folder; otherwise, click Next (Figure 1).
The next screen asks whether you want to back up certain folders. This feature automatically backs up files from three locations — your desktop, documents, and pictures folders. The benefit here is that the files in these three folders will be included in your OneDrive backup and synced from their default locations. That means you don’t have to manually move them to the actual OneDrive folder. If you have enough OneDrive storage to house all the files in these three folders, keep all three checked. If not, then uncheck one or more of them. Click Continue (Figure 2).
Read through the next few screens, clicking Next for each one. Ignore the message to get the mobile app, for now. At the last screen, click the button to open your OneDrive folder. Now you’ll want to drag any folders or files you want to back up and sync to your OneDrive folder. Drag any folders or files for your documents into the Documents folder. Drag any folders or files for Pictures into the Pictures folder. Otherwise, drag and drop (or copy and paste) anything else directly into the OneDrive folder. Of course, you can also create new folders to include them in OneDrive. Keep in mind any storage limitations, especially if you have only the free 5GB of space. (If you need more and a Microsoft 365 subscription isn’t an option, consider upgrading to the inexpensive 100GB plan.) As you move folders and files into OneDrive, they’ll automatically be backed up and synced (Figure 3).
Configure OneDrive
The next step is to tackle the range of settings and options available for OneDrive. Yes, this process can be tricky and time-consuming. But once you’re done, OneDrive should work automatically without too much more upkeep on your part. Right-click on the OneDrive system tray icon and select Settings. Go to the Settings tab. You can safely leave most of the options here checked. Review the options for pausing the sync when this device is in battery-saver mode or on a metered network. If you’re using a laptop where battery power is at a premium, or your laptop has built-in cellular connectivity and you’re concerned about chewing up your data plan, keep these checked. Otherwise, uncheck them. Next, review the option for Files On Demand. If checked, this means that your OneDrive files remain in the cloud but are not stored on your computer. Any file you try to access from OneDrive is downloaded to your PC as you need it. The advantage here is that you don’t waste hard drive space with files you rarely use. The disadvantage is that you have to be online to access any file from OneDrive. If your disk space is low or limited, then you might want to keep Files On Demand enabled. If you have ample free space, then uncheck it. Click OK to confirm that you want to disable Files On Demand (Figure 4).
Next, click the Account tab. Here, you can enable or disable specific folders to include in the OneDrive backup. Click the Choose Folders button. If you’re low or limited on storage and don’t need certain folders on your current computer, deselect them. Those folders remain in the cloud and are available to be synced to other computers; they just won’t be synced to your current machine. For example, I have one folder with a lot of large videos. On my laptop with less storage, I deselected the video folder. On my desktop with more storage, I kept this folder selected. Click OK when done (Figure 5).
Select the Backup tab next. Here, you can manage the backup of the desktop, documents, and pictures folders. You can choose to save files and videos to OneDrive when you connect a phone or camera to your computer. You can also automatically upload screenshots from your mobile device to One Drive (Figure 6).
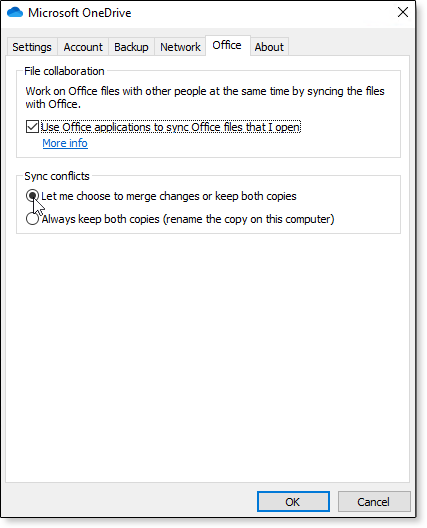
If you use Microsoft Office, click on the Office tab. If you use Microsoft Office to collaborate in real time with other people, you can opt to use Office to sync those files. If you use Office and don’t collaborate with anyone else, deselect this option. If you do decide to sync your files, you can then decide how to handle synchronization conflicts where the same file has been modified by two different people or on two different devices. Keep the option for “Let me choose to merge changes or keep both copies” so that you have control over any conflicts. Click OK when done, to close the Settings window (Figure 7).
If you have more than one Windows computer and want to use OneDrive on each one, the setup and configuration process is the same. Enable or disable the options differently based on usage of the PC, available storage, and other factors you deem pertinent. How does OneDrive actually synchronize your files? That should be enough to get you started and running with OneDrive. In future articles, we’ll look more closely at specific features, options, and issues that you’ll likely bump into the more you use OneDrive.
Lance Whitney is a freelance technology reporter and former IT professional. He’s written for CNET, TechRepublic, PC Magazine, and other publications. He’s authored a book on Windows and another about LinkedIn.
ONEDRIVE — APRIL 19, 2021 OneDrive, several problems
By Fred Langa OneDrive’s poor documentation and weak user interface can cause endless frustration. Some important OneDrive procedures are left unexplained; others literally cannot be accomplished from the desktop and can be done only via the Web interface — but again, with nary a word of guidance. If you previously tried OneDrive but found it opaque and hard to use, today’s column just might be the missing information you need for it to make sense. Bad documentation, weak interface lead to OneDrive confusion
Some software can feel awkward and hard to use until you stumble across some grain of information that makes everything fall into place. That happened to me a while back with OneDrive, Microsoft’s free/paid cloud-based data-storage system. I’ve been using it from the beginning. It started life in 2007 as Windows Live Folders. became Windows Live SkyDrive, and then just SkyDrive; in each case up to that point, it was a standard, easy-to-use, cloud-based storage service. The original concept was simple and PC-centric. You’d store the live copies of your files on your PC and use the remote SkyDrive as secondary storage for duplicate copies, backups, and sharing. Easy. But over time, as SkyDrive evolved and eventually morphed into OneDrive, Microsoft changed some of its basic operating procedures, even turning several key concepts completely on their heads. OneDrive’s changes don’t matter much for new users; those people have nothing to unlearn about the way the product used to work. And there are many excellent how-tos (such as Lance Whitney’s Microsoft OneDrive: The basics (AskWoody Plus 2021-02-01) to help new users get past Microsoft’s anemic documentation. But long-term users may have more trouble — I sure did — because virtually none of OneDrive’s evolutionary changes has been addressed in the OneDrive documentation or help files. As a result, if you’ve used SkyDrive/OneDrive in its earlier incarnations, you can be left in the dust until you unlearn the way SkyDrive/OneDrive used to work. An email from frequent correspondent Henry S. Winokur illustrates the point. Henry, a long-time Windows user, was frustrated by what should have been a simple task — adding a very large folder to OneDrive from a nonstandard location. This simple task literally cannot be done from within OneDrive’s desktop interface, and the officially sanctioned method — moving the folder in question, intact, into the C:\Users\[USERNAME]\OneDrive\ folder — is at best inelegant, and can even be impossible due to local hard drive size limits, as Henry discovered. Take a look:
Sure! In fact, there are at least two easy ways to add any folder to OneDrive — even giant folders in nonstandard locations — without involving the local OneDrive folder at all. There’s no need to move anything around in your system! Catch #1: OneDrive’s documentation completely omits one way of doing this — and barely mentions the other. Sigh. Catch #2: If you’re a long-term user, OneDrive may operate in the reverse of what you expect. The early SkyDrives/OneDrives were PC-centric (cloud-based secondary storage systems). But the current OneDrive is cloud-centric, designed so it can even act as primary user storage, with the user optionally choosing to have none, some, or all user files also retained in local storage. Virtually none of the OneDrive documentation accounts for this fundamental flip-flop, leaving long-term users (such as Henry, and me, and maybe you) to figure out, “Oh, it’s upside down now!” But once you realize it’s cloud-centric now, OneDrive becomes much easier to use. For example, it’s easy to add any new folder to OneDrive if you start at the cloud end of the connection, rather than at the PC end: Ignore the OneDrive applet on your PC — you cannot perform this action at all from within OneDrive’s own app! — and instead click to https://OneDrive.live.com/ and log in to OneDrive Live. Note that OneDrive’s Web-based menu bar has two buttons: New and Upload (Figure 1). Click New to create a new cloud-based folder. Click Upload to upload files from your PC to that (or any other) cloud-based folder. See? It’s ridiculously easy to set up from the cloud end, but — as Henry, I, and countless other users have found out — it’s quite literally impossible to perform this basic task from the PC end, using OneDrive’s own desktop interface. D’oh.
Setting up a new cloud-based folder, as above, lets you upload whatever files/folders you want to the cloud, but it won’t automatically include those files in OneDrive’s routine mirroring/syncing between PC and cloud. Thus, this type of folder is best for archives, backups, and files that don’t change frequently. But if you want large or nonstandard files and folders to be included in OneDrive’s automatic mirroring/syncing, you can also do that — and you don’t have to follow Microsoft’s clumsy suggestion to move everything into your local C:\…\OneDrive\ folder. The trick is to use a symbolic link, or symlink. A symlink is a tiny software construct that acts as a full-function shortcut for software, allowing the operating system and apps to access and work on remote files and folders exactly as if they were local. Here’s the good part: A symlink typically occupies only a couple of hundred bytes (see? tiny!) but can point to anything — even huge folders in nonstandard locations. In Henry’s case, instead of following the usual OneDrive instruction to move his entire 563GB photo collection into C:\Users\Henry\OneDrive\, he could instead create a tiny symlink in his OneDrive folder, and that link will tell OneDrive to treat everything that the symlink points to as if it were physically included in the folder — mirroring and synching the photos exactly as if they really had been placed inside the local OneDrive folder. Making symlinks is easy and useful, so you’d think it’d be a fundamental part of OneDrive. But it’s not, and you have to dig pretty deep into Microsoft’s online OneDrive documentation to find any mention of it at all. I’ll include links for full info on symlinks at the end of this text, but the basics are easy. The command to create a symlink that points to a folder is: Mklink /D “Link” “Target” Mklink is the actual make link command, and the /D stands for directory, an alternate name for folder. “Link” stands for the path (location) and name of the new symlink, and “Target” means the path (location) and name of the folder the symlink is linking to. (Strictly speaking, the quotes enclosing Link and Target are needed only if the paths include spaces, but it never hurts to always enclose paths in quote marks; they’re automatically ignored if not needed.) Let’s use Henry’s dilemma as the ongoing case in point. He wants to get his 563GB P:\Photos\ directories included in OneDrive’s automatic mirror/syncing, but without copying the whole thing into his local OneDrive folder at C:\Users\Henry\OneDrive\. The solution: Create a symlink to P:\Photos inside the local OneDrive folder. Symlinks can be named anything you want; let’s call this one LinkToPhotos. To create a symlink, open an admin-level Command prompt (i.e., type command in the search box and select Run as Administrator when it’s offered). Next, in the command window, follow the mklink template thus: Mklink /D “C:\Users\Henry\OneDrive\LinkToPhotos” “P:\Photos\” See also Figure 2.
In this example, Mklink /D is the standard initial part of the command. “C:\Users\Henry\OneDrive\LinkToPhotos” creates a symlink named LinkToPhotos in his OneDrive folder (again, the name LinkToPhotos is arbitrary and can be whatever you want), and “P:\Photos\” is the target folder/directory that the symlink points to. The resulting symlink in the OneDrive folder occupies only around 260 bytes and yet enables OneDrive to process the full, external 563GB P:\Photos folder. Why simple solutions like these aren’t built into OneDrive — or at least prominently included in the documentation — only Microsoft can answer. But now you know: OneDrive can be easy — once you know what the documentation omits! Further info:
Fred Langa has been writing about tech — and, specifically, about personal computing — for as long as there have been PCs. And he is one of the founding members of the original Windows Secrets newsletter. Check out Langa.com for all of Fred’s current projects.
ONEDRIVE — May 3, 2021 More on OneDrive, and symlinks
By Fred Langa A recent column on OneDrive problems brought a ton of email from readers asking for help with overcoming OneDrive’s poor documentation, weak user interface, and other limitations. The largest group of questions was about using symlinks to allow OneDrive to automatically sync and process files or folders without having to first move and fit them all into the local C:\…\OneDrive\ folder. The second-most common questions involved problems resulting from Microsoft’s recent renaming of the guts of OneDrive’s interface, leaving some users with a broken half-old/half-new setup! For more information on both, read on. Symlinks’ set-and-forget simplicity
AskWoody subscriber Robert Collier was one of many who requested more detail on symlinks — symbolic links. As discussed in “OneDrive, several problems” (2021-04-19 LangaList), Microsoft suggests that you move everything that you want OneDrive to auto-sync into the local C:\…\OneDrive\ folder. This is clumsy at best, and impossible at worst, such as when you have a physically small C: drive. Symlinks are a pretty slick workaround. They’re tiny software constructs that can act as full-function shortcuts for software, allowing the operating system and apps — such as OneDrive — to “reach through” the link to access and work on distant files and folders, exactly as if they were local. Symlinks typically occupy only a couple of hundred bytes in the actual OneDrive folder, too, even when they’re linking to huge numbers and sizes of files in other locations. In short: Symlinks allow you to logically add external folders and files of any size to the OneDrive folder without having to physically move anything! But the details can be confusing and are barely touched on in Microsoft’s documentation.
You’ll be glad to hear that symlinks do exactly what you’re looking for! They’re fully automatic — set-and-forget — with no ongoing manual intervention required. If you recall, the example mklink (“make link“) command I used was as follows. (If you need a refresher, please see the original article for fuller details.) Mklink /D “C:\Users\{username}\OneDrive\LinkToPhotos” “P:\Photos\” The /D portion of the command told mklink that it was being pointed at a Directory (aka “folder”). When mklink is pointed at a directory, it knows automatically to follow that directory/folder’s subdirectories/subfolders (and sub-subdirectories/sub-subfolders, etc.) all the way to the bottom! On the other hand, if or when you want a symlink to point to just one specific file, omit the /D. Because I used the /D in the above example, the tiny LinkToPhotos symlink residing in the C:\…\OneDrive\ folder allows OneDrive to include and process everything residing over in P:\Photos\, including any and all subdirectories/folders — hundreds of gigabytes worth, all the way to the bottom of the folder tree! OneDrive treats symlinked files and folders exactly as if they’d been physically moved into the C:\…\OneDrive\ folder; any changes — additions, deletions, edits, etc. — will be detected and processed normally into the OneDrive cloud, with no extra steps needed and without cluttering up the local OneDrive folder! OneDrive, two mixed versions
Recently — on February 1, 2021 — Microsoft disabled an old version of the applet that acted as OneDrive’s local front end; it’s the component that adds the little clickable cloud icon down in your PC’s notification area. But the handoff to the new version did not go smoothly for all users, leaving some — like AskWoody subscriber Isabel Berney — with a broken OneDrive setup.
Looks like you were caught in the churn earlier this year when Microsoft disabled the old version of OneDrive’s local syncing applet — the version you had tried several years ago. That old version had an oddball, nondescriptive name, groove.exe; you’d never know from its name that it had anything to do with OneDrive! (A guess: The original concept might have been for some kind of cloud-based music library, like iTunes.) The current name is better, I guess, but has its own problems. The new syncing app/front end is called onedrive.exe — except that it’s not, repeat not, the actual OneDrive, which still lives in the cloud. Rather, this local onedrive.exe file is just a new version of the little local syncing applet that used to be called groove.exe. So, Isabel (and anyone in a similar situation), the versioning errors you’re seeing are likely because groove.exe is still on your PC and fighting with its new onedrive.exe replacement. It shouldn’t be hard to fix. Start with a full, just-in-case backup of your user files, and then follow Microsoft’s instructions in “Upgrade to the new OneDrive sync app from old Groove.exe.” Note especially the section labeled Troubleshoot issues, which specifically deals with telling the obsolete groove.exe to let go — and to tell the new onedrive.exe applet to take over. With luck, that will be all you need to get OneDrive going. But if you still have trouble, the solution is to manually remove both the old and new versions of your local OneDrive syncing applet, and then reinstall only the new. None of this should have any effect on the files and folders you already have in the cloud; this affects only the local software your PC uses to access the OneDrive mothership and sync your files. First, sign out of OneDrive.live.com online; and then, exit the local front end, if it’s running: Right-click the OneDrive cloud icon in the desktop notification area, and then select Close OneDrive (see Figure 1).
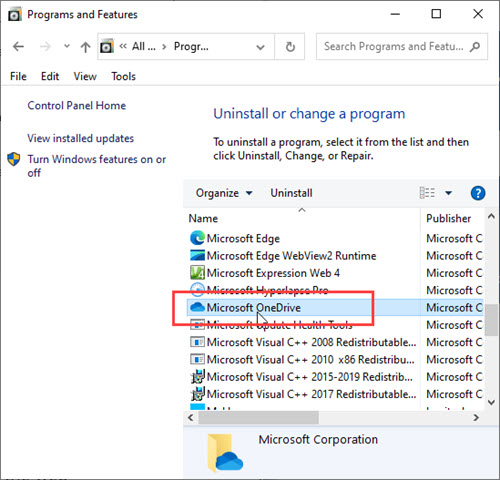
Next, completely uninstall whatever OneDrive version(s) are already set up on your PC. You can use either Settings (type uninstall in the search box, select Add and remove programs when it’s offered; see Figure 2) or Control Panel (click Control Panel | Programs | Programs and Features | Uninstall or change a program; see Figure 3).
When the uninstall is done, restart/reboot the PC to ensure that any in-use programs are closed and flushed from active memory. After the restart, use File Manager (or any file tool you prefer) to search your entire hard drive for groove.exe; if you find it anywhere, either delete it or give it a nonexecutable name (e.g., rename to groove.bak or groove.old, etc.) Next, do the same thing for onedrive.exe, deleting or renaming any copies you find. (Note: The onedrive.exe file is your sole target for this step. Don’t delete or rename other files and folders with “OneDrive” somewhere in their names.) Restart/reboot again. Use any good, lightweight Registry cleaner (e.g., CCleaner; free/paid) to delete any dead or left-over OneDrive-related Registry keys or other data. Restart/reboot yet again. Next, download and install new OneDrive software from the official Microsoft site. Restart/Reboot a final time — and your OneDrive setup should be good to go!
Fred Langa has been writing about tech — and, specifically, about personal computing — for as long as there have been PCs. And he is one of the founding members of the original Windows Secrets newsletter. Check out Langa.com for all of Fred’s current projects.
ONEDRIVE — May 17, 2021 Another OneDrive problem caused by poor documentation
By Fred Langa Microsoft’s OneDrive service can be excellent, but it also can be frustratingly hard to use to its fullest, impeded by documentation that’s sparse, scattered, and incomplete. For example, OneDrive has three very different ways of handling your files, but only one — and it’s not the default — leaves behind a permanent, fully normal, local copy on your hard drive! None of this is explained in OneDrive’s “getting started” documentation or in its top-level help files — but is explained in today’s column. OneDrive’s three very different modes of file syncing
AskWoody Plus subscriber Steve Reilly runs an astronomical observatory, saving the images to a PC. He wants to ensure that OneDrive won’t lose his image files during upcoming heavy PC maintenance. That should be easy, but OneDrive’s documentation makes it much harder than it should be, potentially leaving you unclear as to exactly where your files are and what their status is.
“I found that OneDrive is installed and running, which I think may be contributing to some issues with the supporting programs settings. I want to wipe OneDrive off the system but need to make sure these files aren’t lost. “Can the files from OneDrive be removed and placed back?” Yes, easily. In fact, they may already be where you want them — but OneDrive sure doesn’t make it obvious. OneDrive has three very different ways of handling your files. While all three methods back up your files to the cloud, only one method — not the default! — leaves behind a permanent, fully normal, local copy on your hard drive. I personally think this non-default method is the best of the three because it ensures you always have available two synced and 100% identical copies of every OneDrive file. This way, if anything happens to either set of files — local or in the cloud — you always have the other complete set to work with. OneDrive indicates which file-handling method it’s using, and the status of its files, through an astonishing array of 26 different icons. But, equally astonishing, there’s absolutely nothing in OneDrive’s anemic “getting started” document, or its local help files, that explains these! To address Steve’s question, here’s a short explanation of the three most important icons that OneDrive uses to show you the location and status of your files. (Later in this article, you’ll see a link to relevant support pages that explain the rest.) The three main icons are: a green checkmark in a white circle, a white checkmark in a solid-green circle, and a blue-outlined cloud. They mean very different things. Figure 1 shows a little demo OneDrive folder I ginned up to show these three main icons in use; the filenames indicate what the icons mean.
1) Default mode: By default, OneDrive syncs your local files to the cloud and leaves an impermanent local copy on your hard drive. This condition is shown by a green checkmark icon in a white circle; see file #1 in Figure 1. These local copies work like normal files, but they’re quasi-temporary and can be automatically deleted by Windows disk-cleanup operations (e.g., Storage Sense) or during other, similar major system clean-ups. The cloud-based copies remain intact and unaffected if or when this kind of cleanup happens. 2) “Always keep on this device” mode: Once optionally selected (it’s not the default), this mode tells OneDrive to always leave a fully normal, local copy on your hard drive. (See file #2 in Figure 1; the icon is a white checkmark in a solid-green circle.) These local files are utterly normal and behave the same as any other local file on your hard drive; they won’t be targeted by Win10’s automated housecleaning or maintenance operations. They’re completely ordinary files that just happen to be fully synced with identical copies stored in the OneDrive cloud. Because these local files are always 100% intact and current, this mode also ensures that you’ll always have up-to-date files to work on locally, even if you’ve temporarily lost your network access to the cloud or to the OneDrive mothership. Always keep on this device is the mode I use most, the one I generally recommend, and the one that addresses Steve’s desire to ensure that his OneDrive files are available locally, independent of the cloud. 3) Cloud mode: If you wish, or if your local space is very tight, OneDrive can operate in cloud-only mode. (See file #3 in Figure 1, with the cloud icon.) In this mode, the local drive contains only stubs or links to the cloud-based files. When you click on a file’s local stub or link, OneDrive downloads the full file from the cloud and lets you work on that temporary local copy. The benefit of this method is that your PC can get by with very little local file-storage space (i.e., a very small hard drive), but the downside is that you must have a working network connection to the cloud (and the OneDrive mothership) in order to access your files. How to choose or change OneDrive’s storage mode You can select, via a right-click on any included folder or file, which type of storage mode you want OneDrive to use. The right-click context menu will look something like what’s shown in Figure 2; note the highlighted section.
If you right-click any local OneDrive file or folder and select Always keep on this device, its icon will change to a white checkmark in a solid-green circle (see file #2 in Figure 1), meaning that the file or folder has been backed up to the cloud — but with a full, permanent, synced, local copy retained on the hard drive. Again, this is the mode I recommend and most often use myself. Alternatively, if you right-click any local OneDrive file or folder and select Free up space, the icon will change to a blue-outlined cloud (see file #3 in Figure 1), meaning that the file or folder has been backed up to the cloud, with no local copy retained on the hard drive. Note: These right-click options follow the normal rules of Windows inheritance, so you don’t have to click each file individually to make widespread changes. Rather, you can change the OneDrive mode of a folder, and the entire contents of that folder — including all files and any sub-folders (and sub-subfolders, and sub-sub-subfolders, all the way down) — will inherit and use exactly the same setting. And that leads to the answer to Steve’s question. The easiest way to ensure that you always have a 100% current, local copy of everything that’s been saved to OneDrive is to right-click on your C:\users\…\OneDrive\ folder and select Always keep on this device. Depending on how many files you have and how you’ve previously stored them, Windows will churn for anywhere from a few seconds to several minutes. When the processing is done, your OneDrive cloud account and your local OneDrive folder on your hard drive will be identical. They will contain 100% identical, fully synced, utterly normal files and folders. Then you can work normally, do as you please, just as if they were ordinary files on your hard disk and not synced at all. And although it’s not required, I also take one more step with OneDrive before performing major PC maintenance. I completely disconnect the local PC from the OneDrive cloud. This way, anything untoward that might affect the local files cannot spread to the cloud, ensuring that I’ll always have at least one good copy of every OneDrive file, even if something messes up the PC’s copies during maintenance. Disconnecting from OneDrive is an easy, two-step thing: Right-click the OneDrive icon in the desktop notification area and select Close OneDrive. (This shuts down the local syncing applet.) Next, click to https://onedrive.live.com/ and log out of your online OneDrive account. That’s all it takes to totally disconnect! When your maintenance or repair work is done, log back in to OneDrive.live and re-enable the local syncing applet via a right-click. You’ll be connected again, and OneDrive should immediately start re-syncing. I want to emphasize that this disconnect/reconnect step isn’t strictly necessary. It’s just an extra, belt-and-suspenders precaution I take prior to heavy PC maintenance. Once you understand what the icons mean and how to manage OneDrive’s syncing modes, it’s not at all difficult to ensure that your local hard drive always contains current copies of your files. But it sure would have been nice if Microsoft had explained this up front, as part of OneDrive’s “getting started” documentation, or at least as a top-level item in the local help files. Instead, the information is available only on the general Microsoft.com support site. You can find the relevant page only by performing a manual search through OneDrive’s help files or by using a general search engine. Grrr. To save you the trouble, here’s a direct link to the pages that explain all 26 icons that OneDrive uses: What do the OneDrive icons mean? C’mon, Microsoft — this information should be included right from the start, right at the top of the local help files!
Fred Langa has been writing about tech — and, specifically, about personal computing — for as long as there have been PCs. And he is one of the founding members of the original Windows Secrets newsletter. Check out Langa.com for all of Fred’s current projects.
ONEDRIVE — May 24, 2021 Win7 to Win10 activation trouble
By Fred Langa A subscriber lost his Win7 product key and wonders what will happen if his free Win10 upgrade fails to properly activate, especially now that the old, manual “get a replacement key” methods no longer work! Surprisingly, the original product key might still exist in several unusual locations, even after the upgrade — but digging it out could take some doing. Here are the options, with additional information about what happens if you don’t activate! Plus: More on OneDrive’s permanent vs. impermanent local copies. Missing Win7 product key complicates free Win10 upgrade
An AskWoody subscriber using the nom de web “Whaszupp” writes:
“If I click on Activate but then can’t find my activation number, will the PC still be working correctly, or will it cause problems? Right now it works fine, but I don’t want it to crap out. “I think I might have a Win7 activation key, but cannot find it. “What can I do? Thanks.” For sure, try the automated activation link. It’s always worth trying, and even if it doesn’t work, you’ll be in exactly the same position as you now are — no better, no worse — with an unchanged but still-unactivated copy of Win10. An unactivated copy of Windows won’t suddenly cease to work, or lock you out, or eat your files, or any such thing. In fact, Microsoft is actually quite gentle about enforcing activation and allows unactivated copies of Windows to continue working in a safe, but limited, way for a lengthy, indefinite period. What are the limitations? Unactivated Windows will apply only critical security updates; may skip other security and feature updates; and will limit access to some Microsoft downloads, services, and apps that normally are included with activated Windows. You’ll also get persistent nag screens at various places in the OS. So, while the core features of Win10 will work without activation, it’s definitely a more limited, bare-bones experience. Copies of unactivated Windows used to time out after around six months, at which point you’d have to buy a license or reinstall from scratch. But this no longer seems to be the case (probably because the Win10 upgrade cycle is so much faster than old-school Windows). I’ve managed to keep unactivated demo copies of Win10 running (in virtual PCs) for their entire 18-month service life and then some. So, while an activation failure isn’t good, it’s not a crisis. Your files and apps are safe and can still be used while you resolve the activation issue. And for that, you need a working product key or digital equivalent. When you’re trying to locate an old, lost key, the main variables are the age of your PC and whether you or Windows has done a full disk cleanup after the upgrade. If your PC is a late-model Win7 unit, purchased toward the end of Win7’s heyday, the product key (technically called a digital entitlement) would have been stored in the BIOS/UEFI; Win10 should be able to find it automatically when you launch the activation process. If that doesn’t happen, such as if your PC is an earlier model, it probably used the classic product-key-on-a-sticker method: Check the back or underside of your PC to see whether the product key is affixed there. If you still have any of the original owner’s manual or paperwork, the key might be listed there, too. If you can’t find it anywhere, it’s worth trying a key-finding utility, like NirSoft’s free ProduKey. It’s a long shot: tools like ProduKey will look in most of the same places that Win10 does; so if Win10 can’t find the old key, ProduKey and its ilk probably won’t either. But it’s free and takes only a minute to run, so it’s worth a shot, on the off chance that it works. If you still can’t find the key by any means, physical or digital, there are only two remaining options. If your upgrade was recent (within about a month or so), and neither you nor Windows has performed a Clean up system files operation, then your old Win7 setup — including its product key — is probably still available for rollback. Back up any new files you’ve added since the upgrade, then temporarily revert the PC back to Win7 so that you can recover the old Win7 key. Reverting or rolling back takes some time but isn’t hard. See HowToGeek’s How to Uninstall Windows 10 and Downgrade to Windows 7 or 8.1. If it’s been more than a month or so, you still might be able to roll back and recover the key. See EaseUs’s Break Windows 10 Roll Back Limit – Roll Back to Windows 7/8 after 30 Days. Alternatively, if you have a full backup or system image of your old Win7 setup, you can temporarily restore that. Either way, once Win7 is running again, use ProduKey (or a similar product) to find the product key and write it down in a safe, secure place — off the system you’re working on. Once you have the key, you can then re-upgrade to Win10 and use the key you just recovered to activate the new setup. Sad to say, if that doesn’t work, you may be out of luck. Microsoft has apparently discontinued its old, reliable, activate-by-voice-phone option (via the Software Licensing User Interface slui.exe). Now you either activate Win10 with the automated tools, or not at all. If that’s the situation you find yourself in, your two options are (1) to continue to use Windows in its current, limited, unactivated form (not recommended as a long-term solution) or (2) to obtain a fully licensed copy of Win10. There are two ways to get a valid Win10 license. You could simply buy a new license for your current setup, but I strongly recommend against this for old, Win7-era hardware. Win7-era gear requires drivers that will be increasingly difficult to keep current; also, the fundamental PC hardware is physically incapable of supporting the superior chip-based security measures that Win10 can employ with newer hardware. Rather, with hardware this old, a far better choice is to bite the bullet and get a new, fully current PC — one that comes with a new, fully activated, digitally entitled copy of Windows. OneDrive’s impermanent local copies
Melvin Billik is one of many, many AskWoody readers struggling with OneDrive’s anemic, scattered, and incomplete documentation. After reading Another OneDrive problem caused by poor documentation (AskWoody Plus 2021-05-17), he had a follow-on question:
“I use OneDrive. My PC has a OneDrive folder. Say I have a subfolder there called Legal, and I store (save) important files there. When I save it there, it is now in the cloud and my other PC also has access to it. Right? “Currently, when I use File Explorer, all the Legal files have the white circle with the green checkmark. If I right-click Legal and choose Always Keep on This Device, then the circles become solid green. BUT WHAT HAS CHANGED? “I know I’m missing something obvious.” It’s not you, it’s OneDrive! We’re all missing complete, clear, easy-to-find documentation, because Microsoft hasn’t produced it! Grrr. But here’s the difference between OneDrive’s permanent and impermanent local files. You’re probably familiar with Windows’ standard file attributes (Wikipedia definition) such as Hidden, Read-Only, Compressed, Encrypted, and so on. These attributes carry extra information about the tagged file or folder and tell the operating system how the file or folder should be treated. OneDrive uses its own file attributes. After OneDrive saves a file (or folder) to the cloud, it changes a special local file attribute to reflect whether the backed-up files are set up as OneDrive’s Files on demand (that’s the default), Always keep on this device, or Free up space. (For a refresher, see Figure 1, which I’ve cribbed from last week’s column.)
Superficially, the file attribute determines which icon you see when File Manager shows you your OneDrive files. But far more importantly, the attribute informs the operating system how to handle the files. For example, when a local OneDrive file carries the default Files on demand attribute (indicated by a green checkmark in a white circle), Windows regards the file as redundant (because it’s backed up in the cloud), and so is OK to delete if or when disk space is needed. (Win10 has several built-in, clean-up mechanisms, including Storage Sense, that can perform this type of automatic, behind-the -cenes cleanup.) It’s this potential for automatic deletion that makes these files impermanent. In contrast, the OneDrive mode I recommend, Always keep on this device, tells OneDrive to always leave a fully normal local copy on your hard drive. (See file #2 in Figure 1; the icon is a white checkmark in a solid-green circle.) Always keep on this device files do not have the OneDrive “OK to delete if space is tight” file attribute. Therefore, these files won’t be targeted for deletion by Win10’s automated housecleaning or maintenance operations. Rather, these files are as permanent as any others on your system. So, when Mel switches between OneDrive’s Default and Always keep on this device modes and asks, “WHAT HAS CHANGED?”, the answer is: a file attribute changed — the attribute that tells Windows whether the given file or folder is “OK to delete if space gets tight.” Again, Always keep on this device is the mode I use most, the one I generally recommend, and the only one that guarantees that a copy of your OneDrive files will always be available locally, independent of the cloud and beyond reach of automated OneDrive-related cleanup routines. The only difference is a file attribute — but it’s a very important attribute!
Fred Langa has been writing about tech — and, specifically, about personal computing — for as long as there have been PCs. And he is one of the founding members of the original Windows Secrets newsletter. Check out Langa.com for all of Fred’s current projects.
ONEDRIVE — May 31, 2021 Securing sensitive files in OneDrive’s cloud
By Fred Langa Does it feel like rolling the security dice when you save your files to a cloud-based service? When the files move out of your control and protection and into who-knows-what security measures the cloud-provider is using? You feelin’ lucky? It doesn’t have to be a gamble. Here’s how to take charge of your cloud-based file security to make your remote files snoop-proof and effectively just as safe as those on your local PC. Plus: No, ProduKey isn’t malware, despite what your security app says! How to make files safe in OneDrive — or in any cloud!
AskWoody’s recent OneDrive coverage from Lance Whitney, Susan Bradley, and me (see article list at end of this text) has unleashed a torrent of email from subscribers struggling with various aspects of OneDrive’s poorly documented features and operations. Questions about OneDrive’s security are a common theme. For example, see this note from AskWoody subscriber Jimmy Dominguez:
That’s a great topic, Jimmy, and for much more than just password databases! You probably have many other private, sensitive files, too — financial records, tax information, health data, etc. — that you don’t want to fall into the hands of cloud-based snoops. The good news is that all major cloud-service vendors are extremely serious about the security of your data while it’s in their care — the success of their cloud business depends on users’ being able to trust the service! But your specific question was about OneDrive. Microsoft describes OneDrive’s extensive security measures on the support page, How OneDrive safeguards your data in the cloud. While that’s all good — and truly, OneDrive’s built-in security is good — it cannot be perfect. No human-built system ever is. Worse, it puts you (and your files) into a passive, subordinate position, totally dependent on someone else to correctly spec, implement, and maintain essential security for your cloud-based files. There’s a better way — easy steps you can take to ensure your data remains safe, no matter where it resides. Let’s start with Jimmy’s password manager as the working example. It will lead us to a more general discussion of how to secure any type of cloud-based files. First of all, yes, the KeePass password database is safe to sync to the cloud because, like all the major password-keepers I’m aware of, KeePass encrypts its database. Today’s high-quality file encryption is the very best way to add nearly impregnable security to any file, regardless of where it will be stored — in the cloud, on your PC, on a flash drive, in an email attachment, whatever. Without the correct decryption passphrase or password, the file contents will be safe and totally inaccessible. A good password manager will also never transmit its data unencrypted, “in the clear.” As you saw on the above-referenced Microsoft support page, OneDrive’s cloud-based components automatically enforce the use of encrypted HTTPS connections anyway — so odds are no one will be able to snoop your data while it’s in transit. HTTPS adds good baseline security, but you can significantly enhance your online privacy by also using a VPN (virtual private network), which adds another, independent layer of encryption on top of HTTPS and can also disguise your physical location. Many password-keeper apps also allow use of two-factor authentication when you first sign in, to verify that you’re really you and not some snoop trying to break in. KeePass can use two-factor authentication, although it’s a bit kludgy. See Tutorial — Using KeePass With Two-Factor Authentication. And, if you employ OneDrive’s Always leave on this device setting, as recommended in OneDrive’s impermanent local copies (AskWoody Plus 2021-05-24), your working copy of the encrypted KeePass database will be kept local with a separate and still-encrypted copy tucked away in the Microsoft-protected cloud, synced there via encrypted HTTPS/VPN transmission. I’d say that’s very, very safe! OK, that’s KeePass. But you can employ the same concepts to achieve similarly safe transmission and storage of all your sensitive cloud-stored files — financial records, tax information, health data, etc. The bedrock concepts are to employ file- or folder-level encryption on the files/folders that will sync to the cloud; to use only encrypted communication (e.g., HTTPS and/or a VPN); and, if available, to use two-factor authentication when first signing in to your cloud-based apps and services. Encryption can be easy and virtually automatic. For example, the MS Office apps offer optional, built-in, high-quality, 256-bit AES encryption (Microsoft calls it password protection; see Protect a document with a password.) Just save your Office files this way, using a good, un-guessable password, and your files will be effectively un-snoopable by anyone, anywhere. If you use apps without built-in encryption, you can instead use a simple external file- and folder-level encryption app such as 7-Zip (open source/free; site). 7-Zip can encrypt virtually any file or folder. Note: Whole-disk encryption does not work this way. Systems such as BitLocker encrypt files only while they’re physically present on the local hard drive; the files lose their encryption when they’re exported from a BitLocker-encrypted disk. To secure files in the cloud, you need a file- and folder-level encryption tool such as 7-Zip; not a whole-disk encryption tool like BitLocker. As for communicating with the cloud, make sure your cloud provider enforces use of HTTPS connections. I strongly suggest that you use a reputable VPN. Choosing a VPN can feel random because there are a million services available, free and paid, as this example Google VPN search shows. I’m not a VPN expert by any means, but to give you at least a known-acceptable starting place, my consumer-level experience with ExpressVPN has been positive. It’s been fast and reliable for me from multiple locations, and it allows one VPN subscription to cover all my and my wife’s digital devices — PC, Android, Linux, Chromebook, Mac, and iOS. It has a good reputation for security and comes with a 30-day, money-back guarantee. But, again, this is only my personal, anecdotal experience; there may be other VPNs out there that better suit your needs and preferences. Search away! Bottom line: OneDrive is reliable and reasonably safe on its own. Add in file- and folder-level encryption, secure communication via HTTPS and VPN, and maybe multi-factor authentication, and your cloud-based files will be about as safe and secure as humanly possible! Related info:
More OneDrive coverage in recent issues:
Is ProduKey malware?
In Win7 to Win10 activation trouble (AskWoody Plus 2021-05-24), I mentioned ProduKey as a free example app that can dig out the product keys for Windows and other apps installed on your PC. But some readers, including Bob Petruzzelli, encountered a snag:
“Windows Defender was adamant that it was a virus and wouldn’t let me download it. I created a dummy .zip file and added it to the Windows Defender exclusions in my download folder. Then I could download it. But then when I unzipped it the .exe file was instantly deleted by Windows Defender, whoosh…. So I made a dummy file for that in the Windows Defender exclusions. “”Then I could finally run the file and get my Product Key.” Thanks, Bob. ProduKey isn’t a virus, of course, but many browsers and security apps see that it’s trying to get at product keys, and they incorrectly assume that something evil must be happening. But yes, with Windows Security (formerly “Windows Defender”), you’ll usually have to click through several layers of warnings before the file safely arrives on your disk, and several more to get it to run. It’s confusing and a bit of a pain the first time you encounter this kind of adamant blockage by Windows Security, but the support information at Add an exclusion to Windows Security can help you get the file to run. Alternatively, there are many other product key-finder apps out there (examples). Feel free to experiment until you find one that works the way you — and your anti-malware app! — want it to.
Fred Langa has been writing about tech — and, specifically, about personal computing — for as long as there have been PCs. And he is one of the founding members of the original Windows Secrets newsletter. Check out Langa.com for all of Fred’s current projects.
ONEDRIVE — June 7, 2021 OneDrive’s two Documents folders; missing menu items
By Fred Langa One of the most confusing aspects of OneDrive’s operation is its creation of a second Documents folder. Most Microsoft (and many third-party) apps automatically accept OneDrive’s Documents folder as their new default save-to location, but some apps may still continue to use the original Documents folder. This means your PC can have two different, active, in-use folders identically named Documents, only one of which actually backs up its files to OneDrive. Here’s what’s going on, and how to avoid the worst problems caused by this duplication. Plus: What about OneDrive’s encrypted Personal Vault? OneDrive’s dueling Documents folders
Several readers reported they could not reproduce the how-to steps I wrote about in AskWoody’s recent coverage of OneDrive issues (see article list at bottom of text). Specifically, their PC setups were missing essential OneDrive right-click menu items — e.g., Always keep on this device, and Free up space. Here’s a representative sampling of notes:
I had encountered a similar issue when I was first using OneDrive, way back when, until I realized that my PC now had two separate Documents folders. Hoo boy, was that confusing at first — not at all helped by OneDrive’s anemic documentation. But here’s what’s going on. As you know, Windows sets up its normal, default Documents folder at: But when you install OneDrive, it creates a new, second, local Documents folder at Once OneDrive is active, this latter …\OneDrive\Documents becomes your PC’s new Documents folder. Microsoft apps, and any other apps that allow this kind of relocation, will now automatically store their files there. But even after installing OneDrive, the original …{username}\Documents folder remains in place and will still be used by older and classically coded apps that don’t know about OneDrive or whose programmers prefer the simplicity and maximum compatibility that come from using Windows’ plain-vanilla, unaltered, original default location for Documents. Although both folders are called Documents (why, Microsoft, why?), only …\OneDrive\Documents is managed by OneDrive; only that folder shows the OneDrive status icons for its files; and only that folder provides OneDrive’s right-click menu options. The original …{username}\Documents folder continues to operate as it always did. Any files that you (or your apps) save there will not be synced to OneDrive. The files there do not display a OneDrive status icon and do not offer OneDrive right-click menu options. Take a look: Figure 1 shows a simplified demo folder. The File Manager window title is simply Documents (red outline), but the navigation bar shows that this is actually the OneDrive Documents folder, located at …\OneDrive\Documents. This folder currently contains just one sample file, which I named ThisIsInTheOneDriveDocumentsFolder.txt, just to make the location blindingly obvious. Because this file is in the OneDrive Documents folder, it sports a OneDrive status icon and will be synced to the OneDrive cloud.
If you right-click on ThisIsInTheOneDriveDocumentsFolder.txt (or on anything stored in the …\OneDrive\Documents folder), you’ll see the key OneDrive menu items, Always keep on this device and Free up space, as shown in Figure 2.
So far, so good, right? OK, here’s where it gets confusing. Figure 3 shows another File Manager window on the same demo PC as above. As before, the window is titled Documents (red outline), but the navigation bar shows that this is actually a completely different Documents folder — not the OneDrive Documents we saw above but rather the PC’s original, Windows-created Documents folder, still located at I’ve added a sample text file to this folder, with another obvious name that pinpoints the location: ThisIsInTheOriginalDocumentsFolder.txt. Because this is the original Documents folder, unconnected with OneDrive, it does not show a OneDrive status icon for the sample file; the file will not be synced by OneDrive.
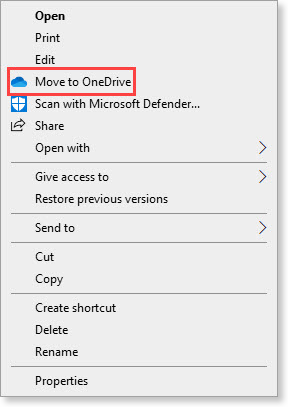
Further, if you right-click on ThisIsInTheOriginalDocumentsFolder.txt (or on anything stored in the original …\{username}\Documents folder), you’ll see only the standard File Manager menu items with just one new OneDrive option — Move to OneDrive — as shown in Figure 4. Other OneDrive menu items, such as Always keep on this device and Free up space, are not available — this isn’t a OneDrive folder!
If you click Move to OneDrive, the clicked-on file or folder will be moved from the original …\{username}\Documents folder to the new …\OneDrive\Documents folder, from which it will begin automatically syncing to the OneDrive cloud. How to avoid “Which Documents folder is this?” confusion In many, many cases, problems with apparently missing OneDrive menu items (and similar issues) can be traced to the confusion caused by having two identically named folders that work very differently. (What a dumb, dumb, dumb move, Microsoft!) I got frustrated with OneDrive early on, after I’d accidentally navigated to the wrong Documents folder one too many times. I needed a way to clearly and instantly remind me of which folder I was in, even if the full path wasn’t visible in the navigation bar, as is often the case. Alas, the seemingly simple solution — eliminating the original Documents folder — won’t work. Old (“legacy”) and classically coded apps still expect to find a valid Documents folder in the normal, unaltered, default location. Eliminating the default Documents folder will break such apps. I have three such apps On my personal-use PC, I have three such apps that still use the old, original Documents folder — Zoom (the videoconferencing app), Macrium Reflect (a disk-imaging tool), and Snagit (a publishing-oriented graphics editor). Figure 5 shows the original Documents folder on my for-real, personal-use PC — the PC I’m using to type this article right now. My old, original Documents folder is almost bare because most of my active files are over in my OneDrive Documents folder. But as you can see, my original Documents folder still contains five items: the folders required by Reflect, Snagit, and Zoom, plus two other oddball items that I manually added to avoid confusing myself.
First, I created an empty text file, naming it (in all caps) NO — THIS IS NOT THE LIVE DOCUMENTS FOLDER.txt. That blatant, in-my-face filename visually reminds me that this is not the new auto-syncing …\OneDrive\Documents folder. Second, I created a shortcut to the …\OneDrive\Documents folder, named the shortcut CLICK HERE — real Documents in OneDrive – Shortcut, and then placed the shortcut into the original Documents folder. This way, if I end up in the original Documents folder by accident, the NO — THIS IS NOT THE LIVE DOCUMENTS FOLDER.txt immediately informs me of my error. I can then click on the shortcut to instantly jump to the …\OneDrive\Documents folder. (BTW, making a shortcut is easy and takes only seconds. In File Manager, navigate to and right-click on your …\OneDrive\Documents folder and select Create shortcut. Then, cut-and-paste the resulting shortcut file into the original Documents folder. Rename it something blatantly clear, like my CLICK HERE… example, and you’re done.) After a while, you’ll get used to having two Documents folders, and the confusion will abate. Microsoft sure didn’t go out of its way to make things easy to understand. Chock up more needless confusion to OneDrive’s poor documentation! Related/recent OneDrive coverage:
What about OneDrive’s encrypted “Personal Vault?”
OneDrive’s Personal Vault is an automatically encrypted folder within your OneDrive cloud on the Microsoft servers. The encryption adds an extra layer of security that can help keep your files safe in the event that someone gains access to your Microsoft account or your device. With that in mind, AskWoody subscriber Bmeacham asked:
“To get access to sensitive files placed in Personal Vault, a hacker would have to not only get into your Microsoft account, but would also have to know the authentication method for your Personal Vault. “Sounds secure to me. Why not mention it in your article?” Personal Vault is extra-secure, true, but it’s very limited in what it can do. It will not, for example, allow for automatic syncing of general files from the Documents folder; you have to more or less manually add things to Personal Vault. And in fact, Microsoft doesn’t recommend Personal Vault for general storage, instead suggesting it for long-term storage of limited types of documents that rarely change — such as scans of your license, passport, tax records, property deeds, etc. It is not for the daily churn of files in your Documents folder. So while Personal Vault is more secure than standard OneDrive, it’s simply not well suited for workaday, general-purpose, automated file syncing and storage of files that change regularly or rapidly.
Fred Langa has been writing about tech — and, specifically, about personal computing — for as long as there have been PCs. And he is one of the founding members of the original Windows Secrets newsletter. Check out Langa.com for all of Fred’s current projects. You’re welcome to share! Do you know someone who would benefit from the information in this newsletter? Feel free to forward it to them. And encourage them to subscribe via our online signup form — it’s completely free!
Publisher: AskWoody Tech LLC (sb@askwoody.com); editor: Will Fastie (editor@askwoody.com). Trademarks: Microsoft and Windows are registered trademarks of Microsoft Corporation. AskWoody, Windows Secrets Newsletter, WindowsSecrets.com, WinFind, Windows Gizmos, Security Baseline, Perimeter Scan, Wacky Web Week, the Windows Secrets Logo Design (W, S or road, and Star), and the slogan Everything Microsoft Forgot to Mention all are trademarks and service marks of AskWoody Tech LLC. All other marks are the trademarks or service marks of their respective owners. Your subscription:
Copyright © 2021 AskWoody Tech LLC, All rights reserved. |


 “Fred: I have an observatory computer that is used solely for automated CCD imaging.


Plus Membership
Donations from Plus members keep this site going. You can identify the people who support AskWoody by the Plus badge on their avatars.
AskWoody Plus members not only get access to all of the contents of this site -- including Susan Bradley's frequently updated Patch Watch listing -- they also receive weekly AskWoody Plus Newsletters (formerly Windows Secrets Newsletter) and AskWoody Plus Alerts, emails when there are important breaking developments.
Get Plus!
Recent Topics
-
LibreOffice 25.8. No Windows 7, 8/8.1, x86
by 33 minutes ago
-
Perplexity Pro free for 12 mos for Samsung Galaxy phones
by 16 hours, 29 minutes ago
-
June KB5060842 update broke DHCP server service
by 15 hours, 1 minute ago
-
AMD Ryzen™ Chipset Driver Release Notes 7.06.02.123
by 19 hours, 3 minutes ago
-
Excessive security alerts
by 14 hours, 44 minutes ago
-
* CrystalDiskMark may shorten SSD/USB Memory life
by 1 day, 4 hours ago
-
Ben’s excellent adventure with Linux
by 50 minutes ago
-
Seconds are back in Windows 10!
by 15 hours, 40 minutes ago
-
WebBrowserPassView — Take inventory of your stored passwords
by 4 hours, 32 minutes ago
-
OS news from WWDC 2025
by 1 hour, 48 minutes ago
-
Need help with graphics…
by 6 hours, 50 minutes ago
-
AMD : Out of Bounds (OOB) read vulnerability in TPM 2.0 CVE-2025-2884
by 1 day, 19 hours ago
-
Totally remove or disable BitLocker
by 19 hours, 7 minutes ago
-
Windows 10 gets 6 years of ESU?
by 22 hours, 22 minutes ago
-
Apple, Google stores still offer China-based VPNs, report says
by 2 days, 6 hours ago
-
Search Forums only bring up my posts?
by 1 hour, 12 minutes ago
-
Windows Spotlight broken on Enterprise and Pro for Workstations?
by 2 days, 18 hours ago
-
Denmark wants to dump Microsoft for Linux + LibreOffice
by 2 days, 11 hours ago
-
How to get Microsoft Defender to honor Group Policy Setting
by 2 days, 19 hours ago
-
Apple : Paragon’s iOS Mercenary Spyware Finds Journalists Target
by 3 days, 5 hours ago
-
Music : The Rose Room – It’s Been A Long, Long Time album
by 3 days, 6 hours ago
-
Disengage Bitlocker
by 2 days, 20 hours ago
-
Mac Mini M2 Service Program for No Power Issue
by 3 days, 8 hours ago
-
New Win 11 Pro Geekom Setup questions
by 1 hour, 16 minutes ago
-
Windows 11 Insider Preview build 26200.5651 released to DEV
by 3 days, 15 hours ago
-
Windows 11 Insider Preview build 26120.4441 (24H2) released to BETA
by 3 days, 15 hours ago
-
iOS 26,, MacOS 26 : Create your own AI chatbot
by 3 days, 19 hours ago
-
New PC transfer program recommendations?
by 2 days ago
-
Windows 11 Insider Preview Build 22631.5545 (23H2) released to Release Preview
by 3 days, 23 hours ago
-
Windows 10 Build 19045.6029 (22H2) to Release Preview Channel
by 3 days, 23 hours ago
Remembering Woody
