
|
There are isolated problems with current patches, but they are well-known and documented on this site. |
|
ISSUE 17.7.0 • 2020-02-17
The AskWoody PLUS Newsletter
In this issue SMALL BUSINESS: RIP FTP: There’s a better way to share files BEST OF THE LOUNGE: Help with upgrading to Windows 10 PATCH WATCH: The trials and tribulations of Windows 7 VIRTUAL PCS: Making an old PC virtually immortal BEST UTILITIES: Freeware Spotlight — eToolz SMALL BUSINESS RIP FTP: There’s a better way to share files
By Amy Babinchak Back in June of last year, I wrote about how Microsoft finally got its OneDrive cloud-storage service right. Today, I’m happy to report on the death of the classic, if somewhat cumbersome, File Transfer Protocol (FTP) — and how its end came at the hands of OneDrive for Business’s new Request Files feature. Let’s have a moment of silence for the ancient FTP’s passing. Created back in the early ’70s as one of the first protocols developed for the then-new Internet, FTP appeared at a time when only a handful of universities and government departments might have access to it. The protocol had only basic security and no real user interface. Over the years, FTP was incorporated into some applications and FTPS added some additional security. But it’s become hopelessly antiquated in today’s world of massive Web connectivity and cloud services. I’ve been slowly killing off FTP for years by using and recommending newer third-party file-transfer tools. But FTP still persists among my clients. For example, one of its final bastions is for transferring CAD drawings. A small number of my clients frequently upload CAD drawings for parts they’re going to manufacture or prototype for customers. Often, there will be design revisions during the production process. So a lot of big files get exchanged. Fortunately, we might be able to put the last nail in FTP’s coffin — and rely instead on the new Receive files feature in OneDrive for Business (more info). Yes, there are numerous other secure file-sharing tools in services such as Dropbox, Box, and even Firefox Send. But OneDrive is already at hand for businesses using 365 subscriptions, and it integrates nicely with other Microsoft business products. Here’s how Receive files works. Configuring a OneDrive for Business file request
To start, go to your OneDrive for Business website and create a new folder for the files you’re requesting. For example, in Figure 1 I’ve created a “Receive Files” folder. Select the new folder and press the Request files button on the toolbar. (Note: You won’t see that option until you select the folder.)
When you press the button, a new Send file request dialog box opens with a link to the folder (see Figure 2). Simply send that link to whoever has the files you wish uploaded to you. Note that this link is permanent; the file-request recipient can use it over and over to upload files to the selected folder.
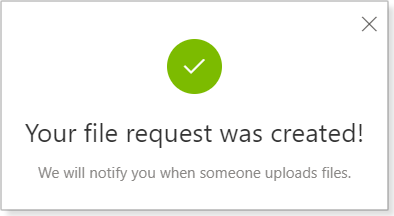
Alternatively, you can enter one or more email addresses and send an email directly from OneDrive. The final dialog box confirms your request (Figure 3).
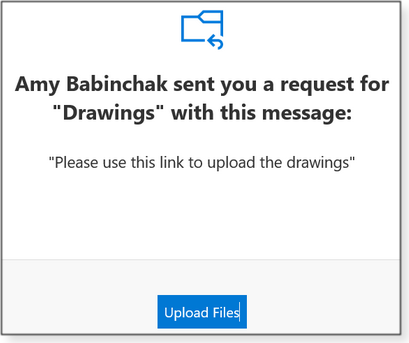
You’ll receive an email notification whenever files have been uploaded to the “receiving” folder. If you choose the email-address option, the recipients will see a message similar to what’s shown in Figure 4.
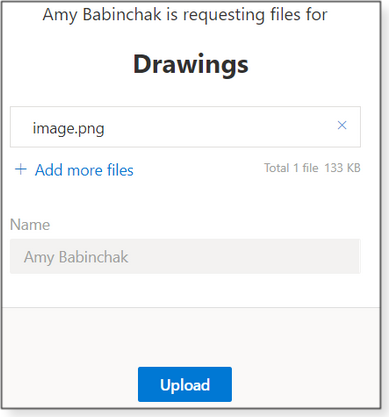
For better security, the person uploading the files cannot do so anonymously. They must either sign in or provide their name. This’ll help confirm that a file was uploaded by a legitimate sender. (In Figure 5, I requested files from myself, so the name field was automatically filled out. Normally, that field will start out blank.)
Files in the “received” folder will have the sender’s name added as a prefix, which helps identify to whom the file belongs (see Figure 6).
Securing received files
Businesses whose Office 365 license includes “Advanced Threat Protection” (ATP) can configure additional file-sharing security. You’ll enable this in your Safe attachments policy, which will automatically scan and block any received files containing malicious content — before you open them. You can also enable Conditional Access to set location restrictions. Look for Safe attachments (Figure 7) in the MS/Office 365 Threat Protection settings. It’s easy to miss; you’ll find it at the top of the policy page. Use the shortcut by entering https://protection.office.com/safeattachment into your browser (sign-in required) — or take the long way around by browsing through Microsoft Admin/Security/Threat Management/Policy/Safe Attachments.
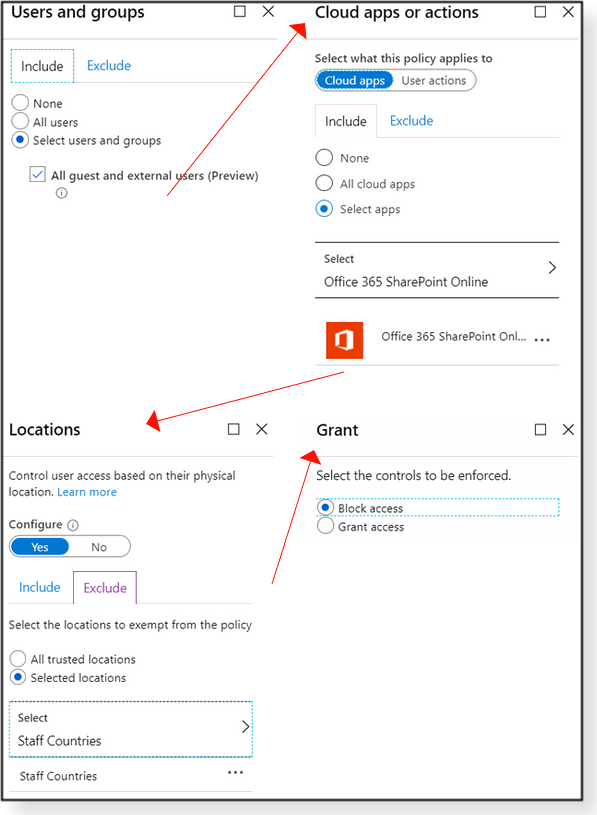
With Safe attachments enabled, you won’t be able to open a newly received file until ATP finishes scanning it. But a moment’s wait is well worth avoiding nasty computer infections. Yet another security step is to limit the locations that can send files to your receiving folder. (This advanced feature requires a license that includes Conditional Access.) You set up “location” restrictions by creating a new SharePoint policy. For example, let’s establish that files can be sent from U.S. locations only. To do so, we use the relatively simple four-step process shown in Figure 8. We start by defining allowed users and groups and then select the target application(s). Next, we define the excluded locations. And finally, we block access to those locations. Note that the new policy will affect all OneDrive and SharePoint activity. But again, it’s worth the extra security.
Keeping it clean with a bit of automation
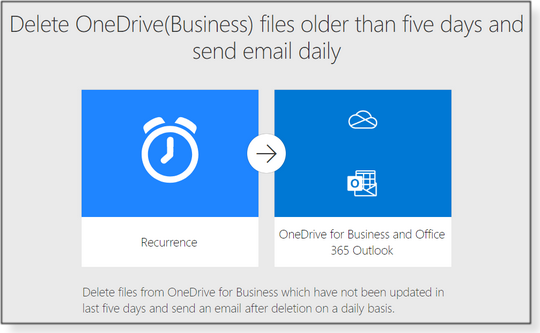
If you’re like my clients, keeping the “receiving” folder clean will not be a natural habit. The solution is to create an expiration policy for the folder. Once set, files are automatically deleted after a fixed number of days. This will keep the folder from getting choked with obsolete data over time. For this task, we can turn to Microsoft’s Power Automate (also included in your 365 subscription) — there’s a ready-made template (see Figure 9). In this example, I’ve set it to five days, but you can apply whatever duration suits your needs. The point is to automate the cleanup process and relieve the staff of managing it.
The template is fairly easy to use, so I won’t go into the fine details. In short, start by choosing the folder you’d like to have automatically cleaned (see Figure 10).
Next, expand the Condition field and edit the -[day period] (“-30” in this example; see Figure 10) to one that suits you. Finally, compose an email to be sent to selected individuals when a file has been deleted. Don’t worry about losing anything important. Deleted files go into a recycle bin, where they can be retrieved for up to 30 days. They then drop into a secondary bin for another 90 days. Still using FTP? As you can see, we now have a powerful, flexible, and feature-rich solution for acquiring remote files, keeping data safe, and automating the cleanup task. It’s been a long time coming.
Amy Babinchak is the owner of three IT-related businesses: Harbor Computer Services, Third Tier, and Sell My MSP. She has been working in the IT field with small and medium businesses for more than 20 years. She’s also a Microsoft MVP and has received numerous leadership awards. Best of the Lounge Help with upgrading to Windows 10
Sure, the resistance to upgrading from Windows 7 to Win10 is still strong, but there are many Win7 users who are preparing to make the jump. And they have questions about the process — lots of questions. Plus member LHiggins, for example, wants to feel confident that the upgrade will go off without a hitch. Posting in the Lounge, LHiggins queries fellow members: How much space on your hard drive is needed? Does Win10 require more RAM? Is the upgrade still free? Should you let Windows upgrade on its own, or is it best to download the Media Creation Tool and make the change with an ISO? All good questions — And AskWoody readers join forces to answer them. Windows 10 updating DaBoss PKCano has posted a Win10-update guide for home and small-business users. PK includes recommended settings and clear definitions for patching terminology. It’s difficult to go wrong when following PK’s advice. Windows updating Plus member bmshulman couldn’t get Windows Update to complete its task. The process always falls just short of completion. After trying everything that came to mind, bmshulman turned to AskWoody readers for help. Following suggestion after suggestion didn’t correct the problem. But after checking installed programs, bmshulman did the proverbial forehead slap — a forgotten third-party update blocker was the culprit. Once bitten, never forgotten! Windows 10 1903 After two months of inactivity, a PC ought to have updates queued up. Plus member dancebert thought so. Instead, nothing showed up, even after a reboot. But with the help of fellow Loungers, dancebert found the answer: a Windows service wasn’t set to automatic. Problem solved — or was it; dancebert now has to contend with updates. Networking Sometimes the best solution to a new problem might be rolling back recent updates. After installing January’s patches, Plus member dwallace115’s two home PCs would no longer talk to each other — instead displaying the dreaded “Contact your network administrator … ” error message. Fellow Loungers provided suggestions, but nothing worked. Would uninstalling January’s fixes prove to be the solution? We’ll have to wait and see. Windows 10 There appears to be no end to upgrading questions in the forum. In this case, Lounger crimsoncricket wants help with the possible fallout of moving from Win7 Home to Win10 Pro. Specifically, what settings adjustments can be made to prevent buggy updates and stop telemetry issues? Other questions include BitLocker settings, OneDrive, and Windows security. Outlook Plus member lenrdbik’s Outlook setup is not playing nicely with recurring tasks. Despite numerous attempts to cure the problem, including suggestions from other Lounge members, the solution remained elusive — until lenrdbik tried a last-ditch effort: a non-destructive reinstall of both Windows and Office. Sometimes extreme measures are the fastest solution. If you’re not already a Lounge member, use the quick registration form to sign up for free. PATCH WATCH The trials and tribulations of Windows 7
We’re starting the Windows 7 extended-support era … with more than our fair share of confusion. Before I shed some light on making Extended Security Updates (ESUs) work, here’s a bit of good news for all Win7 users. You might recall that the final free Win7 updates (January’s) included a bug that broke the “Stretch” wallpaper setting. Some systems ended up with black backgrounds. The easy fix was to use another “Choose a fit” option. But if “Stretch” is important to you — or you’d just like your Win7 copy to be as bug-free as possible — Microsoft released KB 4539601 to fix the flaw. Currently, however, you must manually download and install the patch. The February launch of extended-support updates got off to a shaky start. The day before the first ESUs were due to land (February 11, aka Patch Tuesday), Microsoft released an “Extended Security Updates (ESU) Licensing Preparation Package” — with no real notification. KB 4538483 (32-bit and 64-bit versions) must be downloaded from the Microsoft Update Catalog and installed before you can apply ESU updates. The patch is also needed to add Office updates — but only if you have ESU keys. If you chose to skip extended Win7 support, you’ll see Office security patches offered. (For a bit more info on this patch, see the MS Support article “Procedure to continue receiving security updates after extended support ends on January 14, 2020.”) Note: If you attempt to install any new Windows 7 patches on a machine that isn’t licensed for extended support (doesn’t have an ESU), you’ll receive the error message “Failure to configure Windows updates. Reverting changes. Do not turn off your computer.” The update will show as “Failed” in View update history. If you’re looking for free Windows 7 updates, you can try the Opatch service. Also, regularly check out the AskWoody forum posts in the “Win7 beyond end-of-life” section. Remember: We’ve got your back. For Win7 users and Server 2008 R2 admins planning to go unprotected, here are six critical risks you’re already facing:
The sort-of good news? Aside from the IE exploit, none of the above is being actively used — at this time. That doesn’t mean one won’t show up “in the wild” at some point. Windows 10: Microsoft released the special security update 4524244 for all versions of the OS — except Win10 1909. According to Microsoft, it “addresses an issue in which a third-party Unified Extensible Firmware Interface (UEFI) boot manager might expose UEFI-enabled computers to a security vulnerability.” Not long after the patch was released, Microsoft pulled it from the Updated Catalog and Windows Update because it could cause Windows’ “Reset this PC” option to fail. (See Woody’s post for more information.) If you let Windows 10 install the update, I recommend removing it. So check, open Settings/Update and Security/Windows Update. Next, click View update history. If KB 4524244 is listed, click the Uninstall updates link and search for the update on the Control Panel/Installed Updates screen. Double-click it and press “Yes” to remove it. And that, class, is why we say wait at least a week before installing updates. Microsoft also released a separate Adobe Flash Player update, 4537759, February’s patch summary
We’re less than a week past February’s Patch Tuesday, and a couple of potential problems have already popped up. For example, there was a report of Windows update freezing on HP machines equipped with AMD Ryzen CPUs — probably caused by KB 4524244. I’m also following a possibly more serious issue with KB 4532693. As Woody reported in a Computerworld post, after installing the update, some users lost their usual Windows desktops and were left with nearly blank temporary profiles. Stay tuned for more details.
Windows 10
For you procrastinators, keep in mind PKCano’s post on how to bump up from Win10 1803 to Version 1809. But we recommend jumping to Version 1903 at this time. Servicing-stack updates
Cumulative Windows 10
Windows 10 — all versions .NET Framework There are no new .NET security updates this month, as noted in the .NET blog. The following are optional “quality” patches. Windows 8.1/Server 2012 R2
As we’ve noted previously, Win7 users not ready for Windows 10 might consider Win8.1 as an alternative. Also, expect to see an Adobe Flash update. Windows 7/Server 2008 R2 SP1
If you signed up for Extended Security Updates (ESU), remember to install KB 4538483 from the Microsoft Update Catalog download site before attempting to add new security fixes. If you bought a license but see only Office updates and no security patches, post in the AskWoody forum, and we can get you fixed up. Server 2012
Windows Server 2008 SP2
Office security and non-security updates
January’s updates fix several remote-code-execution and security feature–bypass vulnerabilities. Office 2016 Office 2013 SP1 Office 2010 SP2 The following Office non-security enhancements and fixes were released February 4. Office 2016 Office 2013 and 2010 There are no new non-security updates for Office 2013 and Office 2010. Stay safe out there.
In real life, Susan Bradley is a Microsoft Security MVP and IT wrangler at a California accounting firm, where she manages a fleet of servers, virtual machines, workstations, iPhones, and other digital devices. She also does forensic investigations of computer systems for the firm. VIRTUAL PCS Making an old PC virtually immortal
If you’ve spent years building, repairing, and managing PCs, you’ve probably accumulated a veritable junkyard of old PCs and parts — some still working, some not so much. As the family IT expert and long-time technologist, I’ve lost track of the PCs I’ve bought, built, repaired, re-repaired, and decommissioned over the past several decades. What’s left of most of them is a pile of old hard drives. For most of my computing career, my standard practice for disposing of obsolete (at least to me) machines has been to remove the hard drive and donate or recycle everything else. Then, once I’ve gone through the drive and archived important information elsewhere, I’ll typically wipe it and add it to my pile of empty-but-still-functional drives. Occasionally, I’ll attach a spare drive to a PC via a USB-to-hard drive connector (more info) to archive files or move really big chunks of data from machine to machine. Sometimes, however, I prefer to keep a system as it was originally intended — with a working operation system, applications, and data. And the best way I know to do that without having a bunch of boxes sitting by my desk is to transfer the full setups into virtual machines. It lets me keep old versions of Windows and, say, one or two Linux setups easily — and compactly — accessible. Two ways to create virtual machines
The simple way to create a virtual PC (or Linux, Mac, and other OSes) is to “build” one from scratch in a virtual-PC application. The initial setup is relatively fast and easy, but you do have to install apps and add your files. (Using a service such as OneDrive is the easiest way to transfer data to the new machine.) The other way to create a virtual system is to convert an existing hard drive into a virtual drive and then “attach” it to a new virtual PC (VPC). If it works, you have an instantly usable machine with all your apps, settings, and data in place. But that’s a big “if” — the process frequently fails and can be extremely frustrating. More on this in a minute. The two most popular VPC apps for individual use are Oracle’s VirtualBox and VMware’s Workstation Player. Of the two, I much prefer VirtualBox; it’s frequently updated, it has a better interface (see Figure 1), and it’s completely free! Workstation Player, on the other hand, costs U.S. $150 and, in my opinion, has nothing significantly better than VirtualBox. (You can download a free version of the app, but it apparently allows only one virtual machine. VMware is a bit vague about this. Note: The VMware site didn’t play well with my version of Firefox. If you go there, I suggest using Chrome.)
Setting up a new VPC from scratch is about the same process for either product. I’ll stick with VirtualBox for my examples. When creating VPCs, another consideration is hardware. Any mid-level-to-high-end PC will do. You primarily want lots of free physical drive space and memory. My main machine has an SSD for the primary C: drive and a 1TD hard drive for most of my storage — which includes any virtual PCs I’m currently working with. (Unused VPCs get offloaded to network-attached storage.) I have 12GB of RAM, which is sufficient for good speed; 8GB would be an absolute minimum. You can run a VPC from a network-attached drive, but it’s going to be slow. Building a virtual Windows 7 machine from scratch
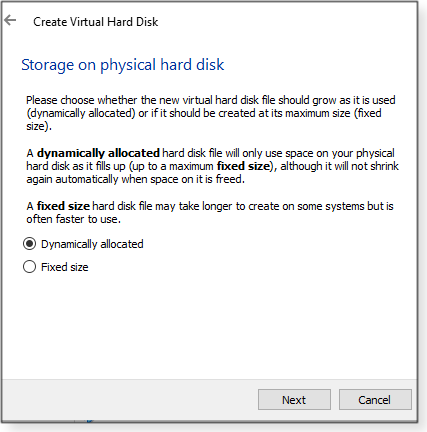
Provided you have an installation disc or media, setting up a new virtual PC takes surprisingly little effort and time. Most of the work involves installing the OS on the new virtual drive. When you click New in VirtualBox, a setup wizard takes you through the following steps:
At this point you have a virtual machine with an empty hard drive. The last step is to load the installation media into the physical PC and start the new VPC. The bootup process should find the Windows-installation media and begin the process of setting up Windows for the first time. It’s effectively just like setting up new hardware. Remember: Just like a new physical installation, you’ll eventually have to enter a Windows product key — if you want to use the VPC over the long run. Feel free to experiment with different VPC settings. And take a look at some of the advanced features in VirtualBox. For example, get to know the Virtual Media Manager tool (under File in the VirtualBox toolbar). Virtual drives are tied to specific virtual machines. But you can move the drives to other VPCs through a process of “releasing” the drive. Migrating physical drives to virtual drives
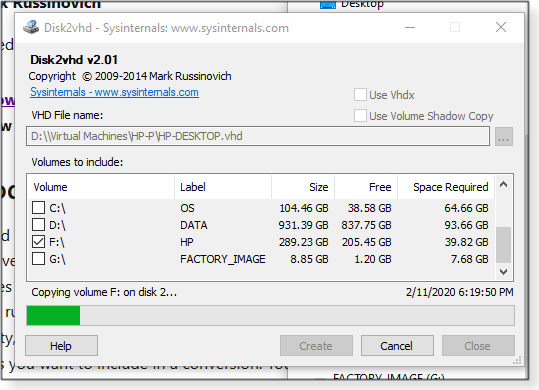
Again, taking a drive out of an old system and converting it into a virtual drive, running in a VPC, is a great way to make a PC nearly immortal — when it works. There are only a few applications for this task, the classic tool being Microsoft’s Sysinternals Disk2vhd (Figure 5).
Two points on this free app: It has not been updated since 2014, and the downloaded version would not run on my Win10 system — I had to use the (automatically downloaded) Sysinternals Live link. Disk2vhd is simple to use and works with drives attached via USB. Even so, read the instructions carefully. Tip: If a newly created virtual drive won’t work, try again with the “Use volume Shadow Copy” option enabled — it can make more reliable transfers. Another option is EaseUS Todo Backup Workstation ($39 per PC/year). Among its many talents is the P2V Copy option. It’s relatively easy to use, although it appears to work only with a physical PC’s internal drives. Again, using either tool is hit or miss. While I successfully created and used a couple of virtual drives from old Windows hard drives, most did not work. Moreover, it’s hard to know whether the problem is with the migration or with VPC settings. For example, I was eventually able to restore an old Windows 98 system as a VPC, but it would run only in Safe Mode. More confusing, it failed initially because I’d set too much RAM. (I had to reset RAM to less than one gigabyte.) The possible lesson? You might have to spend a lot of time researching detailed requirements for old versions of Windows and experimenting with VPC configurations. (Tip: If a VPC starts to run but then crashes, you might try putting a Windows rescue disc in the DVD drive.) Windows 10’s virtual-drive creator
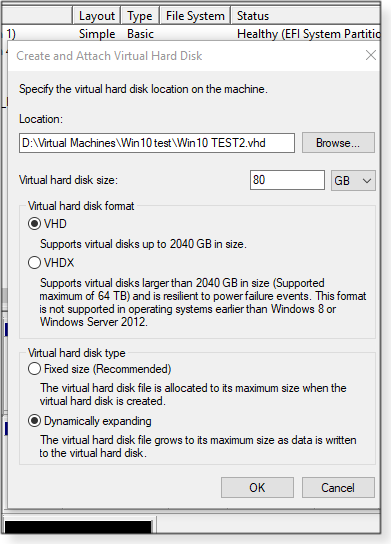
Most Windows 10 users probably don’t know that the OS can create virtual drives. But they’ll always start out empty — you can’t make a virtual drive from an existing hard drive. That said, these new virtual drives can be mapped and used as additional volumes — on both physical and virtual machines. You can, for example, detach them from a physical Windows system and use them as storage for a VPC. Just keep in mind that they are, like all virtual drives, a big file taking up space on a physical drive. Creating a virtual drive in Win10 is really easy. Open Disk Manager and click anywhere in the window. Next, select Action in the toolbar and then click Create VHD. A dialog box (Figure 6) will pop up with fields for the new drive’s location/name and size. You also choose the disk type (format) and whether it’s fixed or dynamic. Here, too, dynamic is the better option.
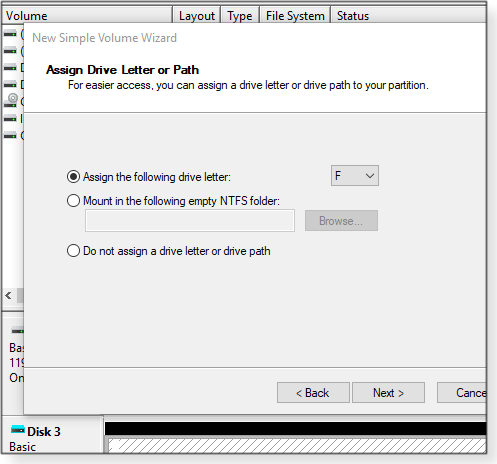
The new drive will now show up in Disk Manager’s drive list with a small, red icon. Right-click the box with the icon and select Initialize Disk from the dropdown menu. (If that doesn’t work, select the drive and click Action/Attach VHD.) In the next dialog box, set the partition type (MBR or GPT) and click OK. Final step: Right-click the graphic of drive (box with diagonal lines) and select New Simple Volume; then follow the prompts in the wizard that appears. When you’re done, you’ll see a new mapped drive in File Explorer.
That new virtual drive can have a number of uses. It can easily be copied and stored elsewhere; it can be placed on a network-attached drive; it can be ejected (but will still exist); or it can be used with a VPC. Bottom line: Creating virtual PCs is the best way to keep obsolete operating systems alive. If they get infected or damaged, simply build a new virtual machine from scratch or use an earlier, known-good, saved copy.
TB Capen is editor in chief of the AskWoody Plus Newsletter. Best Utilities Freeware Spotlight — eToolz
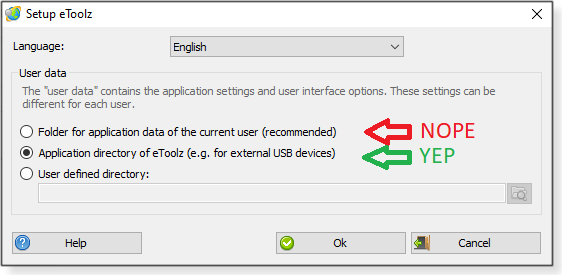
If you’re a relatively young computer tech or system administrator, you’re living in wonderful times. The ability to show up at a worksite with all your tools on a flash drive was the stuff of dreams for us floppy-totin’ grayhairs. To your many portable tools, I suggest adding Austrian developer Werner Rumpeltesz’s eToolz. It’s your go-to app for everything network-related. It does the basics such as Whois, Ping, Traceroute, and DNS Lookup but can also update a target machine’s system time using various online time servers, and it will show you IP info for all local network adapters. It will also … well, let’s just dig in to it. Start by downloading a copy from our OlderGeeks site. Next, unzip it onto a flash drive. (I assume you must have 7-Zip among your tools.) Now just launch eToolz.exe — you’ll see the app’s initial configuration screen, shown in Figure 1. Do not just skip past this window.
You do not want to settle for the “recommended” User data selection. This would put the saved data for the program into the AppData folder of your computer. That’s not useful if you want those saved settings to travel with you. Select the second option, “Application directory of eToolz … . (See Figure 2.) Click OK when you’re done.
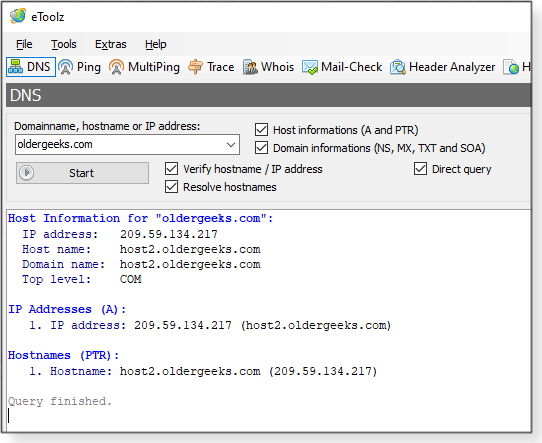
On eToolz’s main screen, the first item in the tools bar is DNS (see Figure 3). Enter your target domain, check all the boxes, and then click Start to get all available DNS information.
Next up is the Ping tool. (I’m not going to insult your skills by going into depth on these tools. Any IT pro worth their salt knows what information they reveal.)
MultiPing lets you check a range of active IPs on a network.
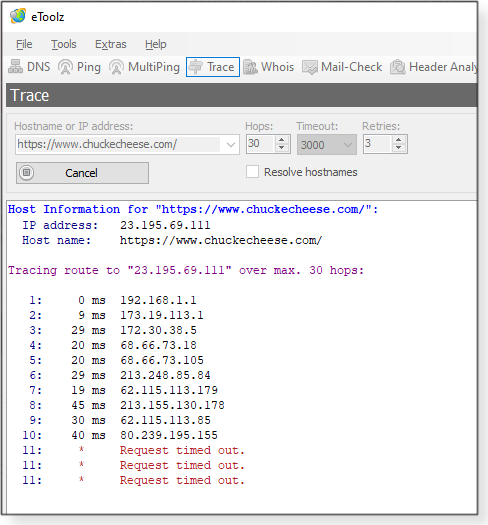
Trace is simply a graphic interface for Traceroute. As you know, the tool shows the route packets travel to their destination. There’s a lot of hops between me and pizza.
Next, the Whois tool reveals public information on a particular site.
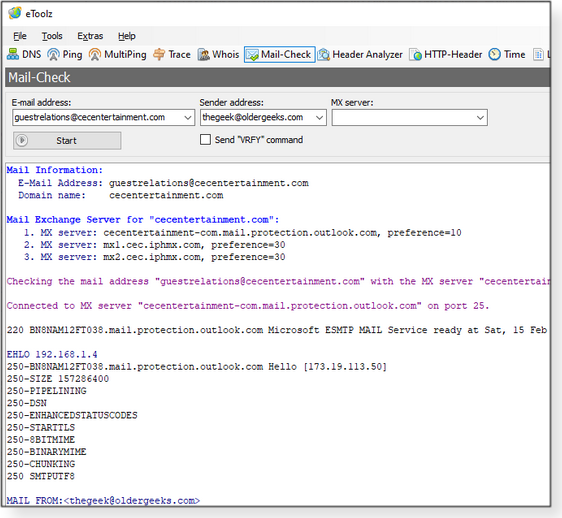
Need to check all the available information about an email address? Mail-Check is your tool. Yes, this is the email address for Chuck E. Cheese!
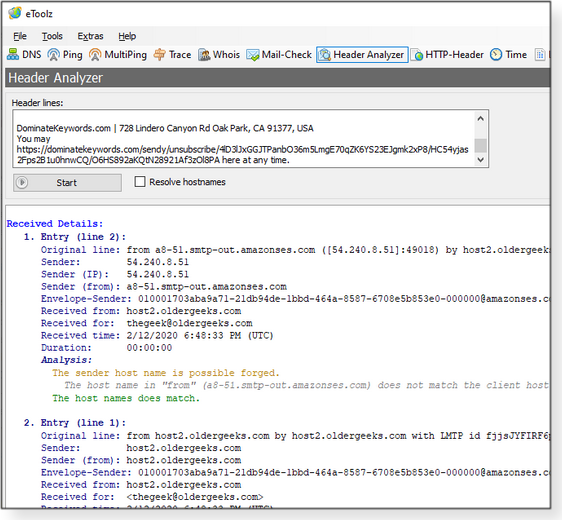
Header Analyzer lets you paste in the entire header of an email to see all available information about the sender.
Use HTTP-Header to view additional information passed between a client and a server (more info).
Time is a nifty tool for quickly and accurately setting a machine’s system time, based on data from online time servers.
Want to look up the default ports for pretty much any service? Use the Lists tool. (I assume eToolz’s author will add other types of lists in the future.)
Last up is the Local Host tool. This gives you all the local network information for a specific system.
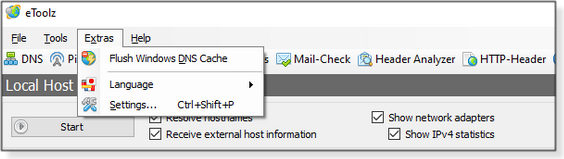
Clicking Extras from the top toolbar lets you quickly flush the DNS cache on a target machine (Figure 14). Choose Extras/Settings (Figure 15) for tweaking the various tool settings to your needs.
Keep checking back for updates to eToolz on its OlderGeeks.com page. I have a feeling we’ll see even more tools added to this already great piece of diagnostic freeware. Happy Computing!
Deanna and Randy McElveen are celebrating over 20 years in the computer business, ten years running OlderGeeks.com, and more than 26 years of putting up with each other. Their computer store is in a small town in the Missouri Ozarks. Believing that happy customers are always the best advertisement, they hope to do it for another 20 years. Publisher: AskWoody LLC (woody@askwoody.com); editor: Tracey Capen (editor@askwoody.com). Trademarks: Microsoft and Windows are registered trademarks of Microsoft Corporation. AskWoody, Windows Secrets Newsletter, WindowsSecrets.com, WinFind, Windows Gizmos, Security Baseline, Perimeter Scan, Wacky Web Week, the Windows Secrets Logo Design (W, S or road, and Star), and the slogan Everything Microsoft Forgot to Mention all are trademarks and service marks of AskWoody LLC. All other marks are the trademarks or service marks of their respective owners. Your email subscription:
Copyright © 2020 AskWoody LLC, All rights reserved. |


 By Susan Bradley
 What to do: It’s the usual post–Patch Tuesday rules: Pause Windows Update for a couple of weeks while we look for any serious side effects. (As always, feel free to test the updates on a non-production machine — and report any anomalies in the AskWoody forums.) Meanwhile, take some time to test your backup-and-restore procedures.
 By TB Capen
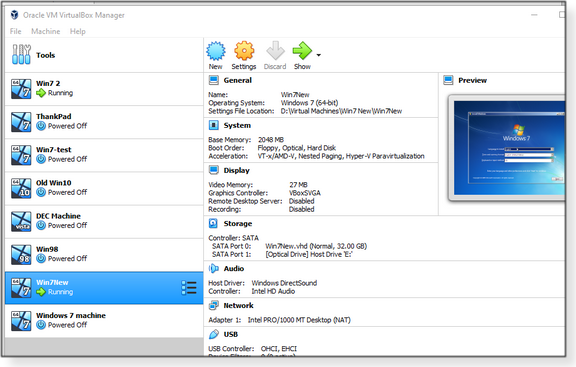


 By Deanna McElveen


Plus Membership
Donations from Plus members keep this site going. You can identify the people who support AskWoody by the Plus badge on their avatars.
AskWoody Plus members not only get access to all of the contents of this site -- including Susan Bradley's frequently updated Patch Watch listing -- they also receive weekly AskWoody Plus Newsletters (formerly Windows Secrets Newsletter) and AskWoody Plus Alerts, emails when there are important breaking developments.
Get Plus!
Recent Topics
-
Microsoft-Backed Builder.ai Set for Bankruptcy After Cash Seized
by 5 hours, 34 minutes ago
-
Location, location, location
by 6 hours, 3 minutes ago
-
Cannot get a task to run a restore point
by 7 hours ago
-
Frustrating search behavior with Outlook
by 1 hour, 58 minutes ago
-
June 2025 Office non-Security Updates
by 17 hours, 46 minutes ago
-
Secure Boot Update Fails after KB5058405 Installed
by 10 hours, 26 minutes ago
-
Firefox Red Panda Fun Stuff
by 17 hours, 42 minutes ago
-
How start headers and page numbers on page 3?
by 1 day, 4 hours ago
-
Attack on LexisNexis Risk Solutions exposes data on 300k +
by 6 hours, 48 minutes ago
-
Windows 11 Insider Preview build 26200.5622 released to DEV
by 1 day, 12 hours ago
-
Windows 11 Insider Preview build 26120.4230 (24H2) released to BETA
by 1 day, 12 hours ago
-
MS Excel 2019 Now Prompts to Back Up With OneDrive
by 1 day, 2 hours ago
-
Firefox 139
by 19 hours, 5 minutes ago
-
Who knows what?
by 9 hours, 26 minutes ago
-
My top ten underappreciated features in Office
by 1 day, 13 hours ago
-
WAU Manager — It’s your computer, you are in charge!
by 1 day, 7 hours ago
-
Misbehaving devices
by 9 hours, 15 minutes ago
-
.NET 8.0 Desktop Runtime (v8.0.16) – Windows x86 Installer
by 2 days, 19 hours ago
-
Neowin poll : What do you plan to do on Windows 10 EOS
by 16 hours, 49 minutes ago
-
May 31, 2025—KB5062170 (OS Builds 22621.5415 and 22631.5415 Out-of-band
by 2 days, 18 hours ago
-
Discover the Best AI Tools for Everything
by 1 day, 17 hours ago
-
Edge Seems To Be Gaining Weight
by 2 days, 8 hours ago
-
Rufus is available from the MSFT Store
by 2 days, 16 hours ago
-
Microsoft : Ending USB-C® Port Confusion
by 3 days, 19 hours ago
-
KB5061768 update for Intel vPro processor
by 1 day, 19 hours ago
-
Outlook 365 classic has exhausted all shared resources
by 1 day, 17 hours ago
-
My Simple Word 2010 Macro Is Not Working
by 3 days, 14 hours ago
-
Office gets current release
by 3 days, 17 hours ago
-
FBI: Still Using One of These Old Routers? It’s Vulnerable to Hackers
by 5 days, 7 hours ago
-
Windows AI Local Only no NPU required!
by 4 days, 16 hours ago
Remembering Woody
