
|
Patch reliability is unclear, but widespread attacks make patching prudent. Go ahead and patch, but watch out for potential problems. |
|
ISSUE 17.13.0 • 2020-04-06
The AskWoody PLUS Newsletter
In this issue SOCIAL NETWORKING: Keeping in touch — from a distance BEST OF THE LOUNGE: How much RAM is enough? LANGALIST: When File Explorer stutters, loses focus BACKUP: From the Lounge: Simple and cheap data backup and storage PHOTO EDITING: Review: Affinity Photo SOCIAL NETWORKING Keeping in touch — from a distance
By Lincoln Spector Social distancing wearing you down? Consider how much more difficult staying home, possibly for weeks or months, would have been 30 years ago. Without the Internet, we’d be much lonelier. As never before, video chat services such as Amazon Chime, Apple FaceTime, Facebook, Google Duo, Skype, and Zoom are helping to keep us together. Your family and friends might be spread all over town, the state, the country, or even the world, but thanks to the Web you can still talk to them all face-to-face. Of course, none of these services is as easy as picking up the phone or sending an email. And of course, their features, ease of use, and cost vary widely. Some are designed for personal use, while others are focused on business communications. (As reported in a ZDNet article and other media outlets, a number of paid video-conferencing services are offering free access to some or all users during the COVID-19 crisis.) Given current events raising video chatting to a new level of interest and importance, I checked out several services that are suitable for those of us who want to see others virtually. Not surprisingly, I found none of the offerings to be perfect. But for major get-togethers — family gatherings, virtual parties, and so forth — I settled on computer-based Zoom as the best choice. For an unplanned video discussion via phone, I preferred Google Duo. Along with discussing these programs’ strengths and weaknesses, I’ll give you my version of “Miss Manners” etiquette (with apologies to Judith Martin) for video chatting. To be clear, I’m concentrating on social connections, not professional ones. Undoubtedly, someone in your company has already decided what service to use and how to use it. That’s less likely with friends and family. Zoom: Difficult, easy, fully powered — and invasive?
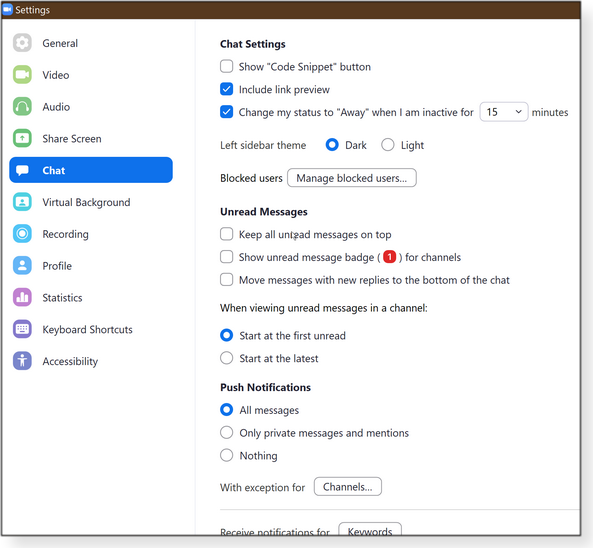
The big problem with any communication system that’s not managed by professionals is getting everyone’s video chat up and working. The uncle who bought a computer “just for email” won’t understand installing a program … let alone setting it up. (If you’re already proficient with Zoom, you can skip the following section.) Zoom setup: This is the “difficult” part. In fact, it’s so challenging that the Zoom website offers 30-minute online classes to teach you how to host a meeting. It’s definitely worth spending the time. Even the free Basic edition has a huge number of settings; most are easy to figure out, but the sheer number can be intimidating (see Figure 1).
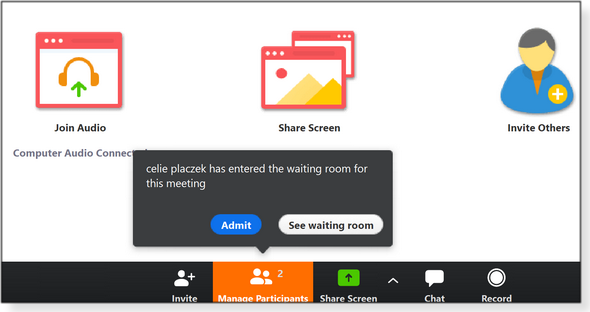
Initiating a Zoom meeting: At the home screen, you start by selecting either New Meeting or Schedule, depending on whether you want to start a discussion now or later. Either way, you invite other people to join, usually via email. At the start of a new session, a video window pops up and options appear at the bottom when you move your mouse. You can invite people, turn on chat, record the meeting, and so on. But for the full set of capabilities, you’ll need to go back to the first window. Click the tiny image of your face in the upper-right corner for the pull-down menu. The service doesn’t insist that every participant be a Zoom expert — only the host must really know the program. Participants need only click the URL in the, say, emailed invitation. If someone has never used Zoom, that will bring up a webpage stating “A download should start automatically in a few seconds.” And it will. Then a big orange sign in the lower-left corner of the page tells the participant what to do to install the program. Then they just have to wait a few seconds for the install to finish. Next, they enter their name — and they’re in the meeting.
But this automated setup isn’t foolproof, and some users are baffled by even the basic concept of “installing a program.” I’ve seen it! In those cases, you’ll need patience to explain over the phone how to get Zoom working.
Participants can do a lot with Zoom. For example, you can share a window from your screen with others in your party. You can text between participants and even privately text-chat with someone in the group. (“Hey, I call BS in Jim’s version of events!) And you can record the event — although that’s probably more useful for a business meeting than a social one. (Some of Zoom’s features have raised numerous privacy flags, as a ProtoMail article details. But it’s hard to know whether Zoom is any more invasive than other video-chat services.) With a free Zoom account, two people can chat with each other for as long as they like. But once you add more participants (up to 100 total), the conversation is limited to 40 minutes. Zoom is currently exempting that limit for schools (more info). For USD $15 a month, you can remove that and other limitations. Other video-chat options
If you want something similar to the free Zoom but without the 40-minute cap (or you’re uncomfortable with Zoom’s privacy policies), Cisco’s Webex (Figure 4) is probably your best bet. It’s relatively easy to set up and use, and it has many of the same basic features as Zoom.
But I ran into an unusual problem with this service. I have two screens connected to my PC, and they have different sizes and resolutions. If I tried to move a chat window from one screen to the other, Webex froze the PC; I had to completely shut down the computer and restart. The problem was limited to Webex; it hasn’t shown up on any of the other video-chat apps I tried — or any other programs, period. That said, the failure might be unique to my setup. No one else I know has seen this lockup issue. On the other hand, a participant in my tests reported that Webex was slow to launch on two systems. As of this article’s publication, I’ve not received a comment from Cisco. One-to-one video chats: If you want something simple — such as making a video phone call — Google Duo is a good option. As the name suggests, it’s primarily designed for person-to-person conversations. But it can handle up to a 12-person discussion — but only if you’re using your phone. On a computer (PC or Mac), you don’t even have to install software. Google Duo runs in your browser, assuming it’s Firefox, Safari, or, of course, Chrome. But the browser version drops you back to just one-to-one communications — there’s no way to add a third person. And the service might decide to switch a chat session to your phone, even when started on a PC. Of course, if the participants all have Apple devices, FaceTime is the natural solution. My editor recently spent an hour video-chatting with his daughter, who’s a month away from delivering her first child (and his first grandchild). What Miss Manners might recommend for video-chat etiquette
You’ve been stuck in the house for weeks. You’ve lost any skills you might have had for talking to others — especially when they’re not in the room. Follow these few rules so people won’t think you’re an idiot, slob, jerk, or troll.
Staying in touch: As we’ve all discovered, it’s a strange new world we’re living in. Isolation is a real and significant problem that video-chat tools can help alleviate. But most of all, keep calm and stay healthy! We truly are all in this together. Credits: As you surely can imagine, it’s really difficult to test video-chat services by yourself; you need people on the other end of the broadband line. I couldn’t have done this without help from Howard Kirsch, Celie Placzek, Elijah Spector, and a few other people who didn’t want their names in print.
Lincoln Spector writes about computers, home theater, and film and maintains the blog, Bayflicks.net. His articles have appeared in CNET, InfoWorld, The New York Times, The Washington Post, and other publications. Best of the Lounge How much RAM is enough?
Buying a new computer is not “one size fits all” these days. Choosing the right configuration can be challenging, especially if you’re not a savvy computer user. AskWoody Lounger TonyC asks fellow members whether it’s worthwhile bumping up a new computer from 8GB of memory to 16GB. TonyC admits to having only modest computing requirements. The easy answer? You can never have too much RAM. The better answer: It depends on the apps you’re running and how much you’re willing to pay for the upgrade. Forum denizens love these types of questions — and often have different views on what choice to make and why. Windows 10 You typically want to be selective about which hardware drivers are installed on a PC. Newer is not always better. Plus member mpw is looking for a way to stop Windows Updates from installing new drivers along with the regular patches. Because the PC is running the Home edition of Win10, using Group Policy isn’t an option. Forum members offer a few potential solutions. Do you have the answer? Windows 10 Plus member lylejk updated to Chromium Edge and immediately ran into a problem. You couldn’t type into the address bar without first running ctfmon.exe after every reboot. It didn’t take long for a fellow Lounger to come up with the cure: simply changing “Touch Keyboard and Handwriting Panel Service” setting to Automatic. Windows 7 Plus member Rhino “upgraded” a 2015 HP Envy laptop from Win8.1 to Win7. But is the machine using BIOS or UEFI to boot? After getting no answer by searching online or looking at the laptop’s system information, Rhino turned to the AskWoody forum for help. Lounge members offered numerous suggestions, but the solution is still elusive. Browser Add-ons An anonymous reader is using the uBlock Origin browser add-on to block ads and filter content. But a prompt to update the tool has this forum guest concerned. Was the installed version of uBlock corrupt? Or was the update’s request for permission to access host names and IP addresses legit? Those questions led to a long and interesting discussion. Browser Security Plus member Alex5723 draws our attention to a new-ish security feature being rolled into Firefox: DoH. No, it’s not Homer Simpson’s oft-uttered response to mistakes. Shorthand for DNS over HTTPS, DoH’s foremost purpose is to block man-in-the-middle attacks. Loungers chimed in with more information on the future of DoH and its possible pros and cons. Windows 10 Plus member chipbutty had a rather unusual request: help with preventing the Windows Logo screen from appearing during bootup. (Eliminating the lock and sign-in screens was no problem.) In short order, Da Boss Microfix provided the solution — loading the Winaero Tweaker utility and changing its Boot Options settings. If you’re not already a Lounge member, use the quick registration form to sign up for free. LANGALIST When File Explorer stutters, loses focus
By Fred Langa PCs with multiple hard drives that spin up at different rates can cause File Explorer to temporarily lose its way. Single-drive systems, too, can experience similar issues due to wear and maintenance problems. Here’s a fix. Plus: An old malware scam resurfaces. Keeping File Explorer on track
Writing from Bridgewater, Connecticut, AskWoody subscriber Bill Chinn seeks help for a confused File Explorer.
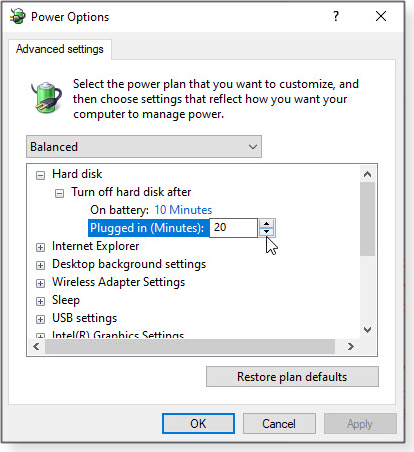
That’s not a lot of clues to work with, but it sure sounds like a hard drive is having a slow start or spin-up, and the subsequent delay is messing up File Explorer. This can happen in single-drive systems, but it’s more common in systems that have multiple drives, and where at least one drive is significantly slower than the primary drive. In that setup, File Explorer opens normally and begins immediately working with fresh data from the primary drive (plus whatever’s left in RAM/buffers/caches). But when a slower-starting drive finally reports in and adds its data to the mix, File Explorer might stutter. It’s almost as if File Explorer has to pause and “find its place” again after the slow drive(s) spin up and come online. I regularly see something like that on my primary PC, which has two large, external, USB-based hard drives attached. If something triggers activity on the two external spinning-platter drives, and they’re in power-saving or sleep mode, they take a few seconds to laboriously (and audibly) spin up. When they’re finally back online, File Explorer sometimes loses focus and/or opens new windows to display their contents. I keep only rarely opened stuff — backups, mostly — on the external drives, so the spin-up delay seldom gets in my way. (It’s good practice to keep infrequently accessed files on your slowest drives and active files on your fastest drives.) If you can’t move often-used files to a faster drive, the solution may be to manually increase Windows’ hard-drive timeout setting. By delaying or preventing the onset of a disk’s power-saving mode, it’ll remain awake and online, ready to respond without spin-up/start-up stutters. Of course, the tradeoff is increased energy use and mechanical wear for the never-sleeping drives. You’ll have to weigh the pros and cons for yourself — it’s your call. You can easily change drive timeout settings via Windows’ Power Options applet, which has remained essentially unchanged through Windows 7, 8, and 10. Part of the classic Control Panel, Power Options is quickly accessed by clicking through Control Panel/System and Security/Power Options. You can also get there indirectly via Win10’s Settings. Click Settings/System/Power & sleep and then look for and click the Additional power settings link under Related settings (usually at the bottom or to the right of the Power & sleep settings). But all those steps simply take you to the same classic Control Panel Power Options app. No matter how you get there, once you’re in the Power Options window, click the Change plan settings link for whatever power plan you wish to adjust (e.g., Balanced), then click Change advanced power settings. Next, expand the Hard disk item and adjust the Turn off hard disk after time to whatever interval you wish. (See Figure 1.) The setting should apply to all internal and USB/external drives.
Networked/remote drives can be harder to adjust, especially if the hardware is under someone else’s physical control. In those instances, there may be no practical fix for remote drives that are slow to spin up other than asking the remote-device Admin for help. And the problem might not be the drive but the network connection itself. Again, start-up stuttering is rarer on single-drive systems, but it could occur if there are problems with a buffer or cache — or if the drive is experiencing excessive read errors or other maintenance and mechanical health issues. Fortunately, it’s easy to check for those kinds of problems. For how-to instructions, see the Check drive health section of “Let your PC start the new year right!” (2020-01-13 AskWoody Plus newsletter). With your PC’s drives healthy, awake, and ready to respond when called upon, File Manager should operate a lot more smoothly. Old malware spoof targets unwary Chrome users
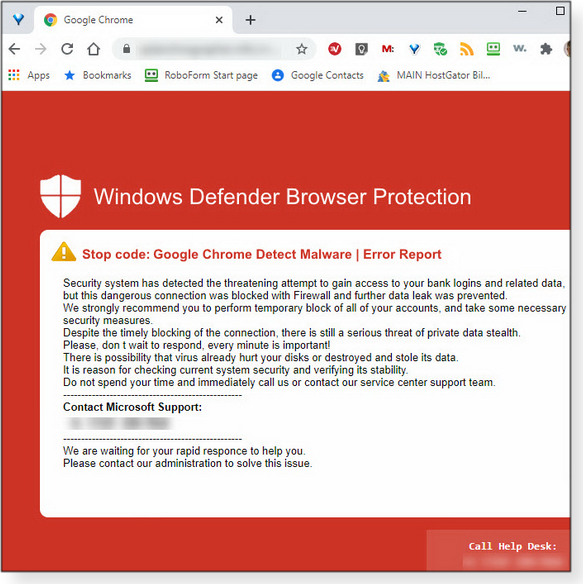
Recently, I apparently mistyped a URL and got a popup in Chrome claiming that my PC was at risk from malware and that I should call Microsoft Support for live assistance or rescue. The warning was totally bogus — in fact, ridiculous on many counts. I mean, just consider the text shown in Figure 2.
The further you read, the sillier it gets, from broken English and misspellings to random bits of jargon tossed about to sound authoritative. Even if you’re not familiar with error messages, nonsense phrases such as the “threat of private data stealth” ought to tip you off that something’s seriously amiss here. And if you’ve seen a few error codes in your time, there are plenty more to alert you. For example, although the heading is “Stop code,” no alphanumeric stop code is given, and no standard Microsoft stop icon (a red X or an X in a red circle) is shown. Instead, the heading is preceded by a yellow exclamation-point warning icon followed by another ungrammatical phrase: “Google Chrome Detect Malware.” Next, the phrase “Error report” is tacked on, even though an error report is a third item that’s different from a stop code or a warning. The entire text is a dish of techie word salad! There’s more, but I’m sure you get the idea. When presented with a warning of this nature, one might ask a larger and obvious question: Why would Microsoft offer live tech support for a Google product (Chrome)? Microsoft typically doesn’t offer live tech support even for its own products! So, everything about this malware popup should tip you off that it’s utter garbage. Still, these scams must be effective at duping naive Windows users, because they keep coming back. For example, see “LizaMoon infection: a blow-by-blow account” (2011-04-07 Windows Secrets), which walks through a very similar type of malware attack that occurred a few years back, mainly in Windows 7. It’s the same basic scam! If you know someone who might be taken in by this sort of fake security warning, send them this article or a link to the LizaMoon article so they can see how these attacks happen — and what they can do about them. You just might save them some grief!
Fred Langa has been writing about tech — and, specifically, about personal computing — for as long as there have been PCs. And he is one of the founding members of the original Windows Secrets newsletter. Check out Langa.com for all of Fred’s current projects. Editor’s note: There is a wealth of expertise in the AskWoody Lounge. From time to time, we will reproduce especially useful and interesting forum posts in the newsletter. This article is an edited version of the original Lounge post. BACKUP From the Lounge: Simple and cheap data backup and storage
It’s axiomatic that the only good data-backup system is one you actually use — often and consistently. There are many options for safely storing your files, but they vary considerably in cost and complexity. I prefer simplicity whenever possible. Data storage really falls into three categories: active files you need to be able to access quickly; system backups, used to recover from catastrophic failures and small data losses; and archived files that you need to keep but might not look at ever again. (I keep all my data on an internal hard drive, much of which I haven’t looked at in ages.) I make backups of my data to an external disk. USB hard drives are now really cheap and really reliable. But they’re not infallible. You might reasonably ask: How long can data be safely stored on an external drive? And how do I check that my files are still intact? How can I tell if the drive is failing? External disks: The cheapest insurance you can get
Cloud storage might be the current rage for file backup, but it has some drawbacks. For instance, once you move your data online, you start to feel like a hostage to your monthly subscription payments. And short of using encryption, how do you know that the subscription service isn’t poking around in your files? Space use is the other consideration. Modern operating systems such as Windows, Linux, macOS, etc. can take up tens of gigabytes of storage. You don’t want to try to back up that code via your typically not-so-fast Internet connection. I’m more comfortable keeping my files stored locally on reliable drives. Modern hard disks and SSDs — basically anything with an IDE, SATA, NVMe or newer interface — include built-in error-correction code (ECC; more info). This technology constantly checks data moving on or off the drive and corrects any errors it finds on the fly. It will also flag and isolate any bad drive sectors. It ensures that Windows — or Mac, or Linux — systems rarely see data errors. And if, say, Windows does report disk errors, it’s a good indication that the disk (or its cable or controller) is about to fail and needs to be fixed or replaced — right now! For most of us, buying a consumer-grade external USB3 disk from the local computer store is the cheapest option. You get a disk (with a warranty) that’s just plug-in-and-go. Some even come with backup software and limited cloud storage for files that you need to share with your portable devices. If you have spare drives — from that upgrade or from an older machine that nobody uses — you can use an external docking bay that you simply plug raw drives into. These are AC-powered units that will accept 2.5- or 3.5-inch disks. They cost anywhere from half the price of a standard external USB disk to twice the price, depending on how many disks they hold and what interface(s) they use. Checking drive health: Hard-disk reliability is high, but it’s still important to check your drives from time to time. Manufacturing defects, power glitches, and heat can take their toll. And then there’s something called bit rot — the gradual corruption of data via small failures in media and RAM. The current standard for disk-health reporting is Self-Monitoring, Analysis, and Reporting Technology (S.M.A.R.T.; more info). It’s important to remember that SMART does not perform any sort of drive repair. It simply provides the detailed stats used to predict drive failures. Moreover, the “standard” isn’t all that standard; hardware and software vendors may apply their own interpretation of what constitutes a potential failure. (The SMART standard also includes several drive self-test tools.) Bottom line: You need a separate app to read and report the SMART data. You can, for example, use Windows 10’s Performance Monitor tool to provide a simple SMART pass/fail (along with a vast amount of other system stats). A Windows Central article shows how. For more thorough drive analysis, I recommend third-party, free or paid disk monitoring software. I’ve been using free monitoring apps for years, with some success — I spotted a failing disk early and replaced it before things really went south. (USB flash drives typically do not support SMART, but there are testing tools for these devices. One example is Check Flash.) Here are a few good disk-monitoring apps:
All disk-monitoring apps let you manually check a disk, but the better versions will also run continuously in the background, notifying you of any problems via an on-screen message, email, or logging of developing disk issues. If your SMART monitor does report a problem, start backing up your data to another drive immediately. Don’t leave it for a week, hoping it’ll be OK — inevitably, it won’t be. Keep in mind that SMART tech is also included in external disks, which are typically just standard drives mounted in a USB- or Ethernet/NAS-attached enclosure. Checking file integrity: Again, preventing file corruption is the job of a drive’s ECC technology. As data are read from the drive, their ECC value is checked. If there’s an error, the drive attempts to fix it automatically — without your ever knowing it. This applies to any disk: internal, external, network, and so forth. To ensure your files are error-free, all you need to do is read the files and let the drive do the testing for you. You could open each one in File Explorer and copy it somewhere else. But that would be tedious, and you probably won’t have the disk space. The best method is to simply back up your data to an external drive, which reads every file on the internal disk and copies it to the external drive. It just doesn’t get any easier! Running this backup process once every couple of months will ensure your data is in tip-top condition. And if you have a hardware failure — or worse, you lose your laptop — you’ll have a clean copy of your data ready to go. Windows, of course, has its own backup tools. They’re comprehensive, but some users find them somewhat confusing. Win10 has effectively three different backup systems: File History, Backup and Restore (Windows 7), and OneDrive. File History and OneDrive are designed to be “set and forget,” operating mostly in the background. But what if, say, File History fails and it’s a few weeks before you discover the problem? Fortunately, there are numerous third-party backup applications available, both free and paid. You can use them in place of Windows’ tools or alongside them. Third-party programs tend to have more features than those built in to Windows. One especially valuable “extra” is the ability to verify backup files, ensuring that they are not damaged. Check that your backup system includes verification — if it doesn’t, grab an app that does. Keep in mind that verification applies to external drives, too. These drives should be tested at least every six months — or more frequently, if you feel inclined. Use the third-party backup tool of your preference. Another method for verifying data on an external disk is file hashing (more info). A hashing app will confirm that files moved from one drive to another are identical. It won’t be quick, but it will be thorough. Try either of these free programs:
Paul Tannard is an AskWoody MVP and frequent contributor to the AskWoody forums. He has spent over 20 years fixing PCs, designing and managing Windows networks in hardware and virtual environments, and helping users via various Web forums. He’s a Windows MCSE and VMware Certified Professional. PHOTO EDITING Review: Affinity Photo
With the advent of digital photography came an explosion of techniques and equipment for making images — and a profusion of applications for processing and editing digital photos. There are dozens of software packages available for fixing and enhancing bit-based photographs — many of them free. Paid packages such as ACDSee, Adobe Photoshop Elements, Adobe Photoshop, and Corel PaintShop Pro typically offer advanced tools such as RAW processing, masking, layers, and other “pro” tools and controls. It can be daunting to pick the best image editor for your needs. But the choice usually comes down to the app you feel most comfortable using, day to day — and that often takes some trial and error. Always on the hunt for a better photo-manipulation tool, I took Affinity Photo (site) for a spin. This powerful program from Europe falls into what serious photographers might call “Photoshop alternatives.” The app runs on iPads, macOS, and Windows and normally costs USD $49.99. But as of this writing, it’s discounted to just $24.99, with a 90-day free trial. When you open Affinity Photo, you’re presented with a fairly typical layout of tools and options (see Figure 1). But the program’s capabilities are wide-ranging and deep — so extensive that I can provide only a few highlights for this review.
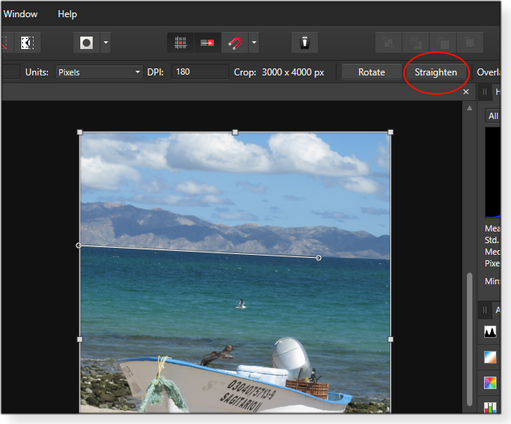
As you work through Affinity Photo, you’ll soon discover that some of the terminology is different from what you might be used to. For example, there are separate workspaces — referred to as “Personas” — labeled Photo, Liquify, Develop, Tone Mapping, and Export. Each Persona has a specific focus. For instance, “Photo” is where you’ll find most of the tools for editing/enhancing images. “Develop” is used to process RAW photos. You can quickly switch between the Personas by clicking their icons at the top left of the main window. Because I’m focusing on image editing, I’ll spend the bulk of this review in Photo. You might think that the best place to start with this application is its Affinity Photo Start guide. In reality, that’s a 23-page overview of the various Affinity components. It does not include any tutorials. A better place to learn about using the app’s many tools is the online Affinity Photo for desktop tutorials webpage. There you’ll find 90 videos covering topics such as masking, working with layers, color correction, sharpening, retouching, typography, layer effects, blending modes, camera RAW, lens correction, straightening, and so forth. Perhaps the most important information in the tutorials addresses the importance of making backups of all image files. Affinity Photo allows non-destructive editing, but it is possible to make permanent changes to the original image. In short: Always have a backup! Keyboard shortcuts are a great way to increase productivity, and the Affinity site offers downloadable PDF cheat sheets for Mac and Windows keyboards. You can also customize the shortcuts to match your workflow. Macros are also important for anyone who edits large numbers of images. For example, let’s say you need to level the horizon on a batch of images. You can create custom macros to automatically apply the “straighten” tool and then fill in the resulting white spaces in the background. Before we jump into creating macros, let’s go through the steps for straightening the horizon on a single photo. First, click File/Open (or enter Ctrl + O) to select and load an image with a crooked horizon. Next, click the Crop tool in the left-hand toolbar and then select Straighten in the context menu (see Figure 2). That brings up a crosshair with a small spirit-level icon. Draw a line from left to right across most of the horizon, then release the mouse button. The image is automatically straightened. To lock in the change, click on the Apply button.
But now there’s a problem: you end up with white areas around the edges (see Figure 3). That’s easily fixed by cropping but might also remove parts of the shot you want to keep.
Instead of cropping, we can have Affinity Photo automatically and intelligently fill in the white areas. Go to Layer/Rasterize & Trim. This discards image information outside of the current crop, and it’s an important first step for “inpainting.” Next, go to Select/Alpha Range/Select Fully Transparent To fill in the white spaces, we need to increase the size of the selected areas so they grow into the colored area of the image and help create a seamless blend. To do so, click Select and then click Grow/Shrink (or Ctrl + B). In the dialog box that opens, set a radius of two pixels and click Apply. This step increases the size of the selection. Now we’re ready to “inpaint” the white areas. Go to Edit/Inpaint — the editor will display a progress bar for a few moments and then fill in the white areas using data from the image. The last step is to click through Select/Deselect to clear the selection delimiters. Figure 4 shows the result: the white areas are nicely blended with the actual image.
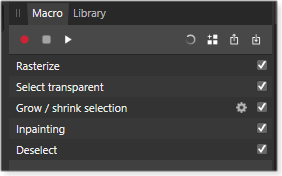
The entire process takes a fair number of steps, but it’s still easier than trying to fill the white spaces by hand. Working faster with macros: Now that we know the steps needed to straighten and fill an image, you can shorten the task by creating one or more macros. It starts with exposing the macro-management panel by clicking View/Studio/Macro. The panel will show up on the left side of the main window as a box with a “Macro” tab at the top (see Figure 5). Simply click the red “Start recording” box at the top of the panel and begin running though the steps you want to automate. When you’re done, click the gray “Stop recording” box. Complicated tasks such as fixing my boat image can be broken down into smaller macros (Figure 6).
RAW power
If you want to exploit the full image-editing power of an app such as Affinity Photo, you need to shoot in the RAW format. When a digital camera takes a JPEG image, there’s a lot of image processing inside the camera. When you open the photo in an editor, your ability to change, say, the exposure is fairly limited. (JPEG photos can also lose some image quality due to compression.) But a RAW image is so called because it contains the “raw” data recorded by the camera. Image processing takes place within your photo editor. That allows for extensive control over the final photo. RAW is effectively the standard format for serious photographers. Note that when you open a RAW file in Affinity Photo, you are automatically switched to the Develop Persona, a dedicated workspace for processing RAW images. Several panels on the far right let you adjust, fix, and enhance images (Figure 7). One small tip: If you double-click on any control point, it will reset to the default position.
One of the advanced features in Affinity Photo is the ability to apply lens correction — but only if your particular lens is listed. Mine wasn’t. I searched online and found a third-party lens list which is supposedly supported by Affinity Photo. But my camera wasn’t on that list, either; I had to resort to manual corrections. I was able to remove the barrel distortion, but I could not add the perspective changes I desired — i.e., making verticals vertical. Unfortunately, the program relies on slider controls and not the more flexible control points found in other apps. As you might expect, Affinity Photo supports a wide range of image formats, including Adobe Illustrator (AI), Adobe Freehand (10 and MX), Adobe Photoshop (PSD), Adobe Photoshop (PSB), DNG, EPS, GIF, HEIF, JPEG, J2K, JP2, JPEG-XR/JXR (WDP/HDP), OpenEXR, PDF, PNG, Radiance HDR, RAW, SVG, TGA, TIFF, and WEBP. Summary
Affinity Photo is a great value, given the depth of tools it offers. Take advantage of the free trial to see whether it fits your workflow nicely. Pros: Clear video tutorials and automatic adjustments that save a lot of time. Cons: No print equivalents of the video tutorials. The RAW processing seems slow, and the controls for perspective distortion are limited: the results were unsatisfactory.
Nathan Segal has been a technical writer for 21 years. His articles have appeared in many popular publications covering technology, photography, and design. His specialties include computer graphics and photography. Publisher: AskWoody LLC (woody@askwoody.com); editor: Tracey Capen (editor@askwoody.com). Trademarks: Microsoft and Windows are registered trademarks of Microsoft Corporation. AskWoody, Windows Secrets Newsletter, WindowsSecrets.com, WinFind, Windows Gizmos, Security Baseline, Perimeter Scan, Wacky Web Week, the Windows Secrets Logo Design (W, S or road, and Star), and the slogan Everything Microsoft Forgot to Mention all are trademarks and service marks of AskWoody LLC. All other marks are the trademarks or service marks of their respective owners. Your email subscription:
Copyright © 2020 AskWoody LLC, All rights reserved. |


 By Paul Tannard
 By Nathan Segal
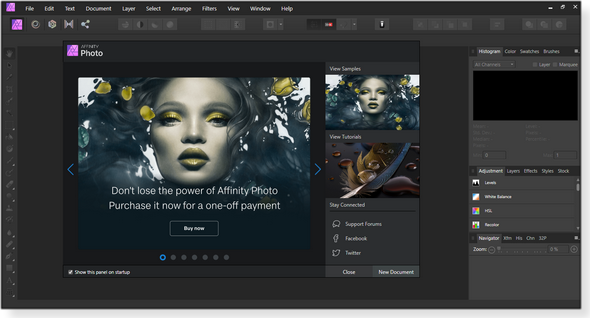


Plus Membership
Donations from Plus members keep this site going. You can identify the people who support AskWoody by the Plus badge on their avatars.
AskWoody Plus members not only get access to all of the contents of this site -- including Susan Bradley's frequently updated Patch Watch listing -- they also receive weekly AskWoody Plus Newsletters (formerly Windows Secrets Newsletter) and AskWoody Plus Alerts, emails when there are important breaking developments.
Get Plus!
Recent Topics
-
Perplexity CEO says its browser will track everything users do online
by 6 hours, 13 minutes ago
-
Login issues with Windows Hello
by 6 hours, 58 minutes ago
-
How to get into a manual setup screen in 2024 Outlook classic?
by 9 hours, 12 minutes ago
-
Linux : ARMO rootkit “Curing”
by 18 hours, 31 minutes ago
-
Employee monitoring app leaks 21 million screenshots in real time
by 18 hours, 37 minutes ago
-
Google AI is now hallucinating idioms
by 19 hours, 8 minutes ago
-
april update
by 15 hours, 7 minutes ago
-
Windows 11 Insider Preview build 27842 released to Canary
by 20 hours, 3 minutes ago
-
Quick Fix for Slowing File Explorer
by 20 hours, 15 minutes ago
-
WuMgr not loading?
by 20 hours, 51 minutes ago
-
Word crashes when accessing Help
by 21 minutes ago
-
New Microsoft Nag — Danger! Danger! sign-in to your Microsoft Account
by 19 hours, 54 minutes ago
-
Blank Inetpub folder
by 17 hours, 18 minutes ago
-
Google : Extended Repair Program for Pixel 7a
by 1 day, 6 hours ago
-
Updates seem to have broken Microsoft Edge
by 16 hours, 51 minutes ago
-
Wait command?
by 23 hours, 42 minutes ago
-
Malwarebytes 5 Free version manual platform updates
by 1 day, 13 hours ago
-
inetpub : Microsoft’s patch for CVE-2025–21204 introduces vulnerability
by 1 day, 19 hours ago
-
Windows 10 finally gets fix
by 2 days, 4 hours ago
-
AMD Ryzen™ Chipset Driver Release Notes 7.04.09.545
by 2 days, 5 hours ago
-
How to use Skype after May?
by 14 hours, 13 minutes ago
-
Win 7 MS Essentials suddenly not showing number of items scanned.
by 2 days ago
-
France : A law requiring messaging apps to implement a backdoor ..
by 2 days, 18 hours ago
-
Dev runs Windows 11 ARM on an iPad Air M2
by 2 days, 19 hours ago
-
MS-DEFCON 3: Cleanup time
by 18 hours, 52 minutes ago
-
KB5056686 (.NET v8.0.15) Delivered Twice in April 2025
by 1 day, 1 hour ago
-
How to enable Extended Security Maintenance on Ubuntu 20.04 LTS before it dies
by 3 days, 7 hours ago
-
Windows 11 Insider Preview build 26200.5562 released to DEV
by 3 days, 10 hours ago
-
Windows 11 Insider Preview build 26120.3872 (24H2) released to BETA
by 3 days, 11 hours ago
-
Unable to eject external hard drives
by 1 day, 21 hours ago
Remembering Woody
