
|
Patch reliability is unclear. Unless you have an immediate, pressing need to install a specific patch, don't do it. |
|
ISSUE 16.39.0 • 2019-10-28
The AskWoody Plus Newsletter
In this issue PRIVACY: How to view and protect the privacy of your MS account BEST OF THE LOUNGE: The Ultimate Utilities List comes to AskWoody LANGALIST: When and how to restore your local driver backups PATCH WATCH: Getting ready for Windows 10 1909 BEST UTILITIES: Freeware Spotlight — SyMenu PRIVACY How to view and protect the privacy of your MS account
Microsoft accounts are used to sign in to Windows, access Office 365 and other services, purchase Microsoft products, and manage devices. But those accounts are also used by Microsoft to keep tabs on us. Through your MS account, the company can track the websites you visit, the activities you perform online, and even the places you go in the real world via your mobile device. You can, however, limit and remove the data Microsoft collects about you — to some extent. Within your online Microsoft Account page, you can view and clear your browsing history, check your privacy settings for specific apps and services, review and control targeted ads directed at you, and even download an archive of your Microsoft-related activities. To start, sign in to your Microsoft Account. At the top of the page, click the Privacy heading, which opens an overview of various privacy categories for your review and management. For example, want to view and clear your MS Edge browsing data? In the Browsing history section, click View and clear browsing history (see Figure 1). Note, however, that Microsoft keeps viewable browsing data only if the “Browsing history” option was enabled in Windows’ Settings/Cortana/Manage the information Cortana can access ….
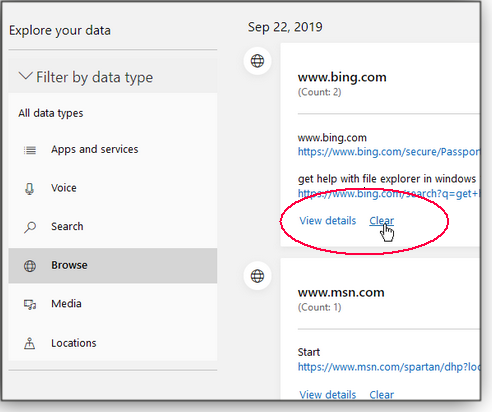
On the Explore your data page, you can see a list of all the sites you’ve visited through Microsoft Edge and your Microsoft account. Click the View details link to see more information on a specific entry, such as why Microsoft collected that bit of data. Click the Clear link to remove that information from Microsoft’s database (see Figure 2).
Return to the Overview page and scroll down to see other privacy information you can manage. For example, click View and clear search history to see Web searches you’ve run through the Bing search engine (not just the MS Edge browser). Again, click the View details link on a specific entry to learn more about the collected data, and click the Clear link to remove it. Back on the Overview page, click View and clear location activity to see whether Microsoft has tracked your whereabouts via your mobile device. Note: Clicking the View details link for any entry will give you instructions for disabling location tracking on Windows, iPhones and iPads, and Android devices. To remove a specific entry from the list, click Clear. Return to the Overview page again and click View and clear voice activity. This page shows you any voice commands you issued to Cortana or to any other Microsoft app that supports voice dictation. As with the other privacy options, you can view the details for a specific entry and clear it (see Figure 3).
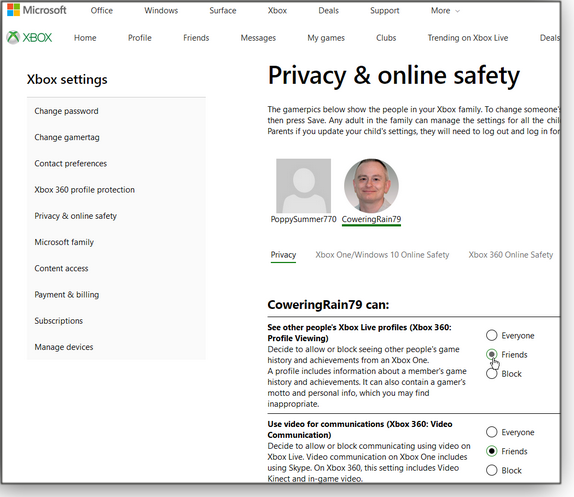
Next up on the Overview page is View and clear media activity, which reveals any data Microsoft collected about the TV shows and movies you’ve watched using a Microsoft app. The View and clear apps and services activity page is where you’ll find collected data on apps and services you’ve used through Windows or your Microsoft account. Non-Microsoft apps might show up here, too. Note that most of the “details” links apparently pop up a stock explanation titled “Why does Microsoft collect this data?” In other words, you’ll probably not find any useful “details” here. Product and service performance data is information on the health and reliability of certain Microsoft products and services. Your only option here is to clear the data. But I would leave this alone, as Microsoft uses the data to help improve its products. If you use Microsoft’s personal assistant, you’ll want to review the Edit Cortana data section. The information on this page points to the Cortana Notebook, where you may have set up or granted access to specific data such as your calendar, messages, or apps. Review each section and clear any information you don’t want Microsoft to retain. Keep in mind, though, that removing data such as your calendar or home location could hamper Cortana’s ability to help you. The next Overview section is View LinkedIn connection settings — it applies only if you connected your LinkedIn and Microsoft accounts. Warning: If you don’t have any LinkedIn connections, pressing the button could open a dialog box to create one. You can ignore the Manage your HealthVault account section because Microsoft is retiring that service. But below that, near the bottom of the Overview page, is the Other privacy settings section. It includes additional privacy controls for specific applications and services including Windows, Xbox, Skype, and Office. Click on the link to view and modify the settings for any of the listed products you use (see Figure 4).
Targeted ads can be one of the more annoying — and creepy — privacy issues. By default, Microsoft serves targeted ads based on what it learns about your interests and activities. To check and/or change your current settings, click Ad settings under “Advertisement preferences.” There are only two options: See ads that interest you (see Figure 5) and See personalized ads in your browser. It’s not clear whether turning off these two settings will reduce the amount of data Microsoft collects and shares about you — the page just states that ads will possibly be less relevant.
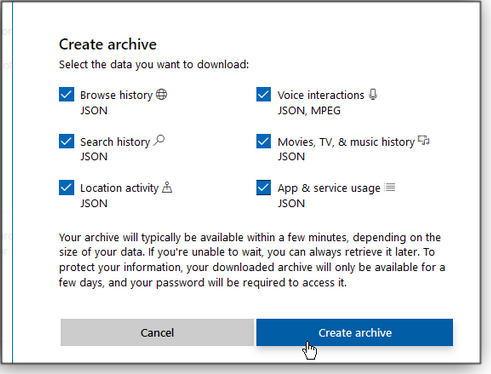
Back on the main Privacy page, click the Download your data heading. Here, you can request and view an archive of data that Microsoft has collected about your activities. Note that the contents can be difficult to read; it’s unformatted plain text, and the information is exceptionally cryptic. It would also be a vast overstatement to say that the archive is a record of all collected data. Still, you might find some value in perusing the archives. To start, click the Create new archive button, select the categories of data you want to see, and click Create archive (see Figure 6).
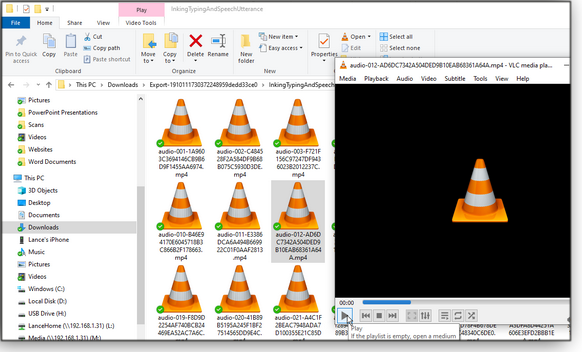
It’ll usually take a few minutes for Microsoft to generate the archive, as indicated by the Pending message. When the archive is ready, click the Download link, save the .zip file, and then uncompress it. You’ll find one or more files with a JSON extension. Right-click a file and open it with Notepad or another text viewer. Here’s something unexpected: If the ZIP file contains a folder called InkingTypingAndSpeechUtterance, you can view and play MP4 recordings of your Cortana voice commands (see Figure 7).
Overall, the Microsoft account Privacy page is probably far less impressive and comprehensive than we might like. But it’s good policy to run through the various options from time to time — especially if you regularly use Bing, Edge, Cortana, and the many other Microsoft services. (On the other hand, a lack of data might indicate that you’ve locked down your privacy settings, giving Microsoft minimal information on your PC activities.) And while you’re at it, check out your local Windows privacy settings (Settings/Privacy).
Lance Whitney is a freelance technology reporter and former IT professional. He’s written for CNET, TechRepublic, PC Magazine, and other publications. He’s authored a book on Windows and another about LinkedIn. Best of the Lounge The Ultimate Utilities List comes to AskWoody
Returning to its rightful place among us is this carefully honed list of useful utilities, many recommended by AskWoody Plus Newsletter contributors. MVP and AskWoody newsletter editor in chief Tracey Capen resumes his Windows Secrets tradition of listing task-orientated, time-saving, and just plain helpful apps that lighten our computing tasks. Join the discussion and tell fellow Loungers about your must-have utilities that make Windows a better OS. After all, without your tips and recommendations, we can’t call it the “ultimate.” Productivity software At some point, you just have to let old software go. Plus member cellsee6 is looking for recommendations on a good accounting package. Members offer suggestions and comments on their choices. What program do you use? Browsers Not all browsers render webpages the same — or equally safe. MVP Nathan Parker is considering using Waterfox (more info), even though his course-ware provider recommends Firefox. Privacy and accuracy are both important points when choosing a browser, but often the best solution is matching the browser to the task. Share your thoughts on browsers and their privacy bona fides. Windows 10 Plus member VaUnicorn revives the often-contentious topic of stopping or blocking Windows from automatically updating. Readers respond with suggestions on what has worked for them, including third-party programs that will do it for you. Windows 7 Plus member Nibbled To Death By Ducks wants to reduce the file size of Event Viewer logs that Windows stores. There’s an option for clearing the log files, but Nibbled wants to remove just the old logs. And with help from fellow Loungers, Nibbled has a solution! Windows 10 Have you had any peripheral-hardware problems after a Windows 10 update? Plus member Michael Austin has — all of his Logitech mice suffer from an annoying lag after updating, and it’s slowing down his productivity. Could it be a driver issue? Windows 10 Lounger dgreen doesn’t want to lose the Win7 UI experience when that OS reaches its end of life. Will Classic Shell or Open-Shell work on Windows 10? Members provide helpful suggestions. If you’re not already a Lounge member, use the quick registration form to sign up for free. LANGALIST When and how to restore your local driver backups
By Fred Langa In a recent column, I showed how to make local backup copies of all your system’s installed drivers. That article prompted a number of readers to ask for the reciprocal story: how to reinstall those previously saved drivers. So, here’s when and how — and how not — to put those backup copies to good use! Why restoring driver backups isn’t simple
The article “Easily back up all your PC’s current drivers” (AskWoody Plus, 2019-10-14) showed you how to use several free tools, including Win10’s built-in export-driver command, to make complete and local backup copies of your PC’s currently installed drivers. Here are two examples of emails from readers requesting help with reinstalling their previously saved drivers.
When and how are indeed the two key questions, mostly because driver restoration is not designed to be a human-managed process! Driver installation and updating are normally handled automatically by operating systems or installation software. Either will identify your PC’s devices from machine-friendly data — in the devices’ firmware, in existing driver software, in the registry, etc. — and then select and install the best-fit drivers. It’s harder to do this accurately by hand, because this data simply isn’t designed to be easily understood or used by humans. For example, my PC’s 106 exported drivers include folders with obtuse names such as cui_dch_comp.inf_amd64_4938423c9b9639d7 and cui_dch_comp.inf_amd64_c8e108d4a62c59d5. There’s no obvious way to know what’s in those packages. Sometimes, well-written driver packages include a clear abstract or descriptive text within the INF file data that explains exactly what a given driver package does. (You can read INF file contents with Notepad.) But far too often, the INF file contains only machine-friendly data that’s not intended for human eyes. So while Windows and installation software can easily decipher a driver package, we humans typically have to resort to some guesswork and manual trial and error to learn exactly what a set of drivers does. That’s far from ideal, and it’s why I use my local DISM-generated driver backups as an emergency driver resource — to be used only if none of the available software-managed methods succeeds. Six ways to restore drivers
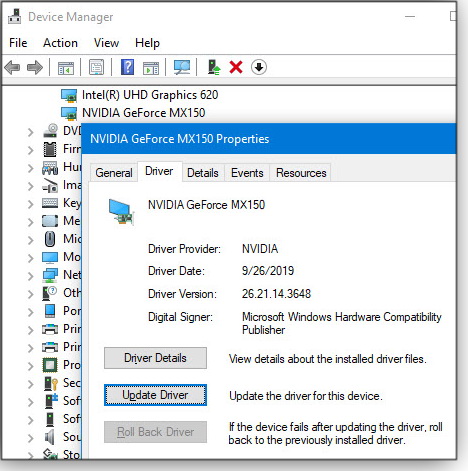
The rest of this article covers the best ways to restore drivers in general (and not necessarily from your backups). I’ll start with easy-to-use, highly automated methods that I recommend — and that I use myself. I’ll then work up to the less certain and more difficult manual methods. However, before we dive in, here are a couple of quick notes. First, as is always the case, before attempting any serious system-level work, make a full and complete system image or backup — just in case things go awry. Second, except where noted otherwise, I’ll use Windows 10 1903 in the following examples. The driver-restoration concepts are very similar across different Windows versions and editions, but Microsoft changed the verbiage in the dialog boxes from Win7 to Win8.1 and in the various versions of Win10. If your setup uses different wording than that shown below, use the closest match your system offers. Again, the underlying concepts are essentially unchanged. 1) If you used a third-party tool to export copies of your drivers: Start with that tool’s restore function to put them back. If the non-Microsoft app saved your drivers in a standard format, you can also use the more general methods discussed below. Usually, however, there’s no easy way to know exactly what technique the third-party driver tool used. So again, try the app’s own built-in restoration method first. 2) Start with Windows’ default drivers. After a system reset, rebuild, or fresh install of Windows, let the OS set itself up as best it can with its built-in drivers. Major hardware makers usually work closely with Microsoft. So Windows’ default drivers are often pretty good — especially with current, still-supported hardware. The built-in drivers might be all you need. To find out whether the initial set of drivers is sufficient, fully exercise all your PC’s functions after it has finished its setup. Check that none of its functions or features is absent or malfunctioning — play some music, start a video, print something out, use the network connections, try the camera, and so forth. If your system works fine with the built-in drivers, I recommend you leave it well enough alone. There’s no need to reinstall or change drivers if everything’s already working! On the other hand, if some important features and functions are missing or broken, you’ll need drivers specifically written for the device in question. 3) Look for drivers on the vendor’s support site. If Windows’ built-in drivers prove insufficient, your next stop should be the vendor or manufacturer who sold the device. Most major vendors’ websites offer automated and manual methods to find the correct, best-fit drivers for their own brands, models, and versions. Use whatever tools the vendor offers to see what your system requires, install any drivers the tools or site recommends, and then re-test your system to see whether any functions or features are absent or malfunctioning. If your system works fine with the new drivers — again, leave well enough alone! There’s no need to reinstall your old drivers if new, fully current ones are working properly! When no new drivers are available: Sometimes, especially with older hardware that manufacturers no longer actively support, new drivers may not be available from any source. If you made local backups of your working drivers using one of the methods described in “Easily back up all your PC’s current drivers,” you can then reinstall those backed-up drivers from your local copies. 4) Restore drivers via Device Manager: This is the simplest semi-manual driver-restoration method. Open Windows’ Device Manager and expand each category until you see the device whose driver you wish to restore. Right-click on the device in question and select Update Driver. (See Figure 1.)
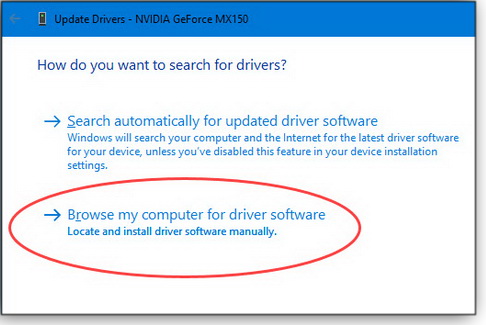
A new window will open with two driver-search options: automatic and manual. Select the manual method, Browse my computer for driver software (Figure 2).
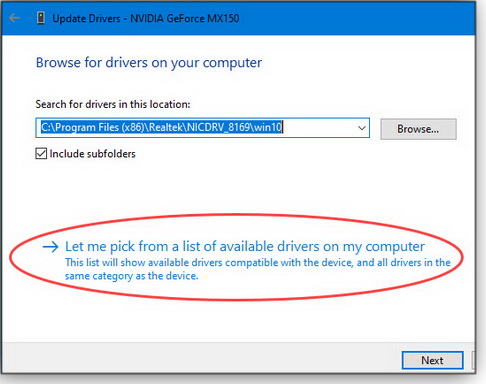
The next window lets you select how you want to browse for drivers on your PC. For our purposes here, ignore the top half of the dialog box and simply click Let me pick from a list of available drivers on my computer (circled in Figure 3).
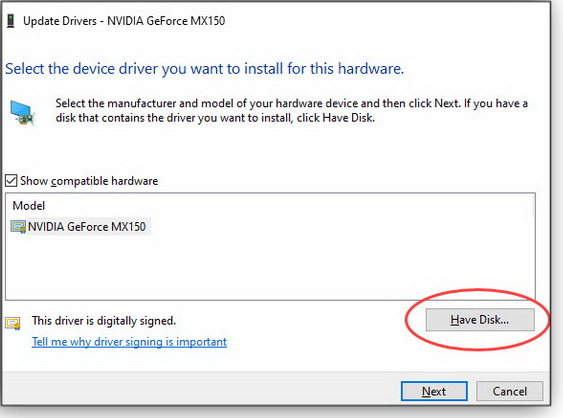
In the next window (“Select the device driver you want to install for this hardware”), you’ll see the currently installed driver — if any. Direct Device Manager to the location of your driver stash by clicking the Have Disk button (Figure 4).
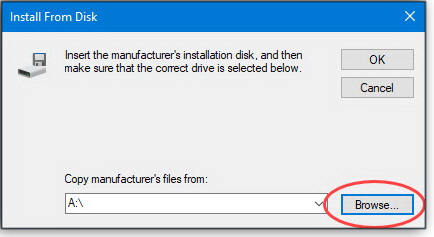
An Install From Disk dialog box will open; click Browse (Figure 5) and then navigate to and open the folder where you stored your driver backups.
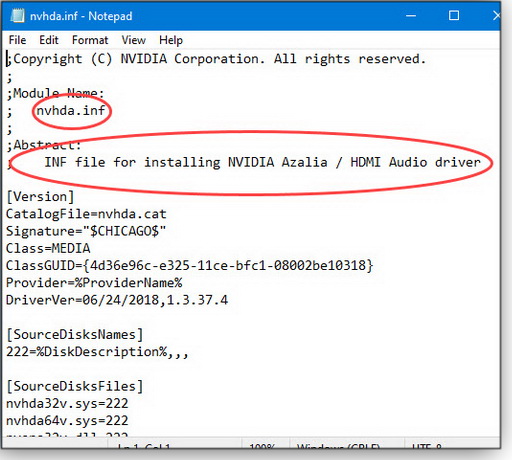
Select and open the subfolder containing the driver files for the device in question. Next, select the device’s INF file and click the Open button. Device Manager should then read the INF file and install the driver. How do you know which INF file to use? As mentioned previously, you can open INF files in Notepad and look for some sort of description. Again, the better driver packages will include an abstract or other verbiage that can help you identify what each INF file (and its associated driver package) is for. Figure 6 shows the abstract for an NVIDIA driver.
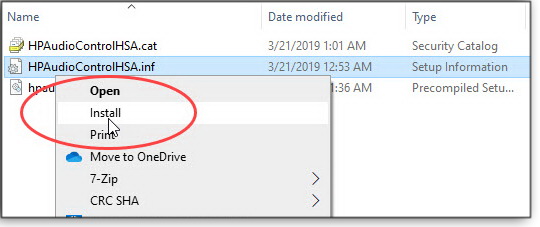
Absent clear identifiers, you may have to resort to guesswork and trial-and-error installs to learn which drivers do what. There may be hints — for example, a driver package with gfx in its name or INF is likely to be graphics-related, a driver package with stor in its name or INF is likely to be storage-related (e.g., disk drives), aud is likely to be audio, and so forth. Guesswork is far from ideal, which is why I always prefer to start with the automated methods. But Device Manager does offer this safety net for driver installs: if you guess wrong and try an incorrect driver for a given device, you’ll usually get an error message and the installation will stop and not install anything. In that case, try the next-most-likely driver until you find the correct one. 5) Installing drivers via direct INF file triggering: You can bypass Device Manager and try a direct driver installation. It’s easy — when it works: navigate to, and right-click, the target INF file and then select Install from the context menu (see Figure 7).
With luck, Windows will parse the INF file and install the driver — as simple as that! But if your PC doesn’t offer that option, you’ll need to do some registry spelunking, as described in the Microsoft Community item “Install Option Missing From the Context Menu of .Inf Files.” And even if the “Install” option is available, it may not be allowed for the specific device you’re working on. You may get an error message similar to that shown in Figure 8 (from a Windows 7 PC).
6) Command-line install: If none of the above driver-reinstall methods works, you’re pretty much down to this last-ditch option. Open an administrator-level command window (e.g., type cmd in the search box, right-click on Command Prompt when it’s offered, and then select Run as administrator). Enter the following command, replacing filename.inf with the path and name of the specific INF file you’re targeting (keeping the path and name in quotes). rundll32.exe setupapi.dll,InstallHinfSection DefaultInstall 132 “filename.inf” Additional details on this command can be found on a Windows Dev Center page. Multiple paths to driver-reinstall success
As should now be clear, you’ll do yourself a favor by trying the two automated methods first (Windows native and vendor support-site drivers). And if you used a third-party backup utility, try its restore function. But if they don’t work, one of the manual methods — installing via Device Manager or direct INF triggering/command-line installation — should let you restore drivers from your local stash and get your PC working again!
Fred Langa has been writing about tech — and, specifically, about personal computing — for as long as there have been PCs. And he is one of the founding members of the original Windows Secrets newsletter. Check out Langa.com for all Fred’s current projects. PATCH WATCH Getting ready for Windows 10 1909
Many of us are still pondering Win10 1903 — and now Version 1909 is almost upon us. Here’s how not to be the next release’s beta tester. If the rumors are true, the next feature release for Windows 10 will begin trickling out on November 12. It looks like Version 1909 won’t be the big deal we thought it might be, which is all the more reason to not be one of the early adopters — unless you really like testing “beta” operating systems. As a rule, Microsoft doesn’t make it easy to put off new releases. But we do have options in this regard. First and foremost, Win10 Home users should pay the Windows 10 tax and upgrade their license to the Pro edition. That’ll give you more control over the updating process. But as Woody describes in a Computerworld article, there’s some confusing update terminology related to the patching process. I suggest you read his column for a bit of clarity. As of now, the best solution is to configure Windows’ Group Policy so we’re no longer relying on the evolving Windows Update settings. Using gpedit — the short version
Here’s the quick tutorial on how to use Group Policy to block feature updates such as Win10 Version 1909. Start by entering “gpedit” into the Windows search box. When the “Local Group Policy Editor” window opens, click through Computer configuration and Administrative templates. Next, open the folders Windows components/Windows Update/Windows Update for Business. Double-click Select when Preview Builds and Feature Updates are received to open its settings dialog box. Click the Enabled radio button to make this option active, and then look for the box labeled “After a Preview Build or Feature Update is released, defer receiving it for this many days.” I typically enter 360 days to ensure I’ve pushed it off well past the “beta” phase. Click Okay and close the Group Policy Editor. I’ll almost always install the deferred release sooner, but this way I know it won’t install until I’m ready for it (and certainly not within the first few weeks of its initial release). Here’s a gentle reminder about Windows Update: With Win10, you should never click the Check for updates option in Settings/Update & Security/Windows Update. Windows 7 lets you click that option, review available updates, and then decide what to do with them. Annoyingly, clicking “Check for updates” in Windows 10 almost always downloads and installs offered patches. If you want to just preview updates that might be in the pipe, I suggest downloading and installing the third-party “Windows Update MiniTool for Windows 10” utility (more info; download site). The app can also be used to defer and install updates, but I’d just use it as a previewer. (You can also use Windows’ built-in PowerShell app to control updates — more on that in a future article.) If you recently clicked “Check for updates,” you might have received what we refer to as the Windows Autopilot “oopsie” patch, better known as KB 4523786. I suggest you uninstall it by opening Windows Update in Settings and then clicking the View update history link. Next, click Uninstall updates, select and remove KB 4523786, reboot your system … and then remind yourself that you shouldn’t “check for updates”! Ever! October patching summary
We’re nearly three weeks out from October’s Patch Tuesday, and the regular release of patches seems relatively well behaved — certainly more so than the Internet Explorer out-of-band update we received early in the month. (The printing issues are apparently fixed.) There are still some glitches that might affect a small number of businesses, but they’re manageable. I now feel comfortable recommending that businesses test and install the standard updates released on October 8, along with the Office updates released October 1 and October 8. As usual, pass on the “preview” Windows patches sent out October 15. (Again, try the aforementioned Windows Update MiniTool for Windows 10 to see what updates might show up only if you click “Check for updates.” The app will give you a Win7-like updating experience.) Windows 10 updates
A final, final reminder: If you’re still on Win10 Version 1803 Home or Pro, November will be the last month you receive non-security and security updates. Move up to Windows 1809 or 1903 soon! As Woody points out, you have options. Using an unsecure operating system should not be one of them. Cumulative Windows updates
Servicing-stack updates
.NET Framework updates As I noted in the previous Patch Watch column, October’s .NET patches for Win10 are confusing. Primarily .NET 4.8 updates, they do not include new security updates — but you’ll see them installed on your systems. If you have an application that won’t work with .NET 4.8, you will need to make a registry change to block the updates (more info).
Windows 8.1/Server 2012 R2
The only listed “known issue” continues to be the ongoing problem with renaming on a Cluster Shared Volume setup. Windows 7/Server 2008 R2 SP1
There are no listed known issues. Server 2012
The only listed flaw is the Cluster Shared Volume issue. Windows Server 2008 SP2
Office security and non-security updates
October’s Office security updates fix the remote code-execution vulnerability CVE-2019-1331. Office 2016 Office 2013 SP1 Office 2010 SP2 The following Office non-security enhancements and fixes were released October 1. Office 2016
Office 2013
Office 2010
Refresher: Patch Watch rules for updating
It’s a new month of patching. Once again, here are our current recommendations for patching Windows and Office. They may change as Microsoft’s updating process evolves.
Stay safe out there.
In real life, Susan Bradley is a Microsoft Security MVP and IT wrangler at a California accounting firm, where she manages a fleet of servers, virtual machines, workstations, iPhones, and other digital devices. She also does forensic investigations of computer systems for the firm. Best Utilities Freeware Spotlight — SyMenu
I’ve been in the computer-repair business for 20 years. I used to carry around a folder of floppy disks containing all my diagnostics and repair utilities — then it became a collection of CDs and later DVDs. Now I carry everything I need on a few flash drives hanging on lanyards. Those utilities are invaluable, but they also have an annoying side: keeping them all up to date and quickly finding the particular app I need on one of the drives. Fortunately, I recently found an awesome solution: a freeware program called SyMenu, created by Italian developer Gianluca Negrelli. SyMenu not only lets you create a custom menu of utilities — you can peruse its list of over 1,376 freeware apps (more are added all the time) derived from SyMenu, NirSoft, and Microsoft Sysinternals suites. You can then select and download your favorites — and quickly find them in your SyMenu menus. As you’d expect, SyMenu is a portable app that runs from a flash drive. That means you can move it easily from machine to machine. It’s a fabulous tool — so let’s just dive right in. Start by downloading SyMenu from our OlderGeeks site. Next, plug in an empty flash drive — one with plenty of storage. Your custom suite of utilities could grow quite large! Using a small flash drive would be like grabbing a grocery-store basket for just milk and eggs and then trying to walk out with 30 pounds of groceries. Unzip the downloaded file to the root of your flash drive, as shown in Figure 1.
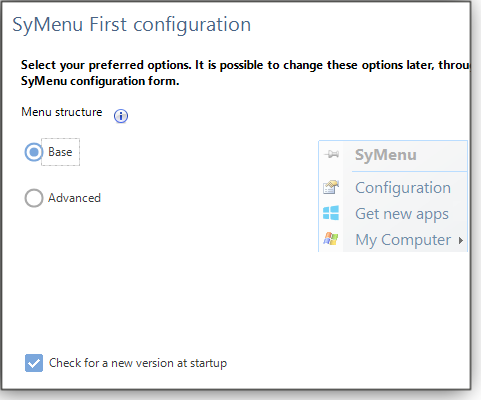
Launch SyMenu.exe and run through the setup screens: language, ULA, and so forth. The next screen gives you two choices: Base (the default; see Figure 2) and Advanced. As an AskWoody Plus reader, I assume you’re no beginner — choose Advanced.
With setup complete, SyMenu displays two icons on your desktop, one in the middle of your screen (left side of Figure 3) and the other down in the notifications area (right side of Figure 3; you might have to click the Show hidden icons up arrow). These icons will appear any time you plug in the flash drive and run SyMenu.exe. It will not make any permanent changes to your Windows setup. The on-desktop icon should float over other apps for easy access, but you can opt to drag/drop it to an out-of-the-way location.
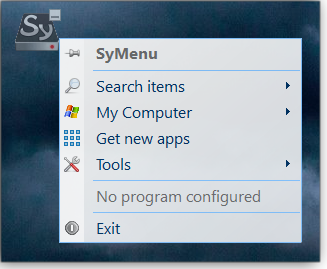
To start building your list of downloaded utilities, click either icon to pop up the app’s base menu and then select “Get new apps” (Figure 4). This is how we go “shopping” for free stuff!
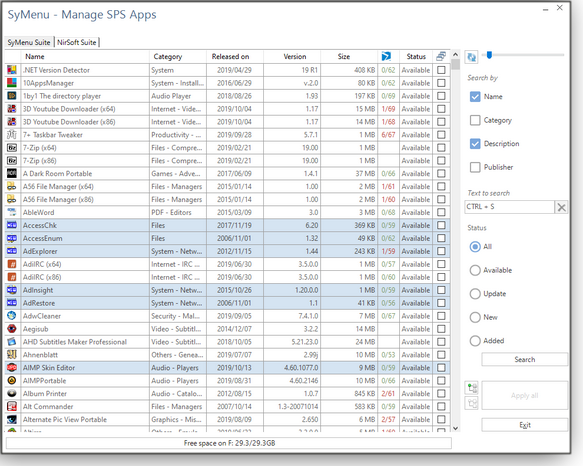
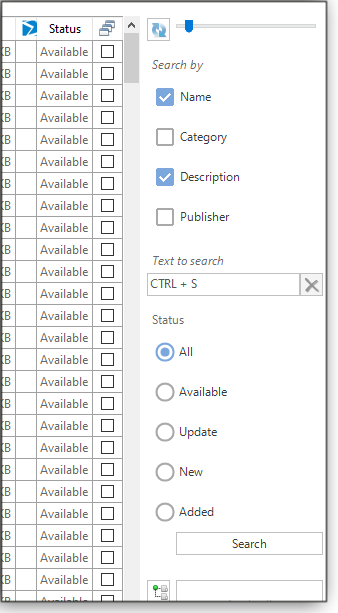
The Manage SPS Apps screen (Figure 5) is where you’ll find the complete list of offered utilities, organized under two tabs: SyMenu Suite and NirSoft Suite. The former includes Microsoft Sysinternals tools (more info). On the top-right side of the screen, you’ll see a slider (Figure 6) that lets you set how often SyMenu should check for updates to the available apps. Below the slider, you can also search for programs by name, category, description, and/or publisher. In the “Status” area you can filter your choices by All, Available, Update, New, or Added.
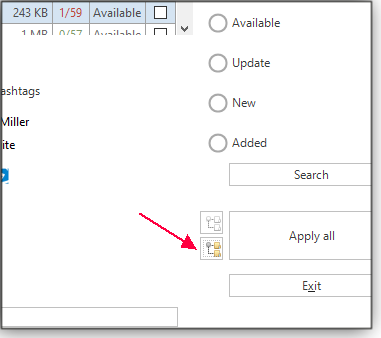
To start “shopping,” just click the checkbox on the far-right end of each app’s description. As you select a utility, you’ll see a more detailed description pop up. If you want your apps organized into categories, be sure to click the small icon highlighted in Figure 7 — otherwise, every program will be installed to the root of the menu by default. We don’t want that!
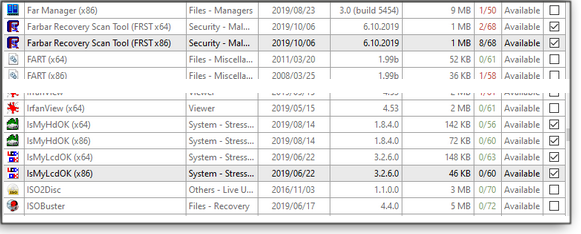
The nicely organized Manage SPS Apps screen gives a quick summary of a utility’s stats, such as its release date, version, size, VirusTotal score, and whether the program is currently available. (See Figure 8.) Oddly, the VirusTotal scores for the NirSoft utilities are not given — and I have no idea why. What are you waiting for? Start shopping! Just be aware of one glitch: I had to select and install items under the SyMenu tab before moving on to the NirSoft offerings.
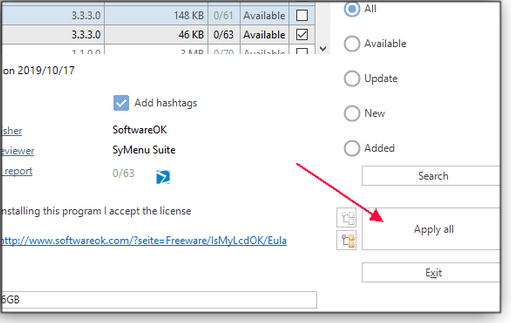
I ran into another oddity: Malwarebytes blocked SyMenu from downloading AdwCleaner. Guess who makes AdwCleaner? Yep, Malwarebytes. (I disabled Malwarebytes to finish … while shaking my head.) Once you’ve made your selections, click the Apply all button (see Figure 9).
Figure 10 shows my initial selections. I had time to get some coffee while they were being installed on my flash drive.
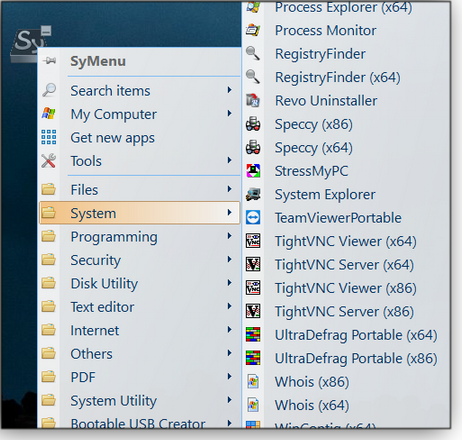
Here’s another potential hitch: If you’re downloading or running some of the NirSoft password-cracking tools, the anti-malware app on your PC will probably flag them as malware — and possibly block them. (No, they are not malware.) Once all of your programs are installed, click Exit. (You can always add and remove other apps later.) Next, click one of the SyMenu icons to see your new menu of apps. Figure 11 shows mine.
Here’s a handy trick: Click the menu’s little pushpin to keep it open (see Figure 12).
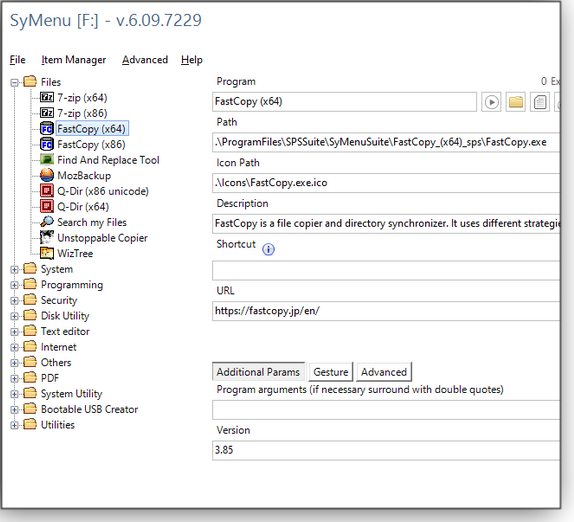
Want to add an already installed application to the menu, one that doesn’t come from the SyMenu list? You can do so with the main menu’s Configuration option. Just click Item Manager/Add Program and then enter the name, path to its executable, and any other information that might be needed. The Configuration option also gives you complete control over the arrangement of your menus. You can edit each menu item (see Figure 13), and you can drag/drop items into other folders. Right-clicking any item on the list will open a context menu with other options — for example, add folders, URL shortcuts, custom-made batch files, and programs. You can even elevate the privileges of individual apps.
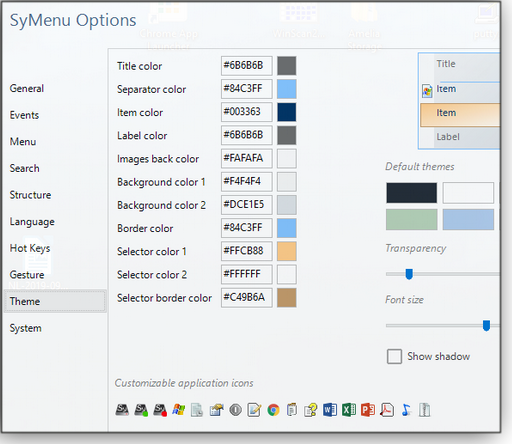
Clicking Advanced/Options provides numerous other settings for your SyMenu setup. You can edit events such as the splash screen, add tooltips, edit “most executed,” set icon sizes and search options, change the menu structure by adding separators, change language, set up hot keys and gestures, and more. You can even make your menus more colorful by changing the theme (see Figure 14).
Holy smokes! It’s amazing this application is free! I hope you get a lot of use out of SyMenu. I know I will! Happy computing!
Deanna and Randy McElveen are celebrating 20 years in the computer business, seven years running OlderGeeks.com, and 26 years of putting up with each other. Their computer store is in a small town in the Missouri Ozarks. Believing that happy customers are always the best advertisement, they hope to do it for another 20 years. Publisher: AskWoody LLC (woody@askwoody.com); editor: Tracey Capen (editor@askwoody.com). Trademarks: Microsoft and Windows are registered trademarks of Microsoft Corporation. AskWoody, Windows Secrets Newsletter, WindowsSecrets.com, WinFind, Windows Gizmos, Security Baseline, Perimeter Scan, Wacky Web Week, the Windows Secrets Logo Design (W, S or road, and Star), and the slogan Everything Microsoft Forgot to Mention all are trademarks and service marks of AskWoody LLC. All other marks are the trademarks or service marks of their respective owners. Your email subscription:
Copyright © 2019 AskWoody LLC, All rights reserved. |

 By Lance Whitney
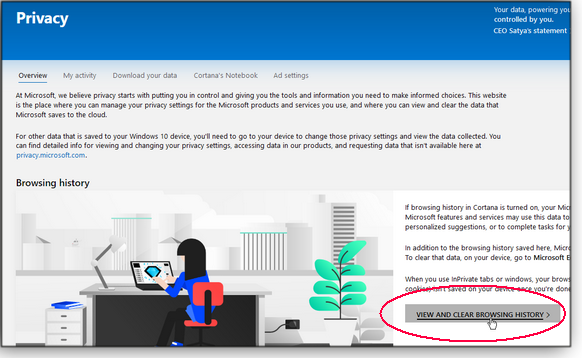


 By Susan Bradley
 By Deanna McElveen
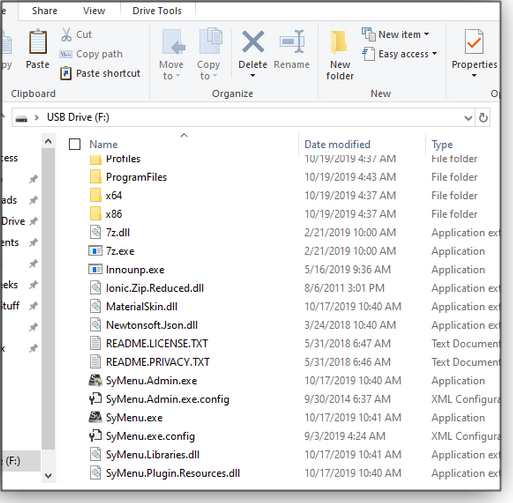


Plus Membership
Donations from Plus members keep this site going. You can identify the people who support AskWoody by the Plus badge on their avatars.
AskWoody Plus members not only get access to all of the contents of this site -- including Susan Bradley's frequently updated Patch Watch listing -- they also receive weekly AskWoody Plus Newsletters (formerly Windows Secrets Newsletter) and AskWoody Plus Alerts, emails when there are important breaking developments.
Get Plus!
Recent Topics
-
Linux Mint Debian Edition 7 gets OEM support, death of Ubuntu-based Mint ?
by 17 minutes ago
-
Windows Update “Areca Technology Corporation – System – 6.20.0.41”
by 1 hour, 27 minutes ago
-
Google One Storage Questions
by 2 hours, 37 minutes ago
-
Button Missing for Automatic Apps Updates
by 9 minutes ago
-
Ancient SSD thinks it’s new
by 6 hours, 36 minutes ago
-
Washington State lab testing provider exposed health data of 1.6 million people
by 10 hours, 36 minutes ago
-
WinRE KB5057589 fake out
by 3 hours, 56 minutes ago
-
The April 2025 Windows RE update might show as unsuccessful in Windows Update
by 16 hours, 48 minutes ago
-
Firefox 137
by 1 hour, 24 minutes ago
-
Whisky, a popular Wine frontend for Mac gamers, is no more
by 22 hours, 59 minutes ago
-
Windows 11 Insider Preview build 26120.3863 (24H2) released to BETA
by 23 hours, 12 minutes ago
-
Windows 11 Insider Preview build 26200.5551 released to DEV
by 23 hours, 14 minutes ago
-
New Windows 11 PC setup — can I start over in the middle to set up a local id?
by 16 hours, 19 minutes ago
-
Windows 11 Insider Preview Build 26100.3902 (24H2) released to Release Preview
by 1 day, 2 hours ago
-
Oracle kinda-sorta tells customers it was pwned
by 1 day, 8 hours ago
-
Global data centers (AI) are driving a big increase in electricity demand
by 1 day, 19 hours ago
-
Office apps read-only for family members
by 1 day, 21 hours ago
-
Defunct domain for Microsoft account
by 1 day, 18 hours ago
-
24H2??
by 1 hour, 8 minutes ago
-
W11 23H2 April Updates threw ‘class not registered’
by 1 day, 3 hours ago
-
Master patch listing for April 8th, 2025
by 7 hours, 28 minutes ago
-
TotalAV safety warning popup
by 18 hours, 2 minutes ago
-
two pages side by side land scape
by 3 days, 19 hours ago
-
Deleting obsolete OneNote notebooks
by 3 days, 21 hours ago
-
Word/Outlook 2024 vs Dragon Professional 16
by 3 days ago
-
Security Essentials or Defender?
by 3 days, 3 hours ago
-
April 2025 updates out
by 42 minutes ago
-
Framework to stop selling some PCs in the US due to new tariffs
by 2 days, 20 hours ago
-
WARNING about Nvidia driver version 572.83 and 4000/5000 series cards
by 2 days, 10 hours ago
-
Creating an Index in Word 365
by 3 days, 13 hours ago
Remembering Woody
