|
ISSUE 17.2.0 • 2020-01-13
The AskWoody PLUS Newsletter
In this issue NETWORKING: How to manage your router – Part II BEST OF THE LOUNGE: Linux Mint and Windows 1909 test drives LANGALIST: Let your PC start the new year right! CLOUD SERVICES: Before moving to the cloud, check the foundation BEST UTILITIES: Make your favorite utility the default app in Win10 NETWORKING How to manage your router – Part II
Your router holds the keys to your local network. Here’s how to use some of its advanced settings. In Part I of this two-part series, I covered the basics of router management: changing router and Wi-Fi credentials, guest networks, parental controls, and blocking devices. If you missed it, head over to the 2020-01-06 AskWoody Plus issue. The basic settings add some security and protection, but if you want to kick that up to a higher gear, you’ll need to dive into the more advanced options. In Part II, we’ll cover topics such as changing DNS servers, running a speed test, blocking specific sites, setting up MAC-address control, viewing logs, and updating your firmware. As I noted in Part I, there are many brands of routers, each using its own settings nomenclature. I’m using a NETGEAR Orbi mesh router, but you’ll likely have some other brand and model. So you might have to do some hunting around and interpretation for a particular setting. As always, your best bet is to consult any help documentation for your specific device. Let’s get started. Reassigning the router’s DNS servers
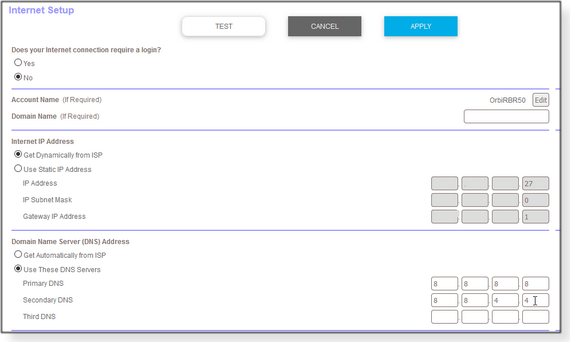
The Domain Name System (DNS) is the translator between human-friendly domain names (e.g., askwoody.com) and the number-based IP addresses that actually define devices on the Net. By default, the DNS settings in your router probably point to your ISP. But you can switch to various third-party DNS services, which might offer faster performance, better security, and other benefits. You can change the DNS settings on each computer and device you own, but changing them in your router is quicker and easier; the change will automatically apply to all devices on your network. (You can learn more about changing Windows’ DNS settings in my 2019-03-25 AskWoody Plus article “How to find and change DNS Settings.”) To change DNS settings in the router, sign in with your administrator credentials and then look for a menu section labeled something akin to “Internet Setup” or “WAN settings” (often in an advanced-settings section). Next, look for a feature called “DNS address” or “DNS type” or something similar. If the address for the DNS server is tied to your ISP or is set to “Dynamic,” enter the address for the DNS service of your choice. Popular vendors include Google Public DNS, OpenDNS, Cloudflare DNS, and Comodo SecureDNS. My aforementioned AskWoody article lists the addresses used by popular third-party DNS providers. When you have the correct addresses — typically, a primary and a secondary — apply them to the appropriate DNS-address fields (see Figure 1). Note: the better DNS services might have specific setup instructions for your particular router. Run a Google search using the service name and router model.
Run a speed test
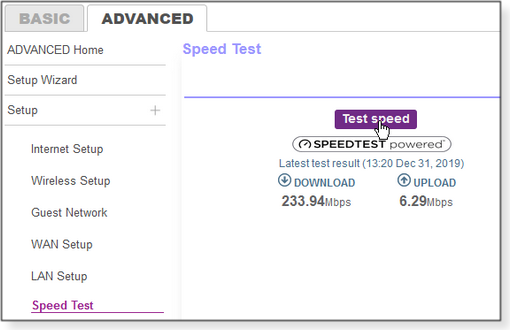
Your ISP likely pledges (but does not guarantee) a certain upload and download speed, based on your Internet connection type and service plan. But how do you know if you’re actually getting that bandwidth? If your router offers a built-in speed test, try it. (It might be listed under “Utilities” or some similar section.) On my router, it’s called, logically, Speed Test and is under the “Advanced” tab (see Figure 2). The test will include upload and download rates in megabits per second (as opposed to megabytes per second). I recommend running the speed-text option at different times of the day to get more-accurate results. If you can’t find a speed test option in your router, a good alternative is the site speedtest.net Keep in mind that all these speed numbers are somewhat artificial — your real-world performance could vary widely, depending on the time of day, type of downloaded content, and other factors.
Block specific sites
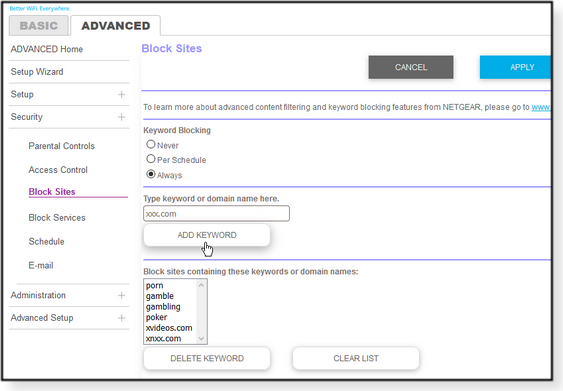
As I mentioned in Part I, you can configure your router to prevent children from accessing inappropriate websites. One simple way to do so is to add the sites to a “blocked” list. Look for an option called “Block Sites” or “Website Blocking.” You can typically enter either the domain name or a keyword (e.g., “porn,” “gambling,” etc.; see Figure 3). My router lets me add multiple sites and choose when they should be blocked. A router might also allow you to configure blocked terms and sites for specific devices, by name (e.g., “Kids’ PC”) or IP address.
Filter devices by MAC address
To enhance your network security, you can specify which devices may access the network, based on their media access control (MAC) address. Every device that can connect to a network is assigned a permanent MAC address — unlike an IP address, which can change over time (typically they’re dynamically assigned). You apply MAC “filtering” by finding and listing the address for every computer, device, and gadget that may attach to your network. Any device whose MAC address isn’t listed will be blocked. (See Figure 4.)
Finding the MAC address for every authorized device can be a tedious process. If it’s not printed on the device, it can usually be acquired via software. On a PC, for example, open a command window and enter ipconfig /all at the prompt. On iPhones or Android devices, look in the Settings area. Not only is filtering by Mac address time-consuming, it’s a never-ending chore as devices come and go over time. Moreover, filtering by MAC address isn’t foolproof: clever hackers can spoof an address. So for most people, this option isn’t worth the effort. But it is an additional tool if you really want to lock down your network. Note: The MAC-filtering settings vary from router to router. Some also let you block devices by MAC address, and some limit MAC filtering to Wi-Fi connections. And if you’ve set up multiple networks in the router, you might be able to filter by SSID. Check the logs
Routers typically create log entries for certain actions: for example, remote sign-ins, accesses, traffic, and other events — even denial-of-service (DoS) attacks. To see what might be impacting your router, look in the settings for “Logs.” Note: You might have to enable logging to have the router collect activity data, and the acquired information will probably be in a long stream of straight text (see Figure 5).
If you see entries for DoS attacks, it’s not always a real threat. In some cases, these entries are false positives; in other cases, they’re port scans initiated by hackers but blocked by the router — which shows it’s doing its job! Update the firmware!
Security is obviously a critical component of routers. Firmware updates often include fixes, security patches, and possibly new features. From time to time, check out the section labeled “Firmware Update” and see whether there are any new patches offered. Installing new firmware will typically shut down your network for some period of time, so run the process when it won’t impact others on the net. Your router undoubtedly offers many other advanced options: remote access, routing, DHCP settings, static IP addresses, NAT controls, and so forth. It’s truly the heart of your network. So it behooves you to become familiar with its options and features.
Lance Whitney is a freelance technology reporter and former IT professional. He’s written for CNET, TechRepublic, PC Magazine, and other publications. He’s authored a book on Windows and another about LinkedIn. Best of the Lounge Linux Mint and Windows 1909 test drives
After trying Linux Mint 19.3 over the holidays, Plus member MW found it not rising to expectations. Rather than waste a learning experience, MW installed Windows 1909 and took it for a test drive. Version 1909 wasn’t all that impressive, either, but MW managed to build it into a fully working system — including support for an older printer — with little effort. However, the new system still needed tweaking and MW wondered what to expect when update time comes around. Check out the whole story — and the many comments. MS Office Plus member BobbyS purchased a new laptop equipped with Win10 Pro installed and managed to avoid setting up an MS account. BobbyS considered Office 2019 but was stymied because an MS account was required. Can fellow Loungers help with getting around this obstacle? Or is it back to Office 2007? Windows 10 Years ago, Plus member alphacharlie’s Lenovo ThinkPad T61 was a top-of-the-line machine, and Win7 Pro was its OS. Now alphacharlie wants to update to Win10 — and has a plan for doing so. Alphacharlie posted the plan in the AskWoody forum and asked for input from those with more experience. Join other members in sharing the vast Lounge expertise. Windows updating Plus member Ron M attempted to update a copy of Win10 1809, but the process stopped at “91%.” After 12 hours, it was still at 91 percent completed — and obviously going nowhere. Ron M turned to other forum members for help. One of the options discussed was upgrading to Win10 1909. Do you have a possible solution? Windows 10 For months, Plus member pjamme has had a vexing restart issue. When any update — Windows or an application — triggers a restart, the machine’s screen just goes black. A full power off/on helps, but not always. With assistance from fellow Loungers, pjamme might be on the path to a solution. MS Office Plus member ScotchJohn is planning for a future without Office 2010 support. Options include Office 2019 and Office 365. What are the risks of cheap Office downloads? The majority of respondents plan to stick with 2010, regardless. Windows Plus member Alex5723 shares an old trick that has come and gone for years. God Mode is a special Windows shortcut/folder that lists all Windows commands and settings in one place. If you’re an old Windows user, is it still sitting, nearly forgotten, on your desktop? If you’re not already a Lounge member, use the quick registration form to sign up for free. LANGALIST Let your PC start the new year right!
By Fred Langa Taking a little time now to thoroughly check and proactively service your Windows PC can pay off big-time in the coming year. This easy-to-follow annual checkup is preventive medicine that can help ensure that your PC begins 2020 in the best shape possible! (Editor’s note: This topic is an AskWoody/Windows Secrets tradition. We refresh and republish it in one of the first issues of each new year. In this iteration, you’ll also find abundant references to classic and detailed PC-maintenance how-tos published in Windows Secrets — available once again in the AskWoody Archives!) Undo a year’s worth of wear and tear
In 2019, Microsoft churned out well over a thousand Windows updates and patches (see the official catalog). Your PC almost surely installed dozens or even hundreds of them — plus one, and maybe even two, completely new versions of Windows 10 (1903 and 1909). You’ve probably also installed new applications, uninstalled obsolete copies, and updated still others. Likely you tuned and tweaked various aspects of your system’s user interface and software settings. And, no doubt, you created and deleted myriad new emails, documents, photos, MP3s, videos, spreadsheets, and more. Given all that activity, the odds are good your PC’s software setup isn’t exactly pristine anymore — and trouble might be brewing if small, currently undetected problems are left uncorrected. Along with that software churn, your PC’s mechanical parts worked hard as well. If your PC has a classic platter-based hard drive, those platters spun hundreds of millions of revolutions over the past year. And the system fans whirred continuously for thousands of hours (drawing dust and dirt into the system’s internals). Throughout the year, heat, mechanical wear, and chemical degradation inflicted a slow but inevitable deterioration of your system’s components — especially those in tightly packed, battery-powered portables. In short: Your PC isn’t the same as it was a year ago. Heck, it’s probably not the same as it was last week! That’s why it’s smart to perform some deep maintenance at least once a year. It’ll help ensure that all the changes in your PC aren’t piling error upon error and that your PC remains fundamentally sound. Here’s an easy, step-by-step process that can help your machine start 2020 right! Preserve and protect, Part 1
As we all know, but often fail to apply, it’s a good habit to make a complete backup before any serious system maintenance. If anything goes awry, you’ll be able to get things back the way they were, quickly and easily. In fact, if you’ve been a bit lax at making regular backups, start the new year with the resolve to do a better job of protecting your data. After all, having a current backup is foolproof insurance against any and all manner of ills that can befall a PC — from power spikes and hard-drive crashes to malware and (ahem) user error. No matter what trouble may brew, a good and current backup ensures your data and settings are safe and easily restorable. Windows 7: The venerable OS is in its final days of across-the-board support by Microsoft, so it’s especially important to create and preserve a current, fully working backup copy of your Win7 setup. Do it right now! The May 12, 2011, Top Story “Build a complete Windows 7 safety net” can walk you through the process of setting up and using Win7’s built-in backup tools. (See Figure 1.)
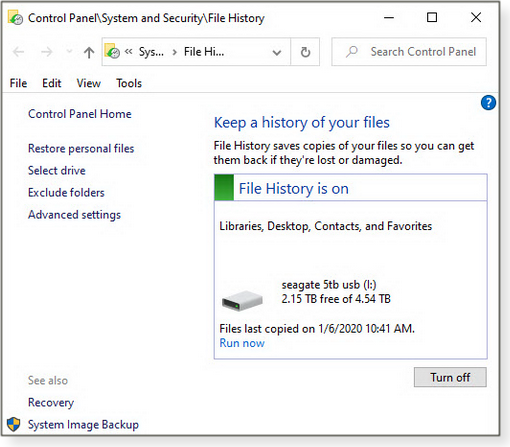
Windows 8.1 and 10: Microsoft moved away from classic backups/restores in Win8 and continued to refine the process in Win10. You’ll see the details in a moment, but in broad-brush terms, those OSes offer robust backup/restore services spread across three built-in systems. File History automatically backs up and restores local copies of your user files on an external hard drive (see Figure 2). OneDrive can back up to and restore from the cloud user files and some system settings. And Reset (in its several flavors) provides OS-restoration services from local or cloud-based sources.
Windows 10’s backup/restore system is detailed on the Microsoft Support page “Backup and Restore in Windows 10”; it was covered in the Oct. 15, 2015, Top Story “Best of breed: Win10’s hybrid backup system.” Windows 8.1’s backup/restore system is covered on the MS Support page “How to refresh, reset, or restore your PC” and in the Jan. 15, 2015, Top Story “Mastering Windows 8’s backup/restore system.” For more information on the separate components of the Win8/10 backup/restore subsystems, see the following Microsoft Support sites:
Alternatively, feel free to use any of the many excellent free or low-cost, third-party imaging/backup apps available. Here’s a sampling: Finally, no matter what backup tool or method you use, be sure to periodically test the integrity and restorability of your backups. See “Unbootable recovery disk makes backups useless,” Nov. 22, 2016, Top Story; and “Update: More on testing and verifying backups,” Nov. 5, 2015, LangaList Plus. Check drive health
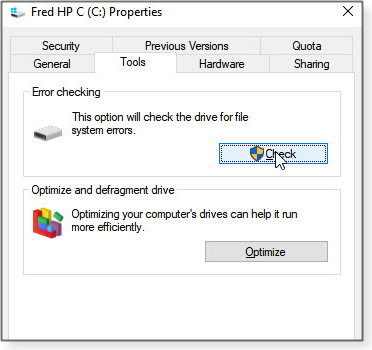
Traditional hard drives are possibly the hardest-working components in PCs. Not only do their spinning platters typically rack up many millions of rotations per year, their read/write heads spend immense amounts of time chattering back and forth, moving astronomical quantities of data on and off the drive. Solid-state drives have no moving parts, but the individual cells that store bits of data also suffer wear — and will eventually fail. It’s a testament to drive technology that these devices work for as long, and as reliably, as they do. But as sure as death and taxes, all drives eventually wear out. So take a few minutes to check your drive’s physical health via the Self-Monitoring, Analysis, and Reporting Technology (aka S.M.A.R.T.) subsystem built into most of today’s drives. (Yes, solid-state drives can also use SMART technology.) Free software can help you extract that information; see the Sept. 6, 2012, LangaList Plus item “Using and understanding SMART hard-drive tools.” While SMART monitors the physical health of drives, Windows’ built-in tools can easily check on the logical health of the files on the drive. Every version of Windows has a chkdsk (as in “check disk”) app for exactly that purpose. The basic version of chkdsk is a simple point-and-click operation. In File Explorer, right-click the drive that you want to examine and select Properties. Click the Tools tab and then, under “Error-checking,” click the Check or Check now button (see Figure 3).
That simple point-and-click function is fine for routine maintenance, but the command-line version of chkdsk (shown in Figure 4; more info) offers advanced users many additional options.
Chkdsk‘s command-line options vary significantly from one Windows version to another, but chkdsk c: /f works across the board for basic C: drive fixes. (Change the drive letter to check and correct other drives.) To see the version-specific chkdsk commands available in your copy of Windows, open an administrator-level command window; type chkdsk /? and press Enter. You’ll see a complete list of all available chkdsk options. Patch and update everything
When you’re sure your hard drives are healthy, build on that foundation by making sure all your software is current and fully patched — especially security-related updates! Start with a manual check of your operating system components, via Windows Update. (You should do so at least two weeks after Patch Tuesday — the second Tuesday of the month — to ensure you’re not installing any problematic updates. Also, don’t install new device drivers through WU; go to the hardware vendors’ sites.) You probably already know how to check for new OS patches, but just in case, here’s the official Windows Update FAQ for Win7, 8.1, and 10. Once Windows is fully up to date, check your applications. Most software lets you manually check for updates via the Help, Help/About, or Help/Update menu. But another way is to use a general-purpose software updating tool or service. For the pros and cons of those kinds of services — and cautions about updating drivers — see the July 26, 2012, Top Story, “Software that updates your other software.” (Note: Although the concepts haven’t changed, the products mentioned may have. However, up-to-date replacements are easy to find, as this Google search for pc+software+app+update+checker shows.) Check your PC’s defenses
Firewall: Open networking ports might expose your system to Internet-based hackers. Several sites offer free, easy-to-use testing tools to check Windows’ built-in firewall or the alternative firewall of your choice. Two good examples are HackerWatch Probe and Gibson Research Corporation’s classic ShieldsUP! (see Figure 5).
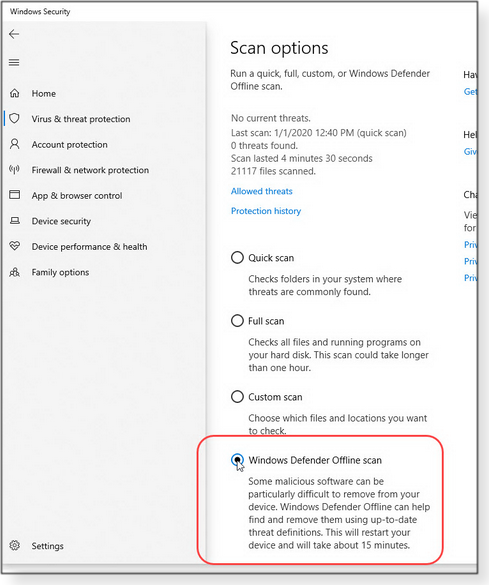
Antivirus: I’ll assume that you have some sort of real-time anti-malware app up and running. But now’s a good time to verify that your system is completely free of viruses, rootkits, worms, Trojans, and other malicious code. Run a full scan with a standalone, self-booting security tool such as Windows Defender Offline (Figure 6; MS info), ESET’s Free Online Scanner (site), and Trend Micro’s free HouseCall (site).
Wi-Fi router: Check with your router maker’s support site to see whether any security/firmware updates are available. If so, install them pronto! Keep in mind that many older Wi-Fi routers contained a flaw in their implementation of Wi-Fi Protected Setup (WPS). If you have one of these outdated models, hackers might easily breach it, regardless of what encryption and password you use. For more info, see the Dec. 13, 2012, Top Story “Routers using WPS are intrinsically unsafe” and the Dec. 20, 2012, follow-up story “Putting Wi-Fi router’s security to the test.” Passwords: As PCs have become more powerful, passwords that were once virtually uncrackable may now swiftly fall to common hacker tools. Make sure your password-manager software is fully up to date — and if you’re not currently using one, seriously consider installing any of the excellent offerings onto your PC. Perhaps the most important security rule is to not use the same credentials for multiple sites; password managers make it easy to generate complex and separate passwords for each site and account that needs one — and you need to remember only the master password. If you’d rather manage your credentials manually, a passphrase (made up of a string of words that make sense only to you) can be easier to remember than a complex password. Whichever method you use, verify that your passwords/passphrases are still secure by checking them against one or more of the free and safe testing sites. See, for example: If you need to manually upgrade your passwords, see the excellent xkcd webcomic Password Strength. Or see “How To Build Better Passwords,” an InformationWeek article I wrote some time ago. (It’s still current!) Take out all the trash
Windows is something of a pack rat (as are most PC users when it comes to their systems). It can accumulate truly astounding amounts of digital debris, including temporary files that sometimes become all too permanent. Fortunately, there are many excellent system-cleaning tools available. All versions of Windows have the built-in Disk Cleanup applet that deletes junk files and unneeded upgrade/update rollback files. For help with this tool, see the Jan. 9, 2014, LangaList Plus item “Clean out obsolete, space-consuming update files.” Note: The cleanup options in the latest Win10 versions have begun to diverge from earlier releases. You can see some recent changes discussed in the Langa.com post “Say goodbye to Windows’ classic Disk Cleanup Tool” and, in another Langa.com post, “Sloppy UI design complicates Win10’s routine disk cleanups.” Third-party cleanup tools can assist in ridding your PC of obsolete, broken, or unused registry entries. There are many to choose from, both free and paid, as this Google search for registry+cleaner+windows shows. For additional background information on the pros and cons of registry cleaners, see the July 16, 2015, Top Story “Are system/Registry cleaners worthwhile?” Defrag (or optimize) data on hard disks
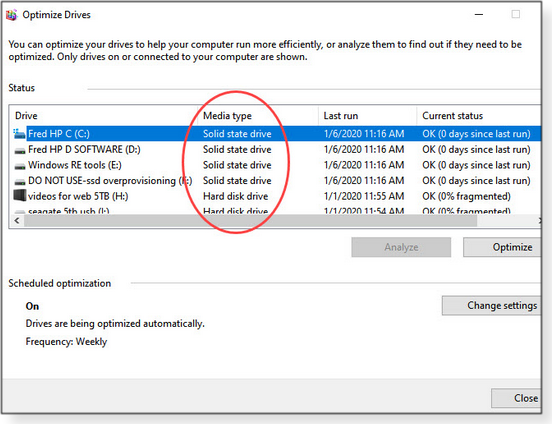
Over time, classic hard drives can become heavily fragmented — files and pieces of files are scattered across the platters, causing wasted drive space and serious slowdowns in data retrieval. The process of defragmentation can improve drive performance on all spinning-platter drives, but it’s neither needed nor wanted on solid-state drives. SSDs instead need a completely different maintenance operation called TRIM (more info). Win7 includes a thorough defrag tool for platter-based drives; it’s covered in an MS support article. On the other hand, Win7’s SSD support is a little sketchy: though it was the first desktop OS to include a built-in TRIM function, there’s no user interface to trigger or monitor this automated and invisible action. The only way to see whether TRIM is working properly on a Win7 PC is to open an admin-level command window and enter the following: fsutil behavior query DisableDeleteNotify Windows will respond with DisableDeleteNotify = 0 if TRIM is working. Win10/8 takes a somewhat different approach to drive maintenance. Instead of a simple disk-defragmenter tool, they provide the Optimize Drives applet (see Figure 7) that automatically employs the correct maintenance technique (defrag or TRIM) needed for each drive. Optimize Drives is covered in a Microsoft Docs article. (The article was written for Windows Server, but the information also applies to desktop Windows.) Scroll down to the section labeled “So what does Storage Optimizer do?”
Note 1: Although you shouldn’t need to, you can use the fsutil command described in the above Win7 section to verify that TRIM is working on an SSD-equipped Win8/10 PC. Note 2: Some drives combine a small SSD with a larger spinning-platter drive in a single package. For the care and feeding of this type of hybrid drive, see “Proper maintenance of hybrid SSHD drives,” May 10, 2016, LangaList Plus. Preserve and protect, Part 2
Once your system is updated, cleaned, defragged, and otherwise optimized, make a new backup or system image to preserve your refreshed setup. If anything goes wrong with your system in the coming months, you’ll be able to return the machine to its fully cleaned and optimized condition with just a few clicks. See Preserve and protect, Part 1, at the top of this column, for links and more info. Dust, you must!
We think of our computers as electronic devices — and they are — but they also have a mechanical side that needs attention. For example, the cooling fans found in most systems are constantly drawing in room air — and everything it contains. Over time, the inside of your machine can become astonishingly choked with dust, hair, and other detritus — resulting in poor air flow, higher temperatures, and possibly premature component failures. Although PCs have improved over the years, the air they typically suck in hasn’t. Thus, some of the older articles on this topic are still useful. The Oct. 13, 2011, Top Story “Take your PC’s temperature — for free!” shows how to check whether your PC is running warmer than it should — and how to clean it, if so. There’s additional, and still relevant, cleaning information in my old InformationWeek article “Getting The Grunge Out Of Your PC.” Congratulations! Your PC’s starting the new year on a fine footing
Your once-a-year, major PC maintenance is done — your machine should be good to go for the busy months ahead. May your 2020 be free from PC bugs, crashes, and other problems!
Fred Langa has been writing about tech — and, specifically, about personal computing — for as long as there have been PCs. And he is one of the founding members of the original Windows Secrets newsletter. Check out Langa.com for all Fred’s current projects. CLOUD SERVICES Before moving to the cloud, check the foundation
By Amy Babinchak For small businesses, migrating to cloud-based services will impose some significant changes in how local computing gets done. But there are also some principles that never change. The cloud might alleviate some information technology (IT) issues, but the basics of good networking practices remain — and they still need to be understood and adhered to. Before any sort of tech migration, establishing a solid IT foundation is essential; this process includes both IT professionals and the technology infrastructure. What makes up the IT foundation?
When it comes to cloud computing, some experts argue over responsibilities — what’s part of the local IT foundation and what falls into the cloud-networking bucket. In truth, they’re all pieces of the same orchestra. That said, before I help a business migrate to cloud services, I want to see an IT infrastructure that’s built on bedrock — what must be in place before moving forward. Those components include the following: Cabling: The wiring that makes up the local network will always be an essential part of a solid computing foundation — especially if you have a central office. I recently visited two potential clients, and both had glaringly obvious cabling issues that were missed by the previous IT firm. One of the businesses is a manufacturing plant where welding is the main activity, the other is an advertising-research firm — two very different environments, but both suffering from network drops and unexplained computer slowdowns. Bolting on cloud services would not help either of those issues; in fact, it would make the companies’ computing issues worse. The solution for the plant would require upgrading to shielded cabling to eliminate electronic noise. Solving the ad firm’s problems would involve removing several daisy-chained small switches and installing dedicated networking lines. The lesson? Local IT pros need to invest some time into learning about cabling: its specifications, its limitations, how to properly pull it, and how to test it once it’s in place. For example, do you know there’s technically a minimum cable length for certain applications? If you’re looking for general cabling info, cmple.com has numerous articles posted. Also, check with your local cable supplier; the company I use offers free classes for installers. Even if you don’t pull cable, attending a few installation sessions won’t hurt. Two tips: Make sure that your networking patch panel matches up with the category of the cable in use and don’t rely on a switch that’s more than five years old. Internet Service: You simply can’t do business without a reliable and fast connection to the Internet — especially as you move to the cloud. Every business needs at least one connection, but two is safer. What type of Internet connection? Cable (Comcast, AT&T, Frontier, etc.) is popular with small businesses because it combines good speed with relatively low cost. Just be aware of the differences between home and business plans. For example, business accounts typically include speed and “up-time” guarantees. Also keep in mind that while upload and download rates are important, latency is everything. Using a gardening analogy, if bandwidth is the size of the garden hose, latency is how long the water takes to reach you. To learn about the effects of latency on your network, scroll down to the “How to properly calculate transfer speed” section in the virtualtothecore.com article “Don’t forget latency when you calculate network performance.” A high-latency Internet connection can drain 20 to 50 percent of the connection’s overall speed. Also keep in mind that latency isn’t just the fault of the service provider; it can be caused by an old firewall, bad cabling, a failing switch, multiple switches, and so forth. How about redundant Internet service? If your business is 100 percent in the cloud, it’s mandatory. Comcast and other cable services are now offering reasonably priced, cellular LTE failover connections with unlimited use (more info). This option provides a slow link to cloud services, should your landlines fail. If that solution isn’t acceptable, you’ll need to add an entirely different service that isn’t dependent on cable. (A second cable line, or adding cable from a competing service, won’t provide the necessary level of redundancy.) Options include fiber, microwave, and point-to-point Wi-Fi. However, those types of connections will be faster and have less latency than cable (and will also be more expensive). So they’ll end up being your primary service — with cable becoming the backup. Finally, you’ll also need a failover device to seamlessly handle the switch between primary and failover services. Here’s a tip: Make friends with your local “I can supply any kind of service” reseller. What’s available will depend on your address — and it can change from one block to the next. The reseller might have options you’ve never thought of. Patching: I recommend updating your systems often and thoroughly. Malicious hacks often depend on businesses not updating software, hardware, and firmware. That includes, for example, routers, printers, Office, Adobe products, and — of course — all PCs. Any patching pain will almost always be less than the suffering caused by someone breaking into your network. User account security: When software and data move to the cloud, the boundaries of your network go with them — and managing user accounts becomes even more critical. It’s why Microsoft is pushing multi-factor authentication (MFA) for all Office 365 subscribers. But IT pros also need to track any attempted hacks on user accounts. Modern Active Directory (AD; more info) tools can block out-of-country sign-in attempts, anonymous IPs, and risky online locations. You can even tie sign-ins to trusted devices. Learning about these new tools is critical to understanding security in a modern network. For example, Microsoft offers free online courses for its Azure AD platform. The OSI model: If you’ve had any formal training in IT, then you should have learned about the Open Systems Interconnection (OSI) model. It’s the original seven-layer conception of how applications and devices communicate. Sure, you might think it’s antiquated knowledge, but it still applies to this new cloudy world we all live in. (Yes, technically, a few of the layers have collapsed together.) Once you understand OSI, troubleshooting becomes so much easier. If you need to brush up on it, Cloudflare has a fine tutorial. In short: Jumping to the cloud without checking your networking foundation is putting the cart before the horse. Businesses need to step back and take a deep and thorough look at their IT infrastructure first — and fix anything that’s not current, that’s out of spec, or that’s poorly implemented. Because when you move to the cloud, pre-existing problems can blow up in a very big way.
Amy Babinchak is the owner of three IT-related businesses: Harbor Computer Services, Third Tier, and Sell My MSP. She has been working in the IT field with small and medium businesses for more than 20 years. She’s also a Microsoft MVP and has received numerous leadership awards. Best Utilities Make your favorite utility the default app in Win10
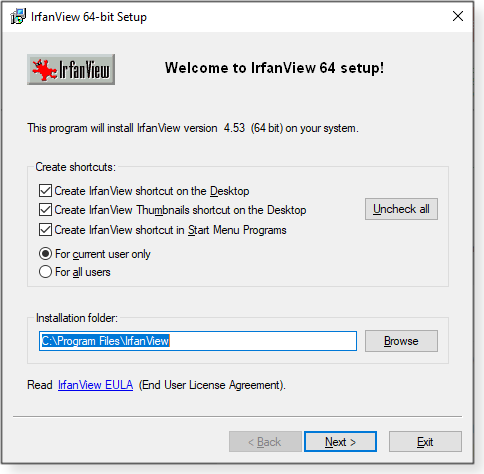
We love the many freeware utilities we’ve installed over the years — but Microsoft sure doesn’t. Take our photo editors, for example. When we click on an image, Windows 10 opens its Photos app — a slow-opening beast with relatively few options. When I want to work on a photo, I want my favorite freeware app to open — automatically! In this week’s column, we’re going to fix the problem of unwanted default apps, using my photo viewer/editor as an example. Let’s get started by downloading an excellent utility from that talented Austrian developer, Irfan Skiljan. Among free (for personal use) image editors/viewers, IrfanView is a true classic. It’s compact but packed with useful features. You can grab the latest edition on our OlderGeeks site in either a 64-bit or 32-bit version. (Our site also shows many of IrfanView’s handy tools.) IrfanView isn’t portable, but unlike lesser freeware apps, it’s totally clean of bundleware. Installing the app is exceptionally quick: just roll through the four simple setup dialog boxes, starting with the standard welcome screen (see Figure 1).
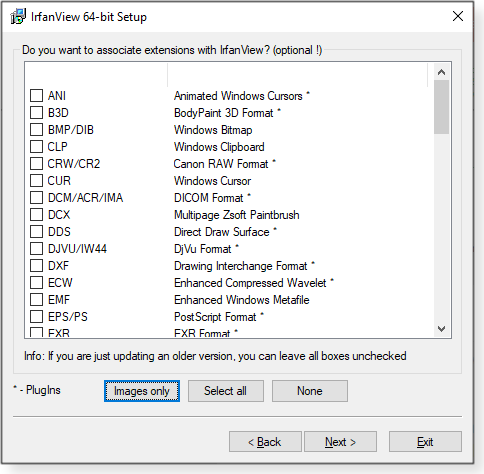
The second setup screen lists what’s changed in the current version. Next, you have the option of associating all sorts of file types with IrfanView (Figure 2). Note the recommendation to leave all boxes unchecked if you’re updating from an older version.
When you’re done with setup and the app is running, you’ll see a simple and classic menu system. To open an image, just click the yellow folder icon.
IrfanView gives you a lean and uncluttered workspace for enhancing images.
The program’s Image menu opens a long list of features and tools for manipulating images — everything from red-eye reduction to cool photo effects.
Making your favorites the defaults
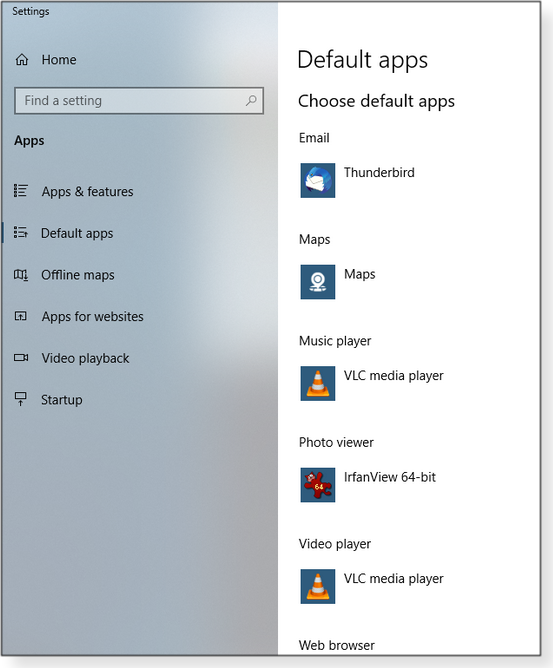
But we’re not really here to review IrfanView; the task at hand is to make Windows 10 always use this app, and not Photos, when I click on an image. So I’ll leave experimenting with IrfanView to you. The option for changing default applications in Win10 is in Settings. But you can get there faster by typing “default apps” in the Windows search bar. Click Default apps when it appears at the top of the search results (see Figure 6).
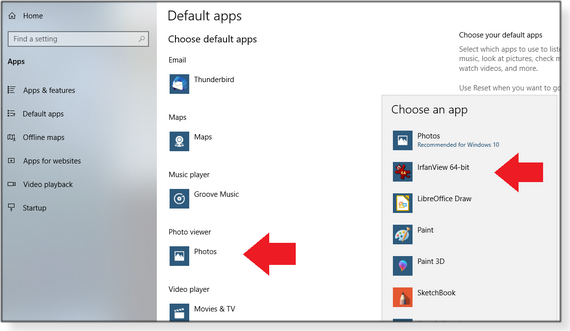
When the Default apps window appears, click Photos and then choose the program you want from the list that pops up (Figure 7) — “IrfanView 64-bit” in this case. (Obviously, you might prefer another app.) Note that “portable” apps can’t be set as Win10 defaults; they are not formally installed, so the OS doesn’t know about them.
Note: On rare occasions, Win10 might refuse to accept your choice. In that instance, scroll down the window, click the Reset button, and then try again. (“Reset” returns the default apps to those that Win10 wants. You might have to reselect other app categories as well.) While you’re at it, check the other “defaults.” Your preference for, say, your email client might have changed, and you forgot to set the newer app as the default. For example, I use Thunderbird for managing mail. So now when I select a file and click “Send to” and “Mail recipient,” a new compose-email box automatically shows up in Thunderbird — and not in Win10’s Mail. I also love using VLC media player. I’ve set it as the default app for both music and videos. Ah …. Much better.
There you go … make Win10 work the way you want it to. Happy computing!
Deanna and Randy McElveen are celebrating over 20 years in the computer business, ten years running OlderGeeks.com, and more than 26 years of putting up with each other. Their computer store is in a small town in the Missouri Ozarks. Believing that happy customers are always the best advertisement, they hope to do it for another 20 years. Publisher: AskWoody LLC (woody@askwoody.com); editor: Tracey Capen (editor@askwoody.com). Trademarks: Microsoft and Windows are registered trademarks of Microsoft Corporation. AskWoody, Windows Secrets Newsletter, WindowsSecrets.com, WinFind, Windows Gizmos, Security Baseline, Perimeter Scan, Wacky Web Week, the Windows Secrets Logo Design (W, S or road, and Star), and the slogan Everything Microsoft Forgot to Mention all are trademarks and service marks of AskWoody LLC. All other marks are the trademarks or service marks of their respective owners. Your email subscription:
Copyright © 2020 AskWoody LLC, All rights reserved. |


 By Lance Whitney





 By Deanna McElveen