|
ISSUE 17.1.0 • 2020-01-06
The AskWoody PLUS Newsletter
In this issue NETWORKING: How to manage your router – Part I BEST OF THE LOUNGE: Problems migrating legacy apps to a new PC LANGALIST: Office updates fail … and fail, and fail PATCH WATCH: No fireworks, closing out 2019 updating BEST UTILITIES: Freeware Spotlight — Infinite Password Generator NETWORKING How to manage your router – Part I
Your router holds the keys to your local network. Here’s how to interpret and configure its various settings. Router management has always been a somewhat challenging task, especially if you venture beyond the basic settings. Over the years, router manufacturers have tried to make the initial configuration process simpler through one-touch buttons and easy-setup wizards. But making sure your Wi-Fi network is configured securely and properly means delving into the local router’s firmware, checking and tweaking various options. In Part I of this two-part series, I’ll cover the basics of router management. In Part II, I’ll dive into some of the more esoteric settings. A plethora of interfaces
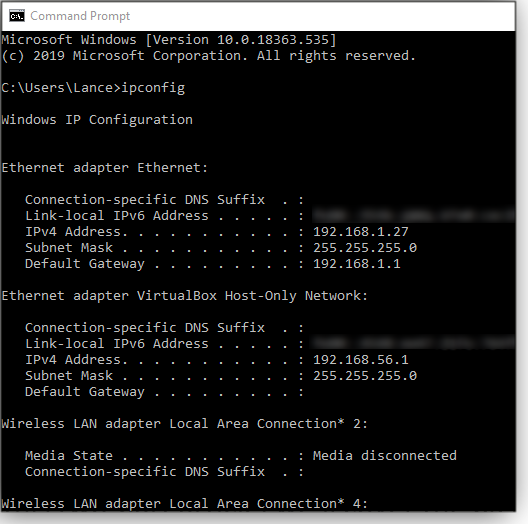
Describing router menus and settings can be a bit complicated: there are many brands of routers, each with its own spin on a user interface and settings nomenclature. Fortunately, most of the concepts and key settings are essentially the same across the board. So the information and steps I cover here should apply to virtually any brand of home/small-business router. Just be prepared to do a bit of interpretation. For this article, I’m using a NETGEAR Orbi mesh router (more info). I’ll assume your router is already set up with a username, password, SSID (service set identifier), and other key information needed to establish a Wi-Fi network and Web connections. Using that as a starting point, let’s check out the router’s basic firmware settings. Managing the router begins with signing in by simply entering its IP address into a browser. A typical default router address is 192.168.1.1, but yours might be different. If you don’t know the address for your device, it’s easy to find: simply open a command window (type “cmd” into the Windows search box) and enter ipconfig at the prompt. Look for the address assigned to the Default Gateway. Figure 1 shows that my gateway/router has the common 192.168.1.1 address.
Check your router username and password
When your router’s sign-in screen appears in the browser, enter the required username and password. (If you don’t know it, try the credentials typically printed on the router’s box. If that fails, it’s probably time to call your router’s installer or tech support. Come back to this article when you have that sorted out.) If you’re still using the router’s default, factory-set username and password, your first task is to change them — they’re often extremely simple (e.g., “admin” and “password”) and are easily hacked. (They’re probably published on the Internet for all to see.) Some routers let you change the username; others don’t. If you do see this option, reset the default name to something more secure and distinctive. You might have to hunt a bit for the screen that lets you change the username and/or password. For example, on my NETGEAR Orbi, I had to go to the Advanced settings screen to change the password (see Figure 2).
As with all passwords, create something that’s strong and secure. Conventional wisdom is to use both alphanumeric and special characters, but that can be difficult to remember. An alternative is a passphrase made up of several easy-to-remember words strung together. Be sure you don’t lose your new password; regaining access might involve performing a factory reset. If your router, like mine, offers password-recovery options such as security/challenge questions (see Figure 2), be sure to set those up as well. In the event you forget the password, the recovery options will quickly get you back into the router settings. Check your Wi-Fi network name and password
Your router also came with a default SSID (your network name) and connection password. If you’re still using them, all the devices connected to your network are vulnerable to hacks. Look for the screen that lets you change both settings (typically the Wireless screen). Figure 3 shows the Wireless Settings windows for my router. Don’t include any personal information in your network name, such as your name or address.
Next, check the network-connection security level. On personal nets, WPA2-PSK is currently the strongest form of Wi-Fi authentication. Avoid options such as WEP or WPA-PSK, if offered. You might also see WPA-PSK [TKIP] + WPA2-PSK [AES] listed, which allows for backward compatibility. Use this option only if you have extremely old wireless devices that don’t support WPA2. The standard rules apply for the Wi-Fi password: use a passphrase or variety of characters to make it strong and secure. Remember: If you change your Wi-Fi name and/or password, you’ll need to update the sign-in on every device that connects to your network — including PCs, phones, tablets, streaming boxes, smart TVs, smart speakers, and all the other gadgets. Set up a guest network
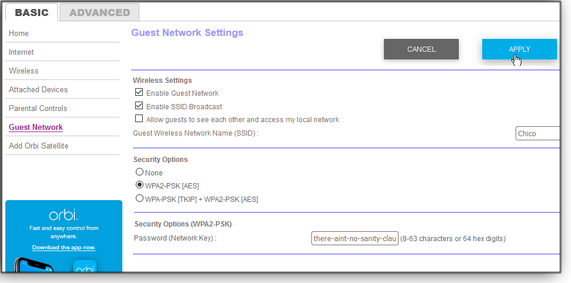
Unless you have absolutely no social life, there will be times when friends, relatives, or others might want access to the Internet via your local Wi-Fi. Rather than giving them the credentials to your primary network, you can usually create a guest network. Look through your router’s setup screens for those settings (see Figure 4). Enabling guest Wi-Fi is nearly identical to configuring the main network: you enter or select a name, password, SSID, and security level. Over time, you can easily turn the guest network on or off as needed.
Set up parental controls
If children will be accessing the Internet via your local Wi-Fi, check out the router’s parental-control settings — assuming it even offers them. Options include filtering or blocking access to specific apps, services, and content — by listed device. If you have kids using multiple devices, limiting Web access via the router can be easier than managing each separate device. Check connected devices
While you’re configuring basic router settings, peruse the screen that lists “attached” or “connected” devices; it’s typically called Access Control (see Figure 5). You’ll see everything connected to the network — by name, IP address, and other information. Look for any devices that should not be using your network. The access control screen also lets you block or otherwise manage any connected hardware. For example, my router allows me to automatically block any new devices.
Your router is now fully secure. In Part II of this series, we’ll look at some advanced router settings such as DNS server, speed tests, site blocking, MAC-address control, remote management, logs, and firmware updates.
Lance Whitney is a freelance technology reporter and former IT professional. He’s written for CNET, TechRepublic, PC Magazine, and other publications. He’s authored a book on Windows and another about LinkedIn. Best of the Lounge Problems migrating legacy apps to a new PC
A post by “anonymous” asked a seemingly simple question: “How to move Windows 10 from laptop A to laptop B.” However, this was no elementary migration. The old laptop contained important proprietary software, and its installation files were no longer available. Making the move proved daunting; setting up a virtual machine was suggested — and rejected. Loungers offered other possible solutions. What’s yours? Join the discussion. Windows Plus member kc27 is shopping for a light-duty PC to run Windows 10 and an Office suite. Purchasing a used system can be a good option for tight budgets. But what’s too old for acceptable Win10 performance? How aged is your still-usable second-hand computer? An abacus doesn’t count. Apple MVP Nathan Parker is the AskWoody forum’s resident all-things-Apple guru. He’s recently posted links to helpful articles for anyone new to the MacOS environment. Interestingly, the discussion takes a detour into using external optical drives with newer “slotless” Macs. Windows 10 Plus member BTSAZ1989 has come to the realization that a 12-year-old PC’s days are numbered. But choosing a new machine isn’t easy for a visually impaired senior citizen. With the local computer store out of business, and worried about moving to Windows 10, BTSAZ1989 turned to AskWoody readers for help. Windows 10 1909 Having more than one computer allows experimenting with more than one OS. When MPV MrJimPhelps couldn’t view Amazon Prime videos on his Linux Mint 19.2 system, he installed the new Windows 10 Version 1909. After jumping a few setup hurdles, MrJimPhelps was pleased with the results. Check out his tale. Hardware Of the “which is best?” topics we love to discuss on the forum, hardware is even more popular than anti-malware apps. MVP RetiredGeek tossed two 1TB Samsung SSDs into the ring and challenged fellow loungers to “make the call!” Of course, opinions varied — considerably. Windows 7 Lounger Moonbear has come to a better-late-than-never conclusion. No, not moving off Win7 and onto Windows 10 — but to stick with the older OS and create a safer standard-user account. Moonbear needs help with that common task; forum members, having been down that road many times, are not timid about sharing their experiences and help. If you’re not already a Lounge member, use the quick registration form to sign up for free. LANGALIST Office updates fail … and fail, and fail
By Fred Langa Hard-to-remove “stealth DLLs” and other leftover components of a previous software installation can break Windows Update. Here’s how to completely remove those errant bits, breaking the never-ending cycle of never-succeeding updates. Plus: A reader seeks fully hands-off automation for applying the “80/20 battery charge” rule. Curing repeatedly failing Office updating
A number of AskWoody Plus subscribers are reporting recurring Windows Update (WU) failures with Microsoft Office patches. Here are two examples:
Although these are quite different systems, and have dissimilar histories, they clearly share one thing in common: they’ve both undergone major software upgrades — to Windows, to Office, or to both. This type of post-upgrade update failure is commonly caused by shared system-level software components — such as DLLs (dynamic-link libraries; info) — that were left behind by an uninstall routine. Failure to remove “obsolete” DLLs might seem like an error, but that’s not always the case. Some of these bits of code are meant to be shared. Common DLLs might be originally installed by one app but then used by many different apps at various times, especially in a complex software suite such as Office. Thus, a routine application uninstall could deliberately leave behind DLLs, based on the assumption that something else might need them. So again, leftover DLLs aren’t necessarily an error. However, over time, as the OS and various apps get upgraded to completely new versions, those older DLLs can become orphaned — they’re still residing on the disk and in the registry, but they’re no longer being called upon by any currently installed software. Unfortunately, Windows Update might detect these obsolete “stealth DLLs” and assume the originating app is still present. WU may then try to “update” the nonexistent app, which obviously isn’t going to work. Or it might try to update just the specific out-of-date DLL (or similar component) it has detected. If the needed patches or newer versions of the old code are unavailable, WU can fail — sometimes gracefully, sometimes not. After the failure, nothing has changed: the orphaned code or its registry entry is still present on the PC — and it can continue triggering endless and futile update attempts. Three ways to break the cycles: Putting an end to these updating failures involves using indirect methods — i.e., not a standard uninstall — that will weed out the obsolete or leftover software and/or registry entries. In ascending order of difficulty, they are:
Note, however, that while registry cleaners and WU resets might help weed out obviously bogus leftover entries, they can’t do anything about properly installed and referenced code and components — even if they’re obsolete and no longer doing anything except messing things up. So if you’ve tried the above cleaning and reset options, and your PC is still being haunted by the ghosts of old setups and installations, you need to try this third option.
For information and cautions on the Windows Reset options, plus Win10’s related Fresh Start reset variant, see “Removing bloatware and OEM mods from new machines” in the AskWoody Plus 2019-12-09 issue. Reader seeks fully automated 80/20 battery charging
The proper care and feeding of lithium-ion batteries has been a hot topic lately, with lots of reader questions still coming in. For prior coverage, see the LangaList items “Is keeping a laptop plugged in harmful?” and “What’s a good initial battery charge for portables?” in the AskWoody Plus 2019-12-16 issue. Also check out the column “‘Battery-limiting’ apps help enforce the 80/20 rule” in the 2019-12-23 issue. I described several apps that can help you manage the proper charging of your laptop’s or phone’s battery for the longest-possible service life. (In short, lithium-ion batteries last longest when you keep their charge state between about 80 percent and 20 percent whenever possible.) That column prompted subscriber Peter Matthews to write:
First, let me gently disagree with your assertion that “software that provides a popup when charging has reached 80 percent is of no use ….” I start charging my phone before bedtime, so it will be around 80 percent when I unplug it and turn in for the night. The now-unplugged phone mostly sleeps all night, losing very little charge. In the morning, as I start my day, I then top off the charge to 80 percent. If needed, I’ll pump it back up to 80 percent or so around lunch or dinner time. This schedule works fine for me; with today’s fast-charging technologies and capacious batteries, the relatively small top-offs don’t take long at all. Getting back to your question, I don’t know of any software that will automatically stop charging a phone below the factory-set 100 percent. However, I’ve heard that there will be a new version of the bare-bones Battery Limiter app (Win7/8.1/10; free; site) I previously wrote about. It will communicate with a smart plug — providing an indirect, kludgy (but clever) way to limit power to a phone by controlling the wall-socket connection! But again, with just a little planning and any of the current fast-charging technologies, it’s not that hard to keep a phone in the 80 percent–to–20 percent charge range — most times. There’s usually no need to let it ride the charger all night long!
Fred Langa has been writing about tech — and, specifically, about personal computing — for as long as there have been PCs. And he is one of the founding members of the original Windows Secrets newsletter. Check out Langa.com for all Fred’s current projects. PATCH WATCH No fireworks, closing out 2019 updating
The past year of Windows and Office patching sure had its ups and downs, false alarms, and true debacles. Fortunately, we seem to be ending the year on a relatively positive note. The new decade starts off with the official end of Windows 7 support — for most users. As regular readers know, we’ve come up with a process for acquiring extended security updates. It’s not free, but the cost is relatively low for any small business that can’t easily upgrade to a newer OS. (See my article “Hunting for an elusive Win7 ESU license” in the 2019-12-23 AskWoody Plus Newsletter.) If you fall into that category, AskWoody contributor Amy Babinchak can provide one or more Extended Security Updates (ESU) licenses to keep your Win7 systems secure after January 14. (Applying the license is relatively easy — once you find someone who will sell ESUs in small numbers.) Fill out this online form and Amy, or her licensing expert Ted, will get back to you to complete the purchase. It’s U.S. $61 for the first year — and increases the second and third years. Microsoft will also end support for Windows Server 2008 and Server 2008 R2 after January. You can purchase ESUs for these platforms, too — but not as easily as for Win7. You must have an Enterprise Agreement (minimum of 500 licenses). The only alternative is to move your server license to a virtual machine in Azure, though you’ll have to pay for Azure hosting. If you must continue using Win7 and/or Server 2008/2008 R2, and you don’t want to pay for an ESU, your options are limited. Check out my CSO article on techniques for isolating these “obsolete” platforms from online threats. Here’s a summary:
Bottom line: Using Windows 7 to connect to the Web without current updates (such as ESU patches) is an unnecessary risk. Think really carefully about that decision. If you’re not ready to move to Win10, I suggest you put your time and energy into setting up a fully current OS: Win8.1 or a Linux derivative such as Mint. Keep in mind that you’re far from alone in your quest for life beyond Win7. There are many askwoody.com forum members that can show you the way. Reminder 1: The process of preparing Win7 for ESU updates includes installing a cumulative update. And if you’re concerned about telemetry, use the tips on an AskWoody post. Reminder 2: If you have Office 365 ProPlus installed on a Win7 system, the suite will also lose support after January (more info) — even if you’ve purchased a Win7 ESU license. Reminder 3: December’s Win7 patches include yet another Microsoft upgrade nag. It should show up only on consumer systems — not on machines attached to domains. You can quash the nag with the following registry key:
Reminder 4: Other support and update events in 2020:
December’s patching summary
Good news! The Access bug introduced in the November updates was eradicated in December’s Office security releases. I’ve not experienced any of the December patch issues Woody has been tracking — including reports of problems with mapping drives after installing servicing-stack updates. I’ve also not run across the reported Server 2012 reboot-loop issue that followed a .NET patch installation (possibly related to Microsoft’s Malicious Software Removal Tool).
Windows 10
Remember, if you are still on Version 1803, you really need to get off the pot and install a newer release. It’s past time to move on. If you’d prefer to step up to Win10 1809, check out PKCano’s post. And, as I’ve stated before, check for BIOS and driver updates before migrating up. Cumulative Windows 10
Win10 .NET Framework updates Note that Win10 1809 has three .NET updates listed. But you should see only one offered. Which one depends on the version of .NET that’s already installed (or blocked).
Windows 8.1/Server 2012 R2
As mentioned in the previous Patch Watch, two of the .NET Framework updates for Win8.1 fix an elevation-of-privilege threat. Again, you should not see all four .NET patches offered.
Windows 7/Server 2008 R2 SP1
Remember, these updates include a time-to-update nag message. Take a few moments to put in the registry keys that will block the warning.
Server 2012
These updates still have the Cluster Shared Volume flaw.
Windows Server 2008 SP2
Office security and non-security updates
December’s security patches fix information-disclosure, remote-code-execution, and denial-of-services vulnerabilities — and also that annoying Access bug. Office 2016 Office 2013 SP1 Office 2010 SP2 The following Office non-security enhancements and fixes were released December 3. Office 2016 Office 2013 and 2010 There are no new non-security updates for Office 2013 and Office 2010. Refresher: Patch Watch rules for updating
It’s a new month of patching. Once again, here are our current recommendations for patching Windows and Office. They may change as Microsoft evolves its updating process.
Stay safe out there. And have a prosperous 2020!
In real life, Susan Bradley is a Microsoft Security MVP and IT wrangler at a California accounting firm, where she manages a fleet of servers, virtual machines, workstations, iPhones, and other digital devices. She also does forensic investigations of computer systems for the firm. Best Utilities Freeware Spotlight — Infinite Password Generator
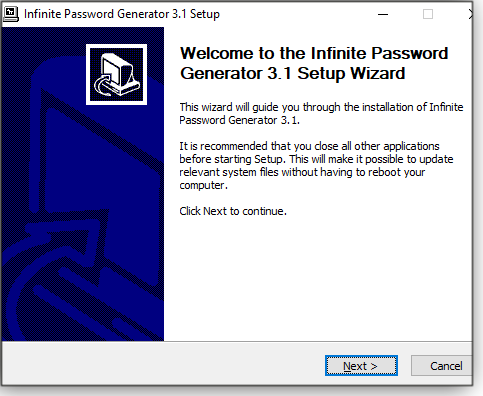
If you’re looking for a password-keeper/-generator app, there are plenty offered for nearly any platform. The real question is which one you can truly trust. Who created it? How are passwords stored? (Browser vaults have been notoriously easy to crack.) Can your passwords be safely transported from one system to another? Sure, I occasionally sport a tinfoil hat, but when it comes to passwords, some paranoia is warranted. I trust an app that lets me control where my security info is stored and how it’s pasted into websites. And of course I want an app I can move from system to system via a USB memory stick. Thus it should be no surprise that my preference is a password manager that’s both simple and portable — such as Yuku Sugianto’s Infinite Password Generator (IPG, for short). It generates secure passwords for websites and applications by combining a single master keyword with keywords you provide for each site. It then stores your passwords on your computer in an encrypted file. We find IPG’s portability especially handy because we can run it from a flash drive attached to any PC we’re working on. It’s also useful if you want to access your passwords while on a public computer. IPG is completely free, though you’ll get a few nags to donate. Note that IPG does not let you add pre-existing passwords to its database of saved credentials; they might not rise to its level of secure credentials. That makes IPG a good choice for anyone who’s still using simple phrases (such as the all-too-common “1 2 3 4”) or who uses the same password for multiple sites and accounts (which might include most PC users). The downloaded install file for this tool is only 364KB and runs on effectively all versions of Windows. Let’s take it for a spin! Grab a copy from our OlderGeeks page. Acquiring IPG’s portable version is a bit unusual. You must first install the full app, using the brief installation wizard shown in Figure 1.
To make a portable version, you simply click the main screen’s Menu button and choose “Create portable version … ” (see Figure 2). Next, select the folder (e.g., “IPG”) that will hold the passgen.exe file and then click OK. That folder can be any mapped location.
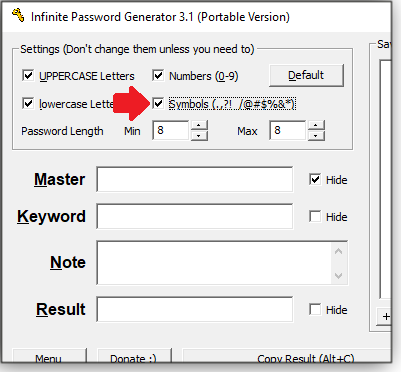
Now just launch passgen.exe from wherever you placed it — a portable flash drive, for example. The next step is to review the app’s settings and make any changes you like. As shown in Figure 3, I enabled the use of symbols in my passwords. (It’s the only setting not checked by default.)
Creating and managing passwords
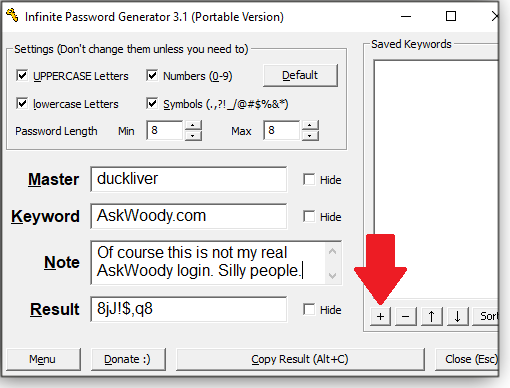
This process starts with creating a “Master” password. For this demonstration, I’ve entered “duckliver.” (Hackers take note: I just dreamed up that phrase; I’ve never used it before — for anything.) Next, add a key word that will make sense for the related site or account. I’ve entered “AskWoody.com” and then added a helpful note. The program immediately creates a new password for me. It does so by combining the master password and keyword, then running the results through a hashing algorithm. (The app’s help file gives more details.) To save the new password, just hit the small plus sign at the bottom of the Saved Keywords list (see Figure 4). You can also select a keyword from the list and use the minus sign to remove it. Note that the app always shows the listed keywords, but you won’t see the actual password until you enter the master — so keep it safe. (It’s the only password you’ll have to remember.)
If you already have a password for a specific site, you’ll need to change it to the new IPG version. After that, you sign in to, say, askwoody.com by selecting the keyword in IPG and then clicking Copy Result. Next, paste it into the site’s/account’s sign-in box. (You’ll still need to manually enter the proper username.)
Note: When using the portable version of IPG, you should always copy its entire folder to external storage devices such as USB flash drives. The folder includes, for example, an INI file that defines the settings for each keyword. One last thing: The Menu button’s drop-down list of options includes Help — a good, old-fashioned help screen with a full manual (see Figure 6).
We hope all AskWoody members have a great new computing 2020!
Deanna and Randy McElveen are celebrating over 20 years in the computer business, ten years running OlderGeeks.com, and more than 26 years of putting up with each other. Their computer store is in a small town in the Missouri Ozarks. Believing that happy customers are always the best advertisement, they hope to do it for another 20 years. Publisher: AskWoody LLC (woody@askwoody.com); editor: Tracey Capen (editor@askwoody.com). Trademarks: Microsoft and Windows are registered trademarks of Microsoft Corporation. AskWoody, Windows Secrets Newsletter, WindowsSecrets.com, WinFind, Windows Gizmos, Security Baseline, Perimeter Scan, Wacky Web Week, the Windows Secrets Logo Design (W, S or road, and Star), and the slogan Everything Microsoft Forgot to Mention all are trademarks and service marks of AskWoody LLC. All other marks are the trademarks or service marks of their respective owners. Your email subscription:
Copyright © 2020 AskWoody LLC, All rights reserved. |


 By Lance Whitney




 By Susan Bradley
 What to do: I recommend businesses install December updates at this time. And if you want a comprehensive record of past and current patches, with installation notes and recommendations, check out our
  By Deanna McElveen