
|
Patch reliability is unclear. Unless you have an immediate, pressing need to install a specific patch, don't do it. |
| SIGN IN | Not a member? | REGISTER | PLUS MEMBERSHIP |
How a packet sniffer reveals local net traffic
In this issue
- LOUNGE LIFE: Changing our ways with our many credentials
- TOP STORY: How a packet sniffer reveals local net traffic
- FIELD NOTES: Off-the-record discussions about technology
- WACKY WEB WEEK: Do you want an app for the time of day?
- LANGALIST PLUS: Windows 8 upgrade error locks user's files
- OFFICE: Use Word macros without learning to write code
Changing our ways with our many credentials
Lounge member Photorer stores almost all his Internet usernames and passwords (295 of them) in his principal browser — Google Chrome.
He mentions this fact (sheepishly) in the Third-Party Browsers forum because he’d like a recommendation for a program that will let him export all these credentials to a colleague.
Happily, he gets the information he needs — without an immense scolding for his potentially unsafe practices. And yes, he plans to start using a password manager soon.
The following links are this week’s most interesting Lounge threads, including several new questions for which you might have answers:
 starred posts: particularly useful
If you’re not already a Lounge member, use the quick registration form to sign up for free. The ability to post comments and take advantage of other Lounge features is available only to registered members.
If you’re already registered, you can jump right into today’s discussions in the Lounge.
How a packet sniffer reveals local net traffic
How often have you looked at an ostensibly idle PC’s flashing drive-access light and wondered: “What’s my computer doing?”
Some of that activity is internal, but much of it also involves external devices and services. Here’s how to get a peek at that otherwise hidden network chatter.
An introduction to sniffing data packets
Before I get into details, you should know that this article is merely an introduction to the process of examining network TCP/IP packets. Thoroughly covering this topic requires considerably more space than will fit into a Windows Secrets issue.
Fortunately, there’s a plethora of books, self-study courses, and in-person training sessions — as well as certifications — for the tools I discuss below. For example, the Wireshark tool has an entire training process built around it. Wireshark University (site) is led by Laura Chappell and Gerald Combs. I’ve attended some of Laura’s classes, and she’s an excellent instructor.
Examining the packets of data that go between your machine and another system is daunting — but it also provides a fascinating glimpse into what your computer is doing. There are numerous tools for analyzing data packets. Along with Wireshark (formerly Ethereal), some of the more popular packet-sniffing tools include Microsoft’s Message Analyzer and RSA NetWitness Investigator, offered on the EMC site.
For space and simplicity, I’m limiting this discussion to Wireshark — it’s the best-known of the three, and it’s relatively easy to install.
Note: As always when adding new software — especially applications that poke deep into Windows — make a full backup of your system. Packet analyzers typically install a small app called WinPcap (Windows Packet Capture; more info) for listening in on your network connections. A backup is always good insurance, should something go awry with an installation or other system changes.
Before installing Wireshark, you might also want to review a few Wireshark videos to get a feel for how it works. At least start with the “Introduction to Wireshark” video.
Note: A warning about Wireshark and similar packet sniffers. We assume you’re using these products on networks you own or have specific permission to analyze. It’s not just bad form to collect someone else’s data, it’s likely to be illegal.
Getting started with Wireshark packet capturing
Once you have Wireshark (download page) installed, you can start packet sniffing by selecting an active network connection and then clicking the Start button (see Figure 1).
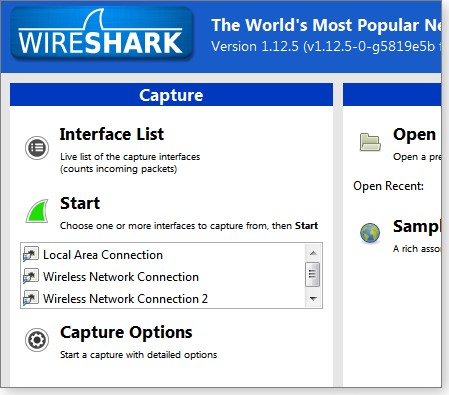
Figure 1. Before clicking Wireshark's start button, you must select a network connection.
Be prepared for a fire hose of information on local network traffic — or, more precisely, on network packets, as shown in Figure 2. (It helps to keep in mind that data sent and received by a device is broken into “packets.” For more on this fundamental building block of digital communications, see the related Wikipedia page.)
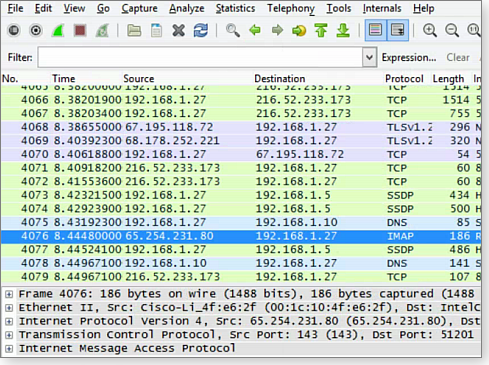
Figure 2. Wireshark's main window displays a daunting amount of packet information.
When I started learning Wireshark, I’d typically start data collection, count to ten, and then stop the session by clicking the bright red box in Wireshark’s toolbar. That way, I’d be working with a manageable amount of information. Trying to watch a live session is generally pointless — our systems are always way too “chatty.”
Once you’ve collected a bit of data, scroll back to the top and see whether there are any interesting captures. (Note: With Win8, the Packet List view might be too small and not resizable. Click View in the Wireshark toolbar and uncheck Packet Details and Packet Bytes.) I have a home-based peer-to-peer network, so Wireshark shows packets from a server that’s poking around the net, requesting information.
To sort through some of the collected packet data, it helps to know the IP addresses for the key systems on your network. (Keep in mind that this use of Wireshark is collecting information on packets traveling across the local network connection — those sent and received by the PC running Wireshark.)
For the IP address of the system you’re examining, open a command window and type ipconfig /all at the prompt. Hit Enter. In the resulting list, look for IPv4 Address in the Ethernet adapter section. In my case it’s 192.168.1.27 (see Figure 3), but it could also be something such as 10.0.0.19. Scroll down a little farther and look for Default Gateway and DHCP server, the addresses for your local router. In my case, they’re 192.168.1.1.
(Note: Your router’s management menus can also provide IP-address information on devices on the local net. It might be under a heading similar to “Connected devices.”)
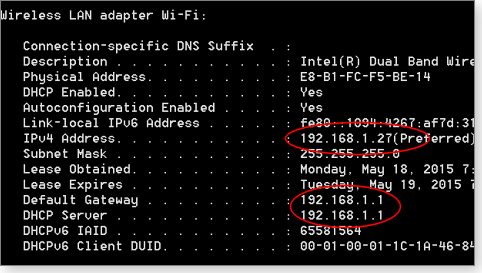
Figure 3. Windows' IPConfig will display the IP address for both the PC and the connected router.
Back in Wireshark, the Packet List has IP source and destination columns. When your PC connects to a site on the Web, the packets sent are listed in the Source column. The Destination column tells you where the packets are going. If the destination IP address isn’t a local device, you find out who owns it by Googling “whois” followed by the IP address — or use your favorite whois tool.
For example, a sample capture (Figure 4) shows that I’m sending to and receiving from IP address 216.52.233.173, which I suspect is my LogMeIn connection. Looking that address up in ipdb.at confirms that 216.52.233.173 is indeed LogMeIn (Figure 5).

Figure 4. Wireshark shows a connection with an outside location.
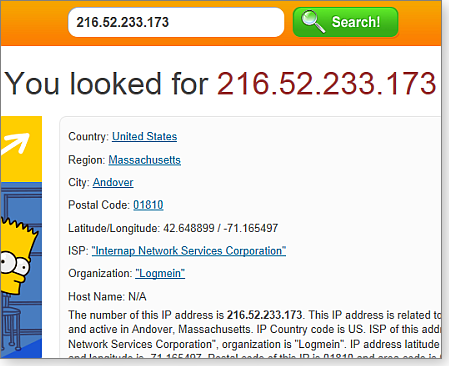
Figure 5. I used ipdb.at to find the owner of a connected IP address.
You can also use Wireshark to determine whether your email clients are securely transmitting your username and messages. With Wireshark running, launch your email client and check for new mail. In my example, I’ve purposely disabled the client’s SSL settings and connected to the mail server using an unsecure connection. I’m using an IMAP-based email account hosted by GoDaddy.
After checking for new mail, I stop the Wireshark logging session and start my search for the related packets. To make the search easier, I can click Edit/Find Packet and enter “imap” into the Filter box. Sure enough, scrolling down the list, I find that my computer connected to the email server and started exchanging data. (I could have also clicked Wireshark’s Protocol column to re-sort the list and then scrolled down to the “IMAP” listings.)
Typically, you’ll see various “hello” strings, as the client software sets up a connection to the server. In my test of an unsecure exchange, I can see my username and password, captured by Wireshark in plain text (Figure 6). This is just how a hacker might steal your username and password while you’re sitting at the local coffee shop — except the packets are traveling over Wi-Fi. It demonstrates why it’s so important to ensure that you have SSL enabled for your Internet authentications.
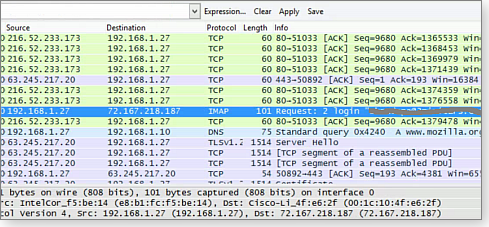
Figure 6. With SSL disabled, Wireshark shows that my email sign-in name (redacted in this screenshot) was sent in plain text.
With SSL turned on, I’m unable to see my credentials in the Wireshark capture — nor would anyone else be able to. Figure 7 shows that the IMAP client set up an encrypted-handshake session. Because I’m using Thunderbird, my email client also connected with the Mozilla website.

Figure 7. Wireshark shows an encrypted handshake with my email server, plus a connection with Mozilla and unreadable credentials and content.
When I scroll farther down the list, I can see my workstation communicating with GoDaddy’s IMAP server and starting a server-key exchange. Also, unlike the non-SSL connection, I can no longer read the content of my messages in the Wireshark captures.
Reviewing the TCP/IP traffic on my system, I didn’t see anything that I would consider abnormal. I noted that the backup server on my network contacted the PC periodically — a normal process of checking in. I also saw that my workstation would periodically check Network Time Protocol servers (site) to ensure it had the correct time. There were various system events — all normal — such as checking for system and anti-malware updates plus other maintenance tasks.
Setting the baseline for what’s ‘normal’
Tools such as Wireshark have their troubleshooting limitations. For example, they don’t make it easy to distinguish normal network traffic from something malicious. Often it comes down to monitoring your system and developing a feel for what’s normal and what’s not.
Here’s a case in point. The other day, one of my workstations started misbehaving. It was slow and constantly popped up “Please wait” messages. Eventually, my Outlook client wouldn’t open — I couldn’t even sign in to the account to review settings.
I launched Wireshark to see whether there was any malicious traffic, but there was nothing that would explain the problem. So I started poking around file locations and realized that the .ost file (more info) in my Exchange email setup had ballooned to a massive size — and was grinding my entire system to a halt.
I renamed the .ost file and then reopened Outlook so it could rebuild the file (something you can do with Exchange or Office 365 but not with a POP or IMAP setup using the .pst file format). With that done, my workstation was back to its normal self.
The upshot? Troubleshooting tools such as Wireshark, Autoruns (WS story), Process Explorer (WS story), and other utilities won’t tell you specifically what ails your PC. But they will help narrow down possible causes. It’s typically up to you to determine what’s “abnormal” on your system.
Off-the-record discussions about technology
Get a group of techies together, and there’s bound to be some interesting discussions — such as how to revive old technology.
Also: A handy tool for discovering local IP addresses, and another unscheduled batch of updates from Microsoft.
Windows Secrets’ behind-the-scenes community
As you might expect, the editors of Windows Secrets get lots of email about our recent articles. But we also get requests for help with computing problems. The more interesting of these are covered in the LangaList Plus column. But as time allows, our other contributors will also try to help, via an email response. (I’m somewhat reluctant to reveal this fact because their time is valuable, and they’re not compensated for their off-the-record efforts.)
Occasionally, a reader’s question starts a longer discussion among the contributors. Recently, for example, we received a query about auto-dialers — a technology I’d forgotten about. In fact, much of the early discussion (via email, unfortunately) centered on what exactly the reader meant by “auto-dialer.” It soon became clear that he was referring to a special type of connection between PC and desk phone — one that would let him look up a name in his contact list and click a button to dial the number. He’d used the technique in the past but couldn’t figure out how to set it up with today’s technology.
It was a handy feature for anyone who made a lot of calls during the day. But it would seem that smartphones and Skype have made auto-dialing (as contemplated by our reader) either obsolete or taken it to its ultimate point-and-dial conclusion. (I must confess I no longer remember the numbers for family members.)
In any case, contributor Doug Spindler reminded us that there’s a dial feature in Office 2013 — and has been since Office 2003. For the hardware connection, he suggests another nearly obsolete device: the common modem. If your newish system doesn’t have one, you can easily find a USB-based version. Add a good headset, and you’re ready to go.
Another tool for examining network connections
While editing our Top Story on using Wireshark to help with computer troubleshooting, I recalled an issue I’d had with one of my network printers. One day, it simply wouldn’t communicate with my work PC. Eventually, I solved the problem by updating the printer’s IP address in the PC’s printer-properties dialog box.
As the Top Story points out, finding the local IP address for a computer is relatively easy, using Windows’ IPConfig command. But how about all the other devices on your home or small-business network? In researching that problem, I ran across a simple and free utility that scans your local net and displays a list of all devices it finds; it gives the address, manufacturer, and MAC address. Advanced IP Scanner (site) can be run as a portable app or installed using the usual Windows method. It has various other features, such as the ability to show and open folders shared over your network. You can even use it to remotely turn some machines on and off.
Another batch of unexpected updates from MS
Keeping our PCs fully updated seems to be getting even more complicated. This past April, Microsoft released a second batch of nonsecurity updates less than a week after the regularly scheduled Patch Tuesday (April 14). Now, the May patch-release schedule is repeating April’s.
Patch Watch’s Susan Bradley reports that Microsoft released another batch of nonsecurity updates this past Monday — again, less than a week after May’s Patch Tuesday release. We’d be happier if Microsoft released all security updates on the official Patch Tuesday and then all nonsecurity updates two weeks later. But issuing both security and nonsecurity updates one week and then another batch of nonsecurity updates six days later just seems confusing — and it makes us wonder what’s going on with Microsoft’s patching crew.
Susan notes one patch in particular: KB 3022345, which enables Microsoft’s Diagnostics Tracking Service. It’ll report corruption if you run the sfc /scannow command after installing the update. Susan considers this to be a bogus error and expects that Microsoft will fix it.
Most of the new releases are for Windows 8.1. For those who follow Patch Watch, the new updates for workstations include the following:
- 3029432 – Win7/8.1; slow sign-in for new users
- 3029603 – Win8.1; xHCI driver crashes
- 3034348 – Win8.1; “Access denied” error
- 3037313 – Win8.1; Leftover files after VM-storage migration
- 3041857 – Win8.x; “Code 0x80070057 …” error
- 3045634 – Win8.x; failed PPP connections
- 3045746 – Win8.1; Font issue in Windows Store
- 3054464 – Win8.1; Apps using AddEntry crash
- 3054476 – Win7; stream.sys driver-based apps
- 3055323 – Win8.1; Enables security feature
- 3055999 – Win8.x; APN database update
Susan recommends not installing these updates for at least another week. She’ll discuss them in next week’s regularly scheduled Patch Watch.
Do you want an app for the time of day?
 |
Conan O’Brien and Andy Richter had some fun recently at Apple’s expense, as they quizzed Siri about the time of day via Andy’s new Apple Watch. As everybody knows, Apple doesn’t make mistakes. So you can watch this video for the wry pleasure of two comedians’ take on technology — and on our sometimes misplaced expectations. How many times have you said: “Gee, I must be doing something wrong.” Click below or go to the original YouTube video. |
| Post your thoughts about this story in the WS Columns forum. |
Windows 8 upgrade error locks user's files
When Windows’ file-and-folder permissions go awry, you might be unable to access your own data! But you can regain control with a few easy steps.
This article discusses two quick workarounds, plus methods to help permanently resolve even difficult permissions problems.
An unpleasant surprise follows a Win8 upgrade
Reader Marsha Casey’s move from Win7 to Win8 seemed to go well — but then came the shocking discovery that she was locked out of her external drive.
- “I’ve recently encountered a problem for which I can’t seem to find help. I copied files from a Win7 laptop to my external hard drive [to prepare for an upgrade to Windows 8]. When I finished installing Win8, I tried to copy those files back — but then got a message that I don’t have correct permissions. I ran a Kaspersky full scan on that drive, and it found no problems.
“The permissions on those files are set to Full Control for Everyone, System, Admins, and me. I’m at a loss as to what else I can do to get my files. Any ideas you can give me would be very much appreciated.”
Wow, what a frustrating problem! Your files are right there — but you can’t access them.
As you surmise, this is almost certainly due to mangled permissions settings. And you did exactly the right thing by manually checking the permissions. Typically, you’d do so by right-clicking the target files or folders, selecting Properties/Security, and then reviewing the permissions via the Edit and/or Advanced buttons. There, you can make any necessary adjustments to permissions for users and groups.
In most cases, those steps work fine, and all users should be able to read, write, change, or delete the selected files/subfolders.
But that didn’t work for you, so you’ll have to dig a little deeper.
Windows’ permissions can be very complex. For example, there are six basic permission types: Read, Write, Read & Execute, List Folder Contents, Modify, and Full Control. In addition, there are over a dozen special and custom permission variations.
Permissions can be applied globally or per user, and they act differently depending on how a user is signed in (i.e., administrator, standard user, guest, or child).
Permissions also vary according to how the separate (but related) sharing settings are configured — and whether the attempted access is local or remote.
Moreover, Windows 8 adds a new way to handle file and folder ownership, which can cause problems if your Win8 username is different from what was used with Win 7 or Vista — as is often the case. Win8 might see your older files as being “owned” by someone other than you!
And that’s just for the standard explicit permissions. The less obvious inherited permissions add even more complexity. For example, a subfolder normally inherits the permissions of its parent folder(s). When a folder tree is many levels deep and you try to manually adjust one or more folders somewhere in the folder tree, the inheritance permission chain can get royally tangled.
That’s a daunting list of things that can go wrong. Rather than trying to nit-pick individual settings, I’ve found that the shortest way to untangle permissions messes is usually to remove all access restrictions for all users. I then go back and adjust the ownership and inheritance settings, as needed.
That practice should help you regain access to all your files or folders.
But before diving into the permanent fixes, I suggest you try two quick and easy workarounds. Although neither will correct the root problem or problems, they might at least let you regain access to your locked files right away.
Quick fix 1: Try this. Repeat your attempts to copy your files, but verify that you’re truly copying and not trying to move (or cut-and-paste) the files. I know that sounds a little silly, but here’s the thing: a simple copy-and-paste operation requires the relatively relaxed Read access permission. In contrast, a move or cut-and-paste requires both Read and Modify permissions. A simple Read operation might succeed where a Read/Modify will fail.
Quick fix 2: If a plain-vanilla copy doesn’t work, exit Windows and boot your PC with a self-contained DVD/CD/Flash-based “live” Linux distribution or rescue disc of your choice. A Linux setup might “see” your files differently and allow you to copy them from the external drive to your main hard drive or other location — bypassing Windows-based restrictions. (Need a good Linux live distro? There are many, and most are free. See, for example, Linux Mint, Ubuntu, Pendrivelinux, and so forth. The LiveCD List also lists many, many other alternatives.)
Whether or not these workarounds let you copy your files, you’ll eventually want to permanently resolve the permissions problems. The following methods focus on Win8 (because that’s what Marsha is using), but the steps and techniques are similar for Win7 and Vista.
These instructions assume you’re signed in to an account with administrator privileges. I’ll start with the simplest method: rebuilding the Sharing settings.
- Right-click a problematic folder and select Properties/Sharing. Click the Share button; the File Sharing dialog box will open.
- Look at the Name listings. If the Everyone group is shown, open its pull-down menu under Permission Level and select Remove, as shown in Figure 1. The Everyone group should disappear from the Name listings.

Figure 1. Start a sharing-problem fix by removing Everyone from the permissions list.
- When the Name field shows no listing for Everyone, re-create it by entering “everyone” into the text box and clicking Add (Figure 2).

Figure 2. Re-creating the Everyone group
- Click the newly created Everyone listing, open the pull-down menu under Permission Level, and select Read/Write.
- Click the Share button at the bottom of the dialog box and then click Done in the File Share dialog box. You’ll be returned to Properties.
Try to access your files. If you’re still having trouble, try adjusting the advanced sharing options.
- Return to Properties/Sharing and click the Advanced Sharing button.
- In the Advanced Sharing dialog box, tick (enable) the Share this folder box at the top and then click the Permissions button (Figure 3).

Figure 3. Adding advanced permissions
- If Everyone isn’t shown in the Permissions dialog box, click Add — the Select Users or Groups settings box will open. Type “Everyone” into the space labeled “Enter the object names to select” and then click OK. You’ll be returned to Permissions.
- Now select Everyone and tick the Allow boxes for Full Control, Change, and Read (Figure 4).

Figure 4. Give the new Everyone group all available permissions.
- Click the OK buttons until you’ve exited all the Properties dialog boxes.
Try accessing your files now.
If you still can’t get at your files, the problem might be with the folder’s inheritance and/or ownership settings. Here’s how to adjust them.
- Navigate to the topmost folder of the drive where your inaccessible files reside (in Marsha’s case, the external drive’s topmost folder would be its mapped drive letter — D:, E:, F:, etc.). Right-click and select Properties/Sharing. Adjust the folder’s basic Sharing permissions, as described above. Try accessing your files again.
- If access is still blocked, right-click and select the topmost folder’s Properties/Sharing tab and adjust the Advanced Sharing settings, as described earlier.
- If your files remain inaccessible, right-click and select the topmost folder’s Properties/Security tab. Click the Advanced button. Figure 5 illustrates the following steps.
- Near the top of Advanced Security Settings dialog box, check who’s listed as the folder’s Owner. If your current, Win8 username is not shown, click the Change link to the right and follow the on-screen steps to enter your Win8 username and give it ownership of the target folder and its subfolders.
- Next, ensure that inheritance is enabled. If you see an “Enable inheritance” button in the lower-left corner of Advanced Security Settings, click it. (Don’t click the button if it says, “Disable inheritance.”)
- If the check box for “Replace all child object permission entries with inheritable permission entries from this object” is empty, tick it to enable this option, as shown in Figure 5.

Figure 5. Check the folder's ownership and inheritance settings.
It’s hard to imagine bad permission settings surviving those settings changes, but if you still can’t fully access your files, it’s time to bring out the big guns.
To start, enable Windows’ hidden Administrator account, as described in the May 14 Top Story, “Activate Windows’ hidden, master admin account.” Sign out of your normal user account and into the newly revealed Admin account, then repeat the preceding steps. Manually set the basic permissions (as Marsha originally did) and then, in sequence, adjust the Sharing, Advanced Sharing, Owner, and Inheritance settings. Test your file access after each step.
And if even that doesn’t work, try downloading and running SubInACL from the Admin account; it’s a free Microsoft Resource Kit tool designed to let admins quickly modify NTFS file and folder attributes — permissions, ownership, and domain. A Microsoft Answers thread contains a 10-step how-to on downloading and using the app to reset file/folder permissions to defaults. (Note: This is an older tool that’s not specifically designed for Win8. But if you’ve tried everything else and still can’t access your files, it’s worth a try. Make sure you restrict the use of SubInACL to modifying only the permissions of the malfunctioning folders.)
If that doesn’t work, well — you’re running out of options. But you can try the advanced (and, frankly, difficult) steps outlined in Microsoft Support article 313222, “How do I restore security settings to a known working state?”
But I don’t think it’ll come to that. Almost surely, one of the simpler options will get your files unlocked and open for full, normal access. Good luck!
Use Word macros without learning to write code
Microsoft’s macro-programming language, Visual Basic for Applications (VBA), can automate many of your regular MS Word chores.
Here’s an introduction to creating simple and useful macros — without the work of learning to be a full-on programmer.
Trading simple for flexible and complex
Writing a macro was considerably easier 20 years ago, back when Word included the simple and intuitive WordBASIC language. If you knew Word’s various menu commands, understood the basics of Boolean logic, and could press F1 for help, you could most likely write useful macros. But with Word 97, Microsoft dropped WordBASIC for the more powerful and professional VBA.
Professional programmers were delighted — I wasn’t.
The tradeoff for a more powerful language was simplicity. Taking full advantage of Word automation requires a thorough understanding of VBA, and if you’re not a professional programmer, VBA can leave you bewildered and frustrated. However, there’s plenty you can do with just a bit of VBA knowledge — and some help from Word. I’ll show you how to create macros by recording task steps, tell you where to keep your new macros, and describe the best ways to launch them. And because I’ve dabbled in VBA, I’ll offer a few of my own simple macros.
Note: VBA isn’t limited to Word; you’ll also find it in Excel and PowerPoint. You can take much of what’s described below and apply it to the other Office applications.
All the macros and instructions I provide in this article will work for Word 2010 and 2013.
What’s a macro? Revealing Word’s macro tools
Generally speaking, macros are user-created scripts, usually specific to particular applications. They’re used to automate common chores and ensure that specific tasks run in a uniform way.
Macros can be basic — you might, for example, create one to automatically apply specific settings when an application is launched. Or a macro might make typing easier. For instance, I made a Word macro that, with one keystroke, toggles a single typed letter between uppercase and lowercase.
Typically, the more complex the task, the more complex the macro. For instance, I also have a slightly complicated macro that helps me create invoices for articles I’ve sent to my editor. This macro required some programming because it stops several times to let me type in needed information. (If I were a better programmer, some of that input would be entered automatically.)
If you want proof that Microsoft sees the creation of macros as a professional task, it’s this: Word’s Developer tab, which contains the tools needed to build macros, is hidden by default.
To reveal it, right-click the ribbon and select Customize the Ribbon. The Word Options dialog box will have two lists; look for Developer in the right column, titled Main Tabs. Check it, and it should appear as one of the tabs in the ribbon.
Okay, now we can get to work.
Creating macros by recording specific tasks
Recording a macro is best for any task that doesn’t need user input or any Boolean-logic branching (e.g., “If this is the case, do that; if not, do something else”). The macro will simply duplicate a set series of steps you take to complete a task.
To start, click the Developer tab and look in the Code section (far-left side of the ribbon) for the Record Macro option (see Figure 1).
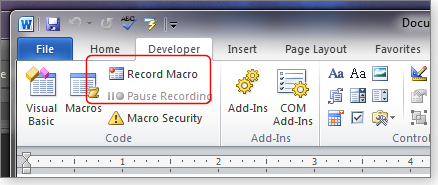
Figure 1. Click the Record Macro button to create a macro for simple tasks.
Clicking Record Macro will pop up the related dialog box. The Macro name and Description fields are self-explanatory; I’ll just discuss the Assign macro to and Store macro in options below. (I’ll talk about them in reverse order because you really need to know where to store a macro before you assign it to anything.)
A macro can be stored in a particular document, in which case it’ll be active only when the document is open. (Note: A document containing a macro must have the *.docm extension. If you open such a document that you didn’t create, it will open in Protected View mode.)
If you want a new macro available in all documents, store it in the Normal.dotm template. You can also create custom templates — say, for different kinds of jobs — and store macros within them. Those macros will be available only to documents created from the respective templates.
There are several ways to launch a macro. You can, for example, click the Macro button in the Developer/Code section, select the appropriate macro, and click the Run button. But the better option is to place it on the Quick Access Toolbar. Click the Button icon in the Record Macro dialog box (shown in Figure 2). Next, select the macro in the left-hand list (it’ll probably be the only one) and click the Add button to put it in the right-hand list, as shown in Figure 3. Click the Modify button to give the macro a shorter name and a more meaningful icon.
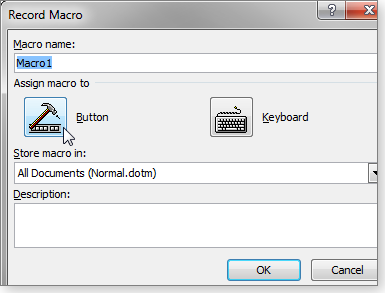
Figure 2. Macros can be assigned to the Quick Access Toolbar with the Button icon.

Figure 3. Moving a new macro to the Quick Access Toolbar
But for the macros you expect to use most, skip the Toolbar and assign them to keyboard shortcuts. Click the Keyboard icon in the Word Options dialog box. Now, with the cursor in the Press new shortcut key field, enter the desired key combination (see Figure 4). (If that combination is already assigned to something else, you’ll be told so.) Click the Assign button to attach the macro to the key combination.
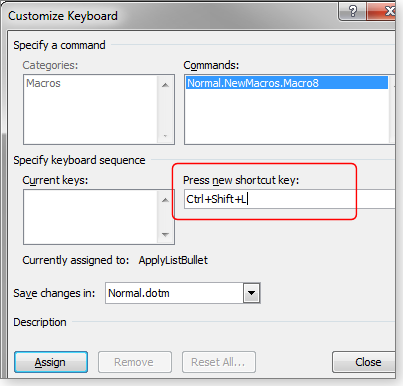
Figure 4. The easiest way to run a macro is via an assigned keyboard shortcut.
In either case, recording starts as soon as you click the OK button. Word will record everything you do on the keyboard as well as mouse activity on the ribbon or in dialog boxes.
It won’t record any mousing within the document’s text. Why? If you click the Bold icon, the macro recorder can easily understand that you want to turn on (or off) bold formatting. But the recorder notes only actions taken — not the cursor’s location within your document or the highlighted content. So clicking, say, a word within your text location is ambiguous; the next time you run the macro, the cursor could be somewhere else entirely, highlighting some other word.
How do you get around that? If you want the macro to select a particular word, search for that word while you’re recording. Or, if you want to move the cursor to the beginning of the next paragraph, press Ctrl + down arrow. (If you have a relatively complex set of steps, you might want to practice them with the recorder turned off — or try recording some of the steps to see what happens.)
You can pause the recording by clicking the Pause button, then click it again to continue recording.
When you’re done, click the Stop icon — it replaced the Record button when you started the process.
A quick guide to managing your macros
Once you’ve got a few macros under your belt, you’ll probably want to go through them, deleting the ones you don’t like or that don’t work as expected. You can also try your hand at fixing them. To do so, click the Macros icon in Developer/Code (immediately to the left of the Recording Macro button).
You’ll see a list of all available macros. (Depending on where you saved the macros, the list might — and probably will — change from document to document.) If you have a long list of macros, you can narrow the list with the Macros in pull-down menu. You can, for example, see macros associated only with the current document.
The Macros dialog box has six buttons on the right (see Figure 5). Let’s go through them:
- Run: This one needs no explanation.
- Step Into: Use this option for debugging. Because we’re avoiding code, we’ll skip this one.
- Edit: This opens the code for a particular macro. You might use it to investigate the commands for a macro or to make minor fixes.
- Create: I’ll discuss this in the next section.
- Delete: I think you can figure this one out.
- Organizer: This is an advanced tool; we’ll skip it for this article.
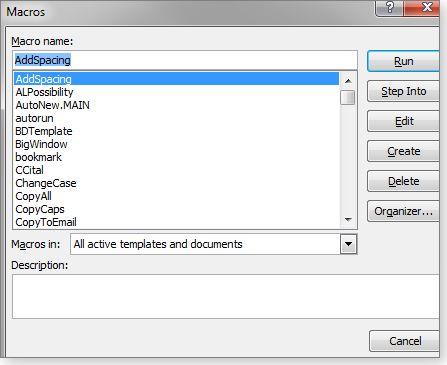
Figure 5. The Macros dialog box includes various options for managing and using existing macros.
A quick note about naming macros: if you use AutoExec for the name, it’ll run every time you open an associated template or document. A macro named AutoNew will automatically run every time you create a new document. Also, note that macro names can’t include spaces or special characters.
Some simple, useful macros to get you started
I’m not going to teach you how to program, but I will give you some code you can use as is. Here are four macros I created on my own, although two of them are useful only when used together.
To add one to your document or template, click the Macro icon. Next, enter the macro’s name given below and click Create. This’ll bring up the VBA development environment, with the first and last lines of the code already there (for example, Sub DeleteSentence() and End Sub). Just copy and paste the text highlighted in bold below in between (see Figure 6).
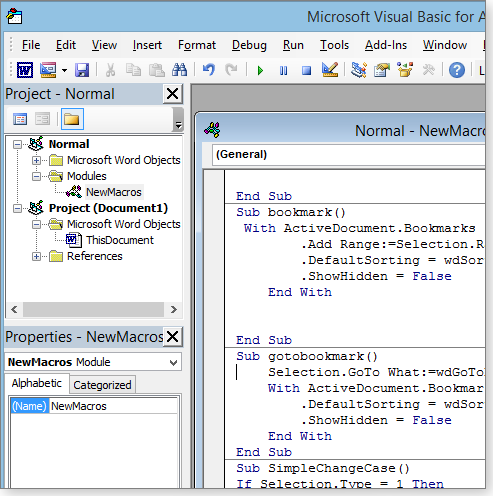
Figure 6. The Visual Basic for Applications window lets you create, edit, and manage all macros.
Once you’re inside the VBA environment, you can simply copy and paste a full macro into it. Word will recognize that it’s an individual macro and will also know its name.
The code is saved automatically when you close the VBA coding window.
- Macro name: DeleteSentence
(This one does just what the name implies.)
Sub DeleteSentence()
Selection.Expand Unit:=wdSentence
Selection.Delete Unit:=wdCharacter, Count:=1
End Sub
- Macro name: SmartPageDown
(This macro is simply a better type of page-down. Paragraphs partially visible at the bottom of the window before running the macro will be wholly visible at the top of the window when the macro finishes.)
Sub SmartPageDown()
Selection.MoveDown Unit:=wdScreen, Count:=2
Selection.MoveUp Unit:=wdWindow
Selection.MoveUp Unit:=wdParagraph, Count:=1
End Sub
Note: The next two are a set. One inserts a bookmark; the other finds it.
- Macro name: Bookmark
Sub Bookmark()
With ActiveDocument.Bookmarks
.Add Range:=Selection.Range, Name:=”here”
.DefaultSorting = wdSortByName
.ShowHidden = False
End With
End Sub
- Macro name: GotoBookmark
Sub GotoBookmark()
Selection.GoTo What:=wdGoToBookmark, Name:=”here”
With ActiveDocument.Bookmarks
.DefaultSorting = wdSortByName
.ShowHidden = False
End With
End Sub
Make existing macros easy to run
Obviously, macros are useful only if they’re easy to access. I use keyboard shortcuts for the macros I use constantly, because they’re so quick to access. The Quick Access Toolbar works well for less frequently used macros, because I don’t have to memorize where they are.
Again, when you record a macro, Word helps you put it on the Quick Access Toolbar or turn it into a keyboard shortcut. But when you create a macro via the Macro dialog box or the VBA environment, you get no such help.
To place a macro into the Quick Access Toolbar, right-click either the toolbar or the ribbon and select Customize Quick Access Toolbar. The resulting dialog box will be similar to the one you used when recording a macro. You will, however, notice many more options in the left column. To filter the list, click the drop-down menu under Choose commands from: and select Macros.
Next, choose an option from the right-hand Customize Quick Access Toolbar list, select the macro in the left column, and then click the Add button.
You can use the same procedure to add macros to the ribbon — simply right-click the ribbon and select Customize the Ribbon. You’ll have to pick a tab in the right column and create a new group for your macros.
To create a keyboard shortcut, right-click the ribbon or Toolbar and select Customize the Ribbon. Yes, I know it’s counterintuitive, but if you look at the lower-left corner of the dialog box, you’ll find Keyboard shortcuts: with a Customize button.
Click it, and you’ll be back to the familiar Customize Keyboard dialog box.
If you’re an infrequent Word user, creating macros is probably a waste of time. Why spend 10 minutes figuring out how to save one minute? But if you do that one-minute task several times a day, every day, cutting it down to a couple of seconds will be worth the effort. I invite you to share your favorite Word macros via the Windows Secrets Lounge link. There’s more macro help in the Lounge; see a related thread.
Publisher: AskWoody LLC (woody@askwoody.com); editor: Tracey Capen (editor@askwoody.com).
Trademarks: Microsoft and Windows are registered trademarks of Microsoft Corporation. AskWoody, Windows Secrets Newsletter, WindowsSecrets.com, WinFind, Windows Gizmos, Security Baseline, Perimeter Scan, Wacky Web Week, the Windows Secrets Logo Design (W, S or road, and Star), and the slogan Everything Microsoft Forgot to Mention all are trademarks and service marks of AskWoody LLC. All other marks are the trademarks or service marks of their respective owners.
Your email subscription:
- Subscription help: customersupport@askwoody.com
Copyright © 2025 AskWoody LLC, All rights reserved.

Plus Membership
Donations from Plus members keep this site going. You can identify the people who support AskWoody by the Plus badge on their avatars.
AskWoody Plus members not only get access to all of the contents of this site -- including Susan Bradley's frequently updated Patch Watch listing -- they also receive weekly AskWoody Plus Newsletters (formerly Windows Secrets Newsletter) and AskWoody Plus Alerts, emails when there are important breaking developments.
Get Plus!
Welcome to our unique respite from the madness.
It's easy to post questions about Windows 11, Windows 10, Win8.1, Win7, Surface, Office, or browse through our Forums. Post anonymously or register for greater privileges. Keep it civil, please: Decorous Lounge rules strictly enforced. Questions? Contact Customer Support.
Search Newsletters
Search Forums
View the Forum
Search for Topics
Recent Topics
-
Lumma malware takedown
by
EyesOnWindows
5 hours, 19 minutes ago -
“kill switches” found in Chinese made power inverters
by
Alex5723
6 hours, 53 minutes ago -
Windows 11 – InControl vs pausing Windows updates
by
Kathy Stevens
6 hours, 47 minutes ago -
Meet Gemini in Chrome
by
Alex5723
10 hours, 52 minutes ago -
DuckDuckGo’s Duck.ai added GPT-4o mini
by
Alex5723
11 hours, 1 minute ago -
Trump signs Take It Down Act
by
Alex5723
19 hours ago -
Do you have a maintenance window?
by
Susan Bradley
6 hours, 9 minutes ago -
Freshly discovered bug in OpenPGP.js undermines whole point of encrypted comms
by
Nibbled To Death By Ducks
6 hours, 41 minutes ago -
Cox Communications and Charter Communications to merge
by
not so anon
22 hours, 19 minutes ago -
Help with WD usb driver on Windows 11
by
Tex265
1 day, 3 hours ago -
hibernate activation
by
e_belmont
1 day, 7 hours ago -
Red Hat Enterprise Linux 10 with AI assistant
by
Alex5723
1 day, 11 hours ago -
Windows 11 Insider Preview build 26200.5603 released to DEV
by
joep517
1 day, 14 hours ago -
Windows 11 Insider Preview build 26120.4151 (24H2) released to BETA
by
joep517
1 day, 14 hours ago -
Fixing Windows 24H2 failed KB5058411 install
by
Alex5723
10 hours, 13 minutes ago -
Out of band for Windows 10
by
Susan Bradley
1 day, 18 hours ago -
Giving UniGetUi a test run.
by
RetiredGeek
2 days, 1 hour ago -
Windows 11 Insider Preview Build 26100.4188 (24H2) released to Release Preview
by
joep517
2 days, 9 hours ago -
Microsoft is now putting quantum encryption in Windows builds
by
Alex5723
5 hours, 12 minutes ago -
Auto Time Zone Adjustment
by
wadeer
2 days, 13 hours ago -
To download Win 11 Pro 23H2 ISO.
by
Eddieloh
2 days, 11 hours ago -
Manage your browsing experience with Edge
by
Mary Branscombe
11 hours, 4 minutes ago -
Fewer vulnerabilities, larger updates
by
Susan Bradley
1 day, 4 hours ago -
Hobbies — There’s free software for that!
by
Deanna McElveen
4 hours, 42 minutes ago -
Apps included with macOS
by
Will Fastie
1 day, 8 hours ago -
Xfinity home internet
by
MrJimPhelps
1 day, 5 hours ago -
Convert PowerPoint presentation to Impress
by
RetiredGeek
2 days, 6 hours ago -
Debian 12.11 released
by
Alex5723
3 days, 11 hours ago -
Microsoft: Troubleshoot problems updating Windows
by
Alex5723
3 days, 14 hours ago -
Woman Files for Divorce After ChatGPT “Reads” Husband’s Coffee Cup
by
Alex5723
2 days, 18 hours ago
Recent blog posts
Key Links
Want to Advertise in the free newsletter? How about a gift subscription in honor of a birthday? Send an email to sb@askwoody.com to ask how.
Mastodon profile for DefConPatch
Mastodon profile for AskWoody
Home • About • FAQ • Posts & Privacy • Forums • My Account
Register • Free Newsletter • Plus Membership • Gift Certificates • MS-DEFCON Alerts
Copyright ©2004-2025 by AskWoody Tech LLC. All Rights Reserved.

