
|
Patch reliability is unclear. Unless you have an immediate, pressing need to install a specific patch, don't do it. |
|
WINDOWS: Getting started with winget PUBLIC DEFENDER: No NumLock key? Problem solved! Here’s the fix. HARDWARE DIY: Windows Storage Spaces ON SECURITY: Is Secure Boot important for security? WINDOWS Getting started with winget
By Simon Bisson If you’ve used Linux, you’ll be familiar with package managers such as Debian’s apt and Red Hat’s yum. They keep track of what’s installed on your computer — downloading updates and installing new software, managing dependencies so you always have the right libraries for your code. Drop into your command line, type a few keystrokes, and you’re automatically up to date. Windows hasn’t really had the same design philosophy. Software comes from distributors, on CD, on DVD, and from Microsoft’s own websites. Microsoft’s app store was initially only for packages built using Windows 8’s APPX (though over time it’s expanded to support MSI and MSIX) as well as installers built using the WIX toolkit. But there are still many programs that don’t come from the store — especially all those little utilities that make your life easier. There are others that can’t be distributed that way at all, such as a business’s own internal tools or applications distributed with enterprise licenses. The store model doesn’t provide an easy way to set up all your usual tools on a new PC, keeping an inventory and automatically installing everything you regularly use. Windows has long needed the same sort of package-management tooling as Linux. Although there have been plenty of third-party options over the years, only Chocolatey has had any traction — and there, mainly with developers and system admins. If you’ve ever gone out to find a Windows package manager, you must have truly wanted one, making them tools for IT pros. Linux’s tools are baked into the main distributions. That’s what Windows needs, too — to get package managers into everyone’s workflow. With Windows 11 opening up its store to a wider selection of software, and even providing direct links to downloads from vendors’ own repositories, there’s an opportunity to change completely the way we work with Windows applications. Introducing winget
Microsoft unveiled its Windows package manager, winget, at its Build conference in 2020, with open-source code available on GitHub. It’s now bundled in the Microsoft App Installer, which is used to sideload¹ Microsoft Store apps and runs in all versions of Windows above Windows 10 1709. There are regular preview versions that can be downloaded from GitHub as a one-off install; or, if you prefer to keep your PCs updated with preview builds, you can sign up for the Windows Package Manager Insider program that runs separately from the main Windows Insider program. Winget is a command-line tool; it hooks into the Windows installer service to access what’s installed on your PC. That lets you quickly list what’s already on your machine, as well as look for updates in its repositories. Out of the box, those repositories are Microsoft’s own GitHub-hosted list of packages and the Windows Store. Recent versions have added support for private repositories, and there are already companies offering hosted repository services that can simplify managing your software distributions. The obvious use for winget is to quickly build a list of the software that’s installed on a PC and update it automatically. The most useful winget commands
All you need to do is open a command-line window (Windows 11 comes with the new Windows Terminal for cmd, PowerShell, WSL, and more) and type winget list. This runs a discovery process to see which applications are installed, displaying names along with their winget repository app ID, the current version, update availability, and any sources. Not everything listed is available through winget; some apps have their own update tools, others come from the Microsoft Store. An example of this command’s output is shown in Figure 1.
Having a list of installed software is useful, especially as you can export it and use that data to set up a new PC. Even though the list it produces is limited only to software that’s managed by the Windows installer service, it’s enough to get you started. Microsoft is working on a PowerShell module that should simplify using winget in any scripts, offering commands for most common operations. However, it’s still available only as part of the preview release and requires PowerShell version 7. You can find details of a specific application by using winget show with the app ID. This shows who published the code, what it does, the installer type and download URL, and links to any license and policy details. Winget lets publishers tag their installers to help with search, and there’s even an SHA-256 hash that is used to verify downloads before they’re installed. It is possible to get a list of all available applications in your current repositories by using the winget search command, giving it a wildcard search term as follows:
If using PowerShell, you’ll need to escape the wildcard with tick marks:
This can be a very long list, so make sure you have plenty of terminal history available! By default, winget uses the Microsoft Store and its own repository, which you can check using winget source list. If you want to add a new private repository for your own applications, use winget source add along with the URL of the repository. This must be done with administrator privileges, to reduce the risks of third parties’ adding new repositories without your noticing. That’s much like adding new sources to apt or yum on Linux. The winget install command loads new software packages, automatically running the installer. Usefully, it’s also a search command, so you don’t need to know the full name of an application. If the package found isn’t the one you want, it’s simple enough to cancel the install. Also, if you’re scripting installs, you can choose the –silent option to suppress the installer UI. Other options allow you to choose a specific version as well as automatically accept license agreements. If you’re using an ARM PC, you can choose to install only ARM64 versions to avoid the overhead that comes with x64 emulation. Of course, there’s an uninstall option too, which requires the exact name of the application to be uninstalled. Its most useful feature is probably winget upgrade, especially with the –all option. This updates every application it can, in one go. It’s worth scheduling this weekly to keep up with the latest versions of your everyday applications. Although it uses the version numbers in app manifests, you can force it to try releases that may not include a valid version number. Upgrades can be tied to a specific version number — where you’re pushing bug fixes and want all your users to move away from one that’s known to be bad — or by using the app ID. You can quickly see a list of all pending updates by running the command without any arguments. To see the complete list of winget commands, simply enter winget. Use winget to set up PCs
Winget proves very useful when moving to a new PC. Use winget export to create a machine-readable file of all your apps, ready to copy onto a flash drive or email to yourself, and then winget import to install them all. It can save a lot of time when rebuilding new hardware. For apps that can’t be installed this way, you can use the output of winget list to at least know what else to look for. Because the export file can be edited, it becomes a good way to bring new team members up to speed, especially when used to share things such as development toolchains. One useful option is the ability to use PowerShell to install winget in the Windows Sandbox, allowing you to test installation scripts before making them part of a build process or before deploying them to users. Keeping your tests isolated from your desktop environment in an isolated, sacrificial sandbox makes a lot of sense: you can see if an installer works silently and can experiment with your own packages and repositories. If anything goes wrong, just create a new Sandbox. As the amount of software available through public and private repositories grows, winget is a tool that’s going to become increasingly important. With Microsoft shutting down the Windows Store for Business, it’s likely to become the most effective way to script software delivery, especially when used in conjunction with the new generation of Windows system-management tooling. The result is that rare thing — a Windows utility that’s as useful for the home user as it is for the IT pro. Resources
Footnotes ¹ “Sideloading” means installing an app without using a vendor’s store (e.g., Google Play, Apple App store, Microsoft App store). It usually involves downloading an app’s install file, then manually installing the program.
Simon Bisson is a freelance technology writer living in London. He has been writing about Microsoft tools and technologies since the 1990s — and using them even longer. PUBLIC DEFENDER No NumLock key? Problem solved! Here’s the fix.
By Brian Livingston Most laptop makers are now leaving the NumLock key out of their smaller notebooks. That’s a disaster for people who’ve been getting symbols that aren’t on their keyboard by entering Alt+number — for instance, typing Alt+0169 on the numeric keypad to get the copyright sign (©). Some laptops have a function key for a “hidden” numeric keypad. But I’ll show you much easier ways. Read this today, and you’ll be writing documents faster — mañana!
To use the Alt+number method to enter any of the characters in Figure 1 into a document in Windows, use the following steps:
If the current font has the character you entered, it should immediately show up in your document. Ever since TrueType was added to Windows 3.1, the operating system has always come with text fonts such as Times News Roman and Arial; the Symbol font; and decorative fonts such as Wingdings. Today, Windows includes several new text fonts — for example, Segoe UI, Segoe Script, five so-called “C” typefaces such as Calibri and Cambria — plus Webdings, which includes many useful symbols. For a larger, printable version of Figure 1, download my free PDF. To see samples of each font that comes with Windows, including the version number when a font was introduced, check out Wikipedia’s list of Windows typefaces. A symbol, a symbol! My kingdom for a symbol!
Eek! The maker of your new laptop said adiós to NumLock! You’ve suddenly lost the only way you’ve ever used for entering your favorite symbols that don’t appear on any key. Let’s fix that, pronto.
Who cares about special characters? You do. That’s especially true if you have any of the following uses (or dozens of others):
The US-English keyboard is a horse of a different color compared to many more-capable keyboard layouts worldwide. But we can wring a lot more work and fun out of it than may appear at first glance. Warning: The following tricks work in many languages, but not every language
To improve on the basic, 101-key US-English keyboard, as many software solutions have been proposed as there are written languages in the world. (Thousands!) By necessity, this article can’t possibly cover every variation and language. Let’s focus here on a single, common writing system.
This character set is known as Latin-1. It consists of the 26 usual suspects, A–Z, plus all the text characters in Figure 1 (and many others). The map at left shows in gray those countries that write using mainly Latin-1. This includes North America, South America, the European Union, sub-Saharan Africa, Australasia, Oceania, and elsewhere. Latin-1 is the official script in 131 sovereign states. (Wikipedia) The countries shown in colors other than gray write with a wide variety of non-Latin glyphs or character shapes. (For a key to the map’s colors, see its Creative Commons page.) Perhaps you need to create documents in Cyrillic (e.g., Russian), Arabic, Hebrew, or one of the CJK (Chinese, Japanese, Korean) scripts of Asian countries. If so, you really need a keyboard that’s designed for your specific writing system. The US-English keyboard just can’t be enhanced enough for serious work in scripts other than Latin-1. But, for most of you, read on! There’s a lot you can do to enter text faster and more easily. First of all, try pasting characters in one at a time (not recommended)
Before you consider my free solution, which I explain below, see whether one of the clunky methods that Microsoft already provides would suffice. These may be good enough to satisfy your occasional need for a copyright symbol or the é in résumé.
Microsoft Word supports several Ctrl+key combinations. (I created the table at left for you as a cheat sheet.) Ctrl+key tricks allow you to enter an accented letter after you press and release a particular two- or three-fingered exercise. This method is known as dead keys. For example, when you press Ctrl+, (comma), you see no change in your document when you release the keys. It’s only when you follow the dead-key combination by entering a c or C that you see a “cedilla”: ç Ç. These characters are commonly used in French and Portuguese, but they’re also present in words that have entered general English usage, such as façade and soupçon. For an official list of MS Word’s Ctrl+key combinations, see Microsoft’s support document. If you commonly write in any European language — but you’re stuck with the “plain Jane” US standard keyboard, for whatever reason — you can learn to type fairly fast using dead keys. But you’re still stuck pressing several keys just to get a single character, one at a time. To get around that limitation, you could try three other methods that are built into Word (and some other word processors):
There’s a big problem with all three of the above methods. They work only within MS Word and related apps. That doesn’t help you enter characters into other programs, Web forms, etc. To escape that limitation, consider two built-in apps that work with every Windows program:
CharMap.exe has been around since dinosaurs walked the Earth. (In other words, since Windows 3.1.) To use it, search in the Start menu for charmap. Open the app, which looks like the dialog box at left. Once the app is open, check the box labeled Advanced view. This expands the controls at the bottom of the window. Select Group by: Unicode Subrange, and a smaller window opens (which I usually place to the right of CharMap’s main window). The smaller window allows you to limit the main window to groups such as Punctuation, Currency, Superscripts and Subscripts, Arrows, Mathematical Operators, Misc. Technical, OCR, Enclosed Alphanumerics (letters and numbers in circles), Symbols & Dingbats, and more. You want a bullet? Take that! (See the image above.) Most websites these days support UTF-8. This international standard has enough codespace to represent over 1 million Unicode glyphs. Unicode presently describes only about 150,000 glyphs. But who knows what new languages the teenagers of today may invent? “OMG, he yassified me!” UTF-8 is the encoding used by 98% of all webpages in the world, according to a W3Techs study. In UTF-8, for example, the hex number for the mathematical bullet symbol is U+2219. (See the lower-left corner of the dialog box above.) Unfortunately, your favorite website may be the last one in the world that doesn’t support UTF-8. So double-check before you enter symbols into a Web form to transfer your last million dollars to your overseas bank account. The dialog box above uses Lucida Sans Unicode. It’s included in Windows 98 and every version through Windows 11, but the font contains just 1,758 characters. An alternative is Google’s Noto Sans, with 3,741 glyphs covering all Latin, Cyrillic, and Greek language groups. It coordinates with 100 other language fonts, all of which are downloadable at no cost. See the Noto page.
The Emoji Panel is a feature that was introduced in Win10 and enhanced in Win11. To use it, simply press WinKey+Period. (Hold down the Windows Key while you press “.” — aka a full stop.) A pop-up window appears, as shown at left (Windows 11 version). The app’s default window is packed with smiley faces and every other kind of dingbat blog candy you can imagine. But perhaps entering goofball faces into the emails you write isn’t your thing. If so, select the symbol icon on the ribbon. A pane of symbols and accented letters pushes the emojis aside. The Win11 version of the app displays its available characters in groups: Punctuation, Currency Symbols, Latin Symbols, Geometric Symbols, Math Symbols, Supplemental Symbols, and Language Symbols. The Recently Used section at the top shows your favorite characters. But the app doesn’t reveal any character’s Unicode hex or decimal values and doesn’t allow you to filter glyphs by Unicode subrange. The Win10 version is even more limited. It has the same groupings as the Win11 build, but an older user interface and a smaller range of characters. The Emoji Panel is more of a toy than a true substitute for the far more powerful CharMap. Forget the US-Intl. keyboard, the On-Screen Keyboard, and macro recorders
There are three other possibilities that are often mentioned to help those whose laptops lack a NumLock key. I list them here just to diss them:
The fix is here! Use my free AutoHotKey script to do anything you want
The cheat sheet at left shows my solution to the lack of special characters on the US-English keyboard. No need for MS Word’s finger-twisting key combinations: Ctrl+Shift+Alt+! and the like. You can now use my free app to enter all the text glyphs in Figure 1 — and any of Unicode’s 150,000 characters — by pressing a single Compose key and two additional lowercase keys. (Some exceptions to this rule include accented letters that bear a tilde — such as ñ, which requires Shift to hit the diacritic — and some quote marks.) I call this app Brian’s Quick Keys. My code is built upon the well-known open-source program AutoHotKey. This remarkable (and free) downloadable tool can automate just about every aspect of Windows you can think of. Simply install AutoHotKey, place my free .ahk file in your Startup folder¹, and restart Windows. You immediately gain all the characters shown at left — and much more — at your fingertips. Now you can have “smart quotes” in every document, not just in Word. As a journalist, I love smart quotes. They make it much easier for readers to quickly see where a quotation starts and ends. And I can hardly imagine writing anything technical without having em dashes — like this — to break up sentences into more digestible, bite-size chunks. If people are going to be limited to the 101-key US-English keyboard, with its lack of any Compose key, this is what the software underlying that keyboard should have been all along:
To be sure, AutoHotKey is such a powerful program that learning to code in its terse, symbol-filled script language is a challenge. Fortunately, I’ve done the work for you! Here’s a snippet of Quick Keys. This excerpt powers the procedures that enter é, è, ë, ñ, ç, and em dash for you:
Looks like a cat was strolling across my keyboard, doesn’t it? Fortunately, each operation makes sense — when you know the code:
You can add any Unicode character you like by copying one of my lines, entering your own key combination, and putting the new hex value within the curly braces. An .ahk script is just a text file you can revise as you please in Notepad or any text editor. (You must save your revised file as “UTF-8 with BOM” [Byte Order Marker], one of Notepad’s Save As options.) Everything is moving to Unicode hex values now. The hex numbers are capable of representing over 1 million Unicode characters — more than we’ll ever need. The lack of a numeric keypad on most of today’s laptops is sunsetting the more-limited old Alt+number method. You can discover any Unicode hex value using Windows’ own CharMap applet, as I described above. That assumes you have something like Google’s Noto fonts supporting the Unicode range you’re interested in. Without such a font, you couldn’t enter or print the characters anyway. When making your own key definitions, you’ll want to avoid key combinations that are already in use by Windows. For the set, see Microsoft’s Win10 and Win11 listings. Luckily, it’s pretty safe for you to use a Backquote key sequence or choose Ctrl+Alt+anything. In the old days, DOS rebooted abruptly upon a Ctrl+Alt+Delete. So apps still avoid Ctrl+Alt, even though the “three-finger crash” now asks before restarting. (Exception: Ctrl+Alt+Tab reveals every running app.) Brian’s Quick Keys is free but copyrighted. So you can’t charge anyone for it or bundle it with any commercial or free product without advance permission. However, you can print as many cheat sheets as you like, give them to your friends, stick one on your wall, etc. I hope you enjoy it! To get AutoHotKey 2.0, download it from OlderGeeks.com. Be sure to read the AHK tutorial. To get my Quick Keys app, download the .zip file from AskWoody. If all else fails, just paste the words in
You may or may not decide to act upon any of the information above. So I’ve put together a quick-and-dirty fix for you in the table below. If all you need is one or two diacritical marks every once in a while, you can copy one of the words in this list and paste it into your document, browser, or whatever. The word will be spelled accurately, and no one will ever know you didn’t type it in manually, letter by letter.
Figure 4. This is only a partial list, omitting many individual and place names that contain diacritics. Source: Windows Vista Secrets We can’t solve all the world’s problems. But we should be able to save ourselves from the headache of most laptop makers’ inexplicable decision to delete NumLock from their keyboards. And with that, I bid you a fond à bientôt! (see you later!). Footnote ¹ To open your startup folder, open the Run dialog (WinKey+R), enter shell:startup, and press the Enter key.
The PUBLIC DEFENDER column is Brian Livingston’s campaign to give you consumer protection from tech. If it’s irritating you, and it has an “on” switch, he’ll take the case! Brian is a successful dot-com entrepreneur, author or co-author of 11 Windows Secrets books, and author of the new fintech book Muscular Portfolios. Get his free monthly newsletter. HARDWARE DIY Windows Storage Spaces
By Will Fastie I decided to try Storage Spaces on Opal, just to see what it would be like. It’s a mixed bag. On the one hand, it’s less technically challenging than the Intel Rapid Storage Technology (RST) solution that lives partly in UEFI and partly in a Windows driver. On the other hand, it’s a work in progress, with some confusing configuration steps. Let’s take a quick look. A brief history of RAID
RAID has been around for quite some time. Because it required processing power to operate and because PCs and servers at the time needed every processor cycle they could get to perform well, the task of managing an array of drives was offloaded to a controller board. Drives were attached to that board (with SCSI in the early days), not to the motherboard’s IDE (PATA) connectors. A driver for the controller board made the array appear to be just an ordinary hard drive to Windows or Windows Server. Just as graphics has evolved from graphics cards to built-in processor graphics, so RAID control has found its way into the firmware (UEFI) of the motherboard. That solution moved the controller function from a dedicated board to software that connected directly to modern SATA drives. Although this sounds like a separation, the firmware is just software that executes on the main CPU, just like any other code. Thus at this point, it’s an all-software solution even though it’s in two places. Faster processor speeds made consuming cycles for RAID operations less of an overhead penalty. Hardware solutions are now the realm of very large systems with very high performance requirements. Windows Storage Spaces is a software-based RAID solution that is built entirely into Windows, no firmware involved. Processors just keep getting faster, so at this point the overhead is negligible. This Windows solution completely standardizes drive arrays — nothing external to Windows is required. As long as you have some attached drives (HDD or SSD, SATA or M.2), you can create a storage space on any computer you like. About Storage Spaces
Storage Spaces became available in Windows 10. The most significant change for Windows 11 is that configuration and control over the drive array happens in Windows Settings. In Windows 10, there is a separate control surface that looks like an old-style management console. It can be launched from Settings, but it operates standalone. The old control surface can still be seen in Windows 11. Although I did not explore the old control surface in detail, my cursory examination shows that not much has changed. That is very typical of Microsoft when integration of a management console into Windows Settings has not been completed. When every feature of a particular control area has been migrated to Settings, then the old management console could go away (although many are retained indefinitely). You’ll recall from my earlier articles that Opal had been configured to use two 6TB hard drives in a RAID 1 (mirrored) array controlled by Intel RST. This needed to be shut down, which removes all data from the drives. There was only a bit of test data on the array, so I didn’t lose anything. If the conversion had involved live data, a backup would have been essential. Reconfiguring Opal
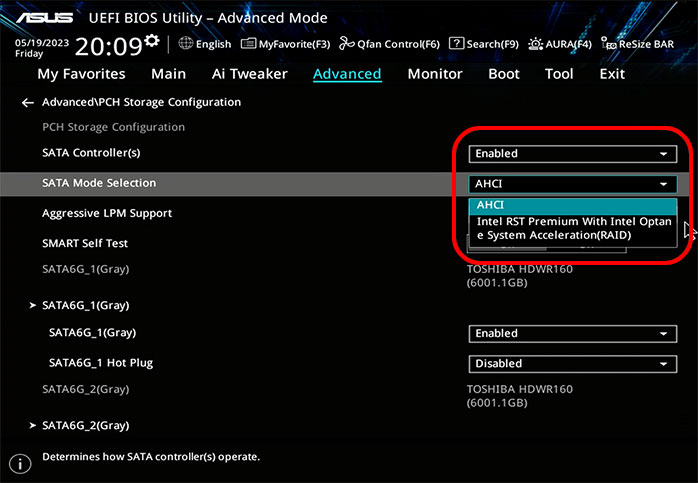
The first step is getting into UEFI and turning off RAID. Figure 1 shows the PCH Storage Configuration section for Opal’s Z590-V motherboard.
Once this setting is changed to AHCI and the PC is rebooted, Windows will no longer see an array but rather two individual 6TB drives. Storage Spaces is part of the System panel of Windows Settings, as shown in Figure 2. (Note that everything you see here was done with Windows 11.)
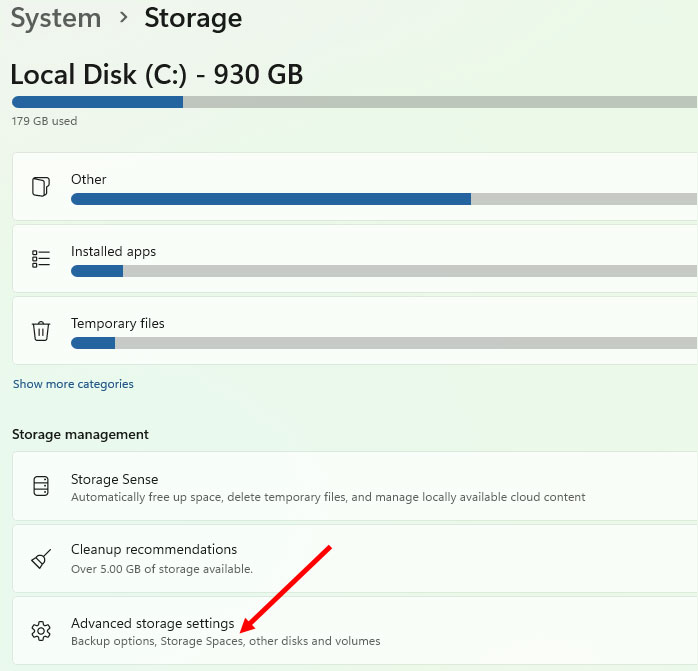
Note: The newsletter’s limited width makes clarity from these large screen captures difficult to achieve. Therefore, subsequent images below will be cropped around the relevant section. Throughout, we’ll be working only in the System section of Settings. Clicking on Storage opens a new panel, as shown in Figure 3.
We’re getting closer. Clicking Advanced storage settings drops down additional options, as shown in Figure 4.
Clicking Storage Spaces brings up a new Settings panel (Figure 5).
This was a rather deep dive. I understand why — Windows Settings is a massive collection of settings covering many areas of Windows configuration. Intel RST includes a control panel dedicated to managing storage, so it gets right to the point without requiring a long drilldown. You can search Settings for “storage spaces,” but it will still take one more click to get to the right place. Most notably in Figure 5, you can see the available Storage spaces (the change in capitalization notwithstanding); of course, nothing has been configured yet, so nothing is listed. We also see the individual 6TB drives (physical disks). This is all under the Breakdown heading. Just above that is an indicator of a storage space named Data with a status of OK. There isn’t such a storage space; I went through this process several times, and it appears Windows remembers what went on previously. This is the first thing I found that was confusing. If these steps are followed when nothing has been attempted before, the display will be different. Next is a graph showing Pool capacity. You can see that the total pool size is 10.9TB, a number that will confuse us again in the next step of the process. That next step is to create a new storage space by clicking the Add a space button. A dialog pops up, asking for a few details.
Confusion abounds here. It begins with the Name, which I set to Data. My mistake was conflating this with the drive label, but it’s the name of the storage space, not the label of the volume that will result. I should have named it something like “Mirror for Drive D,” which is more descriptive. Now for an extremely confusing part. Look at the very bottom of the dialog, and you’ll notice two numbers. The second one, Pool capacity, makes some sense because the available space on a 6TB drive is 5.45TB. There are two drives in the pool, so that’s a total of 10.9. But what’s Maximum pool usage at 21.8TB? That’s twice the total physical capacity of these two drives. I don’t know what it means, so I ignored it. (Yes, I’m sticking my head in the sand for now.) Next comes a user interface (UI) error, something I think is backwards. Under Size & resiliency, the size is shown first, and then the resiliency (which is Storage Space terminology for RAID level) is shown. It should be the other way around — choose the type of array you want first, then figure out (or have the system figure out) the size. I chose Two-way mirror, the equivalent of RAID 1. This means that the actual total capacity available from the 10.9TB pool is not 10.91 as the size field says, but 5.45TB. I made this mistake on my first attempt, and the result made no sense to me. On my second try, I did the advanced math myself, dividing by 2 to get 5.45. I then entered that into the size field. My opinion is that the system should have done these calculations for me. Intel’s RST does them; surely Microsoft can figure that out, too. There must be some rationale for this presentation, but it escapes me.
There are five options on the Resiliency dropdown. The term is a bit fancy, but it’s accurate — it means how well the storage space can tolerate a failure of one of its member drives. Simple means the drives are combined to form one large drive, but it offers no protection from drive failure. It’s not a RAID level. I’m not sure why it’s included, although it could be used to make a large disk out of a bunch of smaller ones, which might be handy for big data or video. But if a drive fails, data is lost. No resiliency at all. A Two-way mirror is RAID 1 using two drives. One drive can fail, and the array can be rebuilt. A Three-way mirror is also RAID 1 but with three drives instead of two. This means that two drives can fail, and the array can still be rebuilt. Technically, RAID 1 can have more than three drives, but even a three-drive array is rare. Additional drives increase resiliency, but not size — no matter how many drives, the resulting volume is the size of the smallest drive in the array. Parity means RAID 5. At least three drives are required, one of which is the parity drive. For n drives of capacity c, the total capacity is c(n-1). For example, with four 6TB drives, the total capacity is 18TB. One drive failure can be tolerated, and the array can be rebuilt. Dual parity means RAID 6. At least four drives are required, two of which are parity drives. Total capacity is c(n-2). Two simultaneous drive failures can be tolerated, and the array can be rebuilt. This list of RAID levels is not comprehensive, but for most of us the ones provided are good enough. The most likely choices will be Two-way and Parity.
Clicking the Create button on the New Storage Space dialog advances to another dialog. This is where the Drive Letter and Label are added. And this is why I made a mistake when I named the storage space Data. I did not draw a distinction between the name of the volume as Windows would see it, the traditional way drives are labeled, and the name of the storage space. There’s a certain lack of clarity here that could be solved by combining these two dialogs so all the settings can be seen at one time. As you can see, there is a dropdown for the File System type. In my case, only NTFS was offered. At this stage, the volume can be formatted. The first time I did this all was well, but when I redid it to capture screen images, something went wrong. I suspect the system saw that the drives were already formatted and did not handle that well. I’ve invested a lot of space describing these two dialogs for creating a new Storage Space. I found this part of the process somewhat opaque and confusing. Perhaps it’s just because this was my first time. Once the drives are formatted, the volume is ready to go. The system returns to the Storage Spaces panel with the new space displayed (Figure 6).
The UI needs work here as well. Compare Figure 6 with Figure 5. Figure 6 shows the new D: volume, but it does not clearly identify the member drives in the array. The Physical Disks section gives no indication that the drives have been assigned. Again, Intel RST makes these relationships crystal clear. Clicking the Properties button next to a storage space shows information about the volume, not the array. With the array configured, I launched File Explorer to confirm that the D: drive existed. Gratified that it did, I then copied about 80GB of data so I could do a test. I shut down the PC and removed the SATA connector from one of the drives, then powered up the PC again. Everything seemed fine. I was able to go to the D: drive and explore the files therein.
But that’s bad. I had simulated a drive failure, but no notification appeared. You may recall from my article about Onyx that I received an in-your-face alert from the RST firmware about a drive failure before Windows even booted, so I was instantly made aware of the problem. It took quite some time for the warning to appear in notifications (left); I went looking for it in Settings before it showed up. This is another flaw in the Storage Spaces system — if there is a failure, the user should hear about it at the earliest possible time, and loudly. An entry in Windows’ notification sidebar could go unnoticed for quite some time. After all, I didn’t notice a problem when I was tiptoeing through the files — all seemed normal. There is no indication in File Explorer. Once the problem is noticed, the Storage Spaces panel in Settings does provide details. You can drill down to see the problem, as shown in Figure 7.
The “Check Storage Spaces …” notification shown is clickable. However, clicking it does not launch Windows Settings but instead the old control panel from Windows 10 (Figure 8).
Thinking that the Open Storage Spaces button on this panel would open Windows Settings, I clicked through. It simply led to another section of this panel. This means using Storage Spaces can involve working with both Settings and the old management console. To complete my test, I shut down, reconnected the drive, and booted again. While the system was in its degraded state, I made no changes on the D: drive, so I didn’t have a chance to see a rebuild in progress. The storage space showed no errors, presumably meaning the drive had been properly restored to the array. The notification problem is the last straw, a strange behavior that leads to the conclusion that the Windows Settings panel for Storage Spaces remains under development and is incomplete. For something as important as storage, that is unacceptable. That said, and even with its confusing UI, Storage Spaces seems to work well. The fact that it can be used out of the box, without the necessity to make changes in UEFI, is a very strong plus. And the fact that it is not connected to UEFI means that it will work the same, regardless of the source of the PC’s motherboard and firmware — all it needs is available drives. Microsoft should attack this oversight with vigor and zeal. Storage Spaces is a much simpler solution for the average person who might be intimidated by the complexity of today’s modern UEFIs. It’s too bad the UI is so rough; I think more people would be inclined to try Storage Spaces if it weren’t quite so confusing. When you get right down to it, all it amounts to is saying, “Take these drives over here and make them into this kind of array.” It used to be complicated, but it shouldn’t be today.
Will Fastie is editor in chief of the AskWoody Plus Newsletter. ON SECURITY Is Secure Boot important for security?
By Susan Bradley During the last few months, some chinks have appeared in Secure Boot’s armor as the result of various attacks and vulnerabilities. Let’s go back in history and understand how we got here. When a computer boots up, and before the operating system is launched, other code runs. For many years, that was the Basic Input/Output System (BIOS) pioneered by IBM in the original IBM PC. Unfortunately, inventive attackers found ways to permanently install malicious code as part of this launch sequence. Device vendors came up with a stronger pre-boot technology — or so we thought. As noted in an NSA document: UEFI Secure Boot is an optional setting that enforces signature checking of the boot process. Secure Boot ensures only signed binaries and those matching whitelisted hashes may execute at boot time. Impacts include:
UEFI, of course, stands for Unified Extensible Firmware Interface, the more advanced successor to BIOS. Secure Boot is a feature of UEFI that requires all low-level firmware and software components to be verified prior to loading, as the quote above describes. Unfortunately, attackers look for weaknesses everywhere. A rootkit that interferes with UEFI is particularly dangerous because it runs at computer startup, prior to loading of the operating syste; therefore, it can interfere with or disable various operating-system security mechanisms such as BitLocker, HVCI, or Microsoft Defender. As before, attackers found weaknesses. We have repeatedly seen updates for Secure Boot to fix vulnerable boot-loader files. Whenever one of these updates is released, I’m not convinced that everyone is at the same amount of risk. If you are a home user, chances are an attacker will use some other means to gain access to your machine. They will try to get you via email or through a malicious banner ad. But if you are a nation state, or targeted organization or person, I urge you to take a closer look at protecting your systems in ways that do not rely only upon Secure Boot. We’re not done
Several months back, a proof-of-concept attack sequence was posted on GitHub that showcased how this vulnerability could be leveraged. As was noted in the update to the GitHub page after this vulnerability was posted, we aren’t done fixing this issue. The poster indicates that: An incomplete revocation occurred, and another CVE (CVE-2023-24932). There’s still vulnerable bootmgfw s that were not revoked, as well as additional patches only fixing the case where bootmgr loads bootmgr. Intel’s leaked keys
But wait: It gets even better! Recently, Taiwanese PC company Micro-Star International (MSI) officially confirmed it had been the victim of a cyber attack on its systems in March 2023. In a claim by Alex Matrosov, CEO of firmware supply-chain security platform Binarly, the leaked source code from that cyberattack on MSI included this data, as well as image-signing private keys for 57 MSI products. This could have long-term impact on the ecosystem if attackers now have access to the signing keys and can code new bootloader files that are signed. So what can we do to better protect our systems? Patching recommendations for consumer and home users
If you have a PC running Windows 10 or 11 Pro with BitLocker enabled, I have long urged that you skip the secure-boot updates due to the fact that they often disrupt the boot process and also trigger a revalidation of the BitLocker recovery key. If you are running Windows 10 or 11 Home edition, BitLocker is not available. Therefore, attackers don’t see these machines as viable targets. I do not recommend proactively protecting yourself from the BlackLotus UEFI bootkit. I will eventually recommend installing the May updates, but I will not recommend that you follow up with the scripts that Microsoft recommends. It’s wiser to let Microsoft first get feedback, because early next year the scripts will become mandatory, and we hope those versions will be sound. Once I know for sure that Microsoft’s approach is trustworthy, I’ll provide guidance. I still recommend that you run as a “patched” human. Watch where you go, what you do, and especially what you download. I do not recommend third-party driver-download sites, so if you are looking for a new driver for something that isn’t working right, come to the forums — we can guide you to a better, safer solution. Chances are, we can find a more secure download than the driver-download bundles. For home users, it’s our behavior that puts us most at risk. We need to act accordingly. Patching recommendations for business users
For business users, however, attackers can gain access in ways other than the user. Because the goal of this type of attack is persistence, I’m taking this more seriously. This threat looks to be ongoing and potentially never-ending, as the attackers find new ways around the supposedly invincible secure boot, so business patchers should take additional actions. There are two attack surface reduction rules that I recommend you enable.
Both of these can be enabled using a variety of methods, ranging from manually setting them using PowerShell, using Group Policy settings, or via Intune. To set them via group policy, go to Computer Configuration | Policies | Administrative Templates | Windows Components | Microsoft Defender Antivirus | Microsoft Defender Exploit Guard | Attack Surface Reduction. You’ll need to use a common setting for all of them under Configure Attack Surface Reduction rules. Then enter the GUID for each setting and the numeric value for the action into a table.
In the value column, enter 0 for Disable, 1 for Block, 2 for Audit, or 6 for Warn. I recommend starting with either Audit or Warn to test whether this impacts your network. Figure 1 shows that I already have Block all Office applications from creating child processes enabled. After doing this, I saw no side effects.
Ensure you are reviewing those log files
For anyone, but for businesses in particular, make sure that you keep an eye on what your network is connecting to. Too often, we set up our firewalls to allow all (unrestricted) outbound access. Even thoug it’s a heavy burden on your IT department or consultants, reviewing what you normally connect to (and excluding all other connections) can go a long way toward protecting your network. In a traditional network with a firewall, egress filtering can identify when an attacker gains a toehold on the network. In the case of the BlackLotus ransomware, Microsoft advises that threat hunters examine network logs for outbound connections from winlogon.exe on port 80, which may be indicative of BlackLotus trying to communicate with its command and control (C2) server. In a newer network that is set up with Azure AD, filtering has to be done at the workstation level. It may not be easy, but it is effective. Don’t rely on Secure Boot. It’s a promised panacea of security that is no longer secure. Resources
Susan Bradley is the publisher of the AskWoody newsletters. The AskWoody Newsletters are published by AskWoody Tech LLC, Fresno, CA USA.
Your subscription:
Microsoft and Windows are registered trademarks of Microsoft Corporation. AskWoody, AskWoody.com, Windows Secrets Newsletter, WindowsSecrets.com, WinFind, Windows Gizmos, Security Baseline, Perimeter Scan, Wacky Web Week, the Windows Secrets Logo Design (W, S or road, and Star), and the slogan Everything Microsoft Forgot to Mention all are trademarks and service marks of AskWoody Tech LLC. All other marks are the trademarks or service marks of their respective owners. Copyright ©2023 AskWoody Tech LLC. All rights reserved.
|
||||||||||||||||||||||||||||||||||||||||||||||||||||||||||


Plus Membership
Donations from Plus members keep this site going. You can identify the people who support AskWoody by the Plus badge on their avatars.
AskWoody Plus members not only get access to all of the contents of this site -- including Susan Bradley's frequently updated Patch Watch listing -- they also receive weekly AskWoody Plus Newsletters (formerly Windows Secrets Newsletter) and AskWoody Plus Alerts, emails when there are important breaking developments.
Get Plus!
Recent Topics
-
Key, Key, my kingdom for a Key!
by 1 hour, 52 minutes ago
-
Registry Patches for Windows 10
by 6 hours, 23 minutes ago
-
Cannot get line length to NOT wrap in Outlining in Word 365
by 6 hours, 36 minutes ago
-
DDU (Display Driver Uninstaller) updates
by 3 hours, 4 minutes ago
-
Align objects on a OneNote page
by 11 hours, 51 minutes ago
-
OneNote Send To button?
by 12 hours, 35 minutes ago
-
WU help needed with “Some settings are managed by your organization”
by 21 hours, 8 minutes ago
-
No Newsletters since 27 January
by 17 hours, 5 minutes ago
-
Linux Mint Debian Edition 7 gets OEM support, death of Ubuntu-based Mint ?
by 1 day, 1 hour ago
-
Windows Update “Areca Technology Corporation – System – 6.20.0.41”
by 2 hours, 12 minutes ago
-
Google One Storage Questions
by 6 hours, 23 minutes ago
-
Button Missing for Automatic Apps Updates
by 7 hours, 27 minutes ago
-
Ancient SSD thinks it’s new
by 2 hours, 16 minutes ago
-
Washington State lab testing provider exposed health data of 1.6 million people
by 1 day, 11 hours ago
-
WinRE KB5057589 fake out
by 1 day, 5 hours ago
-
The April 2025 Windows RE update might show as unsuccessful in Windows Update
by 19 hours, 54 minutes ago
-
Firefox 137
by 16 hours, 13 minutes ago
-
Whisky, a popular Wine frontend for Mac gamers, is no more
by 2 days ago
-
Windows 11 Insider Preview build 26120.3863 (24H2) released to BETA
by 2 days ago
-
Windows 11 Insider Preview build 26200.5551 released to DEV
by 2 days ago
-
New Windows 11 PC setup — can I start over in the middle to set up a local id?
by 20 hours, 23 minutes ago
-
Windows 11 Insider Preview Build 26100.3902 (24H2) released to Release Preview
by 2 days, 4 hours ago
-
Oracle kinda-sorta tells customers it was pwned
by 2 days, 10 hours ago
-
Global data centers (AI) are driving a big increase in electricity demand
by 2 days, 20 hours ago
-
Office apps read-only for family members
by 2 days, 23 hours ago
-
Defunct domain for Microsoft account
by 2 days, 19 hours ago
-
24H2??
by 20 hours, 16 minutes ago
-
W11 23H2 April Updates threw ‘class not registered’
by 16 hours, 10 minutes ago
-
Master patch listing for April 8th, 2025
by 20 hours, 7 minutes ago
-
TotalAV safety warning popup
by 1 day, 19 hours ago
Remembering Woody
