|
In this issue ACCESSIBILITY: Windows’ built-in basics Additional articles in the PLUS issue • Get Plus! PUBLIC DEFENDER: Windows 11 has a silent feature that you can’t undo ONENOTE: How to fix the most common OneNote sync problems ON SECURITY: Brute force vs. local admins ACCESSIBILITY Windows’ built-in basics
By Chris Husted When it comes to adaptive and assistive technologies, especially those found under Ease of Access in Windows Settings, most people think the extra functions do not apply to them, simply because they are not disabled. Nothing could be further from the truth. As Stephen Dawes, a long-time Plus member and a Senior IT Systems Analyst based in Calgary, Canada, points out, “When a technology is developed to help a specific group of people, and when it is done right, everyone benefits.” Stephen began his career more than 32 years ago. He is totally blind; all he sees is black. To get his daily work done, he relies on the assistive technology that most people ignore as part of his accessibility toolbox. Anyone who communicates with him will quickly understand how well he performs his functions. Stephen is far from alone in using assistive technology. According to the United States Centers for Disease Control (CDC), about 12 million people 40 years and over in the US have some form of vision impairment. Approximately 6.8% of children younger than 18 years in the United States have a diagnosed eye and vision condition. Nearly 3% of children younger than 18 years are blind or visually impaired, the latter defined as having trouble seeing even when wearing glasses or contact lenses. The CDC also points out what everyone already knows: the number of people with age-related afflictions, including impaired mobility and dexterity, is continually growing. This is especially true because baby boomers have become senior citizens, a trend that continues. The CDC notes that more than 13 million Americans already use assistive technology. Most people know that Windows’ built-in features in the Ease of Access panel exist, but they never investigate them. These features have been part of Windows for a long time. They first arrived as the “Access Utility for Windows 2.0” in 1985, aimed at improving the accessibility of Windows for people who are deaf or hard of hearing, or who have limited dexterity. The extra functions allowed people to modify how they used the keyboard and mouse, gave visual alerts for the computer and system sounds, and made it possible to operate the computer through devices connected via the now-ancient serial port. The features have evolved a lot since then and are now aimed at a much broader range of users. It’s worth exploring them, even if you’re not a boomer. If you don’t like them, you can simply turn them off. “Make simple changes, even just change the font size to what suits you,” Dawes suggests. “These settings have been created to help everybody. Make your own life easier.” Accessing accessibility
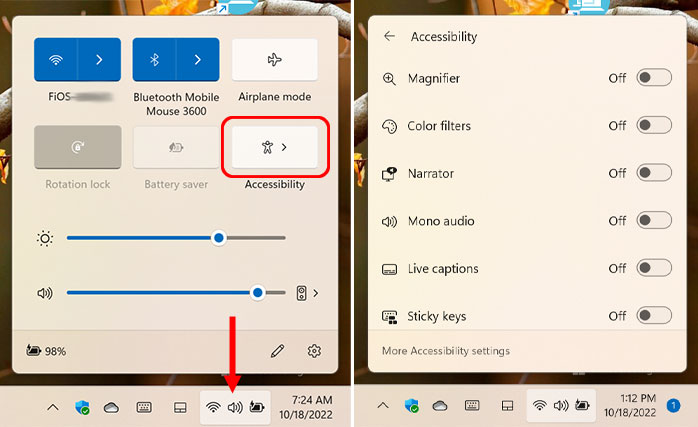
Windows’ built-in accessibility features are found in Settings. For Windows 10, look for Ease of Access. For Windows 11, the panel has been rebranded Accessibility, with a new icon shaped like a person. Regardless of its name, you can get directly to the settings with the keyboard shortcut WinKey+U, a shortcut that has been around since at least Windows 7. (See the Microsoft support article Windows keyboard shortcuts for accessibility for all the keyboard shortcuts associated with accessibility in Windows 7, 8.1, 10, and 11.) Even the Windows sign-in screen has accessibility support. On the screen, three icons appear in the lower-right corner. The center one, which differs in appearance between Windows 10 and 11, brings up a menu of features you can enable to assist your sign-in. Windows 11 has one more way to get to Accessibility settings. By default, the taskbar has a group of three icons representing connectivity, sound, and battery status. Clicking on the group (the individual icons are not clickable) pops up a small dialog that includes a button for Accessibility. See Figure 1.
The changes made to Windows 11 seem to correspond to an increased emphasis from Microsoft regarding assistive technologies. Accessibility has been mentioned in every major Windows 11 event since the new version was announced. For up-to-date information, see Microsoft’s Accessibility — for everyone webpage. Seeing clearly
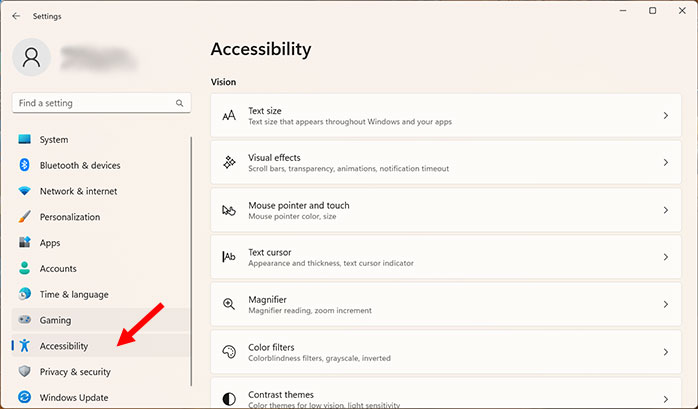
In Windows 11, the top of the list on the Accessibility panel is all about vision. The settings include Text size, Visual effects, Mouse pointer and touch, Text cursor, Magnifier, Color filters, Contrast themes, and Narrator. See Figure 2.
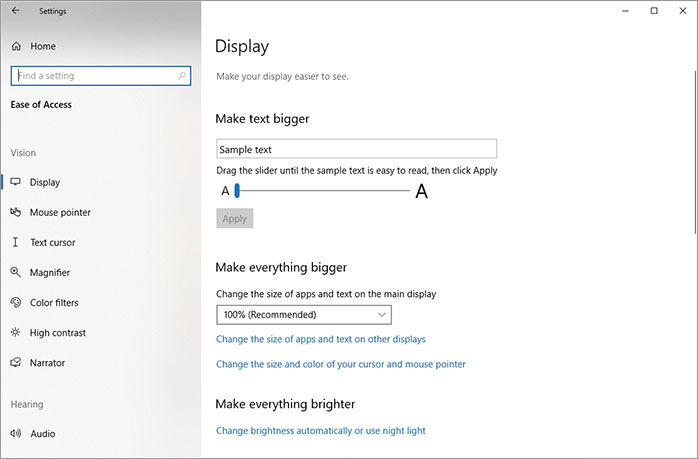
In Windows 10, the list is the same, with Visual effects called Display and the Contrast themes section restricted to only the High Contrast section (Figure 3).
We estimate that 80% of our readers are still using Windows 10, so the descriptions below will relate to settings in that version. Although some names have changed and there are some new features in Windows 11, most settings are the same or similar. Make things bigger
To make text on your screen larger, use the slider next to Text Size in the Display section. You can even select the option Make everything bigger from the drop-down menu to change the size of everything on your screen. The very handy Magnifier enlarges just a part or all of your screen so you can see words and images more clearly. To open Magnifier, press WinKey++ (the Windows logo key plus the plus-sign key). Once open, use WinKey++ or WinKey+- (dash or minus key) to zoom in or out. To close Magnifier, press WinKey+Esc. To make the tiles in your Windows 10 Start menu larger, right-click the app tile you want to resize, select Resize, and choose the size you want. Due to the changed Start menu in Windows 11, this feature is not available. A World of contrast
Some people have difficulty seeing icons and images clearly due to low contrast. This also applies to people who are fully or partially color-blind, as well as those at the onset of low vision. In Ease of Access, High Contrast is available with one click. First you must enable it; then you can choose one of four themes: High Contrast #1, High Contrast #2, High Contrast Black, or High Contrast White. Turning High Contrast on or off can take some time and will momentarily blank your screen with the message “Please wait,” so be prepared. Windows 11 has an expanded set of themes from which to choose: Aquatic, Desert, Dusk, and Night sky. Windows 10 and 11 include a Night light feature, not found under Accessibility but rather under System | Display. Night light changes the display to reduce the amount of blue light and provide warmer colors. A slider controls the strength, and you can schedule Night light so that it automatically turns on and off. You can set specific times, or enable Location services (under Privacy on Windows 10 or Privacy & Security on Windows 11) to have Windows automatically use sunrise and sunset. Color filters
Color filters change the color scheme on the screen to help you distinguish between things that differ only by color, allowing you to make photos, text, and colors easier to see. In Ease of Access | Color filters, turn the feature on. Then choose the option that works for you. There are three options for colorblindness. There is also a switch to turn on a shortcut key, WinKey+Ctrl+C, which allows you to quickly turn color filters on or off. Most people never even experiment with the Contrast and Color filters settings. You may be surprised what a difference they can make. Finding the right combination can significantly reduce eye strain. Mousy mousy
The onset of poor vision can also make the mouse cursor hard to locate on the screen. You can change the color and size of the mouse pointer in Ease of Access | Mouse pointer and choose the options that work best for you. Adding pointer trails helps to see where the mouse is moving on the screen. To enable this tweak, you will need to dig deeper. From the Mouse pointer section in Ease of Access, select Additional Mouse Settings in the upper-right corner. The Mouse Properties dialog will pop up; select the Pointer options tab. The other tabs in the properties dialog control other features, such as the appearance of the pointer and what the buttons and wheel do. On the Pointer options tab, you can change the pointer speed, have the pointer automatically snap to a button in a dialog box, display pointer trails, hide the pointer while typing, and highlight the location of the pointer on the screen by pressing the Ctrl key. I always knew these apps and tweaks existed, but I never appreciated to what extent people might benefit from tailoring their own computer settings to get the most out of using their computers — that is, not until I interviewed Stephen for my first accessibility article earlier this year. Take a look!
Chris Husted, who once upon a time was a junior computer column writer, is currently executive editor at The Phuket News. He has spent 20 years working in news in Phuket, with a one-year hiatus as a staff editor for a small national newspaper on Borneo. We thank long-time Plus member and IT expert Stephen Dawes for his contribution to this article.
The AskWoody Newsletters are published by AskWoody Tech LLC, Fresno, CA USA.
Your subscription:
Microsoft and Windows are registered trademarks of Microsoft Corporation. AskWoody, AskWoody.com, Windows Secrets Newsletter, WindowsSecrets.com, WinFind, Windows Gizmos, Security Baseline, Perimeter Scan, Wacky Web Week, the Windows Secrets Logo Design (W, S or road, and Star), and the slogan Everything Microsoft Forgot to Mention all are trademarks and service marks of AskWoody Tech LLC. All other marks are the trademarks or service marks of their respective owners. Copyright ©2022 AskWoody Tech LLC. All rights reserved. |
||||||||||||||||||||


