
|
There are isolated problems with current patches, but they are well-known and documented on this site. |
|
In this issue HARDWARE: Tooling around with laptops and other useful gear FROM THE FORUMS: How to participate in the forums Additional articles in the PLUS issue • Get Plus! FREEWARE SPOTLIGHT: Biniware Run — All your eggs in one basket INTERNET: My encounter with Verizon PATCH WATCH: Ensuring you can recover
HARDWARE Tooling around with laptops and other useful gear
By Ben Myers Portable computers have evolved from the Compaq luggable suitcase to laptops now weighing three pounds or even less, needing special handling and tiny tools. Today’s notebook, subnotebook, and tablet computers demand an array of small tools, sometimes unique to a brand and model. My small kit for the road can handle the screws found outside and inside many laptops, but I needed more and better help. The turn of the screw, a story about a set of tools
Previously, I used a somewhat motley collection of very small tools lacking labels to identify each screw bit. Excellent help showed up here several weeks ago in the form of a kit of tools (Figure 1) bought from the online store Temu for the mind-boggling price of $26.54, including shipping. Still available from Temu as of this writing, similar kits have long been on the market. The array of screwdriver bits includes familiar flat-head, Phillips, and Torx drivers, as well as pentalobe and tri-lobe for Apple products; security Torx; and still others I may never use. The kit also has the fairly standard pry tool, suction cup, small brushes, plastic spudgers, and a few small hex socket tools.
The kit has over 100 small screw and nut driver bits (including some duplicates) in clearly labeled slots — where they belong when not in use! The clear and orderly labels make it very easy to find the bit you need and to put it where it belongs when you’re done with it. The kit enforces the good organization needed to work well. (See Figure 2.)
What to do to a laptop?
My focus here will be on what it takes to open up a laptop to get at its memory, storage, internal battery, and CMOS battery. A laptop with its interior exposed offers the perfect opportunity to remove dust and dirt and to make the interior almost sparkling clean. Removal and replacement of both keyboard and screen are very much specific to individual makes and models — even very similar models of the same brand. Accordingly, you will not see how to replace a keyboard or screen in this article, because it’s nearly impossible to cover all contingencies. Some open-and-shut cases, or is it shut-open-shut?
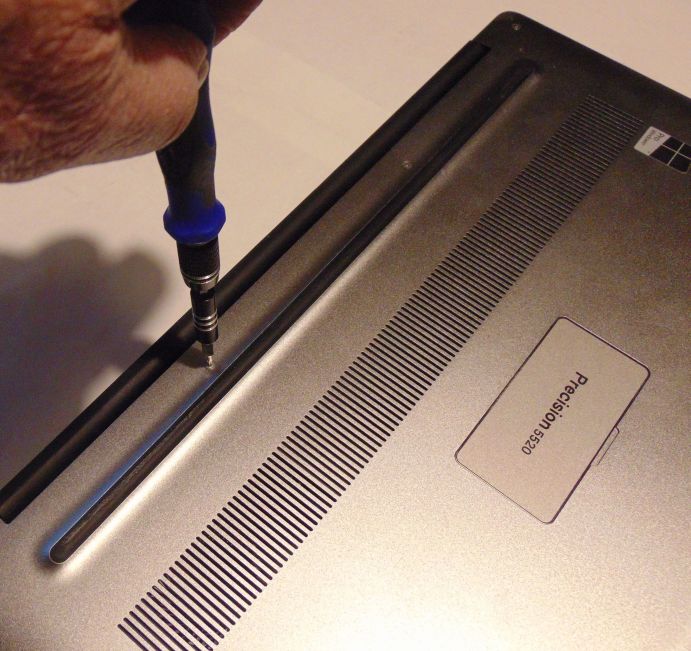
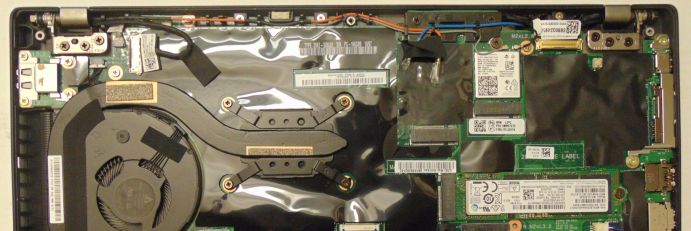
I classify laptops as easy, slightly difficult, and very difficult to open and repair. Once you’ve gotten past the use of small T5 Torx screws around the perimeter, and a pair of Philips head screws under the nameplate, the Dell Precision 5520 in Figure 3 is easy to open — typical of Dell business-class laptops. Prying apart is not necessary.
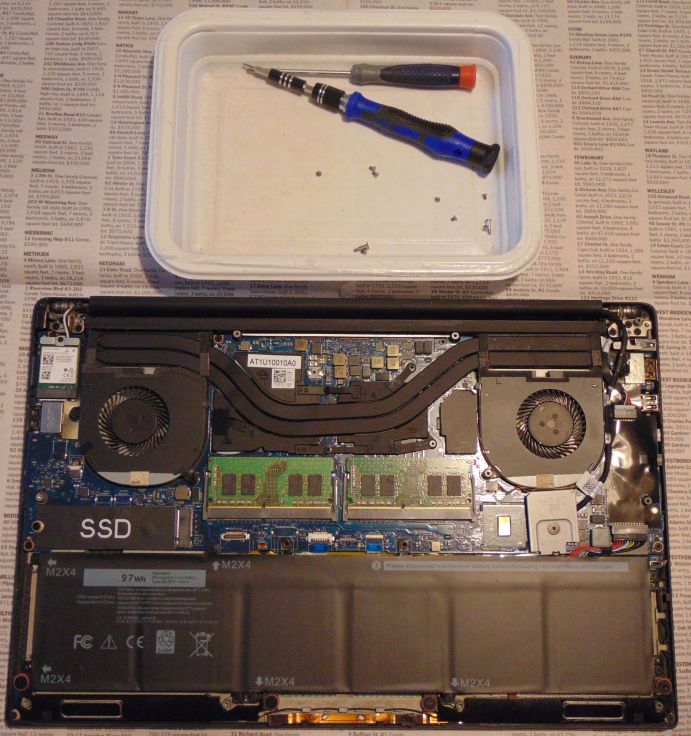
Remove all the screws, lift up the cover, and that’s it! The readily serviceable parts inside the Precision 5520 are exposed in Figure 4, along with its collection of screws and the tools neatly set aside.
Slightly more difficult
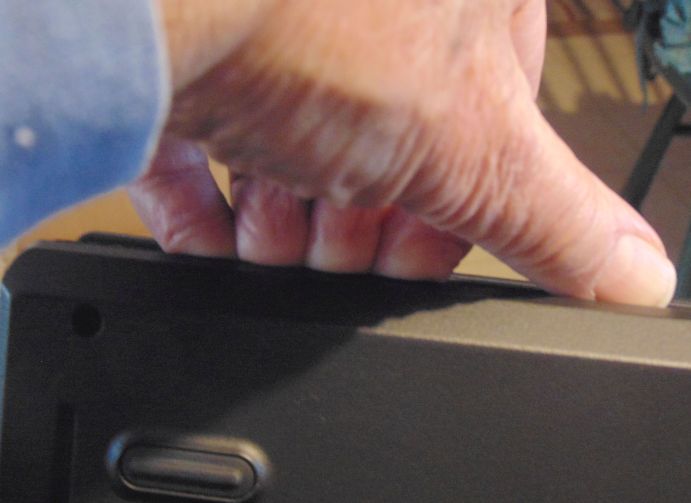
The Lenovo Thinkpad X280 is an example of a computer that opens with medium difficulty. First, loosen all the captive screws — captive because they remain with the bottom panel. Next, release the plastic tabs that still hold the bottom in place. Many videos and still photos show plastic spudgers, shaped like sturdy guitar picks, or a metal blade that looks like a butter knife, to separate the laptop bottom from the top. But plastic (and even stronger carbon fiber) has a habit of breaking. My hands have 10 fingernails and fingertips to take a laptop apart, though I do suffer occasional breakage. (Of fingernails, that is.) Don’t try this unless you have strong nails and keep an emery board handy. Why would I want to do this? Because my fingertips and fingernails have far more sensitive touch than any other tool. So dig your strong fingernails into the groove between laptop top and bottom, Figure 5, and run them along the groove, listening for clicking noises as tabs on the bottom separate from the top or vice versa. Laptop maintenance manuals, if well written and illustrated, show the order in which one separates the tabs.
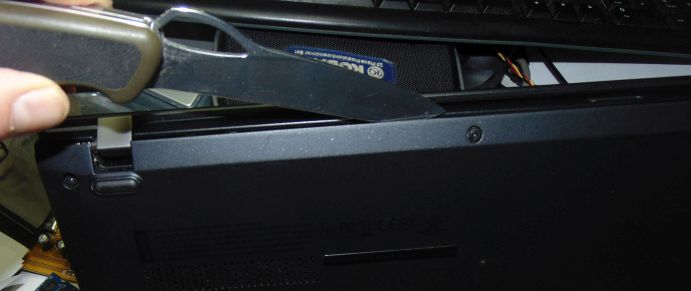
My other useful and most sturdy alternative is a switchblade knife or a knife similar to the Wenger knife in Figure 6. Slide the blade into the groove between bottom and top, and use the knife blade as a very careful lever to pry open the case, popping the tabs loose.
Way more difficult
An older Hewlett-Packard ENVY 15” convertible laptop, model x360 15-u473cl, is a perfect example of a laptop that is very difficult to repair or upgrade, typical of many HP laptops. First, remove the 14 screws that hold the bottom and top together. You must find the four hidden screws first. Next, with the laptop sitting on its base with screen opened, pry open the top from the bottom, starting at the front edge, as in Figure 7, and going around the sides. In passing, note the ergonomics of the light gray key markings against a silver background, not exactly conducive to rapid and flawless keyboarding.
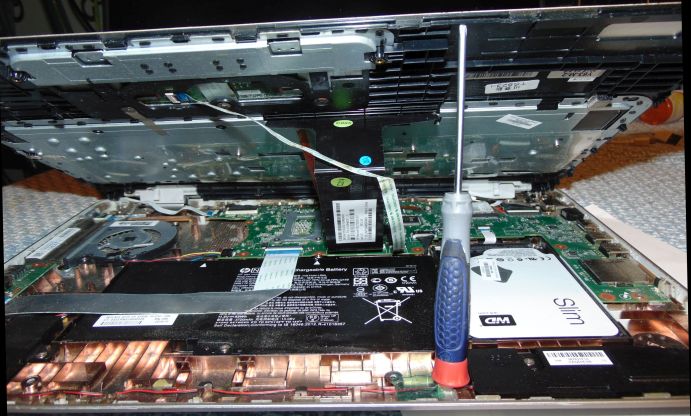
Opening it is just the start of any upgrade or repair of this model. Once open, you get some idea of the difficulty of repair tasks. Peering inside the yawning chassis, propped open with a screwdriver in Figure 8, you see that ribbon cables need to be detached before much else is possible. To replace the hard drive, you must first remove the battery. Memory upgrade? Remove battery, hard drive, cooling fan; then remove the motherboard, flip it over, and upgrade the memory. The iFixit website has a very good series showing and explaining how to do memory upgrades, plus various repairs or upgrades of this model — a design not conducive to repair or upgrade.
Use the manufacturer’s repair manual, an iFixit tutorial, or a YouTube video to assess what you must do before beginning any work on a laptop. At least you will know what you are getting into beforehand. Or don’t do the repair — maybe those sources are a sign that you need a pro. Cleaning inside a laptop
A Q-tip is simply too large to clean a laptop cooling fan, but a small brush can sweep dust away, even from the tiny vanes of the fan (Figure 9). The little brush also does well in clearing away accumulated dust from anywhere inside a laptop. Follow up with a few careful and short squirts of compressed air.
A camera can be a most useful tool
Now, let’s say I must replace a broken screen in a laptop. (I know — I said I wouldn’t talk about replacing the screen.) The problem is that the housing of the screen usually contains the antennas for the various radios providing wireless connectivity. Those wire leads to the antennas run from the inside of the screen frame into the chassis of the computer, attached to a Wi-Fi and possibly a Wireless Wide Area Network (WWAN, usually cellular) card mounted on the surface of the motherboard. The antenna leads wend their way through tight space in the chassis, bending and twisting to fit perfectly inside. Camera to the rescue! First, I take a photo (Figure 10) showing how the wire leads thread through the chassis. Then I print the photo on a full sheet of letter-size paper. I now have an accurate picture showing how the screen is attached to the bottom of the laptop chassis. Most importantly, the photo shows exactly how to thread the wire leads from the replacement screen through the chassis to the cards to which they are connected.
But wait! There is still more fun! Now I need to connect the tiny antenna wire leads to an even tinier pair of posts on the Wi-Fi card. Those fingers you saw earlier are rarely capable of doing this task all by themselves, so I turn to my circular magnifying light that allows me to see these tiny connections. I usually use a small flat-headed screwdriver to nudge each antenna wire onto its post and snap it into place, as in Figure 11. Sometimes tweezers are better. My two magnifying lights are clamped to each end of my workbench. The lamp itself is on a long arm that moves up and down, swivels, and tilts for perfect positioning over whatever needs close attention.
Let’s put a wrap on it, step by step
Once you have replaced parts, it’s time to test, test, and test again before putting the cover back on the laptop. If you find that something is not right, you can handle it easily before the bottom cover is attached snugly to the laptop. What must you test?
* “Some operating system” can be any of these:
Once you are sure everything works OK, then (and only then) do you attach the bottom cover and tighten down the screws. Test everything again to be sure that the laptop is still 100% operational. Our earlier HP ENVY lends itself to testing all at once. Except for closing it up, most of its parts and cables need to be in place before you try to boot it up. Tools for getting your data
Whether copying your data from an old to a new computer or simply recovering data, you need different adapters to connect a storage device to a computer through a USB port. The choice of adapter depends upon the form factor of the storage. Here is a rundown, starting with the latest storage form factor — an NVMe SSD. As you can see, some of these adapters could also see more permanent use as protective housings for an external drive, most often an SSD. Figure 12 shows one of several brands of enclosures that handle NVMe SSDs. Insert the SSD into the slot, secure it with a screw, and slide the housing on. For temporary use, there is no need for the retaining screw, so save some time by simply sliding the housing into place. The SSK brand of enclosure I often use includes tiny screws and a tiny screwdriver, two USB cables, USB-C to USB-C and USB-C to USB-A. It handles the 2242, 2260, and 2280 form factors of SSDs, where the first two digits are the width of the SSD stick and the last two digits the length in millimeters. The SSK enclosure and other similar adapters are widely available from Newegg, Amazon, Walmart, and others.
Making your own external USB 3.0 device may seem a bit odd, considering that SSD manufacturers are now flooding the market with their own branded SSDs. Such SSDs follow the evolutionary path of hard drives before them — a drive in an external case, usually with its own power supply. If the power supply failed, you could open up the external case, remove the drive, and recover its data pretty easily in a desktop or laptop system. However, manufacturers changed such external drives, especially those using 2.5-inch SSDs, to reduce costs. This meant switching from the more standard SATA connection to a proprietary connection that mates the drive directly to USB 3. In this situation, the drive cannot be removed and simply plugged into a handy SATA connector. So if the electronics fail, it becomes impossible to recover the data without sending it to an expensive service. That’s why making your own external USB 3 device is a good idea. Parts are readily available and inexpensive. USB 3 adapter for 2.5″ SATA drives
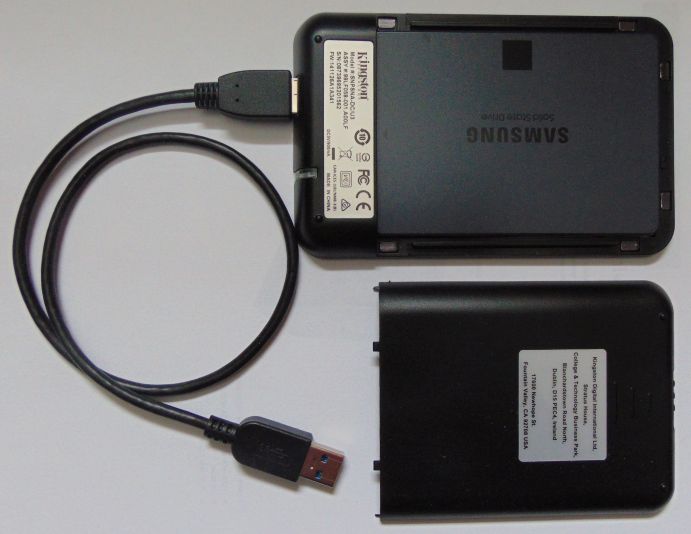
The Kingston USB 3 adapter is easy to use. Simply slide a 2.5″ drive into the SATA connector inside the adapter, put the cover on, attach a USB 3 cable, and you are ready to use the drive, as in Figure 11. The Kingston works properly with an SSD even when connected to a USB 2.0 port. With a 2.5″ hard drive spinning inside, it needs the additional power supplied by USB 3 to function reliably. As with every product mentioned here, there are other brands of similarly convenient USB 3 adapters for 2.5” drives.
Adapters for all seasons
I have a fairly typical box and power supply made by StarTech to handle both 2.5″ and 3.5″ SATA drives, shown in Figure 14. Of course, there are also other kits, adapters, and cables to handle older drive form factors such as mSATA and parallel ATA (also known as IDE, both laptop and desktop).
Apple products cannot escape scrutiny
Apple has gone through a long and sorry progression from standard SATA drives to proprietary SSDs and beyond. For standard SATA disk drives and SSDs, what I’ve described above works just as well in the world of MacOS. But beginning in 2012, Apple began using its proprietary design of SATA SSDs in MacBooks. After all, an inexpensive SSD upgrade cannot possibly be as good as Apple’s own, never mind that Samsung manufactures both and adheres to stringent manufacturing standards. So Apple had to protect MacBook owners from themselves. In 2013, Apple shifted to a different proprietary SSD interface, this time with faster PCI Express speed. Apple’s rationale continued to be the same. I have encountered only these two types of Apple SSDs so far, as pictured in Figure 15, but there are others. If you want learn all about Mac SSDs, read The Ultimate Guide to Apple’s Proprietary SSDs. And, of course, Apple reached the ultimate in SSDs some time after 2017, with SSD chips mounted directly on laptop motherboards, rendering data recovery impossible by regular people.
You need the right tools to do the job
Depending on the scope of your laptop repairs and upgrades, you may be just fine with a few tools. Or maybe you need a cornucopia of them to deal with almost any laptop that shows up. Tools do not have to be pretty, and they do not have to match one another, except maybe your own two hands. They simply have to be effective helpers from beginning to end. Treat laptops right, and keep them running.
For over 25 years, Ben Myers has offered “cradle-to-grave” computer services for small businesses and individual computer owners — including building, upgrading, refurbishing, testing, repairing, and recycling of computer and network gear, primarily with Windows, a bit of MacOS, Linux, and — wait for it — MS-DOS. FROM THE FORUMS How to participate in the forums
By Will Fastie Plus member Chuck wrote to say he wasn’t sure how to make a post in our forums. The comment proved a bit alarming. We have links all over the place to get to the forums. We even have a huge area in the right sidebar of the site, devoted to the forums. This includes simple and advanced search features as well as the following sections:
The Recent Topics section is updated every time you refresh a page, so it can instantaneously tell you where the action is. And you can go directly to the top level of the forum by clicking the Forums button in the site’s main menu. From there, you can navigate to anything. Have we missed something? What else might we provide to help you find what you’re looking for in the forums, or to find a particular topic of interest? Tell us about it. Post to the, um, forum topic for this note. Chuck wanted to find the forum topic relating to a specific article. There are two ways to accomplish that. First, there is a link at the bottom of every article. We call it the “talk bubbles box.” (That’s what we call our iconic logo — talk bubbles.)
The “our forums” link will take you directly to the topic. Second, all articles published in the newsletter also have an associated post in the home page blog. That “stub” post includes a link directly to the forum topic:
How would you rate our explanation here? Got some thoughts? Well, now you know what to do — just scroll down a tiny bit more, and click that link! Oh, one more thing — don’t forget to log in before posting.
The AskWoody Newsletters are published by AskWoody Tech LLC, Fresno, CA USA.
Your subscription:
Microsoft and Windows are registered trademarks of Microsoft Corporation. AskWoody, AskWoody.com, Windows Secrets Newsletter, WindowsSecrets.com, WinFind, Windows Gizmos, Security Baseline, Perimeter Scan, Wacky Web Week, the Windows Secrets Logo Design (W, S or road, and Star), and the slogan Everything Microsoft Forgot to Mention all are trademarks and service marks of AskWoody Tech LLC. All other marks are the trademarks or service marks of their respective owners. Copyright ©2023 AskWoody Tech LLC. All rights reserved. |
||||||||||||||||||||||||


Plus Membership
Donations from Plus members keep this site going. You can identify the people who support AskWoody by the Plus badge on their avatars.
AskWoody Plus members not only get access to all of the contents of this site -- including Susan Bradley's frequently updated Patch Watch listing -- they also receive weekly AskWoody Plus Newsletters (formerly Windows Secrets Newsletter) and AskWoody Plus Alerts, emails when there are important breaking developments.
Get Plus!
Recent Topics
-
KB5058379 / KB 5061768 Failures
by 1 hour, 37 minutes ago
-
Windows 10 23H2 Good to Update to ?
by 1 hour, 46 minutes ago
-
At last – installation of 24H2
by 2 hours, 30 minutes ago
-
MS-DEFCON 4: As good as it gets
by 1 minute ago
-
RyTuneX optimize Windows 10/11 tool
by 14 hours, 42 minutes ago
-
Can I just update from Win11 22H2 to 23H2?
by 8 hours, 2 minutes ago
-
Limited account permission error related to Windows Update
by 1 day, 4 hours ago
-
Another test post
by 1 day, 4 hours ago
-
Connect to someone else computer
by 22 hours, 41 minutes ago
-
Limit on User names?
by 1 day, 2 hours ago
-
Choose the right apps for traveling
by 15 hours, 42 minutes ago
-
BitLocker rears its head
by 1 day ago
-
Who are you? (2025 edition)
by 1 hour, 31 minutes ago
-
AskWoody at the computer museum, round two
by 18 hours, 4 minutes ago
-
A smarter, simpler Firefox address bar
by 1 day, 14 hours ago
-
Woody
by 2 days ago
-
24H2 has suppressed my favoured spider
by 23 hours, 22 minutes ago
-
GeForce RTX 5060 in certain motherboards could experience blank screens
by 2 days, 14 hours ago
-
MS Office 365 Home on MAC
by 2 days, 8 hours ago
-
Google’s Veo3 video generator. Before you ask: yes, everything is AI here
by 3 days, 4 hours ago
-
Flash Drive Eject Error for Still In Use
by 3 hours, 6 minutes ago
-
Windows 11 Insider Preview build 27863 released to Canary
by 3 days, 23 hours ago
-
Windows 11 Insider Preview build 26120.4161 (24H2) released to BETA
by 3 days, 23 hours ago
-
AI model turns to blackmail when engineers try to take it offline
by 3 days, 2 hours ago
-
Migrate off MS365 to Apple Products
by 3 days, 3 hours ago
-
Login screen icon
by 2 days, 17 hours ago
-
AI coming to everything
by 8 hours, 32 minutes ago
-
Mozilla : Pocket shuts down July 8, 2025, Fakespot shuts down on July 1, 2025
by 4 days, 14 hours ago
-
No Screen TurnOff???
by 4 days, 15 hours ago
-
Identify a dynamic range to then be used in another formula
by 4 days, 15 hours ago
Remembering Woody
