
|
Patch reliability is unclear. Unless you have an immediate, pressing need to install a specific patch, don't do it. |
|
In this issue MICROSOFT 365: Mastering the art of screenshots Additional articles in the PLUS issue PUBLIC DEFENDER: Powerful humanoid robots will take all blue-collar jobs WINDOWS 11: ARM is really important for Windows 11 ON SECURITY: The resources you need for a secure computer
MICROSOFT 365 Mastering the art of screenshots
By Peter Deegan • Comment about this article We should all know how to capture screen images from our devices. The ability to capture such images — screenshots — is built into nearly every computer, regardless of brand, size, or type. Screenshots are especially useful in support situations, in which one image of a problem or of a system’s error message is more helpful than a verbal description or a written explanation. A picture is, quite literally, worth a thousand words. In this brief primer, we’ll look at the mechanics of capturing screenshots from devices running Windows; Mac, Linux, Apple devices running iOS and iPadOS; and Android devices. Many people do not know how to snap screenshots on their phones! Here are just a few reasons a screenshot can be helpful.
Zoom in on detail
The default is often to take an image of the entire computer screen (Figure 1), but it’s rarely helpful.
It’s more effective to zoom in on a single program or part of a program (Figure 2).
It’s even more effective to zoom in on a specific area of the screen that contains the part of interest, such as an error message. Sometimes you can annotate it to make your point or ask a question.
Privacy
Protect your privacy before sharing any image. Even if you trust the receiver, the screenshot may accidentally reach a wider audience. Use simple editing tools to hide or blur names, email, passwords, or other confidential info. This example shows three ways to obscure sensitive info: blur (email), line-through (passwords), overwrite with an object (bottom rows).
The modern Windows Snipping Tool editor — or even the humble Windows Paint — has the basic tools to hide personal info. iPhone and iPad screenshots will go to an image editor. Clipboard, file, or editor?
Depending upon the device and the capture feature, the screenshot will be placed on the clipboard, into a file, or directly into an image editor. The clipboard is the most common, but even then the system may save a file as well. On Windows, it often goes immediately to OneDrive. On phones, it is most often saved to a file, which makes it more convenient for attaching to an email or a text message. The option I prefer is the system clipboard, because then you can paste into any editor or document. It’s quick — snap the screenshot, switch to the desired app, and paste. Saving to a file is common on portable devices because screenshots are usually added to the list of recently taken images (e.g., the Camera Roll). Cloud-storage apps with automatic image upload (e.g., Apple, OneDrive, or Dropbox) will automatically copy the screenshots to online storage, just as with photos taken with the device’s camera. The modern Windows Snipping Tool and Snagit have options for dropping a screenshot directly into their own image editors. Delay
An important option is Delay, which adds a pause between selecting the area for a screenshot and capturing the image. During that pause, you will have a few moments to set up a pull-down menu, tooltip, or other interactive elements that disappear as a result of launching the screenshot process. Delay is available in most screenshot apps, including Windows Snipping Tool. Windows
Modern Windows has keyboard shortcuts to take an image of the entire screen or part of it, then put that image onto the Windows clipboard or directly into the Snipping Tool app. From the clipboard, you can paste the image virtually anywhere, including an Office document, Outlook email, or image editor. Windows 10 and Windows 11 The key combo most commonly used captures the screen region last specified. For example, if you last captured a rectangle, that’s the mode the snipping tool will be in when launched again.
Windows 8, 8.1, 10, and 11 Here’s the longer list of options:
Windows 7, Vista, XP
Other tools
For occasional use, a device’s built-in tools are usually sufficient. If you want more capability, many other tools are available. Many are free, with extra features available in a paid version. And some, such as the popular, paid tool Snagit, are extremely rich and powerful. Snipping Tool in Windows
Windows 11/10 comes with Snipping Tool (the app formerly known as “Snip & Sketch”). It has more selection options (freeform, window, rectangle, full screen) plus some annotation features. While the basics are the same, the recent version of Snipping Tool in Windows 11 has more editing tools and works with video shots as well.
Microsoft Office
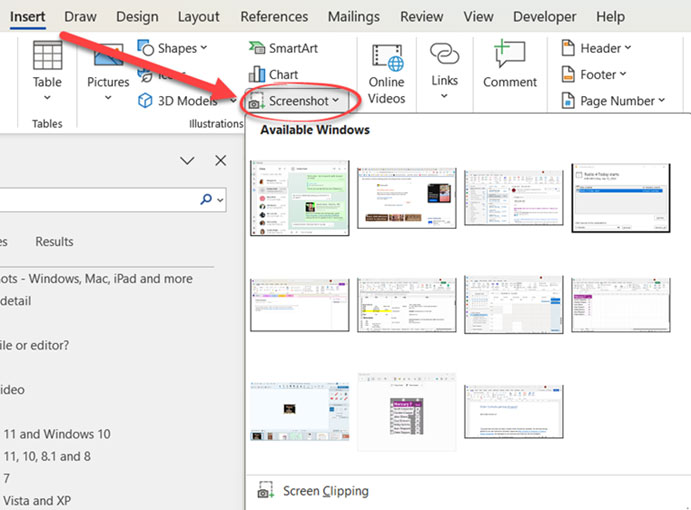
Word, PowerPoint, and other Office apps for Windows (Office 2010 and later) have a Screenshot option on the Insert tab (Figure 6). Click to display a gallery of the open program windows or choose “Screen clipping” at the bottom to select a screen region.
Screen clipping in Office doesn’t cover all situations. It can grab only images of static windows; you can’t get an image of a right-click menu, a pull-down list, or a gallery from the Office ribbon. In other words, Office screenshot does the basics but is no replacement for more powerful tools. OneNote screen clipping
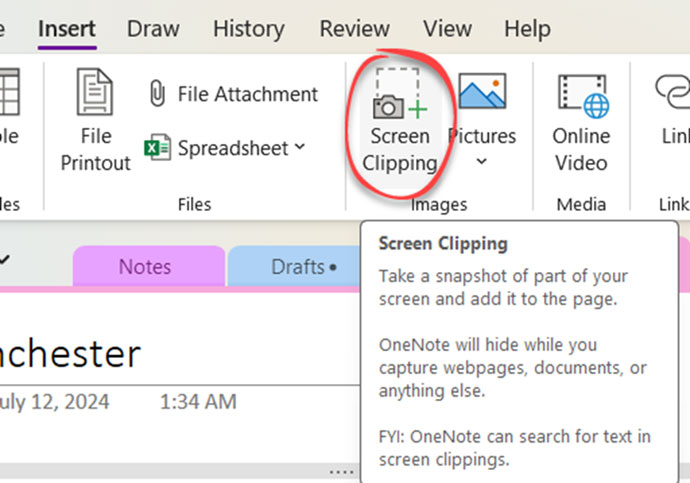
OneNote for Windows and OneNote for Mac are a little different, because there is no gallery of open windows. The Insert tab has a Screen Clipping button (Figure 7). Clicking it allows selection of a screen region to be copied onto the OneNote page.
Free utilities
There are many, many free screenshot tools — too many to list here. Greenshot is well regarded. It’s free and open-source, and it includes annotation and obfuscation tools. WinSnap is another Snagit
I’ve used Snagit for many years on both Windows and Mac. It’s a premium product for people like me who take screenshots all the time. See my recent review of Snagit (AskWoody, 2024-06-10). Mac
Mac OS comes with a nice range of screenshot shortcuts. The full list:
In addition, you can hold down these keys to control the selection:
Apple iPhone and iPad
There are screenshot shortcuts built into iPhones and iPads. Hold the Up Volume button (top left) then press the Sleep/Wake button (right). On older models, hold the Sleep/Wake button (on top or side), then press the Home button. The image appears in an edit window before being saved to a folder, such as the Camera Roll. If your Camera Roll is linked to cloud storage (iCloud, OneDrive, Dropbox), the shot will appear in your folder on other devices within a few seconds. Android
It’s more complicated on Android devices. Each brand and even each model of the Android phone/tablet has its own screenshot options. The best approach is to search the Web for screenshot help specific to your device. For example, search for “Samsung Galaxy A55 screenshot.” Android 11 and above should have a built-in shortcut. Press the Power and Volume Down buttons at the same time. You must press both buttons at the same time, not in sequence. This takes some practice; too often, it doesn’t work at all. In some cases, hold down the Power button until a Screenshot option appears. Screen images are usually saved to the camera roll of recently taken images. An image editor may be available after taking a screenshot, depending on the Android release. Another option is using a mirroring app that displays the device screen on a Windows or Mac PC. You can then take screenshots using the Windows/Mac tools. Linux
Linux releases don’t have a global screenshot shortcut. The closest it gets is the PrtSC key (entire screen), optionally in combination with the Shift (select part of screen) or Alt (current window only) keys. Just as with Android devices, it’s best to search for the shortcut or tool using the name of the Linux version plus the magic word “screenshot” (e.g., “Ubuntu Unity screenshot”). Virtual machines
With virtual machines, you have three options for taking a screenshot.
Images to text
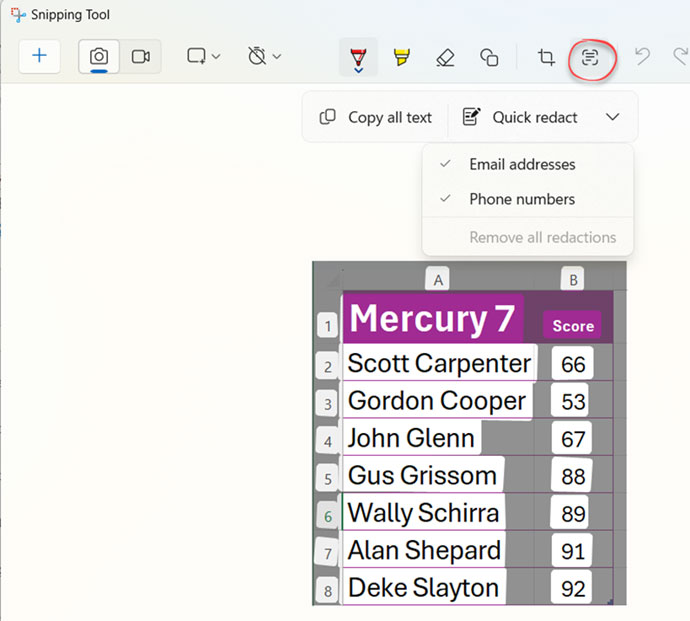
The latest Windows 11 Snipping Tool has a Text Action button that includes some Quick Redact options to hide email addresses and phone numbers. See Figure 8.
OneNote will add searchable text for any screenshot, though with varying degrees of accuracy. Snagit has a similar Grab text option. Excel 365 can transfer data from a picture into a worksheet; check it out at Data | Get & Transform Data | From Picture. Extracting text doesn’t just save a lot of typing — the text can be found later when searching documents or emails. Taking screenshots should be taught in all beginner computer classes. It’s that important and useful.
Peter Deegan is the author of Windows 11 for Microsoft Office Users, Microsoft 365 for Windows: Straight Talk, Eye-Catching Signs with Word, Christmas Cheer with Office, and others. He has been the co-founder and editor in chief of the Office Watch site and newsletters since they started in 1996.
The AskWoody Newsletters are published by AskWoody Tech LLC, Fresno, CA USA.
Your subscription:
Microsoft and Windows are registered trademarks of Microsoft Corporation. AskWoody, AskWoody.com, Windows Secrets Newsletter, WindowsSecrets.com, WinFind, Windows Gizmos, Security Baseline, Perimeter Scan, Wacky Web Week, the Windows Secrets Logo Design (W, S or road, and Star), and the slogan Everything Microsoft Forgot to Mention all are trademarks and service marks of AskWoody Tech LLC. All other marks are the trademarks or service marks of their respective owners. Copyright ©2024 AskWoody Tech LLC. All rights reserved. |
|||||||||||||||||||||||||


Plus Membership
Donations from Plus members keep this site going. You can identify the people who support AskWoody by the Plus badge on their avatars.
AskWoody Plus members not only get access to all of the contents of this site -- including Susan Bradley's frequently updated Patch Watch listing -- they also receive weekly AskWoody Plus Newsletters (formerly Windows Secrets Newsletter) and AskWoody Plus Alerts, emails when there are important breaking developments.
Get Plus!
Recent Topics
-
“kill switches” found in Chinese made power inverters
by 1 hour, 33 minutes ago
-
Windows 11 – InControl vs pausing Windows updates
by 1 hour, 59 minutes ago
-
Meet Gemini in Chrome
by 3 hours ago
-
DuckDuckGo’s Duck.ai added GPT-4o mini
by 3 hours, 9 minutes ago
-
Trump signs Take It Down Act
by 11 hours, 8 minutes ago
-
Do you have a maintenance window?
by 2 hours, 22 minutes ago
-
Freshly discovered bug in OpenPGP.js undermines whole point of encrypted comms
by 2 hours, 23 minutes ago
-
Cox Communications and Charter Communications to merge
by 14 hours, 27 minutes ago
-
Help with WD usb driver on Windows 11
by 19 hours, 37 minutes ago
-
hibernate activation
by 23 hours, 22 minutes ago
-
Red Hat Enterprise Linux 10 with AI assistant
by 1 day, 3 hours ago
-
Windows 11 Insider Preview build 26200.5603 released to DEV
by 1 day, 6 hours ago
-
Windows 11 Insider Preview build 26120.4151 (24H2) released to BETA
by 1 day, 6 hours ago
-
Fixing Windows 24H2 failed KB5058411 install
by 2 hours, 21 minutes ago
-
Out of band for Windows 10
by 1 day, 11 hours ago
-
Giving UniGetUi a test run.
by 1 day, 17 hours ago
-
Windows 11 Insider Preview Build 26100.4188 (24H2) released to Release Preview
by 2 days, 1 hour ago
-
Microsoft is now putting quantum encryption in Windows builds
by 2 hours, 25 minutes ago
-
Auto Time Zone Adjustment
by 2 days, 6 hours ago
-
To download Win 11 Pro 23H2 ISO.
by 2 days, 3 hours ago
-
Manage your browsing experience with Edge
by 3 hours, 12 minutes ago
-
Fewer vulnerabilities, larger updates
by 20 hours, 44 minutes ago
-
Hobbies — There’s free software for that!
by 1 day, 3 hours ago
-
Apps included with macOS
by 1 day, 1 hour ago
-
Xfinity home internet
by 21 hours, 48 minutes ago
-
Convert PowerPoint presentation to Impress
by 1 day, 23 hours ago
-
Debian 12.11 released
by 3 days, 3 hours ago
-
Microsoft: Troubleshoot problems updating Windows
by 3 days, 6 hours ago
-
Woman Files for Divorce After ChatGPT “Reads” Husband’s Coffee Cup
by 2 days, 10 hours ago
-
Moving fwd, Win 11 Pro,, which is best? Lenovo refurb
by 2 hours, 35 minutes ago
Remembering Woody
