
|
Patch reliability is unclear. Unless you have an immediate, pressing need to install a specific patch, don't do it. |
|
In this issue WINDOWS 11: Managing your hardware with PowerToys Additional articles in the PLUS issue PUBLIC DEFENDER: Microsoft Defender could be your free antivirus fix FREEWARE SPOTLIGHT: Reset Windows Update Tool — but you might never use it for that WINDOWS 10: A year and counting
WINDOWS 11 Managing your hardware with PowerToys
By Mary Branscombe • Comment about this article Find your mouse pointer, customize your keyboard layout, and shift your focus between multiple computers. As screens get bigger and interfaces get busier, spotting your mouse pointer on the screen has gotten trickier. Instead of waggling your mouse or cranking up the cursor size so that it hides what you’re trying to click on when you do find it, you could turn on what used to be called “mouse sonar.” From Windows XP on, there’s been an option in the control panel to show a highlighted ring around the mouse pointer when you press and hold the Ctrl key, just like a target in a submarine’s periscope. These days, that feature is actually part of the first PowerToy I’ll discuss, but it now comes with several other helpful options. Mouse utilities
For a start, you’re less likely to trigger it by accident. You must press Ctrl twice or shake the mouse; optionally, you can make your own shortcut. If you’re prone to tapping Ctrl by mistake when you want Shift, you can have it work only when you also hold down the Windows key. And because it’s in PowerToys (which is all about giving you the power to tweak things), you get much more control over the bright circle that appears, zooming in to highlight the mouse pointer like a spotlight while the rest of the screen briefly dims.
If you prefer something more obvious, turn on Mouse Pointer Crosshairs. When you press WinKey+Alt+P (think P for point), it paints very large red crosshairs on the screen to highlight the position of the pointer. It is unlike Windows’ built-in Find My Mouse feature because it stays visible as you move the mouse around and does not go away until you use the same shortcut to turn it off.
If you’re giving a training session and want the mouse position to be obvious, try Mouse Highlighter. It paints a little dot on the screen each time you click. By default, it’s bright yellow — but you can pick the colors for left- and right-click, how large the dot is, and how long until it fades away. Turn it on and off with WinKey+Shift+H (H for highlight). If you’ve got a really big screen and your wrist gets tired while mousing around, or if you just lose track of the pointer, turn on Mouse jump. Press WinKey+Shift+D to get a window showing a shrunken version of your desktop. In that window, click the area you want. The window closes and leaves your pointer in that spot on the desktop.
Mouse Without Borders
If you really want to send your mouse pointer traveling, how about putting it on the screen of a completely different computer? If you use multiple PCs or Macs, a hardware KVM (Keyboard Video Mouse) switch lets you use one keyboard, one display, and one mouse for all of them. That doesn’t work so well if you need to work on two laptops, or a laptop and a desktop — especially if you have room for multiple screens on your desk and need to switch from one of your computers to another. A “virtual” KVM also makes it easy to drag files or copy and paste between PCs without messing around with clipboard sync in Windows. Mouse Without Borders (a free tool from a Microsoft employee) has been a popular solution for this for many years. Although still widely used, it was no longer being actively developed and was starting to become less reliable. Since becoming part of PowerToys, it’s back to being a useful tool for Windows PCs. (If you need something that can also control a Mac, look into Synergy or the open-source version, Deskflow.) With Mouse Without Borders enabled, you can connect to as many as four PCs from one PC’s keyboard and mouse. Simply move your mouse pointer off the screen you’re looking at, and it will move onto an adjacent PC. Once there, the mouse and keyboard control that PC. For security purposes, an encryption key known to both the controlling and controlled PCs is required.
There is one oddity. If you run PowerToys as an administrator, you won’t be able to rearrange the screens in Settings. You can do so only as a normal user. And if you have multiple screens on one computer, the Mouse Without Borders setup will show them as a single screen. You will have to move over to the right or left of all the screens to switch to the next PC. (Mouse jump can speed that up, of course.) Controlling multiple PCs on the same network is very straightforward. Drag your mouse over the edge of one screen, and it will appear on the other. There, you can click, scroll, copy, paste, or type normally — including using mouse and trackpad gestures that use multiple fingers. Dragging from one PC to another works as long as the file is less than 100MB and is a single file and not a folder. If one of your PC screens is much larger or smaller than the others, turn on Move mouse relatively. If you use Aero features, such as dragging applications into the corner of the screen or clicking in the bottom-right corner to hide all open windows, you may want to enable Block mouse at screen corners.
If your PCs aren’t on the same network but you can route between them, you can configure the connection under IP mappings in Advanced Settings. If you run into problems, try turning on Validate remote machine IP. You may need to update the rules in the Windows Firewall to let it through: under Troubleshooting, select Add a firewall rule for Mouse Without Borders. This opens a command prompt, deletes any existing firewall rules for the utility, and creates a new one. If you want to connect over a VPN, the connection must support split tunneling.
Some power features in Mouse Without Borders make things a little more complicated. If you can log into your PC as local admin, you can run the Toy as a service. Choose Restart PowerToys as administrator and reboot your PC when you want to go back to using PowerToys as a normal user. When you run Mouse Without Borders as a service, you can control the lock screen or interact with elevated applications (running as admin) on another PC. But it does remove one of the normal security boundaries, where you must be controlling a PC directly to log in or to use elevated apps. Not everyone will be comfortable doing that, so you may want to turn on extra security features such as allowing connections only from the same subnet. One warning: If you’re running Windows Insider versions of Windows 11 24H2, some networking changes seem to make Mouse Without Borders unreliable. These should be fixed soon, but for now I suggest not upgrading to 24H2 if you rely on Mouse Without Borders. If, however, you’ve already moved to 24H2, don’t use Mouse Without Borders until these problems are resolved. Wizardry with Keyboard Manager
The Keyboard Manager tool in PowerToys lets you change your keyboard around. You can remap one key, swap two keys if you don’t like your keyboard layout, or disable a key you don’t need and find yourself hitting by accident. You can also map a key to send text you type frequently, or to a keyboard shortcut such as Ctrl+V. That’s something SharpKeys, the remapping tool I previously used, can’t do. SharpKeys remaps by making changes to Windows Registry, but it can’t map key combinations or the special keys you only find on some keyboards (such as the dedicated Office buttons on some Microsoft keyboards). However, Keyboard Manager can perform such tasks because it’s always running and can intercept keyboard commands that can’t be changed in the Registry. The interface for key remapping can be confusing (Figure 8). Click the first Select button under the heading Select: and then press the key you want to change. A dialog pops up showing the name of the key. If you hit the wrong key, press Esc and try again; otherwise press Enter or click OK to continue.
If you’re swapping two keys around, you can pick the replacement key command to send from the keyboard by clicking the Select button under To send:, which opens a dialog where you can press the key you want to use (Figure 9). But because the key you want to use may not be on the keyboard at all, you can also pick it from the Send Key/Shortcut dropdown menu.
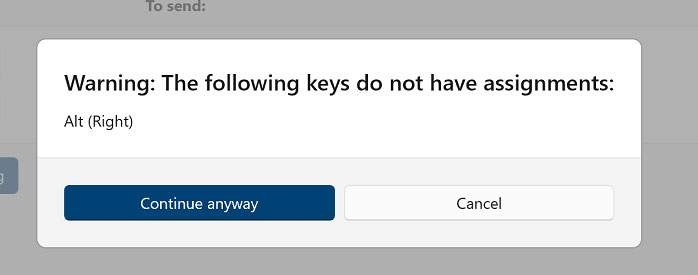
Here I’ve chosen Apps/Menu, which is the right mouse button key. When you’re sure you’re swapping the right keys, click OK at the top to apply it. Don’t worry about the error message in Figure 10, which you will almost certainly see. It doesn’t mean that your key didn’t get remapped to the new command correctly but rather that it has been remapped and now you no longer have that original key function anywhere on the keyboard.
Remapping keyboard shortcuts means you can pick a key you never use and remap it for another purpose. You can also reclaim Windows key shortcuts that Microsoft decided to change. Choose Remap a shortcut and then press the button with the icon of a pencil under Select:. Type in the key combination shortcut you want to use. If you want to use a sequence of keys such as holding down WinKey+Shift+V,U to send Volume Up and using WinKey+Shift+V,D to send Volume Down, turn on the Allow chords slider so you can type the full sequence.
Unlike key remapping, which works every time you press the key, you can limit which applications a keyboard shortcut works with. Because Bill Gates thought Ctrl+F should forward an email in Outlook rather than search for it, you must remember Ctrl+E to search. With Keyboard Manager, you can remap Ctrl+F in Outlook alone. You need to know the process name. Some are obvious (such as outlook.exe for Outlook) but others are not (e.g., msedge.exe for Edge). To find the one you need, open a command prompt and type tasklist to get the process names of all currently running applications. (Or right-click on an application in Task Manager and choose Properties.) To replace a shortcut, choose Send Key/Shortcut as the Action. As with remapping a key, you can also choose to send a snippet of text. But you can also create a shortcut to run a program or open a URI.. That could be a website or another Internet address, such as the ms-settings URIs that open specific pages in the Settings app. Use WinKey+R to check that Windows can handle the URI you want to use, because some work only if you paste them into the browser address bar. There are some limitations to shortcuts: they must start with Ctrl, Shift, Alt, or WinKey; they can’t have more than four keys (five if you make a “chord” sequence); and the order that you press the keys may matter. But you can still get very creative with shortcuts. You might want to copy them to another PC. PowerToys stores your keyboard customizations in the %LocalAppData%\Microsoft\PowerToys\Keyboard Manager\default.json file. Make a copy of that, and save it in the same folder on another PC with Power Toys running: you’ll see your key remappings and shortcuts in Keyboard Manager there too, but you have to select Remap a key and Remap a shortcut to get them working. You don’t need to edit the mappings — just open and close the dialogs. If you prefer, you can back up all your PowerToys settings at once from PowerToys Settings | General | Backup and then restore them on another PC. Shut yourself up quickly with Video Conference Mute
Windows 11 has a new keyboard shortcut for muting your microphone in a hurry, such as when you have a sudden coughing fit or the dog starts barking. WinKey+Alt+K is designed to mute the microphone without your needing to click in your video-conferencing app first. But when it first came out, the fancy new shortcut didn’t work with the new Teams app that Microsoft pushed to users. Even now, the functionality for the new shortcut also seems to break hardware mute buttons, even the ones on Microsoft’s own Surface devices. Thankfully, PowerToys is keeping its Video Conference Mute tool, which both mutes the microphone and turns off your camera when you press WinKey+Shift+Q. You can use WinKey+Shift+A and WinKey+Shift+O to toggle the microphone and camera off and on individually. If you need to mute just for a second while you sneeze, hold down WinKey+Shift+I for as long as you need your microphone disabled. A small toolbar pops up when you use these keyboard shortcuts, so you can see when the microphone and camera are on or off — even if the usual icons for that aren’t visible in the task bar.
Originally, the PowerToys team planned to remove this tool because it would be replaced by a Windows 11 feature and because it does have limitations. For one thing, you must be running Windows as a local admin; you can’t even enable it in PowerToys Settings if you’re not. Plus, you have to set Video Conference Mute (VCM) as the source in all the applications you want it to mute. Although VCM can use a Windows API for muting the microphone, there’s no equivalent API turning the camera on and off while an app is using it. This tends to make the camera connection in that app unstable. So instead of actually turning the camera off, VCM just sends a black image (or an image of your choice). To make that work, it must be the source, rather than your actual camera. But even when it works, the new Windows 11 shortcut doesn’t handle the camera, and it’s not coming to Windows 10. However, you can use VCM in reverse, as it were, to enable push to talk. So VCM will continue to be part of PowerToys, albeit in maintenance mode (meaning it gets bug fixes but no new features). There are still more PowerToys to play with, including a brand-new one for laying out applications on screen where you want them. I’ll tackle those next time.
Mary Branscombe has been a technology journalist for nearly three decades, writing for a wide range of publications. She’s been using OneNote since the very first beta was announced — when, in her enthusiasm, she trapped the creator of the software in a corner.
The AskWoody Newsletters are published by AskWoody Tech LLC, Fresno, CA USA.
Your subscription:
Microsoft and Windows are registered trademarks of Microsoft Corporation. AskWoody, AskWoody.com, Windows Secrets Newsletter, WindowsSecrets.com, WinFind, Windows Gizmos, Security Baseline, Perimeter Scan, Wacky Web Week, the Windows Secrets Logo Design (W, S or road, and Star), and the slogan Everything Microsoft Forgot to Mention all are trademarks and service marks of AskWoody Tech LLC. All other marks are the trademarks or service marks of their respective owners. Copyright ©2024 AskWoody Tech LLC. All rights reserved. |
|||||||||||||||||||||||||


Plus Membership
Donations from Plus members keep this site going. You can identify the people who support AskWoody by the Plus badge on their avatars.
AskWoody Plus members not only get access to all of the contents of this site -- including Susan Bradley's frequently updated Patch Watch listing -- they also receive weekly AskWoody Plus Newsletters (formerly Windows Secrets Newsletter) and AskWoody Plus Alerts, emails when there are important breaking developments.
Get Plus!
Recent Topics
-
Login screen icon
by 1 hour, 30 minutes ago
-
AI coming to everything
by 3 hours, 7 minutes ago
-
Mozilla : Pocket shuts down July 8, 2025, Fakespot shuts down on July 1, 2025
by 5 hours, 17 minutes ago
-
No Screen TurnOff???
by 5 hours, 39 minutes ago
-
Identify a dynamic range to then be used in another formula
by 6 hours, 12 minutes ago
-
InfoStealer Malware Data Breach Exposed 184 Million Logins and Passwords
by 17 hours, 49 minutes ago
-
How well does your browser block trackers?
by 4 hours, 6 minutes ago
-
You can’t handle me
by 8 hours, 31 minutes ago
-
Chrome Can Now Change Your Weak Passwords for You
by 3 hours, 35 minutes ago
-
Microsoft: Over 394,000 Windows PCs infected by Lumma malware, affects Chrome..
by 1 day, 5 hours ago
-
Signal vs Microsoft’s Recall ; By Default, Signal Doesn’t Recall
by 8 hours, 41 minutes ago
-
Internet Archive : This is where all of The Internet is stored
by 1 day, 5 hours ago
-
iPhone 7 Plus and the iPhone 8 on Vantage list
by 1 day, 5 hours ago
-
Lumma malware takedown
by 17 hours, 56 minutes ago
-
“kill switches” found in Chinese made power inverters
by 1 day, 14 hours ago
-
Windows 11 – InControl vs pausing Windows updates
by 1 day, 14 hours ago
-
Meet Gemini in Chrome
by 1 day, 18 hours ago
-
DuckDuckGo’s Duck.ai added GPT-4o mini
by 1 day, 18 hours ago
-
Trump signs Take It Down Act
by 2 days, 2 hours ago
-
Do you have a maintenance window?
by 7 hours, 15 minutes ago
-
Freshly discovered bug in OpenPGP.js undermines whole point of encrypted comms
by 1 day, 4 hours ago
-
Cox Communications and Charter Communications to merge
by 2 days, 5 hours ago
-
Help with WD usb driver on Windows 11
by 14 hours, 16 minutes ago
-
hibernate activation
by 2 days, 14 hours ago
-
Red Hat Enterprise Linux 10 with AI assistant
by 2 days, 18 hours ago
-
Windows 11 Insider Preview build 26200.5603 released to DEV
by 2 days, 21 hours ago
-
Windows 11 Insider Preview build 26120.4151 (24H2) released to BETA
by 2 days, 21 hours ago
-
Fixing Windows 24H2 failed KB5058411 install
by 1 day, 17 hours ago
-
Out of band for Windows 10
by 3 days, 2 hours ago
-
Giving UniGetUi a test run.
by 3 days, 9 hours ago
Remembering Woody
