
|
Patch reliability is unclear. Unless you have an immediate, pressing need to install a specific patch, don't do it. |
|
In this issue WINDOWS 11: Make the most of the snipping tools in Windows Additional articles in the PLUS issue PUBLIC DEFENDER: How good is Mac software vs. Windows software, really? FREEWARE SPOTLIGHT: Back to BASICs — Hello, World! ON SECURITY: Why is software security so hard?
WINDOWS 11 Make the most of the snipping tools in Windows
By Mary Branscombe • Comment about this article When you need a record of something you see on screen, Windows has multiple tools — plus ways to get images you saved on other devices, too. As usual with Windows, there isn’t just one way to snip, clip, or capture a screenshot of part of your screen. There’s a handful of options in Windows 10 and a more powerful new tool just for Windows 11. Windows 10 comes with an update of the Windows 7 Snipping Tool. You can open that from the Start menu, but as you can see (Figure 1), it’s very basic and has a broken link to Paint 3D.
The biggest hint that Microsoft thinks there’s a better option is that the Win+Shift+S keyboard shortcut now opens the rather more minimal Snip & Sketch tool (at the very top of Figure 2), ready to snip what’s on screen onto the clipboard.
If you open Snip & Sketch from the Start menu, you get an even more minimal interface: just a menu that lets you set a delay before opening the overlay. This gives you time to set up anything you want to capture that needs the keyboard (typing anything will close the capture overlay) or to prepare something that takes a few seconds to happen. Annoyingly, you can’t take a delayed snip using the keyboard shortcut. You can also get to Settings from the … menu in the right corner. The option to save the URL of a webpage you’re snipping (a reminder of Snipping Tool’s OneNote heritage) is gone, but you can now put an outline around snips. You can have multiple Snipping Tool windows open if you want to capture several images in succession.
Snip & Sketch is so minimal that it doesn’t stay open after you snip an image; the image goes onto the clipboard. If you haven’t changed the default notification settings, you’ll see a notification appear in the bottom-right corner of your screen. Click on this to open the snip in Snip & Sketch. If you miss that, click the notification button on the taskbar to open the Action Center, and open it from there. That gives you yet another Snip & Sketch window where you can edit, annotate, or save your image; you can also start another snip from this window.
OneNote users will know that the app has its own screen-snipping tool, which once used the Win+Shift+S shortcut before Snip & Sketch came along. There’s also a screenshot tool built into the Edge browser, because it needs a way to let you include screenshots in feedback requests and because it’s handy for Web developers. As well as choosing Screenshot from the … Settings and More menu, you can open it with Ctrl+Shift+S, but that shortcut works only when Edge is the active window.
This offers the usual drawing tools, but with a different selection in the three different modes. If you snip a section from a webpage, Edge assumes you’ll want to search Bing for a match to the image — although you can open the drawing tools by choosing Mark up capture. If you snip the browser interface, you get tools for drawing arrows, putting circles around elements, or adding numbered stamps so you can identify parts of the image for a discussion. And if you capture the whole page, you’ll get a menu with the same drawing tools as in the Edge PDF viewer, so you can pick the color and line thickness to draw free form. Unlike all the other snipping tools, the Edge screenshot tool doesn’t automatically put snips onto your clipboard. You must click the Copy icon yourself. And if you click the Save icon, the clip ends up in the Edge Downloads folder, which causes the Download menu to pop up. That allows you to get to the file and put it somewhere more useful — because the Downloads folder may get cleared out automatically. These snipping tools have one thing in common. If you change your mind about capturing an image, press Esc to close them quickly. If you want to capture a single window rather than an area you mark out on screen, there’s another option: press Win+G to open the Xbox Game Bar. If you don’t see the Capture widget, click the icon that looks like a camera to open it. Then click the Take Screenshot icon (looks like a camera) to get a capture of the window that had focus before you opened the Game Bar. Use the Gallery widget (click See my captures or the last icon on the Game Bar) to see thumbnails of screenshots you’ve already taken with the Game Bar.
Where screenshots go
The Xbox Game Bar interface looks cluttered and clunky, perhaps because it’s designed to be used with a game controller rather than a mouse when you’re playing a game. If you hover over the Take Screenshot button, you’ll see it’s just a fast way to press Win+Alt+PrtScn. It’s useful to know about this, because there are some windows (such as Microsoft’s own Casual Games) that Take Screenshot can’t capture. But it also allows you to capture video. Because Take Screenshot is designed to grab images quickly in the middle of a fast-paced game, it also saves the image automatically. It is placed in C:\Users\[USER]\Videos\Captures and given a file name based on the application window title. That will usually be the name of your game, the title of a webpage, or the file name of an open document, depending on what you capture. You can obviously edit the name in the Gallery. If that’s not where you want those screen captures to go, you can just move the Captures folder elsewhere by dragging it in File Explorer. Windows will keep track of where you move it and save the images there instead. That’s slightly different from what happens when you use the PrtScn button on your keyboard — the traditional Windows option to grab either the whole screen or just a single window. Pressing PrtScn puts a screenshot onto your clipboard; pressing Alt+PrtScn clips just the current application (i.e., with the focus) onto the clipboard. (If that doesn’t seem to work, double-check whether the Function key lock is on, because most laptops double up PrtScn with another key.) Holding down the Windows key while you press PrtScn also saves an image of the whole screen to the default screenshot folder, using the date and time as the file name. (I’ll come back to that in in a minute.) However, and as mentioned above, if you use Win+Alt+PrtScn, it becomes a Game Bar screenshot and puts the file into your Captures folder. In both Windows 10 and Windows 11, you can set the PrtScn button on the keyboard to open the Snipping Tool instead. In Windows 10, do this in Settings | Ease of Access | Keyboard; In Windows 11, use Settings | Accessibility | Keyboard.
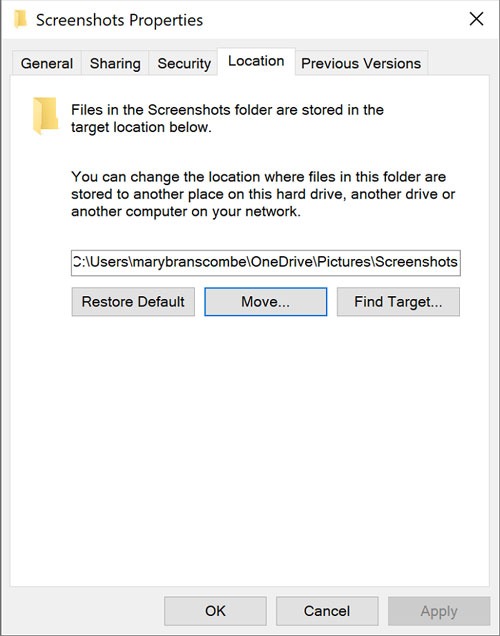
The location of the default screenshot folder used by PrtScn depends on whether you use OneDrive to back up your Pictures folder. If you don’t use OneDrive, you’ll find the Screenshots folder in %UserProfile%\Pictures (C:\Users\[USER]\Pictures\Screenshots) by default. You can also type shell:Screenshots into the File Explorer address bar to open it quickly. Because this is a shell folder, you can change its location. In the Registry, edit the path under HKCU\Software\Microsoft\Windows\CurrentVersion\Explorer\User Shell Folders. Alternatively, use File Explorer. Make a new folder called Screenshots where you want to save images, then right-click on the default Screenshots folder and choose Properties | Location. Click the Move button and navigate through your folders until you can select the newly created Screenshots folder. Windows will change where the shell folder points to and move all the files there.
If you use OneDrive to back up the Pictures folder, your default screenshot folder will be in a slightly different place: %UserProfile%\OneDrive\Pictures (C:\Users\[USER]\OneDrive\Pictures\Screenshots). You can turn that on from the OneDrive cloud icon in the System Tray. Choose the Help & Settings cog icon, then Settings | Sync and backup | Manage backup and set the toggle for the Pictures folder to On. This moves the Pictures shell folder under OneDrive into your user folder. Because the Screenshots folder is in the Pictures folder, it will be saved to OneDrive. Note that if it’s not in a location synced by OneDrive, it won’t be backed up to the cloud. Confusingly, you may also see a setting under Sync and backup that lets you save screenshots to OneDrive without backing up the Pictures file. Microsoft says that this feature was removed from OneDrive in 2024, even though it’s still in the interface on some versions of Windows 10. Saving screenshots to OneDrive is convenient because you can see them on other devices. And saving screenshots from your phone to OneDrive makes it easy to see them on your PC. Phone Link lets you see recent (the previous 2,000) images from an Android phone. Windows 11 even lets you copy text from images when you view them through Phone Link. But if they’re in OneDrive, you don’t have to rely on the phone-to-PC Bluetooth connection to scroll through them. It can take some time for thumbnails of older images to load and other opened images to sync to your PC. On Android, OneDrive usually turns on image upload automatically; choose the Me icon at the bottom of the OneDrive app and then Settings | Camera backup to see extra options — such as whether videos will be backed up and whether uploads require a Wi-Fi connection. Tap Back up device folders to choose what’s included. Screenshots are on by default, but also by default they go into the Camera roll. Turn on Categorize in sub-folders at the top of the screen, and screenshots will start showing up in your default Screenshots folder instead.
On iOS, you need to turn on the Camera roll upload to OneDrive yourself, and it will include screenshots. Tap your profile picture in the OneDrive app and choose Settings | Camera Upload. You can upload to only one OneDrive account, and you need to leave the OneDrive app open for files to upload — don’t swipe the app up and away when you’re scrolling through open apps. You can’t change where screenshots are saved from iOS, so they will show up in the OneDrive Camera roll folder. You can turn off the automatic month and year folders that are created, if you prefer. Do more with Windows 11 snips
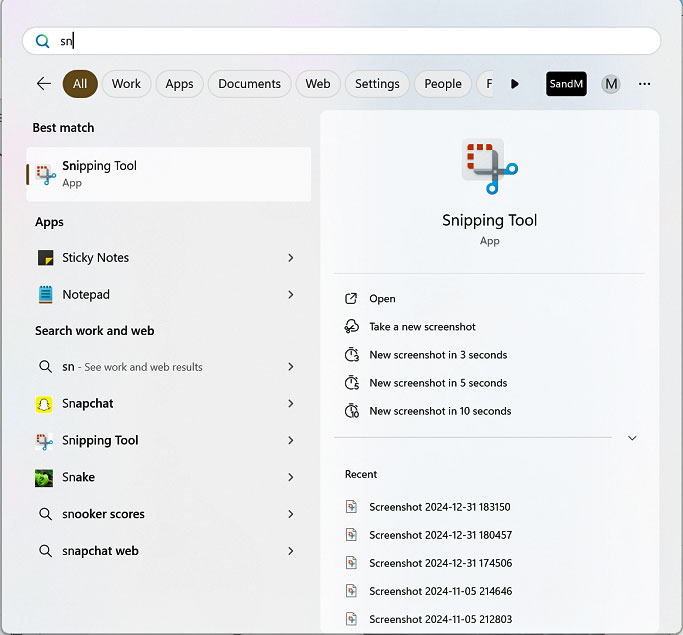
The Windows 11 Snipping Tool combines features from both Snip & Sketch and the Windows 10 Snipping Tool, and it’s getting regular updates with new features Microsoft isn’t bringing to Windows 10. Examples include being able to record video, extract text from a screenshot, or search the Web. Taking a snip is the same as on Windows 10; use the Win+Shift+S shortcut, or open it by searching for the app. The basic snipping controls are the same, too – you still can’t choose to delay a snip if you use the keyboard shortcut, but you can click the video icon to make a screen recording. Here’s one trick most people don’t know. Use Win+Shift+R to open the Snipping tool with the video option selected. The only choice here is to select the area of the screen you want to record, and you can’t set a delay. When you select the area to record, another overlay toolbar appears; here you can mute system sounds and turn on the microphone if you want to record your own narration with the video. Use the mouse to select the area that will be recorded; after releasing the mouse, click on the handles of the selected area to adjust it. Click Start when you’re ready to record. There’s a three-second countdown, and you’ll see a red, dotted line on the screen showing the area being captured. You can pause and restart the video if you don’t want a continuous recording.
Annoying as the new Start menu in Windows 11 can be, Microsoft is also doing some useful things with it. If you launch the Snipping Tool from Start rather than with the keyboard shortcut, you can choose a delayed screenshot or jump straight to recent captures. However, if you open the Snipping Tool this way on a device with a smaller screen, you may find the controls are stuck behind the Start menu.
When the snip opens in the editor, you get the new options. You also find easier ways to get to options such as editing the capture in Paint, which was previously hidden away on the menu. You can also use these options on screenshots from your Android phone if you install Phone Link and connect it to your phone. Then go into Settings | Bluetooth & devices | Mobile devices and turn on Allow this PC to access your mobile devices. Click Manage devices and make sure Get new photo notifications is turned on. When the notification for a new screenshot pops up on your PC, select it to open the image in the Snipping Tool.
The option to copy text out of a screen capture appears more powerful than the same feature in Phone Link because it can handle QR codes and detect tables. It also promises to automatically redact email addresses and phone numbers so you don’t accidentally share those online. But don’t rely on that one — in my tests, phone numbers or email addresses remained in the text I copied out of images. To avoid this, I used the cursor to select text, then right-clicked and chose Redact text, which blacks out the text in the image and replaces it with the word [REDACTED] when you copy and paste it. When you’ve captured a clip with the Snipping tool open, the Text Actions feature appears as an icon on the toolbar, the sixth icon in the middle to the right of the Crop icon (see Figure 13).
There’s a keyboard shortcut for redacting text — Ctrl+R. Annoyingly, that’s the same keyboard shortcut for displaying the ruler over a captured image. Microsoft appears to think that no one will want to both use both redaction and the ruler on the same image, because as soon as you select Text Actions, the ruler entry in the menu becomes grayed out and the ruler, if displayed, will disappear. The Windows 11 Snipping Tool also assumes you want to keep your snips. It can save both images and videos. Instead of having to copy any edits you make to the clipboard, just make sure Automatically copy changes is turned on in Settings. Snip & Sketch has the sole option of automatically prompting you to save snips before you close them. Turn on Automatically save original screenshots and Automatically save original screen recordings. By default, images are saved in the Screenshots shell folder, but you can click Change in Settings to pick a different location, The same goes for recordings, which default to C:\Users\[USER]\Videos\Screen Recordings unless you’re backing up videos with OneDrive. In that case, you’ll find them in C:\Users\[USER]\OneDrive\Videos\Screen Recordings instead. I hope this has helped take some of the mystery out of Microsoft’s various screen capture capabilities. It’s a shame that the tools are so scattered, with incompatible techniques. Perhaps the Windows 11 Snipping tool is a good harbinger of the future.
MMary Branscombe has been a technology journalist for nearly three decades, writing for a wide range of publications. She’s been using OneNote since the very first beta was announced — when, in her enthusiasm, she trapped the creator of the software in a corner.
The AskWoody Newsletters are published by AskWoody Tech LLC, Fresno, CA USA.
Your subscription:
Microsoft and Windows are registered trademarks of Microsoft Corporation. AskWoody, AskWoody.com, Windows Secrets Newsletter, WindowsSecrets.com, WinFind, Windows Gizmos, Security Baseline, Perimeter Scan, Wacky Web Week, the Windows Secrets Logo Design (W, S or road, and Star), and the slogan Everything Microsoft Forgot to Mention all are trademarks and service marks of AskWoody Tech LLC. All other marks are the trademarks or service marks of their respective owners. Copyright ©2025 AskWoody Tech LLC. All rights reserved. |
||||||||||||||||||||||||||||


Plus Membership
Donations from Plus members keep this site going. You can identify the people who support AskWoody by the Plus badge on their avatars.
AskWoody Plus members not only get access to all of the contents of this site -- including Susan Bradley's frequently updated Patch Watch listing -- they also receive weekly AskWoody Plus Newsletters (formerly Windows Secrets Newsletter) and AskWoody Plus Alerts, emails when there are important breaking developments.
Get Plus!
Recent Topics
-
24H2 has suppressed my favoured spider
by 2 hours, 52 minutes ago
-
GeForce RTX 5060 in certain motherboards could experience blank screens
by 7 hours, 1 minute ago
-
MS Office 365 Home on MAC
by 49 minutes ago
-
Google’s Veo3 video generator. Before you ask: yes, everything is AI here
by 21 hours, 3 minutes ago
-
Flash Drive Eject Error for Still In Use
by 22 hours, 36 minutes ago
-
Windows 11 Insider Preview build 27863 released to Canary
by 1 day, 15 hours ago
-
Windows 11 Insider Preview build 26120.4161 (24H2) released to BETA
by 1 day, 15 hours ago
-
AI model turns to blackmail when engineers try to take it offline
by 19 hours, 35 minutes ago
-
Migrate off MS365 to Apple Products
by 20 hours, 24 minutes ago
-
Login screen icon
by 10 hours, 46 minutes ago
-
AI coming to everything
by 6 hours, 45 minutes ago
-
Mozilla : Pocket shuts down July 8, 2025, Fakespot shuts down on July 1, 2025
by 2 days, 7 hours ago
-
No Screen TurnOff???
by 2 days, 7 hours ago
-
Identify a dynamic range to then be used in another formula
by 2 days, 8 hours ago
-
InfoStealer Malware Data Breach Exposed 184 Million Logins and Passwords
by 2 days, 20 hours ago
-
How well does your browser block trackers?
by 2 days, 6 hours ago
-
You can’t handle me
by 5 hours, 11 minutes ago
-
Chrome Can Now Change Your Weak Passwords for You
by 1 day, 23 hours ago
-
Microsoft: Over 394,000 Windows PCs infected by Lumma malware, affects Chrome..
by 3 days, 7 hours ago
-
Signal vs Microsoft’s Recall ; By Default, Signal Doesn’t Recall
by 2 days, 10 hours ago
-
Internet Archive : This is where all of The Internet is stored
by 3 days, 7 hours ago
-
iPhone 7 Plus and the iPhone 8 on Vantage list
by 3 days, 7 hours ago
-
Lumma malware takedown
by 2 days, 20 hours ago
-
“kill switches” found in Chinese made power inverters
by 3 days, 16 hours ago
-
Windows 11 – InControl vs pausing Windows updates
by 3 days, 16 hours ago
-
Meet Gemini in Chrome
by 3 days, 20 hours ago
-
DuckDuckGo’s Duck.ai added GPT-4o mini
by 3 days, 20 hours ago
-
Trump signs Take It Down Act
by 4 days, 4 hours ago
-
Do you have a maintenance window?
by 2 days, 9 hours ago
-
Freshly discovered bug in OpenPGP.js undermines whole point of encrypted comms
by 3 days, 7 hours ago
Remembering Woody
