
|
There are isolated problems with current patches, but they are well-known and documented on this site. |
|
In this issue WINDOWS: How I learned to use my PC with a broken wrist FROM THE FORUMS: Forum Top Ten lists! Additional articles in the PLUS issue PUBLIC DEFENDER: Can we align human interests with robots, so they don’t turn on us? ON SECURITY: Email authentication and older clients don’t mix
WINDOWS How I learned to use my PC with a broken wrist
By Lance Whitney • Comment about this article After fracturing my wrist in a recent fall, I had to figure out how to use the accessibility features built into Windows to work and write. Despite my writing about the Windows accessibility features in a host of articles over the years, it wasn’t until this accident that I actually had to use them every day. In June, I took a bad fall on the concrete stairs outside my home. Beyond suffering several nasty cuts, I fractured my left wrist. After a trip to an orthopedic doctor at urgent care, my left arm and wrist were in a cast. Though the healing had begun, my left arm was out of action, meaning I couldn’t use it for my daily work of writing, typing, and otherwise controlling my PC. With only my right arm available (and luckily, I’m right-handed), I had to turn to all those accessibility features that I had described and used sparingly in the past. In this process, I learned which features were helpful, which were not, and how to alter my own way of working. Here’s how it went. Using voice dictation
I first tried typing with just my right hand to see if that might work. The short answer? Nope. After a couple of minutes and a host of typos, I realized that typing with just five fingers was too slow and clumsy. My next thought was voice dictation. Here, I had a few choices. Windows 10 and 11 include their own tools for dictating text and controlling Windows via your voice. Microsoft 365, aka Microsoft Office, comes with its own dictation tool to use in programs such as Word and Outlook. To muddy the waters, Microsoft offers more than one voice-recognition tool across Windows 10 and 11. In Windows 10, you’re able to use the dictation feature to dictate text in a document, email, or other file. There’s also the Windows Speech Recognition tool, which lets you dictate text and navigate your computer. In Windows 11, you can dictate text through a feature called Voice typing, which works similarly to the Windows 10 dictation feature. Speech Recognition remains an option, though Microsoft is ending support for that one. As a replacement for Speech Recognition, Windows 11 provides a tool called Voice access, which lets you dictate text and control your PC. Dictation or voice typing
I first started with the dictation feature in Windows 10, aka voice typing in Windows 11. To enable this, go to Settings in Windows 10 (Settings & security in Windows 11). Select Privacy and then select Speech. Turn on the switch for Online speech recognition.
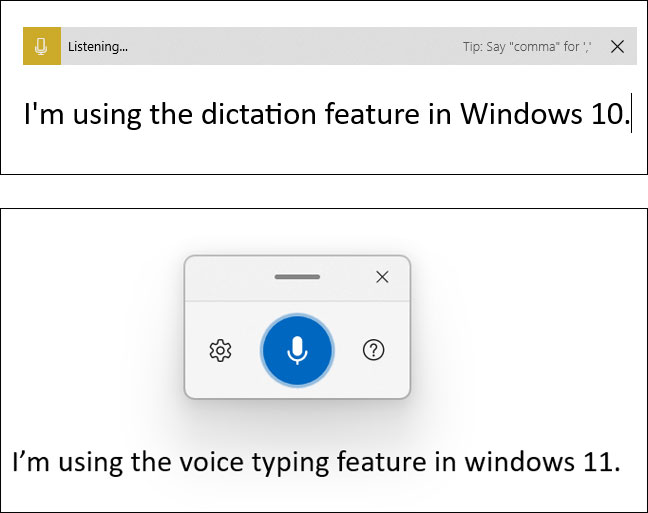
Open a document or other text file and press WinKey+H. In Windows 10, a horizontal bar appears at the top, with dictation mode automatically turned on. Click the microphone icon to turn dictation on and off. In Windows 11, a small square window pops up with voice typing mode enabled. The Windows 11 version is an improvement because you can turn dictation on and off by pressing WinKey+H. You can also access a settings menu with options to choose your default microphone, automatically add punctuation, and access voice typing when you’re in a text box.
The dictation/voice typing feature worked about the same in Windows 10 and 11. For me, the accuracy was fine overall, though it did make mistakes here and there. In Windows 10, it also had trouble keeping up with my speech, so I had to slow down or pause at certain times. Otherwise, I found it a reliable way to dictate text. Speech recognition
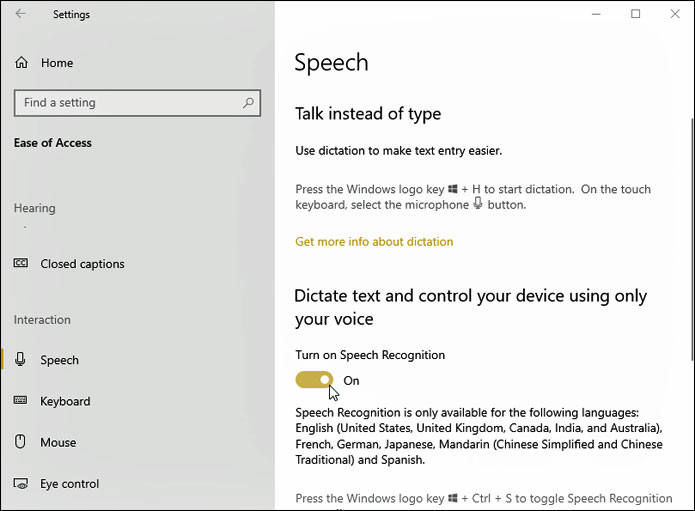
The Speech Recognition tool seems like a solid option in Windows 10 because it lets you dictate text and navigate your PC. Microsoft is removing this tool from Windows 11 in a future update, though you can still use it for now. In Windows 10, go to Settings | Ease of Access | Speech. Turn on the switch under Turn on Speech Recognition. In Windows 11, head to Settings | Accessibility | Speech. Turn on the switch next to Windows Speech Recognition.
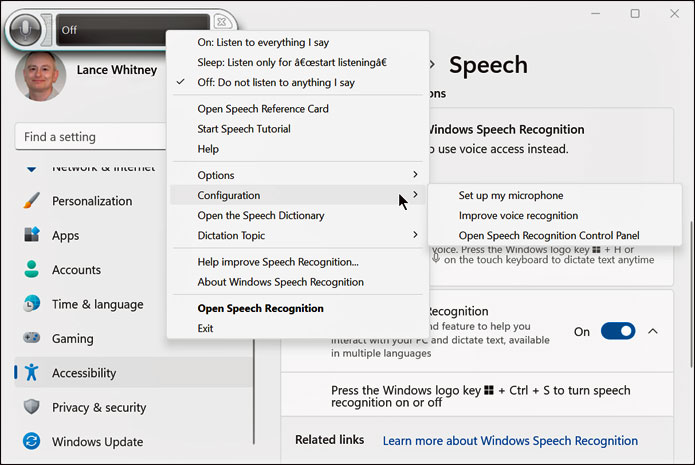
After you turn on Speech Recognition, the tool pops up on the screen. Click the microphone icon to turn it on and off. Right-click on the tool, and you can turn it on and off, open a reference card, run a tutorial, open the speech dictionary, and do much more. The first time you start the tool, you may be asked to set up your microphone and train the tool on your voice. Follow the screens to take care of these tasks.
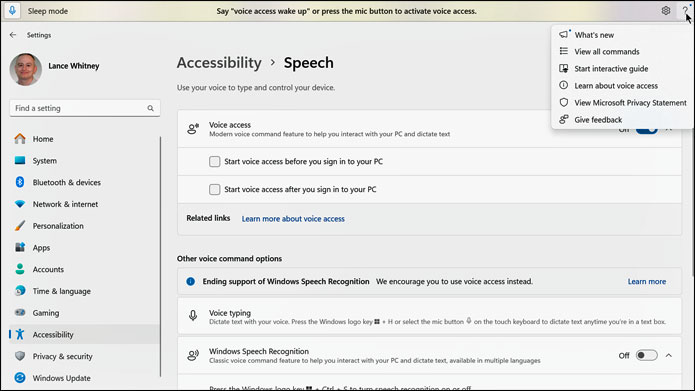
To use Speech Recognition at any time after enabling it, press WinKey+Ctrl+S. Click the microphone icon to start dictating your text. The results? Speech Recognition was virtually useless for me. Even after training, the tool proved frustrating in both Windows 10 and 11. When I dictated text, Speech Recognition made a lot of mistakes, forcing me to spend time and effort correcting them. When I tried to navigate and control Windows, it had trouble understanding what I was saying. I quickly gave up on this one. The voice-access tool in Windows 11 is a much better option, especially because you can dictate text and control Windows. To set this up, head to Settings | Accessibility | Speech and turn on the switch for Voice access. The voice-access bar appears at the top of the screen. Click the Gear icon to set up your microphone and manage other options. Click the question-mark icon to view an interactive guide and learn more about the feature.
Voice access in Windows 11 worked far better for me than the other tools. When I dictated text, it made virtually no mistakes. When I tried to control Windows, voice access understood me each time, quickly following my commands. If you use Windows 11 and need a good voice-recognition tool, I highly recommend voice access. If you still use Windows 10, then the dictation tool should do the trick. Dictate in Microsoft 365
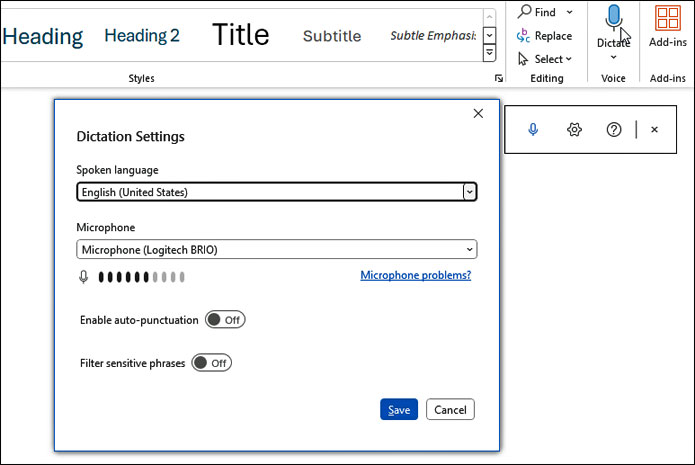
One more option, strictly for dictation, is the Dictate tool in Microsoft 365, both on the desktop and on the Web. To try this, open Word, Outlook, Excel, PowerPoint, or another program in the suite. Click the Dictate button on the ribbon, and a small toolbar pops up. Click the microphone icon to turn dictation on and off. The Gear icon provides access to key settings, while the question mark icon launches a side pane with helpful instructions on how to use the feature.
This Dictate tool was very effective for me, especially in Word and Outlook. It was highly accurate and easy to use. This is what I typically relied on to write documents, emails, and other content in Microsoft 365. However, I’ll confess that I did find it challenging to write via voice dictation. For me, thinking, writing, and typing are all linked together, so it’s hard to separate them into different processes. Using voice dictation, I had to first think of the words and then dictate them, a process that felt awkward. With practice, I did grow more comfortable with this method, though it never felt quite as intuitive for me as writing by typing. Sticky Keys
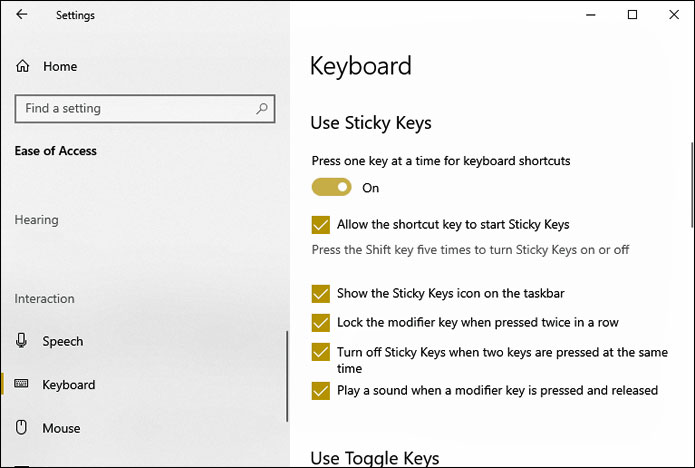
Another problem for me was pressing certain keys on the keyboard. Normally, I use my left hand not just to type but to press common keyboard shortcuts in Windows, such as Ctrl+C, Ctrl+V, and Ctrl+Z. Those moves were more difficult with just the right hand. Yes, I did try using my mouse to run Cut, Copy, Paste, Undo, and other commands from the top and right-click menus. But I’m so used to the keyboard shortcuts for these that I instinctively kept turning to them. That’s when I tried Sticky Keys. With this accessibility option, you can first press the modifier key and then the other key, rather than pressing them both at the same time. To enable Sticky Keys, go to Ease of Access in Windows 10 and Accessibility in Windows 11. Click Keyboard and then turn on the switch for Sticky Keys. Next, press the Shift key five times to turn on the feature. To lock a modifier key, such as Ctrl, Alt, or Shift, just press it twice in a row. Then press the other key. For example, to run the Undo command using Ctrl+Z, press the Ctrl key twice and then press Z.
Sticky keys took some practice. At times, I’d accidentally trigger it and then have to correct the error. But I did grow fond of this method. As my left hand got better, I could use those fingers for limited typing. However, stretching my fingers for certain keyboard combinations was still too painful. Here, Sticky Keys came to my rescue by letting me press those combinations with just one finger. Mouse keys
Because my right hand was fine and I’m right-handed, I had no trouble using the mouse. But if I were left-handed or had fractured my right wrist, I could have used an option called Mouse keys. For this one, go to Ease of Access in Windows 10 and Accessibility in Windows 11. Click Mouse and then turn on the switch for Control your mouse with a keypad.
The upside with Mouse keys is that you use the numeric keypad to move the mouse pointer. Simply press the numbers on the keypad to move the pointer horizontally, vertically, or diagonally. But that’s also the downside, because you need a computer with a dedicated number pad, which rules out most laptops that have a screen size less than 17 inches. I did use Mouse keys on my desktop PC because my external keyboard has a numeric keypad. Moving the cursor by using the number keys was slower and less precise than using the mouse itself. But by tweaking the settings, I was able to speed up and improve the movement. At this point, my left wrist has healed sufficiently so that I can write and type with both hands again. Stretching certain fingers on my left hand is still difficult, so I continue to rely on Sticky keys for specific keyboard combinations. Ultimately, finding the right accessibility tools to help me work and write with a broken wrist was a combination of training, patience, and trial and error. But it’s good to know that the features I’ve written about in the past were able to help when I most needed them.
Lance Whitney is a freelance technology reporter and former IT professional. He’s written for CNET, TechRepublic, PC Magazine, and other publications. He’s authored a book on Windows and another about LinkedIn. FROM THE FORUMS Forum Top Ten lists!
The forums are a centerpiece of AskWoody, allowing our community to engage with one another to solve problems, share insights, offer feedback, and add to our collective knowledge. (Not to mention keeping us in line.) We appreciate both the questions and the ongoing willingness of forum members to participate. Here’s a quick summary of posts from the first half of this year. We look forward to seeing what happens in the second half. Don’t forget to log in before posting! Support
The section of the forums devoted to support has long been the most active area of all. Did you know that the support section alone accounts for over 187,000 topics with over 1,200,000 comments? So check out Support from time to time — you never know when you might have that unique insight that will help someone else. In the first half of this year, hundreds of new questions were asked and several thousand replies were posted. Here are the ten most active Q&A sessions from that period.
Newsletter and blog
As you all know, a forum topic is associated with every post on our blog (the site’s home page) and every article published in our newsletter. Almost every one of those topics generates some interest, so almost all have at least a few replies from the readership. The replies may be compliments on our articles, complaints about what we have written, disagreement with our conclusions, corrections of errors, further information about the topic, or in-depth commentary about specific points. We appreciate the activity in the forums. Even if you don’t think there is anything to add, you might find the additional information provided in the forums useful. In the first half of this year, we published roughly 119 newsletter articles and another 45 blog posts. From those 164 items, here are the ten most heavily discussed forum topics.
The AskWoody Newsletters are published by AskWoody Tech LLC, Fresno, CA USA.
Your subscription:
Microsoft and Windows are registered trademarks of Microsoft Corporation. AskWoody, AskWoody.com, Windows Secrets Newsletter, WindowsSecrets.com, WinFind, Windows Gizmos, Security Baseline, Perimeter Scan, Wacky Web Week, the Windows Secrets Logo Design (W, S or road, and Star), and the slogan Everything Microsoft Forgot to Mention all are trademarks and service marks of AskWoody Tech LLC. All other marks are the trademarks or service marks of their respective owners. Copyright ©2024 AskWoody Tech LLC. All rights reserved. |
||||||||||||||||||||||||


Plus Membership
Donations from Plus members keep this site going. You can identify the people who support AskWoody by the Plus badge on their avatars.
AskWoody Plus members not only get access to all of the contents of this site -- including Susan Bradley's frequently updated Patch Watch listing -- they also receive weekly AskWoody Plus Newsletters (formerly Windows Secrets Newsletter) and AskWoody Plus Alerts, emails when there are important breaking developments.
Get Plus!
Recent Topics
-
.NET 8.0 Desktop Runtime (v8.0.16) – Windows x86 Installer
by 11 hours, 12 minutes ago
-
Neowin poll : What do you plan to do on Windows 10 EOS
by 6 hours, 56 minutes ago
-
May 31, 2025—KB5062170 (OS Builds 22621.5415 and 22631.5415 Out-of-band
by 9 hours, 46 minutes ago
-
Discover the Best AI Tools for Everything
by 9 hours, 55 minutes ago
-
Edge Seems To Be Gaining Weight
by 4 minutes ago
-
Rufus is available from the MSFT Store
by 8 hours, 7 minutes ago
-
Microsoft : Ending USB-C® Port Confusion
by 1 day, 10 hours ago
-
KB5061768 update for Intel vPro processor
by 17 hours, 23 minutes ago
-
Outlook 365 classic has exhausted all shared resources
by 13 hours, 34 minutes ago
-
My Simple Word 2010 Macro Is Not Working
by 1 day, 6 hours ago
-
Office gets current release
by 1 day, 9 hours ago
-
FBI: Still Using One of These Old Routers? It’s Vulnerable to Hackers
by 2 days, 23 hours ago
-
Windows AI Local Only no NPU required!
by 2 days, 7 hours ago
-
Stop the OneDrive defaults
by 3 days ago
-
Windows 11 Insider Preview build 27868 released to Canary
by 3 days, 10 hours ago
-
X Suspends Encrypted DMs
by 3 days, 12 hours ago
-
WSJ : My Robot and Me AI generated movie
by 3 days, 12 hours ago
-
Botnet hacks 9,000+ ASUS routers to add persistent SSH backdoor
by 3 days, 13 hours ago
-
OpenAI model sabotages shutdown code
by 3 days, 13 hours ago
-
Backup and access old e-mails after company e-mail address is terminated
by 3 days, 2 hours ago
-
Enabling Secureboot
by 3 days, 9 hours ago
-
Windows hosting exposes additional bugs
by 3 days, 21 hours ago
-
No more rounded corners??
by 3 days, 17 hours ago
-
Android 15 and IPV6
by 3 days, 7 hours ago
-
KB5058405 might fail to install with recovery error 0xc0000098 in ACPI.sys
by 4 days, 10 hours ago
-
T-Mobile’s T-Life App has a “Screen Recording Tool” Turned on
by 4 days, 12 hours ago
-
Windows 11 Insider Preview Build 26100.4202 (24H2) released to Release Preview
by 4 days, 7 hours ago
-
Windows Update orchestration platform to update all software
by 4 days, 20 hours ago
-
May preview updates
by 4 days, 7 hours ago
-
Microsoft releases KB5061977 Windows 11 24H2, Server 2025 emergency out of band
by 3 days, 23 hours ago
Remembering Woody
