
|
Patch reliability is unclear. Unless you have an immediate, pressing need to install a specific patch, don't do it. |
In this issue BEST UTILITIES: Freeware Spotlight — Anti-Twin Additional articles in the PLUS issue LANGALIST: A VPN dissenter speaks out PUBLIC DEFENDER: The Internet passport is coming — are you ready? PRODUCTIVITY: The legacy and vitality of LibreOffice ON SECURITY: Browsing your way to more security
BEST UTILITIES Freeware Spotlight — Anti-Twin
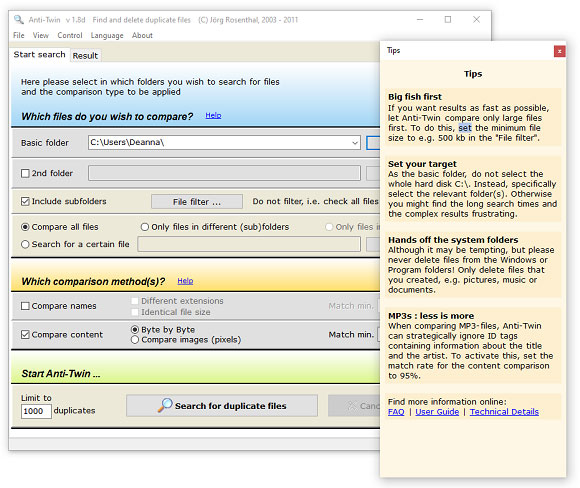
By Deanna McElveen Yes, those seashell pictures you took from the ocean were great, and that recipe for Frito Pie is a real crowd-pleaser. But do you need seven copies of these on your hard drive? Data clutter is a common thing these days. Often I see customers’ computers that have hundreds of duplicate files on them, especially pictures. Whether it be from a mishap with choosing the same drive for backups or accidentally making copies of folders, an unorganized computer can fill up space quickly. This is certainly a big issue with smaller, solid-state hard drives, where you might not have the space to spare. In this article, we are going to discuss Anti-Twin by Jörg Rosenthal, a talented German developer. Anti-Twin is a portable tool to search for duplicate files on your hard drive. It does this in several different ways, to give you full control of the search process. Although the program was last updated in 2010, it runs flawlessly from Windows 2000 to Windows 10. Sometimes a program is just so well written that further updates are not needed. Let’s get the file downloaded from OlderGeeks, and we’ll take it for a spin. The file (AntiTwin.exe) has everything it needs to do its job, so we won’t be installing anything. If you want to check multiple computers, just run it from a flash drive. Important: Right-click on the file and Run as Administrator. Once you have done that, you will get the main screen along with some handy-dandy tips for Anti-Twin’s use. At the bottom of this tip window, you can view the FAQs, user guide, and technical info. Who reads directions?
The first thing we need to do is choose a folder to compare. This is called the “Basic folder.” You can also choose a “2nd folder,” but only if you want to compare two different locations. An example would be two supposedly identical folders on two different drives, or maybe a network location. By choosing just a “Basic folder,” we will be searching this folder and its subfolders (you will have to check the box “include subfolders”) for identical files. “Deanna, can I choose a whole drive?” Well, yes you can, if you have no problem with waiting a while for the search to finish and don’t mind sifting through the results. I’m going to search for duplicate pictures among folders in my Pictures folder, so I am checking “Include subfolders.” Clicking “File filter” will let you filter some results, such as minimum and maximum size, and certain file extensions allowed or not allowed. It will even have the program scan images pixel by pixel if you are searching for exact image duplicates.
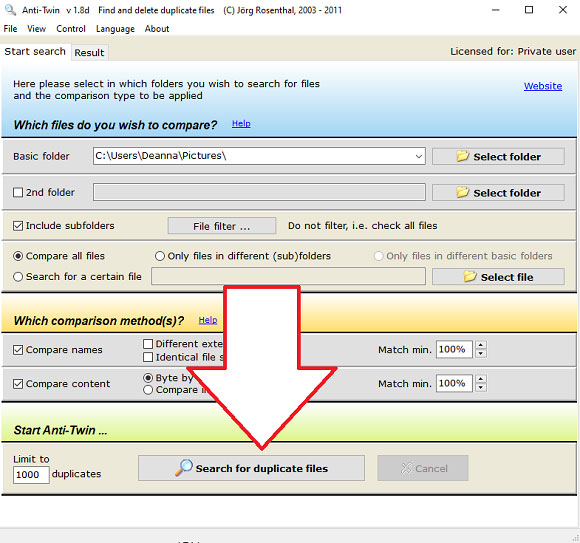
The middle section, titled “Which comparison method(s),” is where you choose what to compare. You can choose to compare all files (default), only files in different subfolders, or files in different basic folders (requires choosing a second folder at the top). Lastly, you can search for duplicates of a particular file by checking “Search for a certain file” and using “select file” to browse for it.
The next section lets you set the program for how you want it to compare your files. The default setting is for Anti-Twin to compare files byte by byte; or you can choose to compare the pixels of images. Both of these choices are extremely accurate but also slow, depending on the amount to be scanned and the speed of the hard drive. By checking “Compare names” and deselecting “Compare content,” you get a much faster scan. This works well if you are just casually looking for things such as the same document name with different file extensions, or if you simply want to quickly find all copies of a file of a certain size.
Once you have everything set just the way you want it, you can also set a limit on the number of duplicates to find for this search, in the lower-left corner. You can always do the scan again if you hit the limit. Click “Search for duplicate files” to kick off the search.
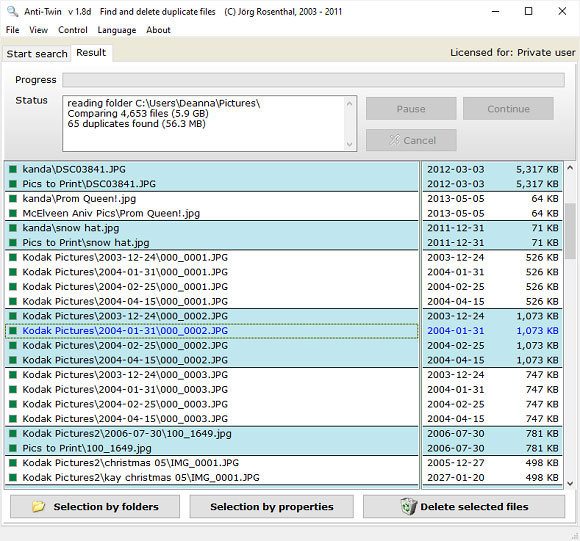
Out of 4,653 files that I scanned (took only several seconds on my SSD), Anti-Twin found 65 duplicates. Looking at very old Kodak pictures in particular, I notice I have the same picture in four different folders. Note that the duplicate files are separated into blue and white blocks. That display is excellent, making it very easy to see a group of duplicates.
So what do we do now? Get rid of the duplicates. See those tiny green boxes to the left of each file? If you click one, it will change to a red button with a white X. This means this file has been selected for deletion. What I did below was mark all the duplicates. Files left with the green box will stay. What do you think of the nifty preview window? I like!
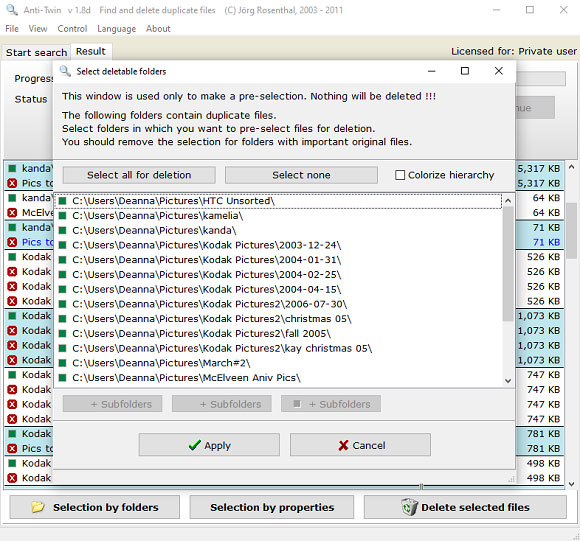
Before we click to delete our selections, note there are two other ways to do some filtering if your list is huge. First, “Selection by folders” lets you choose only certain folders to be displayed for your file-deleting enjoyment.
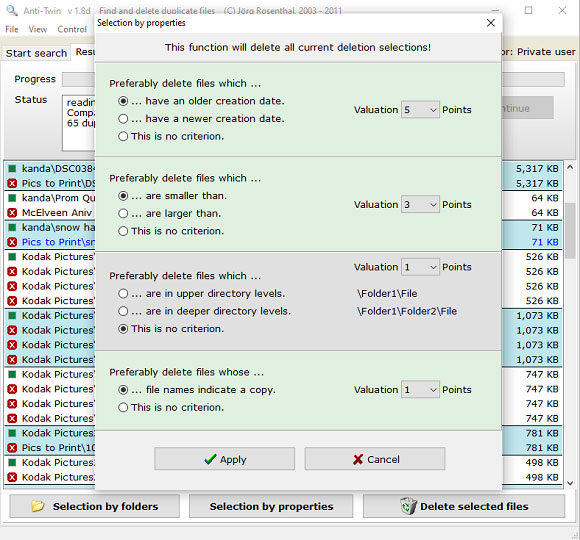
Second, “Selection by properties” gives you a ton of ways to filter your selection. Choosing anything here will undo any previous selections you have made. There are a lot of complicated options here, so I’m going to recommend reading the manual for those details.
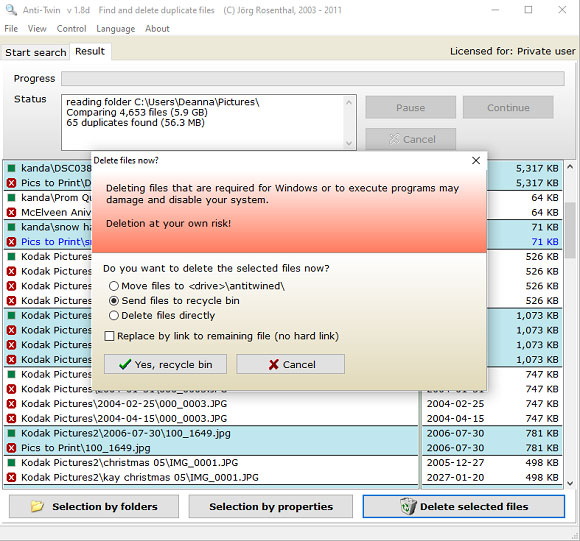
Okay, I’ve marked everything I want to delete. I’m not waiting any longer. Time to hit the “Delete selected files” button! But wait — there’s more. Now we need to choose what to do with the files. It may seem like you have three choices here (see Figure 10), but be sure you understand what you’re selecting. Two of the options keep a copy of the deleted files, one in Anti-Twin’s special folder called “antitwined” at the root of the drive and the other in the Windows Recycle Bin. The third option, “Delete files directly,” permanently deletes the duplicates. The first two options provide a way out if you delete duplicates unintentionally. See that little tick box at the bottom, “Replace by link …”? When checked, Anti-Twin will stick a shortcut to the surviving file into the folders of the deleted duplicates. How cool is that!? One thing, though: before using that feature, be sure that any other program you are using that indexes your files (such as the organizer in Adobe’s Elements products, or even Lightroom) properly handles links instead of files. They should, but check anyhow. If you choose to create those links and need to run a future scan on the same folder, set the minimum size (Figure 2) to a value slightly larger than a typical shortcut file so the scan will ignore them.
And that is pretty much it. With duplicates safely moved to the Recycle Bin (or preserved in /antitwined, just in case), my drive is in much better order, and it didn’t cost me a cent! Happy computing!
Deanna and Randy McElveen are celebrating over a decade running OlderGeeks.com, over two decades in the computer business, and even more than that putting up with each other. Their computer store is in a small town in the Missouri Ozarks. Believing that happy customers are always the best advertisement, they hope to squeeze in a couple more decades doing the same.
You’re welcome to share! Do you know someone who would benefit from the information in this newsletter? Feel free to forward it to them. And encourage them to subscribe via our online signup form — it’s completely free!
Publisher: AskWoody Tech LLC (sb@askwoody.com); editor: Will Fastie (editor@askwoody.com). Trademarks: Microsoft and Windows are registered trademarks of Microsoft Corporation. AskWoody, Windows Secrets Newsletter, WindowsSecrets.com, WinFind, Windows Gizmos, Security Baseline, Perimeter Scan, Wacky Web Week, the Windows Secrets Logo Design (W, S or road, and Star), and the slogan Everything Microsoft Forgot to Mention all are trademarks and service marks of AskWoody Tech LLC. All other marks are the trademarks or service marks of their respective owners. Your subscription:
Copyright © 2021 AskWoody Tech LLC. All rights reserved. |
|||||||||||||||||||||||||||||


Plus Membership
Donations from Plus members keep this site going. You can identify the people who support AskWoody by the Plus badge on their avatars.
AskWoody Plus members not only get access to all of the contents of this site -- including Susan Bradley's frequently updated Patch Watch listing -- they also receive weekly AskWoody Plus Newsletters (formerly Windows Secrets Newsletter) and AskWoody Plus Alerts, emails when there are important breaking developments.
Get Plus!
Recent Topics
-
Uninstalr Updates
by 7 minutes ago
-
Apple zero days for April
by 37 minutes ago
-
CVE program gets last-minute funding from CISA – and maybe a new home
by 10 hours, 19 minutes ago
-
Whistleblower describes DOGE IT dept rumpus at America’s labor watchdog
by 10 hours, 29 minutes ago
-
Seeing BSOD’s on 24H2?
by 3 hours, 9 minutes ago
-
TUT For Private Llama LLM, Local Installation and Isolated from the Internet.
by 53 minutes ago
-
Upgrade from Windows 10 to 11
by 19 hours, 9 minutes ago
-
Microsoft : AI-powered deception: Emerging fraud threats and countermeasures
by 21 hours, 59 minutes ago
-
0patch
by 1 hour, 1 minute ago
-
Devices might encounter blue screen exception with the recent Windows updates
by 15 hours, 21 minutes ago
-
Windows 11 Insider Preview Build 22631.5261 (23H2) released to Release Preview
by 1 day ago
-
Problem opening image attachments
by 1 day, 2 hours ago
-
advice for setting up a new windows computer
by 1 day, 17 hours ago
-
It’s Identity Theft Day!
by 21 hours, 35 minutes ago
-
Android 15 require minimum 32GB of storage
by 1 day, 22 hours ago
-
Mac Mini 2018, iPhone 6s 2015 Are Now Vintage
by 1 day, 22 hours ago
-
Hertz says hackers stole customer credit card and driver’s license data
by 1 day, 22 hours ago
-
Firefox became sluggish
by 1 day, 19 hours ago
-
Windows 10 Build 19045.5794 (22H2) to Release Preview Channel
by 2 days, 2 hours ago
-
Windows 11 Insider Preview Build 22635.5235 (23H2) released to BETA
by 2 days, 3 hours ago
-
A Funny Thing Happened on the Way to the Forum
by 1 day ago
-
Download speeds only 0.3Mbps after 24H2 upgrade on WiFi and Ethernet
by 5 hours, 5 minutes ago
-
T-Mobile 5G Wireless Internet
by 1 day, 1 hour ago
-
Clock missing above calendar in Windows 10
by 1 day, 2 hours ago
-
Formula to Calculate Q1, Q2, Q3, or Q4 of the Year?
by 2 days, 18 hours ago
-
The time has come for AI-generated art
by 1 day, 22 hours ago
-
Hackers are using two-factor authentication to infect you
by 2 days, 7 hours ago
-
23 and you
by 2 days, 14 hours ago
-
April’s deluge of patches
by 18 hours, 51 minutes ago
-
Windows 11 Windows Updater question
by 8 hours, 47 minutes ago
Remembering Woody
