
|
Patch reliability is unclear. Unless you have an immediate, pressing need to install a specific patch, don't do it. |
|
In this issue WINDOWS 11: 11 settings to tweak on a new Windows 11 PC Additional articles in the PLUS issue LANGALIST: Wide-ranging reader questions PUBLIC DEFENDER: How to find out who owns that website you hate ON SECURITY: Falling for the click
WINDOWS 11 11 settings to tweak on a new Windows 11 PC
By Lance Whitney There are a bunch of settings you should configure before you fully dive into Windows 11. Let’s assume you’re running Windows 11 on a new or upgraded PC. Before you fully start working, playing, and hopping online, there are several key settings and features you should review, configure, or enable. By doing so, you’ll feel more at home with Windows 11. Among the settings to check are the Start menu, Taskbar, battery power, universal clipboard, and Windows Hello options. Much of the advice I offer here applies whether you’ve just bought a brand-new PC with Windows 11 or upgraded your current PC from Windows 10. Certain features that are the same in both versions will carry over from one to the other. But for any new or redesigned features, such as the Start menu and Taskbar, you’ll want to tweak those in the new version of Windows. Either way, here are 11 settings I recommend you visit if you’ve just jumped ship to Windows 11. Start menu
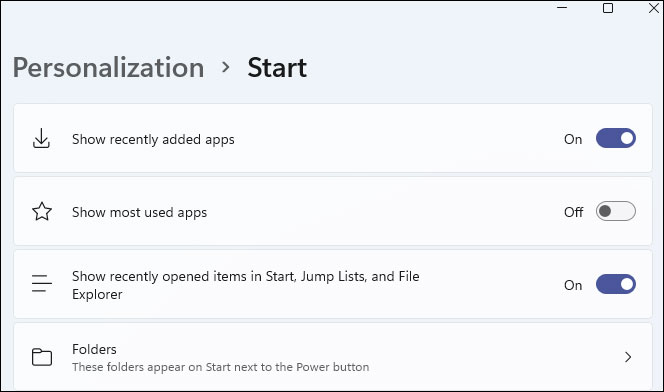
Whether you love it or hate it, the new Start menu doesn’t offer very many options to tweak. But there are a few key settings you can change to make the menu more hospitable. By default, the new menu displays pinned apps, but you can control what else appears. Go to Settings, Personalization, and then Start. Turn the switches on or off for recently added apps, most used apps, and recently opened apps — depending on what you want to see on the menu (see Figure 1).
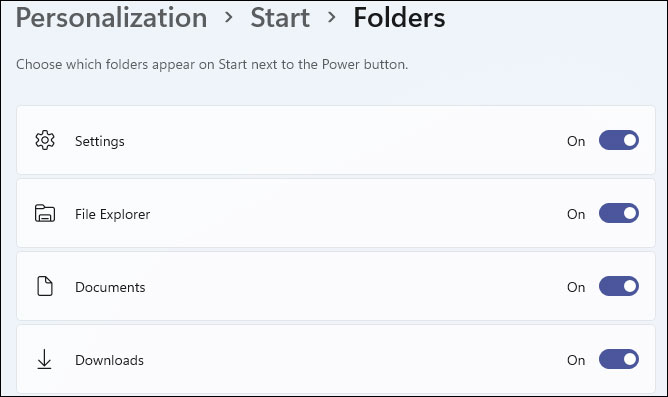
Next, click the entry for Folders, and you can elect to display icons for Settings, File Explorer, Documents, Downloads, and other folders directly on the Start menu (see Figure 2).
I wish there were more you could do to enhance the limited Start menu in Windows 11, but as usual, it’s Microsoft’s way or the highway. If you want something more usable, your best bet is to install a Windows 11 Start menu replacement (see Two solid replacements for the kludgy Windows 11 Start menu, AskWoody 2021-12-13). Taskbar
The taskbar is another Windows 11 feature with limited customization, but you can perform a few tweaks. Go to Settings, Personalization, and then Taskbar. Under Taskbar items, decide which icons you really need to see, such as Search, Task view, Widgets, and Chat. Next, choose what should appear in the system tray, aka the bottom-right corner of the taskbar. If you’re using a touchscreen device or a tablet, you may want to turn on the switches for all three items here — Pen menu, Touch keyboard, and Virtual touchpad. Otherwise, leave them off (see Figure 3).
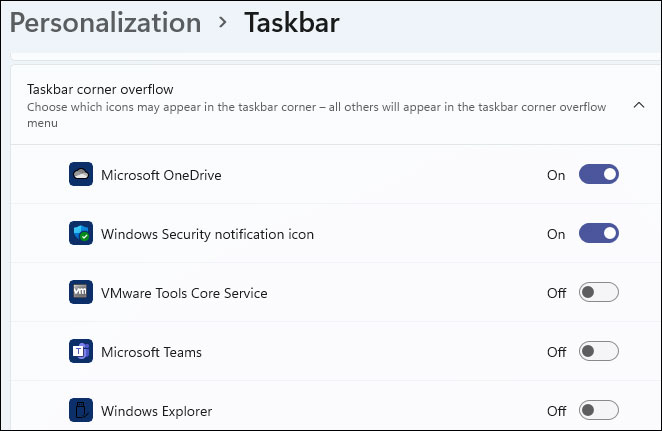
Under Taskbar corner overflow, choose the items you always want to see directly in the system tray — as opposed to those that appear only when you click on the little up arrow in the tray. Your best bet is to turn each one on or off (to see what shows up in the system tray) and then stick with the items you really need to be visible at first glance (see Figure 4).
Finally, select the setting for Taskbar behaviors. If you’re more comfortable with the taskbar in its old familiar spot, change the alignment from Center to Left. You can also opt to hide the taskbar so it appears only when you move your mouse cursor to the bottom of the screen. Turn on the switch for “Show badges (unread messages counter) on taskbar apps” to see alerts for any type of activity in certain apps. If you have a multi-display setup, turn on “Show my taskbar on all displays.” And enable the switch for “Select the far corner of the taskbar to show the desktop” to display the desktop if you move your mouse cursor to the far-right corner (see Figure 5).
Background
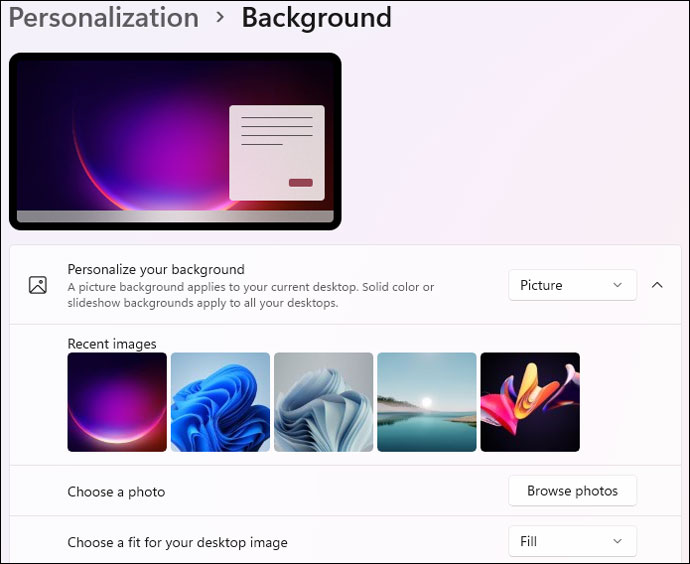
I always customize the wallpaper background in Windows to give it a more distinctive look. To do this, go to Settings, Personalization, and then Background. Select a picture you like from among the recent images. For a more personal touch, click the button for “Browse photos” to select one of your own photos or images as your background. Depending on the size and resolution of the image you choose, you can then play with the fit, choosing among fill, fit, stretch, tile, center, or span (see Figure 6).
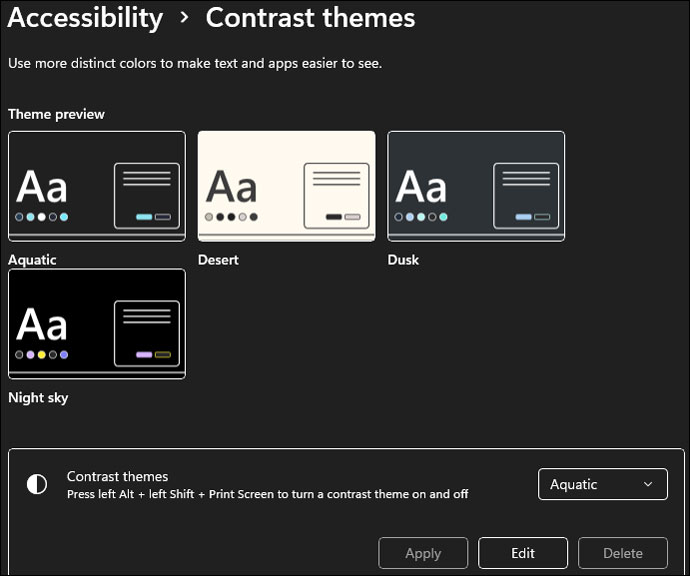
If you have vision problems, the next option can be helpful. Click the setting for “Contrast themes.” Try each of the four themes — Aquatic, Desert, Dusk, and Night sky — to see which one is easiest on your eyes. You can even tweak each theme by selecting one and clicking the Edit button. You can then change the color for specific elements, such as the background, text, hyperlink, and button text (see Figure 7).
Colors
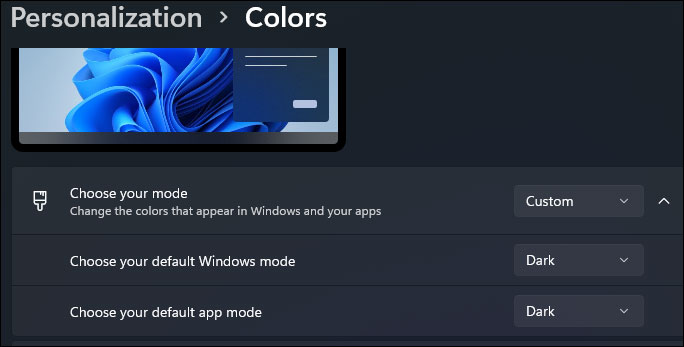
I don’t spend much time playing with the color scheme in Windows. But if you need to tweak the look of Windows with specific colors, especially if you have vision issues, then that should be your next step. Go to Settings, Personalization, and then Colors. Change the mode to Dark if you find that easier on your eyes. Choose the custom setting to change your default mode for Windows itself as well as for apps (see Figure 8).
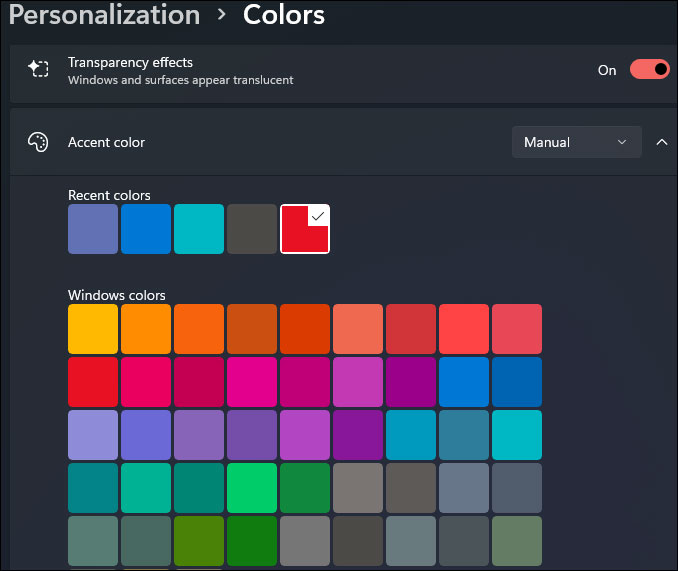
Next, you can make windows and surfaces appear translucent to give them a more pleasing appearance. If you wish, you can experiment with different accent colors. I usually stick with the automatic setting here, but you may prefer a certain color to grace buttons, menus, and other elements — in which case, you would change the setting to Manual and pick your preferred color (see Figure 9).
Notifications and Focus assist
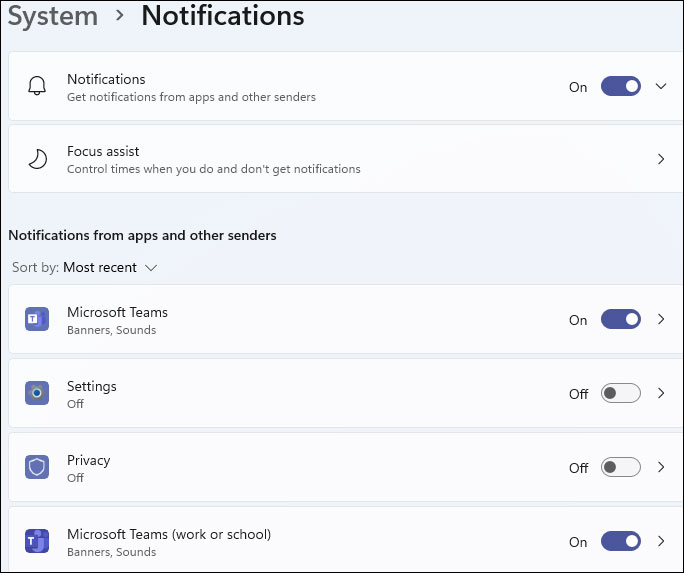
Getting interrupted by a software update, new email, or other notification can be annoying when you’re in the middle of something. But you can control notifications so they don’t bother you. Go to Settings, System, and then Notifications. To cut the cord entirely, turn off the switch for Notifications. However, that prevents important notifications from reaching you. Instead, keep them on and just turn off the notifications for specific apps and settings that you don’t need or use (see Figure 10).
Another option is to disable notifications during certain times or activities. Click the entry for Focus assist. Here, you can opt to see only notifications that you set as priorities or only alarms (such as those for calendar appointments). Scroll down to the Automatic rules section, and choose the times and events when notifications are silenced (see Figure 11).
Power and battery
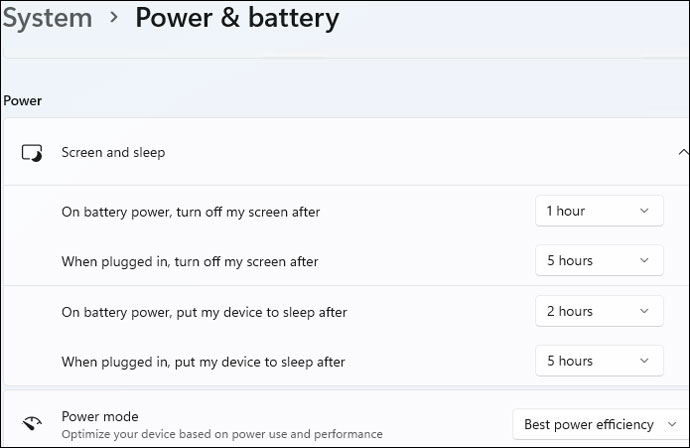
If you’re using a Windows 11 laptop, you’ll want to tweak the power settings to preserve your battery charge. First, make sure your PC is running on battery power. Go to Settings, System, and then Power & battery. Click the entry for Screen and sleep. Here, you can set when the screen turns off and when your computer goes to sleep, both under battery power and AC. Depending on your battery capacity and charge, you’ll likely want to keep the settings for “On battery power” on the low side and the ones for “When plugged in” on the higher side. Select the entry for Power mode and set it to “Best power efficiency to preserve your battery charge” (see Figure 12).
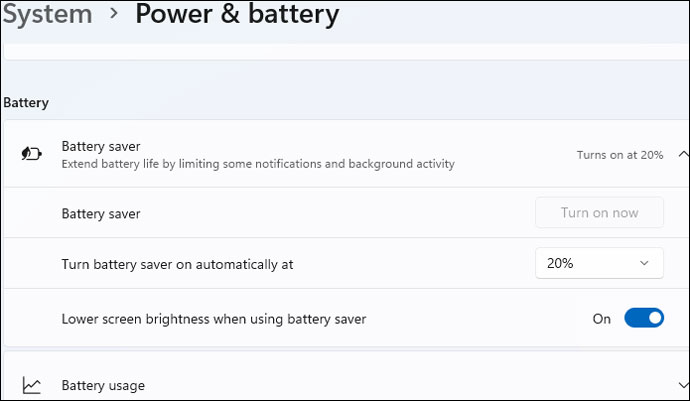
Next, click the entry for Battery saver. Select the percentage for “Turn battery saver on automatically at” and set it to at least 20%. Turn on the switch for “Lower screen brightness when using battery saver.” Turn on the button for Battery saver to see whether the screen is bright enough for you when in Battery saver mode (see Figure 13).
Windows Hello
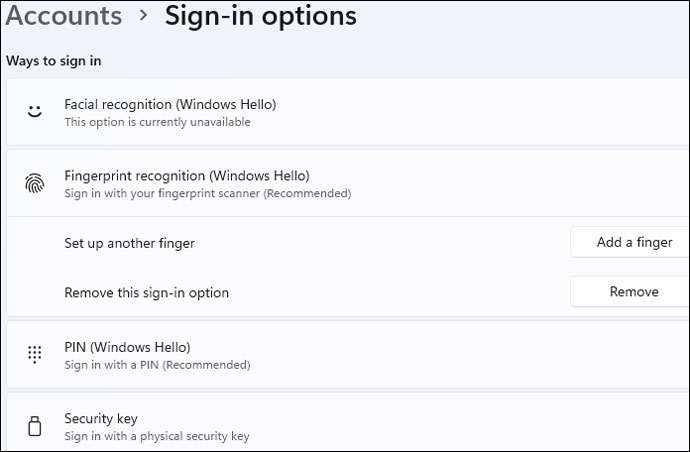
For tighter security and smoother ease of use, create other methods to sign in to Windows beyond a password. Go to Settings, Accounts, and then Sign-in options. If you haven’t already done so, click the option for PIN (Windows Hello) and set up a PIN. By default, the PIN must be at least six digits and no more than 127 digits. You can also include letters and symbols. On a desktop or other PC safely situated in your home or office and not generally accessible by others, a shorter PIN will suffice. But on a laptop that you take with you on trips, create a PIN with at least six or eight digits. If your PC has a fingerprint reader and/or a Windows Hello–supported camera, set up the options for Fingerprint recognition and Facial recognition. Windows will tell you whether either method is available. You can also add a physical security key if you wish (see Figure 14).
Universal clipboard
Introduced in Windows 10, the universal clipboard is a handy way to store a history of text, images, and links that you copy and paste. To set this up, go to Settings, System, and then Clipboard. Turn on the switch for Clipboard history to store every item copied to the clipboard up to 25. To access the same clipboard history across multiple computers, turn on the switch for “Sync across your devices” and set its option for “Automatically sync text that I copy” (see Figure 15).
Enable location
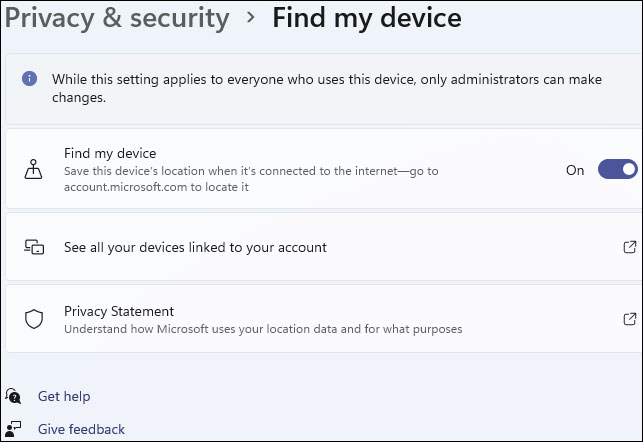
Usually, I recommend disabling most of the privacy-related settings in Windows to limit the information Microsoft can track and record about you. But one setting to consider if you have a laptop is Find my device. This feature will help you track down your laptop if it’s ever lost or missing. The major drawback is that this option works only if you’re signed in to your Windows 11 PC with a Microsoft account, as opposed to a local account. To set this up, go to Settings, Privacy & security, and then Location. Turn on the switch for Location services. Go back to the previous screen and select the entry for “Find my device.” Turn on the switch for Find my device (see Figure 16).
If your laptop ever goes missing, sign in to your Microsoft account website. Click the heading at the top for Devices, and then click the link for Find my device. Click on your missing PC to see its last known location in an address and on a map (see Figure 17). I initially had trouble with this feature before it finally kicked in, so you should test it out at your home or office before you try it on the road.
Windows Update
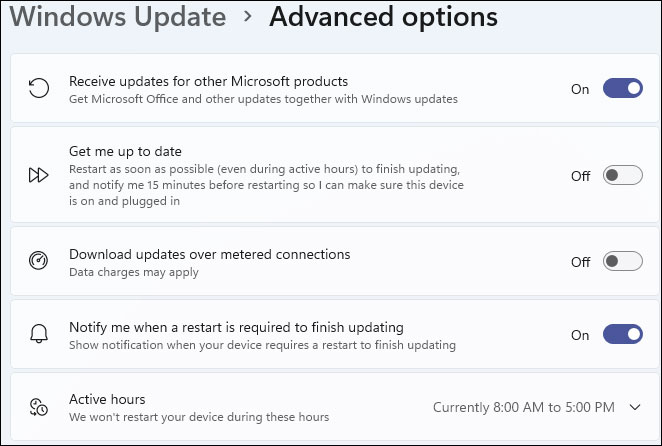
Don’t forget to check for the latest Windows updates, especially any critical security patches. Go to Settings, Windows Update and then Check for updates. While you’re here, why not also configure and control the updates? Click the setting for Advanced options. If you use Microsoft Office or other Microsoft programs, flip on the switch for “Receive updates for other Microsoft products.” Turn on the switch for “Notify me when a restart is required to finish updating.” And if you don’t want to be interrupted by updates that require a reboot, click the setting for Active hours, set it to either Automatically or Manually, and choose your Start and End times (see Figure 18).
Create a recovery drive
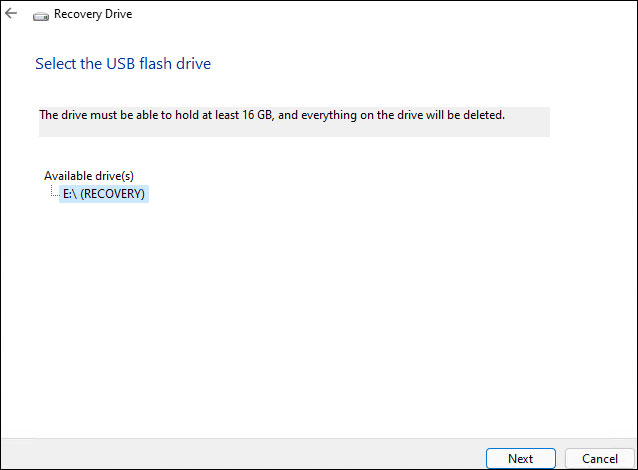
Finally, you should create a recovery drive that will boot up your PC and troubleshoot specific problems, should Windows ever fail to boot. To set this up, insert a USB stick with at least 16GB of storage into your computer. Click the Search icon, start typing “recovery drive” in the search field, and then select the result. At the first screen, check the box for “Back up system files to the recovery drive.” Select the recovery drive when it appears on the screen. Click Next and then click Create to set up the drive. If Windows ever refuses to boot, insert the recovery drive and use it as your boot device (see Figure 19).
Besides getting your new or updated PC off to a good start, going through these settings will give you greater familiarity with Windows 11 settings in general and, hopefully, give you greater confidence in managing your PC.
Lance Whitney is a freelance technology reporter and former IT professional. He’s written for CNET, TechRepublic, PC Magazine, and other publications. He’s authored a book on Windows and another about LinkedIn.
You’re welcome to share! Do you know someone who would benefit from the information in this newsletter? Feel free to forward it to them. And encourage them to subscribe via our online signup form — it’s completely free!
The AskWoody Newsletters are published by AskWoody Tech LLC, Fresno, CA USA.
Your subscription:
Microsoft and Windows are registered trademarks of Microsoft Corporation. AskWoody, AskWoody.com, Windows Secrets Newsletter, WindowsSecrets.com, WinFind, Windows Gizmos, Security Baseline, Perimeter Scan, Wacky Web Week, the Windows Secrets Logo Design (W, S or road, and Star), and the slogan Everything Microsoft Forgot to Mention all are trademarks and service marks of AskWoody Tech LLC. All other marks are the trademarks or service marks of their respective owners. Copyright ©2022 AskWoody Tech LLC. All rights reserved. |
||||||||||||||||||||||||


Plus Membership
Donations from Plus members keep this site going. You can identify the people who support AskWoody by the Plus badge on their avatars.
AskWoody Plus members not only get access to all of the contents of this site -- including Susan Bradley's frequently updated Patch Watch listing -- they also receive weekly AskWoody Plus Newsletters (formerly Windows Secrets Newsletter) and AskWoody Plus Alerts, emails when there are important breaking developments.
Get Plus!
Recent Topics
-
Microsoft : Edge is better than Chrome
by 10 hours, 46 minutes ago
-
The EU launched DNS4EU
by 23 hours, 28 minutes ago
-
Cell Phone vs. Traditional Touchtone Phone over POTS
by 13 hours, 48 minutes ago
-
Lost access to all my networked drives (shares) listed in My Computer
by 1 day, 4 hours ago
-
Set default size for pasted photo to word
by 1 day, 10 hours ago
-
Dedoimedo tries 24H2…
by 23 hours, 2 minutes ago
-
Windows 11 Insider Preview build 27871 released to Canary
by 2 days, 9 hours ago
-
Windows 11 ad from Campaign Manager in Windows 10
by 2 hours, 41 minutes ago
-
Small desktops
by 1 hour, 47 minutes ago
-
Totally disable Bitlocker
by 1 day, 3 hours ago
-
Phishers extract Millions from HMRC accounts..
by 2 days, 7 hours ago
-
Windows 10 22H2 Update today (5 June) says up-to-date but last was 2025-04
by 3 days, 13 hours ago
-
Thoughts on Malwarebytes Scam Guard for Mobile?
by 1 day, 8 hours ago
-
Mystical Desktop
by 3 days, 17 hours ago
-
Meta and Yandex secretly tracked billions of Android users
by 2 days, 22 hours ago
-
MS-DEFCON 2: Do you need that update?
by 9 hours, 45 minutes ago
-
CD/DVD drive is no longer recognized
by 4 days, 8 hours ago
-
Windows 11 24H2 Default Apps stuck on Edge and Adobe Photoshop
by 4 days, 11 hours ago
-
North Face and Cartier customer data stolen in cyber attacks
by 4 days, 9 hours ago
-
What is wrong with simple approach?
by 2 days, 7 hours ago
-
Microsoft-Backed Builder.ai Set for Bankruptcy After Cash Seized
by 4 days, 20 hours ago
-
Location, location, location
by 3 days, 11 hours ago
-
Cannot get a task to run a restore point
by 4 days, 22 hours ago
-
Frustrating search behavior with Outlook
by 4 days, 12 hours ago
-
June 2025 Office non-Security Updates
by 5 days, 8 hours ago
-
Secure Boot Update Fails after KB5058405 Installed
by 11 hours, 16 minutes ago
-
Firefox Red Panda Fun Stuff
by 5 days, 8 hours ago
-
How start headers and page numbers on page 3?
by 5 days, 19 hours ago
-
Attack on LexisNexis Risk Solutions exposes data on 300k +
by 4 days, 21 hours ago
-
Windows 11 Insider Preview build 26200.5622 released to DEV
by 6 days, 3 hours ago
Remembering Woody
