
|
Patch reliability is unclear, but widespread attacks make patching prudent. Go ahead and patch, but watch out for potential problems. |
|
ISSUE 16.37.0 • 2019-10-14
The AskWoody Plus Newsletter
In this issue LANGALIST: Easily back up all your PC’s current drivers BEST OF THE LOUNGE: What’s the real risk in using Internet Explorer? PATCH WATCH: October’s updates look promising; however … NETWORK TROUBLESHOOTING: Using the ipconfig command to troubleshoot network problems BEST UTILITIES: Freeware Spotlight — Windows Registry Recovery LANGALIST Easily back up all your PC’s current drivers
By Fred Langa Free tools, including Win10’s built-in export-driver command, make backing up your device drivers simple. Plus: Free security info from the U.S. Department of Homeland Security. And, do new laptops really require a 100 percent initial charge? Fast and free driver-backup tools
Device drivers provide the essential link between a PC’s operating system and its internal and external hardware components. Right now, your PC is probably juggling something close to 100 separate drivers and driver packages! Want to see for yourself? Open Windows’ Device Manager (e.g., type device manager in the taskbar’s search box and select Device Manager when it appears). In Device Manager’s menus, click View and then select Show hidden devices. Next, in Device Manager’s main area, fully expand every listed category — and start counting. Just about every device shown in your fully expanded list requires at least one driver. Most mainstream PCs can use Windows’ built-in generic drivers to at least get going. But if you want full access to advanced or specialized brand-/model-specific features, you typically need separate drivers specifically written for each device. And in most cases, they come from your hardware vendor’s or manufacturer’s support site — not Microsoft. Going directly to the vendor/manufacturer is the gold standard for obtaining the best drivers for your exact hardware. But you can take a much faster and easier shortcut, should you need to reinstall the drivers sometime in the future. If your current PC setup is stable and not experiencing any driver-related issues, you can simply export copies of your current, working, installed drivers and then save those copies for use down the road. Win10 and Win8 make this easy with a export-driver option built into the operating systems’ Deployment Image Servicing and Management app (DISM.exe). Although DISM is highly complex (Microsoft info), the export-driver command is actually quite simple. I’ll cover that first. Win7 needs relatively simple third-party software to export its drivers, but the apps are easy to use and there are many free options. I’ll discuss this in a moment. Win10/8 DISM driver export:
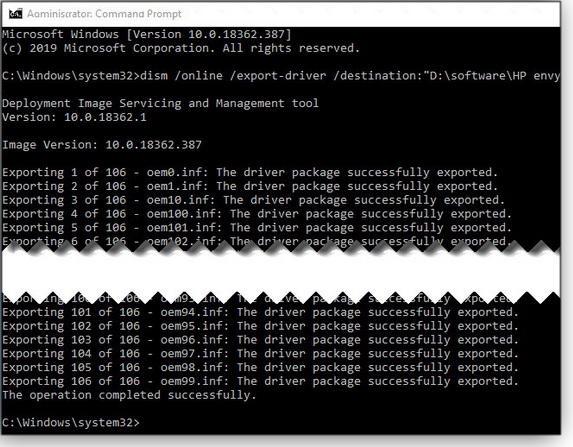
When I ran an export-driver command on my PC, DISM generated the results shown in Figure 1 — 106 separate drivers successfully exported to the specified destination. (I cut the middle out of the image to make it a more manageable size).
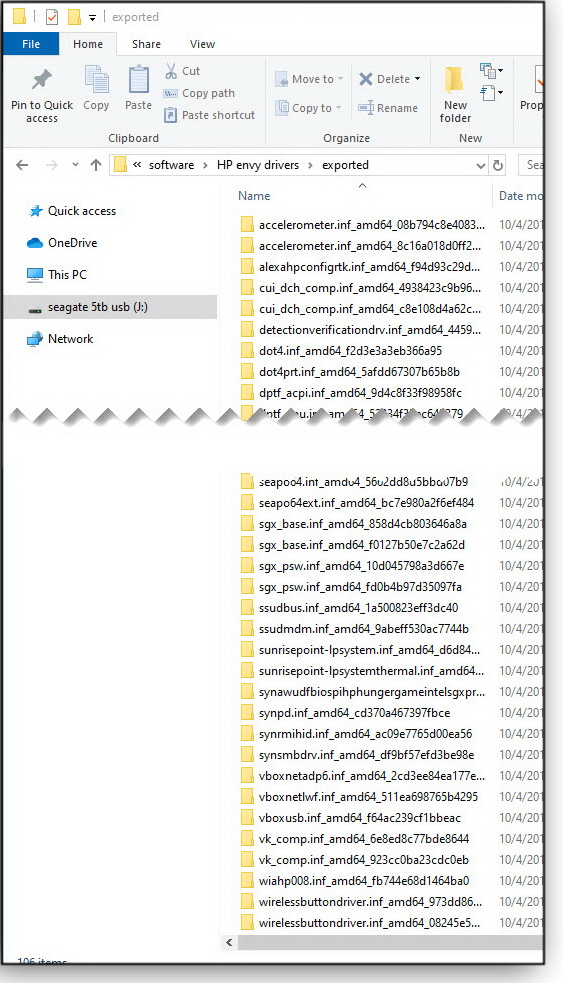
Figure 2 (also truncated) shows the exported driver files in the destination folder. Note that it’s a standard folder with normally named subfolders, each containing the relevant driver and/or INF file (Wikipedia info).
For more DISM information and options, see the Microsoft MSDN article “DISM Driver Servicing (.inf) Command-Line Options.” Creating Windows 7 driver backups: Win7’s DISM lacks the export-driver option, so you’ll need a third-party tool instead. There are many, as a quick Google search (“windows 7 driver backup”) will show. But one popular option is the free/donationware DriverBackup 2! (site). Figure 3 shows a sample backup operation.
Note: This utility is really old — the most recent files are from 2010. That’s contemporaneous with Windows 7, so there’s no inherent problem using the app with that OS. But it’s not built with Win8 or Win10 in mind. For those OSes, I recommend staying with the free, purpose-built DISM export-driver option explained above. Either way, via DISM or third-party tool, you’ll end up with a library of known-good drivers that could be very handy for future PC maintenance, upgrades, and rebuilds! Free security guides from the Department of Homeland Security
October is National Cybersecurity Awareness Month, and the U.S. Department of Homeland Security has a site offering an array of free, distributable/sharable PDFs covering cyber security in 13 different areas. Topics include PCs, smartphones, the Internet of Things, ecommerce security, and more. The site even has a simple security-trivia game, free for the downloading. The info’s a comprehensive refresher for the security-savvy — and a solid foundation for the less experienced. Check out the DHS’s National Cybersecurity Awareness Month site soon. Do new laptop batteries really require a full initial charge?
An anonymous correspondent asks:
Required? Not in the sense of “the device won’t work if you don’t.” Most lithium-ion devices ship with 30 to 40 percent battery charge because that’s the sweet spot for minimum self-discharge and safe long-term storage. A new device will turn on and run fine with a 30 to 40 percent charge — or just about any charge above the OEM-set level that triggers the device’s automatic shutdown. That said, there are some excellent arguments in favor of starting off with a full charge. Top of the list: A full charge will establish that the new device and charger can actually do everything they’re supposed to. That’s no joke! Electronic devices tend to fail either very early or very late in life. Barring accident (drop, electrical surge, and so forth), once a new device has been successfully and fully exercised, odds are good it’ll continue working correctly until its statistical end-of-service life, usually some years down the road. But if you don’t fully charge your device at least once, you won’t know how it (and the charger that it came with) will handle a full charge — or even if it really can accept and hold the full, stated battery capacity. In other words, a full first charge lets you immediately discover whether there’s a major battery, charger, or other electrical issue. It may also help the device more accurately calibrate itself for proper charging in the future. The second important reason to do an initial full charge is to prevent your new device from running out of power during its initial setup — usually an extended period of heavy download activity, lit screens, high CPU use, lots of read/writes to the storage medium, and maybe one or more restarts. Running low on power midway through that process risks leaving your new device in a partially complete state. It could even cripple the device (thus, in some instances, the warning to have a full charge or be plugging into AC power during setup/update). In short, a full first charge ensures the device will have plenty of uninterrupted power during its demanding initial setup/update. So, while it’s not a requirement to fully charge Li-ion–powered devices before first use, it’s smart to do so!
Fred Langa has been writing about tech — and, specifically, about personal computing — for as long as there have been PCs. And he is one of the founding members of the original Windows Secrets newsletter. Check out Langa.com for all Fred’s current projects. Best of the Lounge What’s the real risk in using Internet Explorer?
In an AskWoody post, Susan Bradley ponders the risks of an Internet Explorer zero-day threat versus installing an out-of-band patch. The upshot? She doesn’t see this particular exploit as all that dangerous to anyone running current versions of Windows. AskWoody readers weigh in. MS Office MVP joep517 shares some important information for Windows 7 users running Office 365 ProPlus. With support for Win7 ending early in 2020, fellow Lounge members discuss the impact a grace period might have on them. Chromebook Plus member bbkingman01 is buying a new Win10 PC … and a new Chromebook. Is Win10 1903 reliable? And what’s the best tool for learning the unfamiliar ways of Chrome? We wouldn’t want bbkingman01 singing the blues after the fact, so share your opinions. Hardware Plus member cmptrgy has been tasked with fixing a problematic HP LaserJet MFP. The problem at hand? How to make sure all traces of existing printer drivers are removed so they won’t interfere with the newly installed drivers. AskWoody Forums Plus member Alexhousek wants to know whether there’s a way to mark all forums and posts as “read.” Members share tips and thoughts on how to accomplish this. Fun Stuff Plus member Nibbled To Death By Ducks wants to know whether you use any (slightly wacky) rituals to keep your computer working. Don’t be afraid to share in the silliness. Patching blues CaliPhil’s notebook PC took a header after a recent update. Is there a list of necessary Win7 patches? Loungers respond to this new AskWoody member with helpful pointers. If you’re not already a Lounge member, use the quick registration form to sign up for free. PATCH WATCH October’s updates look promising; however …
First, a mea culpa: I said I was comfortable with installing the out-of-band Internet Explorer update released October 3. I have to take that back. The update was designed to block the new IE vulnerability CVE-2019-1367. The October 3 release was the third time Microsoft sent out essentially the same fix, but it’s the only one I’ve called a true out-of-band update. Unlike the two previous attempts, Microsoft pushed this patch out to everyone via the usual channels: Windows Server Update Services (WSUS) and Windows Update. Where did I go wrong? (Or more accurately, how was I led astray?) Microsoft stated that the update included the fix for a print-spooler problem that came with the earlier releases. But that wasn’t the case. My early tests running standard print jobs did not turn up any issues. Then, this past Monday we noticed erratic printing from a line-of-business application. I spent about an hour figuring out why we were getting only one complete print job, out of four tries. That’s what I get for breaking my own patching rules. Worse, I recommended that other businesses would be better off with the patch rather than taking a chance on the IE vulnerability. If you followed my advice and then ran into printing problems, I apologize. So now October’s updates are out. It’s time to test the updates — but put off installing them on production systems. That said, how do you test an update if you have only one computer? Your best option is to rely on the AskWoody community to be your testing platform. Every month, I see posts from forum members reporting their patching experience — both successes and failures. Other options include having a second PC where tested patches can fail without real impact on your productivity. Some advanced users set up virtual machines for testing both patches and applications. In truth, most Windows machines survive the updating process without bumps, crashes, or other serious impediments. However, patch failures are random — you might not have a problem for months, then get hit with the bug of the month. You could catch something as serious as system crashes on boot or as benign as needing a second reboot. Here are some ways to reduce your exposure.
In a recent blog post, Microsoft expressed its concern that we’re not installing updates — and suggested that it was our social responsibility to do so. To Microsoft I say: “We need solid and reliable updates!” An update that breaks print spoolers might be an inconvenience to a casual Windows user, but to a business it can spell disaster. And if Microsoft pushes out an out-of-band update, we should be able to trust that it was thoroughly tested by Microsoft. We should never have to feel we’re the company’s unofficial beta testers. Installing updates is easy; trusting that updates won’t cause issues isn’t. The October 3 IE update was a somewhat painful reminder of why I defer updates as a rule. Also ensure that you defer major feature updates. A Windows Blogs post notes that Windows 10 Version 1909 should start appearing on PCs in November. It’ll be best to put off that release for a few months, giving Microsoft time to shake out the bugs. To do so, you need to be on Windows 10 Pro, which lets you apply the needed blocks via the Local Group Policy Editor (more info). If you want to be a pioneer on a new version of Windows, do so on a test machine. October’s patch summary
In the days following the most recent Patch Tuesday (October 8), there’s been a small but steady stream of bug reports on the AskWoody forum. They include issues with Outlook, Edge, VMWare, Windows search, and the Start menu. They don’t appear to be widespread, but again, the impact on specific machines can be rather random.
Windows 10 updates
Win10 1803 reminder! Pro and Home versions receive their last updates in November. You should be planning your upgrade to Version 1809 (not easy) or Version 1903 (largely automatic). Check the links below for known issues. For server administrators, the Cluster Shared Volume failure is apparently still not fixed. There’s also a problem with some Asian-language packs, a fix for a blank screen on startup, and error messages related to the Windows Mixed Reality Portal. Cumulative Windows updates
Servicing-stack updates
.NET Framework updates .NET releases continue to confound me. When the out-of-band updates were released on October 3, I also received the optional .NET 4.8 update as well. More surprising, the .NET update did not include any security fixes. Fortunately, it hasn’t impacted my desktop. But if you manage Exchange 2010 from a Win10 1903 machine, you’ll need to block .NET 4.8 — or use another platform to manage Exchange. Expect to see the following .NET 4.8 (and others, as noted) updates:
Windows 8.1/Server 2012 R2
Note that Microsoft still hasn’t fixed the Cluster Shared Volume issue. Look for the following Win8.1 and Server 2012 R2 updates: Windows 7/Server 2008 R2 SP1
There are no listed known issues. Server 2012
Windows Server 2008 SP2
Office security and non-security updates
October’s Office security updates fix the remote code-execution vulnerability CVE-2019-1331. Office 2016 Office 2013 SP1 Office 2010 SP2 The following Office non-security enhancements and fixes were released October 1. Office 2016
Office 2013
Office 2010
Refresher: Patch Watch rules for updating
It’s a new month of patching. Once again, here are our current recommendations for patching Windows and Office. They may change as Microsoft’s updating process evolves.
Stay safe out there.
In real life, Susan Bradley is a Microsoft Security MVP and IT wrangler at a California accounting firm, where she manages a fleet of servers, virtual machines, workstations, iPhones, and other digital devices. She also does forensic investigations of computer systems for the firm. NETWORK TROUBLESHOOTING Using the ipconfig command to troubleshoot network problems
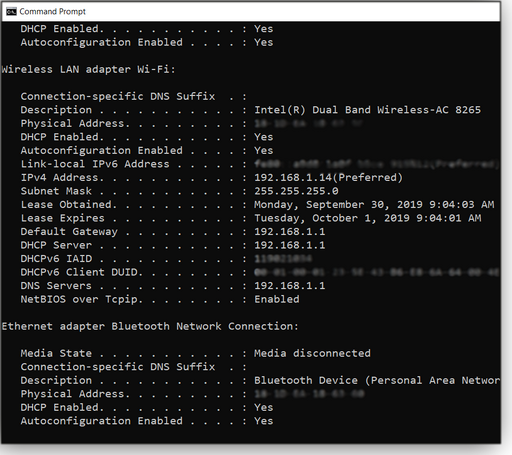
When you’re having trouble connecting to a network, Windows’ command-line option IP Configuration can reveal helpful information. Network-connection problems can crop up anywhere and in various ways: at home, at a hotel, connecting to a network printer, opening webpages, and so forth. Connection issues can be relatively simple or complex. For example, you might have an IP-address conflict, where two devices are trying to use the same address — and the solution is a quick IP refresh. Or your system could have trouble resolving addresses: you can connect to a site or server via its IP address but not through its name. That might require some deeper digging. Using ipconfig, you can check your devices’ IP address, router address, MAC address, and other important networking information. Add specific “switches” to ipconfig, and you can, for instance, reset your domain name system (DNS) cache or check the addresses for your DNS and dynamic host configuration protocol (DHCP) servers. This information can be useful whether you’re doing your own troubleshooting or getting help from a support person — as I know from first-hand experience. Again, ipconfig is a command-line option — you begin by opening a command window. Enter “cmd” into the Windows search bar; Command Prompt should appear at the top of the search list. You can simply click it, but with command-line options, it’s generally better to use the Run as administrator option in the right column. Let’s start with the basics: Enter ipconfig at the command prompt. You’ll next see separate sections for each type of network connection — Ethernet, LAN, Wi-Fi, and virtual machine. Look for the section that applies to your current or default connection. For example, on a desktop PC that normally connects via an Ethernet cable, look for the Ethernet section. With laptops, you’ll typically check the Wi-Fi section. The most fundamental bit of information is your current device’s internal (inside the network) IP address. Ignore the IPv6 address for now; it’s still not in wide use. Rather, note the IPv4 address — it should look something like 192.168.0.10. On a typical network, each device address is made up of four sets of digits — or octets. Only the last octet can vary, and it should be unique for each device on the net. The subnet mask (more info) should be 255.255.255.0. The next-most important piece of information is the address for the default gateway (usually, your router). In most cases, the gateway’s address will be 192.168.0.1 or 192.168.1.1. For example, in Figure 1, the local device is 192.168.1.14 and the gateway is 192.168.1.1. Again, each device on a net must have its own octet, but also check that the third octet (typically 0 or 1) for your local device and your router match.
Troubleshooting with ipconfig
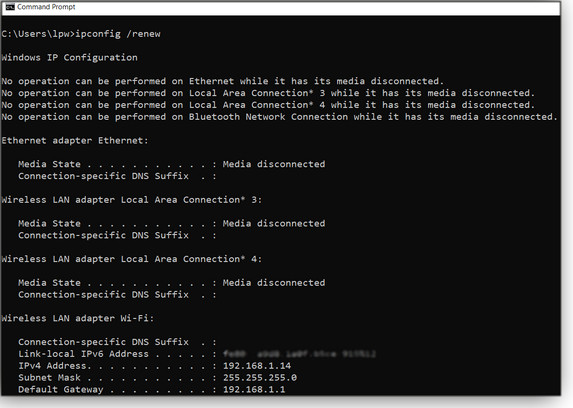
To see whether your device is at least “talking” to the router, use the ping command. At the command prompt, type ping and then the default gateway’s IP address — as in ping 192.168.1.1. If you can connect, that’s a good start — it means that the device and the gateway are communicating correctly, and that the problem is elsewhere, such as with Windows. If ping doesn’t work, it’s time to try other ipconfig commands. Sometimes you may need to have the DHCP server assign your computer a new address. (Usually, most devices on a network have a “dynamic address” that’s automatically assigned by the DHCP server in your router. A device’s dynamic address may change over time. On the other hand, a “static” address is typically assigned and changed manually.) To refresh an IP address, type ipconfig /release at the command prompt. The command will release the current IP address on your active connection, whether you’re using Ethernet or Wi-Fi. At this point, ipconfig will probably report “Media disconnected” for all connections (or it might also report an unusable IPv4 address). To grab a new IP address, enter ipconfig /renew (see Figure 2). Now ping the router again — if that works, try connecting to other devices on the net or to websites.
If you’re still having connection problems, you need to gather some more information. By itself, ipconfig reveals only basic facts; to see the full range of data, type ipconfig /all at the command prompt. The section for your current connection will show your device’s physical (MAC) address, DHCP server, DNS servers, and more (see Figure 3).
Here’s a real-life example: During one of my travels, I once had trouble connecting to a Wi-Fi network in my hotel and had to enlist the help of a support rep to get a connection. None of the usual troubleshooting steps worked. Finally, he suggested adding my computer’s MAC address to the list of allowed computers on the hotel’s network. Running ipconfig /all, I was able to quickly provide the rep the requested address — and get a connection to the Web. Troubleshooting website-connection issues
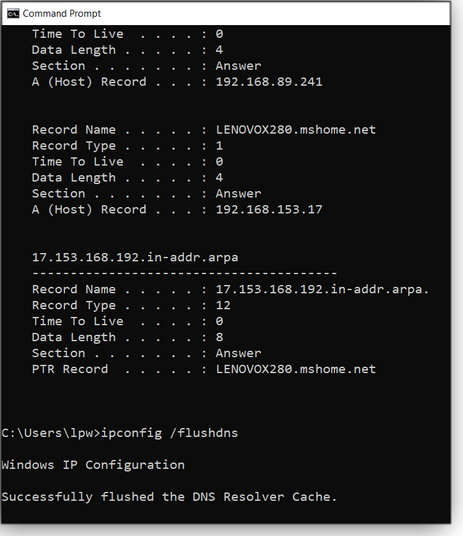
If you’re able to connect to servers and sites via their IP addresses but not with their names, the fault could lie with the information provided by a domain name server — whose primary function is to translate IP addresses into a useful name (e.g., askwoody.com) and vice versa. (It’s a lot easier to remember and enter google.com than it is 172.217.12.206.) Because the IP addresses for most websites don’t change (they’re “static”), the DNS information used by your computer is cached locally to speed up access. In some cases, that cached DNS information might need to be refreshed. You can display the DNS information for specific servers and websites by typing ipconfig /displaydns at the prompt. The results show you the IP address and other information for various sites. To flush the DNS cache, type ipconfig /flushdns (see Figure 4). Next, try connecting to a server or website using its name — if the DNS cache is working properly, you should be able to connect.
Finally, you can see a list of all ipconfig switches by entering the ipconfig /? command. Windows’ IP Configuration can’t solve all network problems. But it is a useful tool for gathering connection information — for both immediate issues and future troubles.
Lance Whitney is a freelance technology reporter and former IT professional. He’s written for CNET, TechRepublic, PC Magazine, and other publications. He’s authored a book on Windows and another about LinkedIn. Best Utilities Freeware Spotlight — Windows Registry Recovery
So your computer died, and you want to build a new one. With the right tools, moving your data to the new machine can be relatively easy. But what about your settings and Windows ID? In some settings, retrieving that information can be helpful for both setting up a new system and diagnosing a machine that simply won’t boot. There’s a ton of configuration data stored in the Windows registry. One handy utility for digging deep into the registry on an inactive system drive is MiTeC’s Windows Registry Recovery (WRR). To be clear, WRR is designed for data recovery — not for file recovery. It lets you drill down into the depths of the Windows registry hive files (MS definition) to extract all kinds of settings from an inactive registry. (Windows security may prevent you from accessing active hive files on a running PC.) WRR is a tool for those who feel comfortable diving deep into Windows. How do you get access to that information? Let’s assume you still have the old hard drive from the dead system and it still runs. One of the simplest ways to access its contents is to pop the drive into a USB-based enclosure, or use USB adapter cables (example), and then attach it to a working (or new) system. (When setting up a new system, a USB connection makes it easy to move your data directly from the old drive to the new machine.) Here are a few ways you might use WRR as a diagnostic tool:
Working with Windows Registry Recovery
As always, we like our utilities free, clean, and portable (when possible). Windows Registry Recovery checks all the boxes — so let’s get started! The app downloads as a ZIP file that contains the single WRR.exe executable. Double-click the file, and the program opens to a mostly dark, blank window that makes you wonder what the heck went wrong.
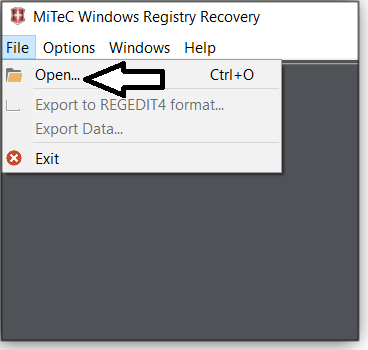
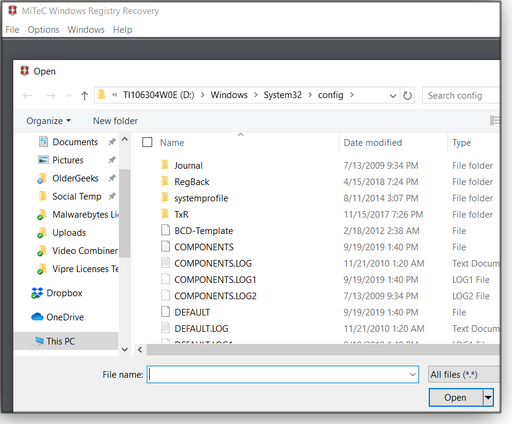
No worries — you just have to load the registry hive files, located in the Windows config folder. (In this case, it’s on the D: drive, running in my USB-connected drive enclosure.) To start, click Open from the File drop-down menu (see Figure 1).
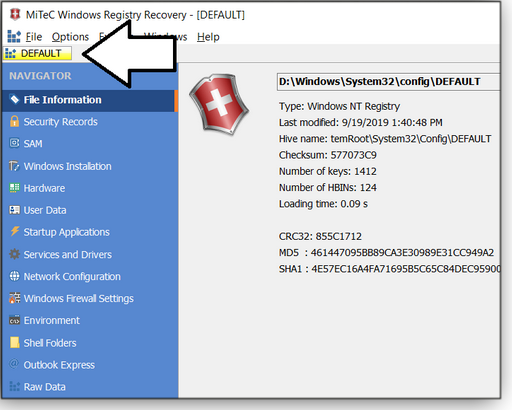
Now, navigate to Windows/System32/config (Figure 2) and select the DEFAULT file (which has no extension). Click Open.
Back in the WRR main window, you’ll now see DEFAULT listed as a tab below the WRR menus (Figure 3). This is the first of the five main hive files.
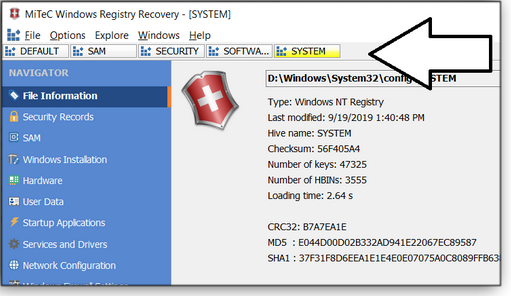
Continue opening four more files: SAM, SECURITY, SOFTWARE, and SYSTEM. Don’t be alarmed if the program hangs for a few minutes while loading the SOFTWARE hive — it’s huge!
On the WRR window’s left column, you’ll see different “explorers” under NAVIGATOR. At this point, things get a bit tricky. Each hive will show a different set of information, so you’ll have to roll though all the hives to see everything that’s accessible. For example, if you’re looking for the Windows Product ID, you click “Windows Installation.” But if you have the DEFAULT tab selected, you won’t see a thing. Why? Because that info is stored in the SOFTWARE hive.
The following screen shots show other information you might find. Figure 7 shows how user and group data are displayed in the Security Account Manager (SAM) hive. (This hive is where Windows stores users’ passwords, under a cryptographic lock. But you can’t use the app to view them in plain text.)
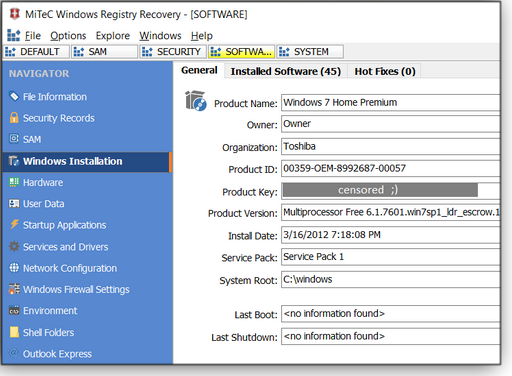
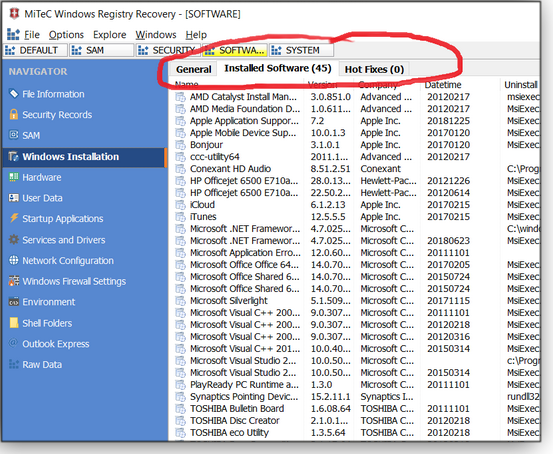
Note that there are often more tabs of data in the right pane. In Figure 8, I clicked on the Installed Software tab under Windows Installation/SOFTWARE. This shows us all programs installed on the old drive. (Sadly, it won’t let you recover lost software-license keys, either.)
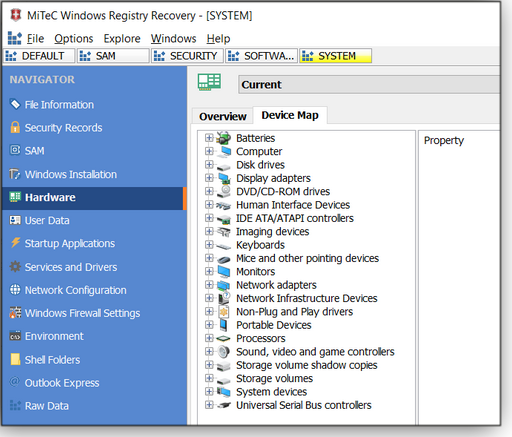
Some of the “explorers” make you work for the information. For example, to see the former system’s basic chipset data, I had to select SYSTEM/Hardware — and then hit the Refresh button. To see all hardware info, I had to select CURRENT (top of right panel), then check the Device Map box, and then hit Refresh again. That opened up a new tab — Device Map (Figure 9), which looks much like Windows’ Device Manager.
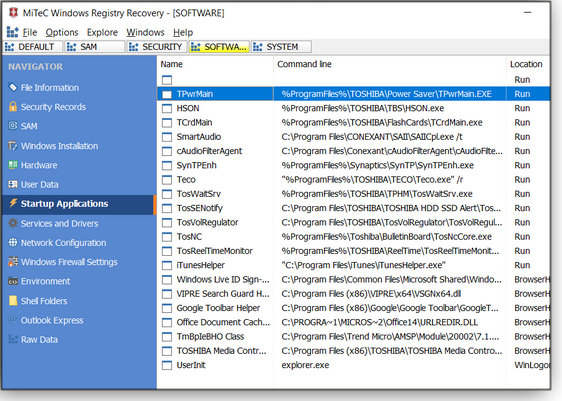
It’s possible that using SOFTWARE/Startup Applications (Figure 10) might be a way to find out what applications were automatically loading on system boot, and then use that information to help diagnose an unbootable system. I have yet to try it, but it’s worth considering.
The Services and Drivers tabs (Figure 11) under SYSTEM/Services and Drivers could also be a useful diagnostics tool.
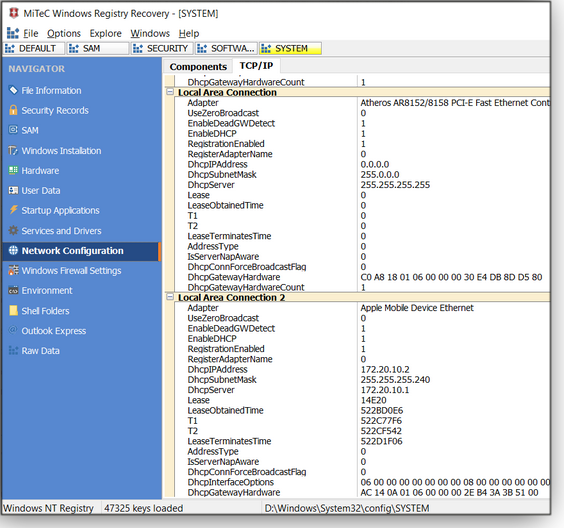
Forgot what the network info — such as IP, subnet, and gateway — used to be? Use the Network Configuration explorer under the SYSTEM hive (see Figure 12).
That should be enough to get you started. Comments and any other useful info you’ve found are welcome in the forums. To download the utility, go to its OlderGeeks page. Happy computing!
Deanna and Randy McElveen are celebrating 20 years in the computer business, seven years running OlderGeeks.com, and 26 years of putting up with each other. Their computer store is in a small town in the Missouri Ozarks. Believing that happy customers are always the best advertisement, they hope to do it for another 20 years. Publisher: AskWoody LLC (woody@askwoody.com); editor: Tracey Capen (editor@askwoody.com). Trademarks: Microsoft and Windows are registered trademarks of Microsoft Corporation. AskWoody, Windows Secrets Newsletter, WindowsSecrets.com, WinFind, Windows Gizmos, Security Baseline, Perimeter Scan, Wacky Web Week, the Windows Secrets Logo Design (W, S or road, and Star), and the slogan Everything Microsoft Forgot to Mention all are trademarks and service marks of AskWoody LLC. All other marks are the trademarks or service marks of their respective owners. Your email subscription:
Copyright © 2019 AskWoody LLC, All rights reserved. |


 By Susan Bradley
 What to do: I’m sticking with the plan — and so should you. Defer the following updates until we give the all-clear — and keep an eye on
  By Lance Whitney
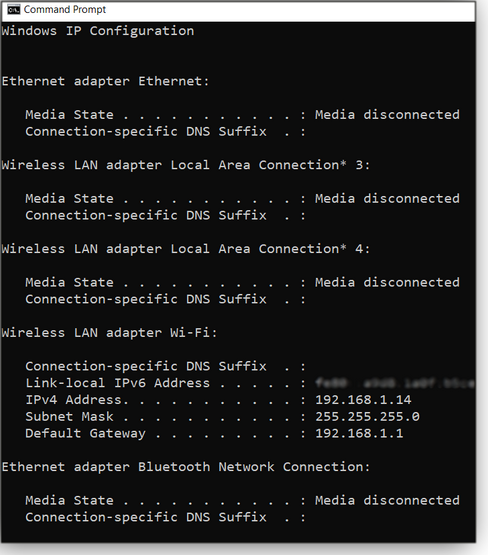
 By Deanna McElveen
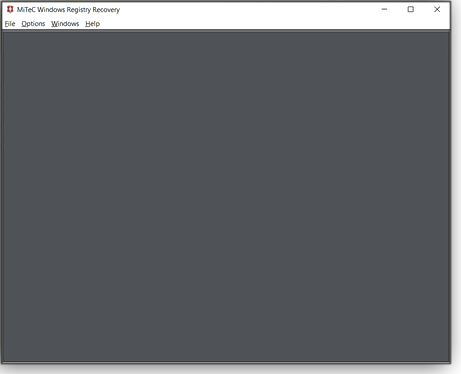


Plus Membership
Donations from Plus members keep this site going. You can identify the people who support AskWoody by the Plus badge on their avatars.
AskWoody Plus members not only get access to all of the contents of this site -- including Susan Bradley's frequently updated Patch Watch listing -- they also receive weekly AskWoody Plus Newsletters (formerly Windows Secrets Newsletter) and AskWoody Plus Alerts, emails when there are important breaking developments.
Get Plus!
Recent Topics
-
Trying to backup Win 10 computer to iCloud
by 1 hour, 40 minutes ago
-
Windows 11 Insider Preview build 26200.5570 released to DEV
by 11 hours, 25 minutes ago
-
Windows 11 Insider Preview build 26120.3941 (24H2) released to BETA
by 13 hours, 13 minutes ago
-
Windows 11 Insider Preview Build 22635.5305 (23H2) released to BETA
by 13 hours, 15 minutes ago
-
No April cumulative update for Win 11 23H2?
by 15 hours, 32 minutes ago
-
AugLoop.All (TEST Augmentation Loop MSIT)
by 13 hours, 46 minutes ago
-
Boot Sequence for Dell Optiplex 7070 Tower
by 1 day, 4 hours ago
-
OTT Upgrade Windows 11 to 24H2 on Unsupported Hardware
by 1 day, 8 hours ago
-
Inetpub can be tricked
by 1 day, 9 hours ago
-
How merge Outlook 2016 .pst file w/into newly created Outlook 2024 install .pst?
by 2 hours, 18 minutes ago
-
FBI 2024 Internet Crime Report
by 1 day, 12 hours ago
-
Perplexity CEO says its browser will track everything users do online
by 23 hours, 58 minutes ago
-
Login issues with Windows Hello
by 1 day, 23 hours ago
-
How to get into a manual setup screen in 2024 Outlook classic?
by 1 day, 11 hours ago
-
Linux : ARMO rootkit “Curing”
by 2 days, 10 hours ago
-
Employee monitoring app leaks 21 million screenshots in real time
by 2 days, 10 hours ago
-
Google AI is now hallucinating idioms
by 2 days, 11 hours ago
-
april update
by 15 hours, 46 minutes ago
-
Windows 11 Insider Preview build 27842 released to Canary
by 2 days, 12 hours ago
-
Quick Fix for Slowing File Explorer
by 2 days, 12 hours ago
-
WuMgr not loading?
by 1 day, 8 hours ago
-
Word crashes when accessing Help
by 3 minutes ago
-
New Microsoft Nag — Danger! Danger! sign-in to your Microsoft Account
by 2 days, 12 hours ago
-
Blank Inetpub folder
by 2 days, 9 hours ago
-
Google : Extended Repair Program for Pixel 7a
by 2 days, 22 hours ago
-
Updates seem to have broken Microsoft Edge
by 2 days, 9 hours ago
-
Wait command?
by 2 days, 16 hours ago
-
Malwarebytes 5 Free version manual platform updates
by 3 days, 5 hours ago
-
inetpub : Microsoft’s patch for CVE-2025–21204 introduces vulnerability
by 3 days, 11 hours ago
-
Windows 10 finally gets fix
by 3 days, 20 hours ago
Remembering Woody
