
|
Patch reliability is unclear. Unless you have an immediate, pressing need to install a specific patch, don't do it. |
|
ISSUE 17.16.0 • 2020-04-27
The AskWoody PLUS Newsletter
In this issue WINDOWS: 2020’s Windows 10 2004 BEST OF THE LOUNGE: Free Windows 7 ESU installer LANGALIST: ‘Overprovisioning’ your SSD PHOTO EDITING: Photoshop Elements: Fun with pictures BEST UTILITIES: Freeware Spotlight — Staying at home edition WINDOWS 10 2020’s Windows 10 2004
Well, it’s that time of year! Microsoft releases a new version of Windows 10 … and we promptly put it off for as long as we can. Or at least until we know it’s stable and thoroughly tested. As you might expect, I’m going to recommend that you don’t install this latest feature update when Microsoft first offers it. Instead, I regard a new Win10 release as an occasion to take a brief time-out — a moment to take stock of what versions I’m running at home and at the office, and to decide whether it’s time to upgrade to a newer but thoroughly vetted version. A brand-new Win10 is also a reminder that I need to download and save the latest Win10 install/recovery ISO. Microsoft often makes it difficult to acquire any version other than the most recent one. In other words, once Win10 2004 is rolling out to users’ machines, you might be unable to get the code for Version 1909 without jumping through hoops. That’s especially annoying for Win7/8.1 users who might want to upgrade to a known-good Win10 release. (It’s just good policy to keep up-to-date installation media for the two or three most recent Win10 versions — just in case you need to do a full recovery or roll back to a previous release. More on that in a minute.) Start by confirming that you’re running the Win10 version you think you are. You might be in for a surprise: it’s not always obvious that your machine has been upgraded. That’s especially true with Version 1909, which is more like a service pack for Win10 1903 than it is a true upgrade. And in some cases, upgrades fail without any real warning. In Windows Settings, click System/About and then scroll down the page to the Windows specifications section. For business applications, I recommend Version 1903; for home machines, I tend to stay one release newer than my work systems — in this case, Version 1909. That way, my personal PC becomes a sort of test platform/early-warning system, where any egregious flaws will hopefully surface before that version gets deployed in the office. The next stop is Microsoft’s Download Windows 10 site. Under the Create Windows 10 installation media section, click the Download tool now button and follow the prompts. On the What do you want to do screen, be sure to select Create installation media … . You’ll then be offered two choices: USB flash drive or ISO file. I recommend saving an ISO to an external hard drive. If one of my systems chokes on a feature update, I can try an upgrade from the ISO. (I’m looking at you, my Acer Spin with the puny 32GB drive.) This is also an excellent time to review your disaster-recovery strategies. Along with the ISOs, that includes ensuring you have a list of all product keys, usernames/passwords, and any other system information that isn’t currently documented. For businesses, the release of a new Win10 should trigger another task: checking in with their line-of-business software vendors. You want to know how and when they will support the next Win10 release. In my case, staying a couple of versions back at the office ensures that my vendors have had plenty of time to make their products fully compatible with all changes to the OS. Cleaning house
I also use this time to make sure other components are fully up to date: primarily the bios and hardware drivers — especially graphics. Failed Windows upgrades are often tied to old graphics software. Ensuring your preferred antivirus software is fully up to date will also help raise the chances of a good upgrade experience. Next, check your Windows health by running its built-in tools. Start with the System File Checker applet to find any corrupted system files. Here’s the quick how-to:
If the System File Checker reports issues it can’t fix, try the Deployment Image Servicing and Management (DISM) command. The service runs three health checks, but only the last one can fix errors. Still, I recommend running all three.
This command will run for a bit and then report any issues it finds. You then go to the next command to check for Component Store corruption. (Again, neither CheckHealth nor ScanHealth actually fixes anything.)
The final command — RestoreHealth — does attempt to automatically repair issues it finds.
Repair versus restore?
If your system is still reporting problems, you have two options: continue looking for causes, or reinstall Windows 10. In most cases, I think the second choice is the fastest and easiest solution. On occasion, I’ve opened a support ticket for a user whose Windows Updates wasn’t … well, updating. Diagnosing the problem would often consume many hours of reviewing the case notes, digging through cbs.log files, and then trying to translate the information. If I was lucky, I might discover which patch didn’t quite take properly and needed to be added manually to the machine using DISM. It’s always a painful process, one that you’d want to tackle only on a legacy machine that can’t be fixed by reinstalling Windows 10. Bottom line: Restoring everything on a PC might seem painful, but attempting a detailed diagnosis and repair can be far worse. (The fastest way to get up and running is to keep applications and data in the cloud. Once Windows is reinstalled, you’re essentially just a username and password away from a fully functioning system. But most of us simply aren’t there yet.) Fixing Windows Update: For the vast majority of Windows users, the monthly Win10 updating process goes smoothly — especially if they defer the updates for a few weeks. Severe patching problems typically strike a small minority of machines — something in their configuration is flawed, out of date, or odd. Here again, reinstalling the operating system will usually be far less painful than trying to diagnose the problem. (Of course, this assumes you have current Windows ISOs and good backups.) What’s new in 2004
Again, the move to Win10 1909 was generally fast and painless because it was more like a service pack for 1903. (In fact, the two versions share the same cumulative updates.) But Win10 2004 will be the real deal — a full operating-system upgrade. Cortana: Microsoft’s digital assistant will no longer be a component of Windows. It becomes a native application that can be updated more frequently or less frequently via the Microsoft Store. Fixes and enhancements are no longer tied to operating-system updates. CPU temperature: This important system information will now show up in Task Manager — if your system supports it. Task Manager will also list whether drives are solid-state or hard-disk. Speaking of storage, if your copy of Win10 is still running on a spinning-platter drive, I suggest it’s time to bite the bullet and upgrade to an SSD — or purchase a new system with one. Crucial has a handy system for matching a new drive with your particular system. There are, of course, lots of other small fixes and enhancements in Win10 2004. For example, current versions of Windows 10 let you control update downloads by percentage of bandwidth via Deliver Optimization/Advanced options. Version 2004 will add the ability to set a specific megabits-per-second limit. Still, I don’t see any new must-have features — cool things that would compel me to upgrade soon after the new OS is released. You can review some of the other expected features in a Fossbytes post. Getting ready for 2020’s 2004
The tea leaves suggest that the new release will appear sometime in May. If you have a test system, you can download its ISO now. The better news? If you’re running Version 1903 or later, you won’t be immediately shoved onto Win10 2004. Rather, at some point you’ll get a prompt that the next feature release is ready for your machine; you can then pick a time to install it. Now’s the time to review your current Windows setup, check its overall health, and ensure everything is fully updated. When you do get around to installing Win10 2004, the process is more likely to go smoothly. Bottom line: We’re all dealing with a major disruption in our lives. Don’t add to it by upgrading to the latest Windows 10 right away.
In real life, Susan Bradley is a Microsoft Security MVP and IT wrangler at a California accounting firm, where she manages a fleet of servers, virtual machines, workstations, iPhones, and other digital devices. She also does forensic investigations of computer systems for the firm. Best of the Lounge Free Windows 7 ESU installer
We all like a nice workaround for computing problems. If your OS has reached its end of life, that might include acquiring security updates. What if your operating system is Win7, and you’re not willing to pay Microsoft for extended support? What are your options? Go without support? Move to a current operating system? MVP abbodi86 has posted a tutorial for getting the paid Win7 Extended Security Updates for free. That, in turn, raised questions and comments both ethical and moral. Windows 10 Seeking advice on how to safely reformat a hard drive and install a fresh copy of Windows 10, WSAnders Family turned to the AskWoody Lounge. Helpful advice was forthcoming, and all was working as expected — until WSAnders Family accepted OneDrive’s backup services. That decision caused OneDrive’s free space to immediately fill up — and files to disappear. A final “HELP!” question to readers solved that issue as well. Linux When Plus member Larry B wanted to run Linux, he booted to an external hard drive. But a Linux update hosed both the Windows and Linux boot process. Launching either required jumping through hoops. After following some detailed suggestions from fellow forum members, Larry B now has both Linux and Windows playing nicely again. Windows 10 After Plus member Thompson DK applied a Quicken patch to Win10 Pro, all saved passwords and transactions in the app disappeared. Reinstalling Quicken did not help. So Thompson reverted to a backup Win7 PC. But what about Quicken on the Win10 PC? Some experimentation revealed that Windows Defender was the culprit. Moving to a different anti-malware product solved the problem! Windows 10 Building your own computer gives a lot of satisfaction — and ensures you get just the machine you want. But when you buy a Windows license to go with that build, you’ll probably have the same question posed by Plus member Casey H. Is an OEM or retail license transferable to some new DYI project down the road? Macrium Backup We typically download an application on the machine it will run on. But Plus member Mike wants to download Macrium Reflect 7 on one PC and install it on another. Unfortunately, the options are a bewildering array of “Installers,” “REs,” and “PEs.” AskWoody readers put Mike on the correct path. Windows 10 On wakeup, Plus member Alex5723‘s laptop displayed a different OneDrive icon on the taskbar. There had been no recent updates, so everything should have been unchanged. More irritating, pressing PrtSc popped up an offer to save the screenshot to OneDrive. Alex questions Microsoft’s right to do unannounced changes to his computer. But it seems clear that the company’s EULA disagrees. If you’re not already a Lounge member, use the quick registration form to sign up for free. LANGALIST ‘Overprovisioning’ your SSD
By Fred Langa You may be able to extend the life and increase the speed of your solid-state drive through overprovisioning — reassigning some of the drive’s file-storage capacity for use by the drive’s firmware. As usual with tech “hacks,” there are significant gotchas to overprovisioning: its benefits might be minimal on a consumer PC, and you may have to move or resize some disk partitions to set it up. Here’s what’s involved and how to do it — plus some excellent free tools for managing the technology. Looking for help with overprovisioning setup
Writing from South Africa, AskWoody subscriber David Malherbe had questions about configuring SSD overprovisioning:
Generally speaking, overprovisioning is allocating more resources to a given function than it actually needs. SSD overprovisioning takes some of the drive’s normal file-storage space and reassigns it for internal use by the drive’s firmware. So while file-storage capacity is reduced, overprovisioning can help extend drive life by allowing some housekeeping activities to be spread over a greater number of memory cells, thus reducing cell wear. It can also slightly boost the speed of some drive operations. (See related Wikipedia article.) But the most important consideration in overprovisioning is the over part. Most consumer-grade SSDs come from the factory pre-provisioned with a set amount of dedicated internal-use memory, based on what the manufacturer thinks the drive will need for its intended role. Some of this dedicated memory is used as firmware workspace. Some of the space is held in reserve as spare data locations, to be activated and swapped in when some of the regular SSD memory cells eventually wear out. SSD wear happens mainly during erase and write cycles, so a consumer-grade SSD might be factory-provisioned based on this assumption: about 80 percent of the drive’s activity will be data-reads — which is easy on the hardware — and only 20 percent of the activity will be wear-inducing data-writes. In contrast, an SSD intended for write-intensive commercial or industrial use might require far more aggressive provisioning to account for the write-cycles’ extra wear and tear. (A Kingston Technology post offers a good overview of how the company handles SSD provisioning and overprovisioning.) Bottom line: For consumer applications, a well-designed SSD’s initial OEM provisioning should be sufficient for maintaining its rated speeds and service life — no overprovisioning needed. So unless there’s something unusual about your Windows system or the way you intend to use it, you should probably ignore overprovisioning. In David’s case, with a standard name-brand PC, SSD, and OS, all used in a normal manner (i.e., nothing exotic going on and “everything working like a dream”), overprovisioning won’t provide any real benefit. David’s system is good to go, as is. I enabled overprovisioning on my system’s 1TB SSD as a sort of “Why not try it?” experiment. I had way more storage space than I was currently using. But because I typically load several virtual machines, I was also incurring heavy drive activity. Now that I have it set up, I plan to leave overprovisioning enabled on my PC until I need the disk space it’s using. At that point, I’ll remove the overprovisioning configuration and return that space to normal file-storage purposes. My SSD will then continue operating in its normal, factory-provisioned condition. If your circumstances require overprovisioning, or if you (like me) have plenty of SSD space to play with and simply want to see what benefits the technology might yield (however marginal), then go for it! How to set up overprovisioning
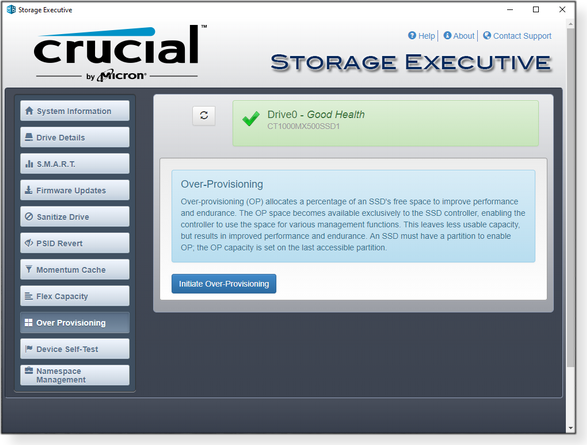
Setup isn’t hard, but it is a little fussy. There are several types of overprovisioning that use different locations on the SSD. But as David discovered, Crucial-brand SSDs (and many others) want the dedicated space to be at the end of drive storage — i.e., following all partitions. (I’ll use Crucial as the example, but obviously you should use whatever tools and techniques your SSD’s manufacturer recommends.) To create the overprovisioning space, you’ll need a partitioning tool. You can use Windows’ basic and built-in Disk Management app (see Microsoft’s Overview of Disk Management) or any of the excellent third-party utilities such as MiniTool’s Partition Wizard (free/paid; site), EaseUS’s Partition Master (free/paid; site), and others. If your SSD is already fully partitioned and in use (like David’s), launch the partitioning tool and shrink the last partition on the drive by the amount of space you want to dedicate to overprovisioning. Leave the freed-up space unallocated — i.e., unlabeled, unformatted, and with no drive letter assigned. (You’ll see this illustrated a bit later, in Figure 2; feel free to peek ahead if you’d like.) I’ve never had a problem resizing OEM recovery-image partitions. And on some systems, I’ve completely deleted and repurposed that partition after making a local copy of the factory-restore image. Most OEMs provide instructions for burning a completely authentic and official factory-reset disc or drive. For example, see HP’s “Obtaining PC Recovery USB Drives or Discs” page. That said, a very full or badly fragmented partition may present trouble, resisting your attempts to shrink it. Moving files out of that partition and defragmenting the remainder can help free up space. But if the last partition can’t be shrunk for some reason, you can usually open up raw space by shrinking a different partition, then moving or resizing the surrounding partitions to shuffle the empty space to where you want it — at the end of the drive. (For more information, see the references at the end of this article; see, too, the instructions included with most partitioning tools.) The number of partitions shouldn’t be an issue because you’re not adding another partition to the drive — you’re just opening up raw, unformatted, empty space outside the existing partitions. Moreover, although old-style (legacy) MBR disks could support only four primary partitions, modern GPT disks can support up to 128. (For more on MBR/GPT differences, see “Up against the 2TB drive-size ceiling,” Windows Secrets 2013-03-21.) If you’re setting up a new and empty SSD, use the partitioning tool to create and size partitions as you wish — just be sure to leave an unallocated area at the end of the drive that’s equal to the amount of space you want to dedicate to overprovisioning. Again, don’t do anything to the space you’re setting aside — don’t label it, format it, or do anything else to it. How much dedicated space is needed? There’s no exact science for the size of the overprovisioning area, though there are general guidelines such as those laid out in the previously cited Kingston overprovisioning article. Crucial’s overprovisioning applet — part of the Crucial Storage Executive tool (free; site; see Figure 1) — lets you set aside anywhere from 1 percent to 50 percent of a drive’s overall capacity. It automatically defaults to 10 percent.
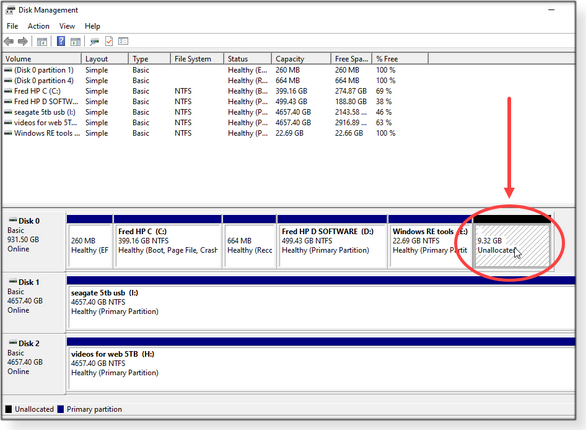
Within those bounds, you can set aside as much or as little overprovisioning space as you want. But remember: consumer drives typically come pre-provisioned with the amount of internal workspace they’re likely to need. You might not want to dedicate vast swathes of disk storage to it. I chose to set my overprovisioning to just 1 percent. That might sound paltry, but 1 percent of a 1TB drive is 10GB, which struck me as a good-sized chunk of extra real estate to add to the SSD’s built-in factory provisioning. On your system, it’s your call: set your PC’s overprovisioning as you wish. Using Windows’ Disk Management app, I shrank my SSD’s last partition to free up 1 percent of disk space. When new and unformatted, my drive had a full 1TB of space available. But partitioning and formatting yielded 932GB of usable disk space. Thus, when I shrank the drive by 1 percent, I ended up with 9.32GB of unallocated, unnamed, unformatted, and completely raw space at the very end of my drive. (See Figure 2.)
Next, I used the Crucial Storage Executive app to set up overprovisioning in the newly opened space (see Figure 3). I entered 1 percent as the Custom size and then clicked the Set OP (overprovisioning) button — and that was that! The Crucial app claimed the raw space as its own, and my SSD was now overprovisioned!
Conclusion: It’s not hard to set up overprovisioning with the right tools and techniques. But again, this function is primarily useful in write-intensive industrial and commercial applications. Don’t be surprised if you don’t see any major benefits on a Windows-based SSD in normal end-user service. Here are some additional resources:
Fred Langa has been writing about tech — and, specifically, about personal computing — for as long as there have been PCs. And he is one of the founding members of the original Windows Secrets newsletter. Check out Langa.com for all of Fred’s current projects. Photo editing Photoshop Elements: Fun with pictures
By Lincoln Spector Special effects aren’t limited to Hollywood movies anymore — or professional photographers. Today, with some help from image-editing apps, even a snapshooter can perform photographic tricks — place yourself somewhere you’ve never actually visited, turn black-and-white into color (and vice versa). With the right tools, almost anyone can cleanly remove people from a photo — without cropping! (Are you paying attention, Match subscribers?) There are dozens of photo editors to choose from, but I’ve been using Adobe’s Photoshop Elements for longer than I can remember. It’s the cheaper and somewhat less powerful version of the classic Photoshop. It’s rare that Elements lacks a tool I need … but then I’m not a professional graphic artist. “Cheaper” is relative, however; Photoshop Elements 2020 is currently priced at USD $99.99 (or $70.99 for an upgrade). That makes it one of the more expensive “consumer” image editors. Still, the price has not hurt its popularity — and for good reasons. In this article, I’ll show you a few of the more interesting photo-manipulation options for amateur photographers, using tools in Elements. Most good image editors have similar features and methods. So if you’re not using Elements, you should still get the basic ideas, which you can then apply to the editor of your choice. I’ll also discuss some new features in Elements 2020 — some, pretty cool; others, not so much. Creating Big Sky country
Scenic shots lend themselves to lots of dramatic sky. But what if the original image is a bit heavy on foreground? Here’s how to add more emphasis to the wild blue yonder without resorting to cropping.
This technique isn’t perfect, especially with clouds. As you can see in Figure 2, half of the sky is a mirror image of the other half. Here’s a tip: Use the Spot Healing Brush to help hide the obvious duplication/inversion.
Select something more complex
Selecting and clipping out people, pets, and other objects lets you do some fun things. For instance, you can put someone into another place or change the sky. This was once a difficult trick, but automated tools now make the task considerably easier. Elements 2020’s new Select Subject option is a good place to start. With your photo open, click Select/Subject. In theory, Elements recognizes the photo’s main subject and selects it. You should see a line of animated dashes showing what is and is not selected (see Figure 3).
The Select Subject tool has its limitations. For example, in Figure 3, notice that the space between my elbow and torso should have dashes (in order to exclude the background) but doesn’t. And my hat should be included with the rest of me but isn’t. To get a better “selection,” you might have to resort to manual retouching: carefully removing some things from the selection and adding others. Zoom into the image to see more details, and follow the selection line to see what must be fixed. Elements has several tools for selecting items. My favorite is the Quick Selection Tool, which looks like a magic wand. You just move over an area and it becomes selected — or de-selected; you can do one or both. Hair is the most difficult thing to select properly. Once you’ve selected a portion of a photo, you can copy it to another image or another layer, or you can make other fun modifications. For example, you can replace the original sky with another one — creating that sunset in the snapshot that never was. Color and black-and-white — together
If you’ve seen the movie Pleasantville, you might remember people in color walking through a monochrome town. It gives the image a real pop. Here’s how to do it — at least with still photos.
At this point, you’re probably wondering: “Why not simply select the people, inverse the selection, and convert it to black-and-white?” You could, but the multiple layers let you easily fiddle around with the color and black-and-white sections. For instance, you could add more contrast to the black-and-white portions or less saturation in the colored parts. Also, the background layer provides a safety net if something goes wrong. New tools in Photoshop Elements 2020
Select Subject is perhaps the best new feature in Elements 2020, but here are two others worth learning. Object Removal allows you to remove objects and people from photos without cropping the frame. You select what you don’t want to see, and Elements replaces it with an extension of the existing background. I don’t really care about stray objects in my photos, but I found a better use for this tool: removing dirt and scratches from scans of physical film pictures. (Sure, you can use the healing brush tool, but it’s more tedious.) To clean up a picture — or remove someone else’s kid — go to Elements’ Guided tab and select OBJECT REMOVAL. Next, use one of the four selection tools to grab the offending object and then click the Remove Object button. Again, these automated tools are not perfect. If you look closely, you can see flaws in the background — especially if you’re removing something big. The classic Spot Healing Brush and the Clone Stamp Tool can blend the background back into something more pleasing. Colorize photo: Ever since Ted Turner messed up Casablanca, I’ve been deeply opposed to colorizing classic black-and-white movies. But common photos are different. Colorizing can make an old photo seem like something new. In Figure 5, take a look at the before and after images of my then-young grandparents. I found the results astounding.
How did I do it? I simply clicked Enhance/Colorize Photo; Elements will then offer you four slightly different thumbnail results to choose from. If you’re not happy with any of the four, you can switch to Manual mode. But be warned: I found the manual adjustments to be overly complicated and tricky — it was almost impossible to get a satisfactory result. The big picture
There are endless ways to edit and enhance images with Photoshop Elements — or with its many competitors. But not all tools work equally well. For example, my attempts to apply the new Open Closed Eyes feature resulted in unintended laughs, as shown in Figure 6.
Nevertheless, with some time and experimentation, almost anyone can make their photos more beautiful and interesting. Working through the many tutorials offered by the various editors will speed the process along. Have fun!
Lincoln Spector writes about computers, home theater, and film and maintains the blog, Bayflicks.net. His articles have appeared in CNET, InfoWorld, The New York Times, The Washington Post, and other publications. Best Utilities Freeware Spotlight — Staying at home edition
We’re certainly living in a different world right now — social-distancing with friends, co-workers, and others; social-bonding with family. Those of us still working are in many cases doing so from home — some with the added complication of kids. And then there’s the drain on our bank accounts. All of which make the community of open-source and freeware software development more important than ever. To help you get through the current trials and tribulations, here’s a compendium of utilities and apps, for both adults and kids, that might make your stay-at-home experience a bit easier. Here we go … Office on the cheap: Is Microsoft’s productivity suite too expensive for your home-computing budget? An excellent alternative is The Document Foundation’s LibreOffice, an improved fork of the Open Office project. LibreOffice’s compatibility with documents created in MS Office is exceptionally good. If someone sends you an Excel or Word document, you can usually open and edit it using Calc (for spreadsheets; see Figure 1) or Writer (for text documents; Figure 2). When you’re done making changes, you can save the file in its original Microsoft format or use the widely supported OpenDocument format. Other LibreOffice apps include Impress for presentations, Draw for vector graphics and flowcharts, Base for databases, and Math for formula editing.
LibreOffice runs on numerous platforms (more info) — grab the edition of your choice on OlderGeeks.com or the LibreOffice site via these links. Staying on schedule: So you’re now in charge of home learning. Or maybe you have a bunch of online meetings, college classes, or work deadlines scheduled. Bottom line: You’re having trouble staying organized. Desktop Calendar (Figure 3) is a great organizer for Windows. Simply double-click on a day of the week to manage appointments, to-do lists, schedules, and more (Figure 4). You can sync it to your Android phone (see the QR code on the download page) to keep your calendar in your pocket, too!
DIY video conferencing: In this era of stay-together-apart, video conferencing is now on everyone’s mind. And so is security. For example, there have been numerous stories about Zoom privacy and hacks. Surprisingly, you don’t need some big corporation to host your video calls. BearWare.dk’s TeamTalk 5 (Figure 5) lets you set up your own hosting server, allowing complete control over your audio/video conversations. It also includes desktop and file sharing. The download includes both client and server (Figure 6) apps, but participants can also use public TeamTalk hosts. The program’s broad platform support includes Windows, Mac, Linux, Rasphian, CentOS 7, and mobile devices. There’s also Classic Client for Accessibility for the visually impaired. Setting up the server is relatively easy — as long as you know how to forward the correct port in your router.
Video editing made simple? Yes, that might sound like a non sequitur, but an abundance of family time could generate lots of home videos that need to be trimmed and spliced. Most people find video editing a time-consuming and daunting task — especially at the start. Eric Raijmakers’s Vidiot (gotta love the name) is about as easy as a video editor can be. It features non-linear video editing, video converting, compositing, trimming, cutting, titles, key frames, transitions, speed changing, cropping, and scaling. Whew! It runs on most Windows versions, and it’s free!
Build your own fun: There’s nothing wrong with playing video games to occupy a bit of free time. But why not learn something in the process? Microsoft’s free Kodu Game Lab (Figure 8) lets anyone make games using the Kodu visual-programming language. It’s specifically designed to be kid-friendly — even to pre-teens. Who knows, you could be inspiring the next Grace Hopper.
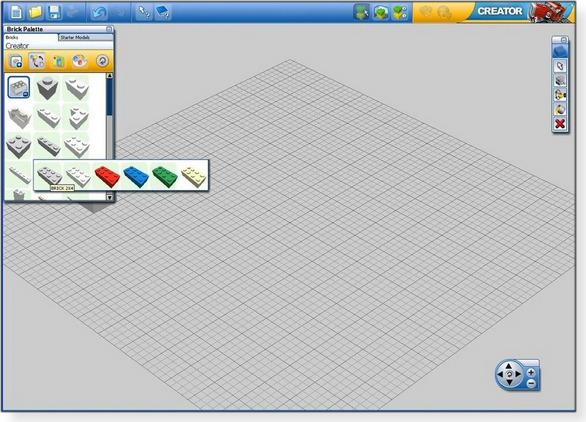
Speaking of building, how about LEGOs? Who doesn’t love those classic blocks? LEGO Digital Designer lets you play with blocks … without injuring your feet! First released in 2004, the program has been a favorite among kids, parents, non-parents, teachers, and anyone else with an imagination. Use Digital Designer to build your dream creation on-screen, or use it to prototype something you’ll assemble later with the real things.
Looking for other free games? We have about 400 to choose from on the OlderGeeks site (scroll down the page). Plan before turning dirt: Growing your own food can provide solace during difficult times. It makes staying at home feel like time well spent. Kitchen Garden Aid (Figure 10) lets you plan a garden before you start digging up soil. Visualize the garden’s layout, learn about recommended rotations, seed management, companion planting, and other interesting planting info. (Note: You’ll need Java installed to run the app.)
Calculations for free: Were your kids unable to bring home that fancy calculator? As a mom of twins, I know how expensive those handheld machines can be. The Wabbitemu TI Calculator Emulator (Figure 11) lets you use a virtual Texas Instruments calculator on your computer screen. Emulated models include the TI-73, TI-81, TI-82, TI-83, TI-83+(SE), TI-84+(SE), TI-84+CSE, TI-85, and TI-86!
Downloadable editions include: Parsecs to astronomical units? Lots of apps can change centimeters to inches or miles to kilometers, but how about … the Beaufort scale, the Rydberg and Hartree energy units, the Planck constant? No, I don’t know that one, either. Oh, and you might need the manual.
Instant PDF: Whether working from home or helping with home learning, it’s probable you’ll need to convert a document to PDF. WinScan2PDF (Figure 12) makes it exceptionally simple to transfer documents from any scanner straight to a PDF file.
There you go: 10 useful programs for riding out the pandemic — and day-to-day computing. Stay safe!
Deanna and Randy McElveen are celebrating over 20 years in the computer business, ten years running OlderGeeks.com, and more than 26 years of putting up with each other. Their computer store is in a small town in the Missouri Ozarks. Believing that happy customers are always the best advertisement, they hope to do it for another 20 years. Publisher: AskWoody LLC (woody@askwoody.com); editor: Tracey Capen (editor@askwoody.com). Trademarks: Microsoft and Windows are registered trademarks of Microsoft Corporation. AskWoody, Windows Secrets Newsletter, WindowsSecrets.com, WinFind, Windows Gizmos, Security Baseline, Perimeter Scan, Wacky Web Week, the Windows Secrets Logo Design (W, S or road, and Star), and the slogan Everything Microsoft Forgot to Mention all are trademarks and service marks of AskWoody LLC. All other marks are the trademarks or service marks of their respective owners. Your email subscription:
Copyright © 2020 AskWoody LLC, All rights reserved. |

 By Susan Bradley
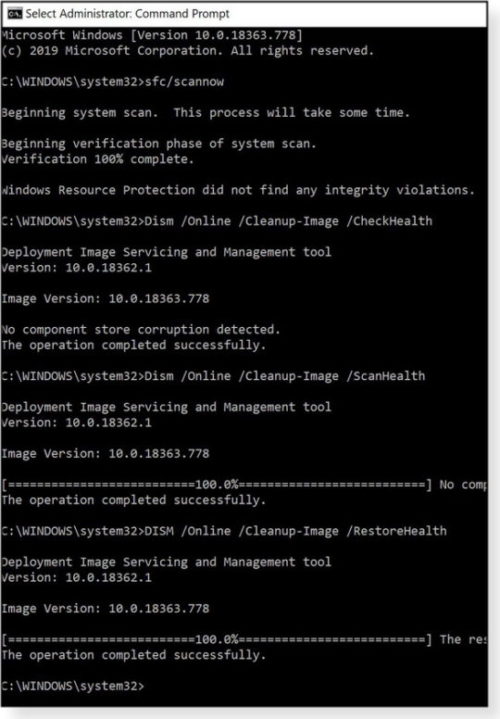


 By Deanna McElveen


Plus Membership
Donations from Plus members keep this site going. You can identify the people who support AskWoody by the Plus badge on their avatars.
AskWoody Plus members not only get access to all of the contents of this site -- including Susan Bradley's frequently updated Patch Watch listing -- they also receive weekly AskWoody Plus Newsletters (formerly Windows Secrets Newsletter) and AskWoody Plus Alerts, emails when there are important breaking developments.
Get Plus!
Recent Topics
-
Turn off right-click draw
by 37 minutes ago
-
Introducing ChromeOS M137 to The Stable Channel
by 4 hours, 8 minutes ago
-
Brian Wilson (The Beach Boys) R.I.P
by 5 hours, 19 minutes ago
-
Master patch listing for June 10, 2025
by 5 hours, 44 minutes ago
-
Suggestions for New All in One Printer and a Photo Printer Windows 10
by 11 hours, 42 minutes ago
-
Purchasing New Printer. Uninstall old Printer Software First?
by 11 hours, 46 minutes ago
-
KB5060842 Issue (Minor)
by 16 hours, 19 minutes ago
-
EchoLeak : Zero Click M365 Copilot leak sensitive information
by 18 hours, 52 minutes ago
-
24H2 may not be offered June updates
by 1 hour, 15 minutes ago
-
Acronis : Tracking Chaos RAT’s evolution (Windows, Linux)
by 1 day, 7 hours ago
-
June 2025 updates are out
by 7 hours, 32 minutes ago
-
Mozilla shutting Deep Fake Detector
by 1 day, 22 hours ago
-
Windows-Maintenance-Tool (.bat)
by 1 day, 7 hours ago
-
Windows 11 Insider Preview build 26200.5641 released to DEV
by 2 days ago
-
Windows 11 Insider Preview build 26120.4250 (24H2) released to BETA
by 2 days ago
-
Install Office 365 Outlook classic on new Win11 machine
by 2 days ago
-
win 10 to win 11 with cpu/mb replacement
by 1 day, 16 hours ago
-
re-install Windows Security
by 2 days, 4 hours ago
-
WWDC 2025 Recap: All of Apple’s NEW Features in 10 Minutes!
by 2 days, 7 hours ago
-
macOS Tahoe 26
by 2 days, 1 hour ago
-
Migrating from win10 to win11, instructions coming?
by 13 hours, 2 minutes ago
-
Device Eligibility for Apple 2026 Operating Systems due this Fall
by 1 day, 16 hours ago
-
Recommended watching : Mountainhead movie
by 1 day, 17 hours ago
-
End of support for Windows 10
by 1 day ago
-
What goes on inside an LLM
by 1 day, 11 hours ago
-
The risk of remote access
by 6 hours, 59 minutes ago
-
The cruelest month for many Office users
by 19 hours, 12 minutes ago
-
Tracking protection and trade-offs in Edge
by 1 day, 21 hours ago
-
Supreme Court grants DOGE access to confidential Social Security records
by 3 days, 6 hours ago
-
EaseUS Partition Master free 19.6
by 2 days, 6 hours ago
Remembering Woody
