• Windows RE — Curiouser and Curiouser

    Home » Forums » AskWoody support » Windows » Windows 11 » Questions about Windows 11 » Windows RE — Curiouser and Curiouser

    Author
    Topic
    #2632949

    This started over here, but needs its own thread.

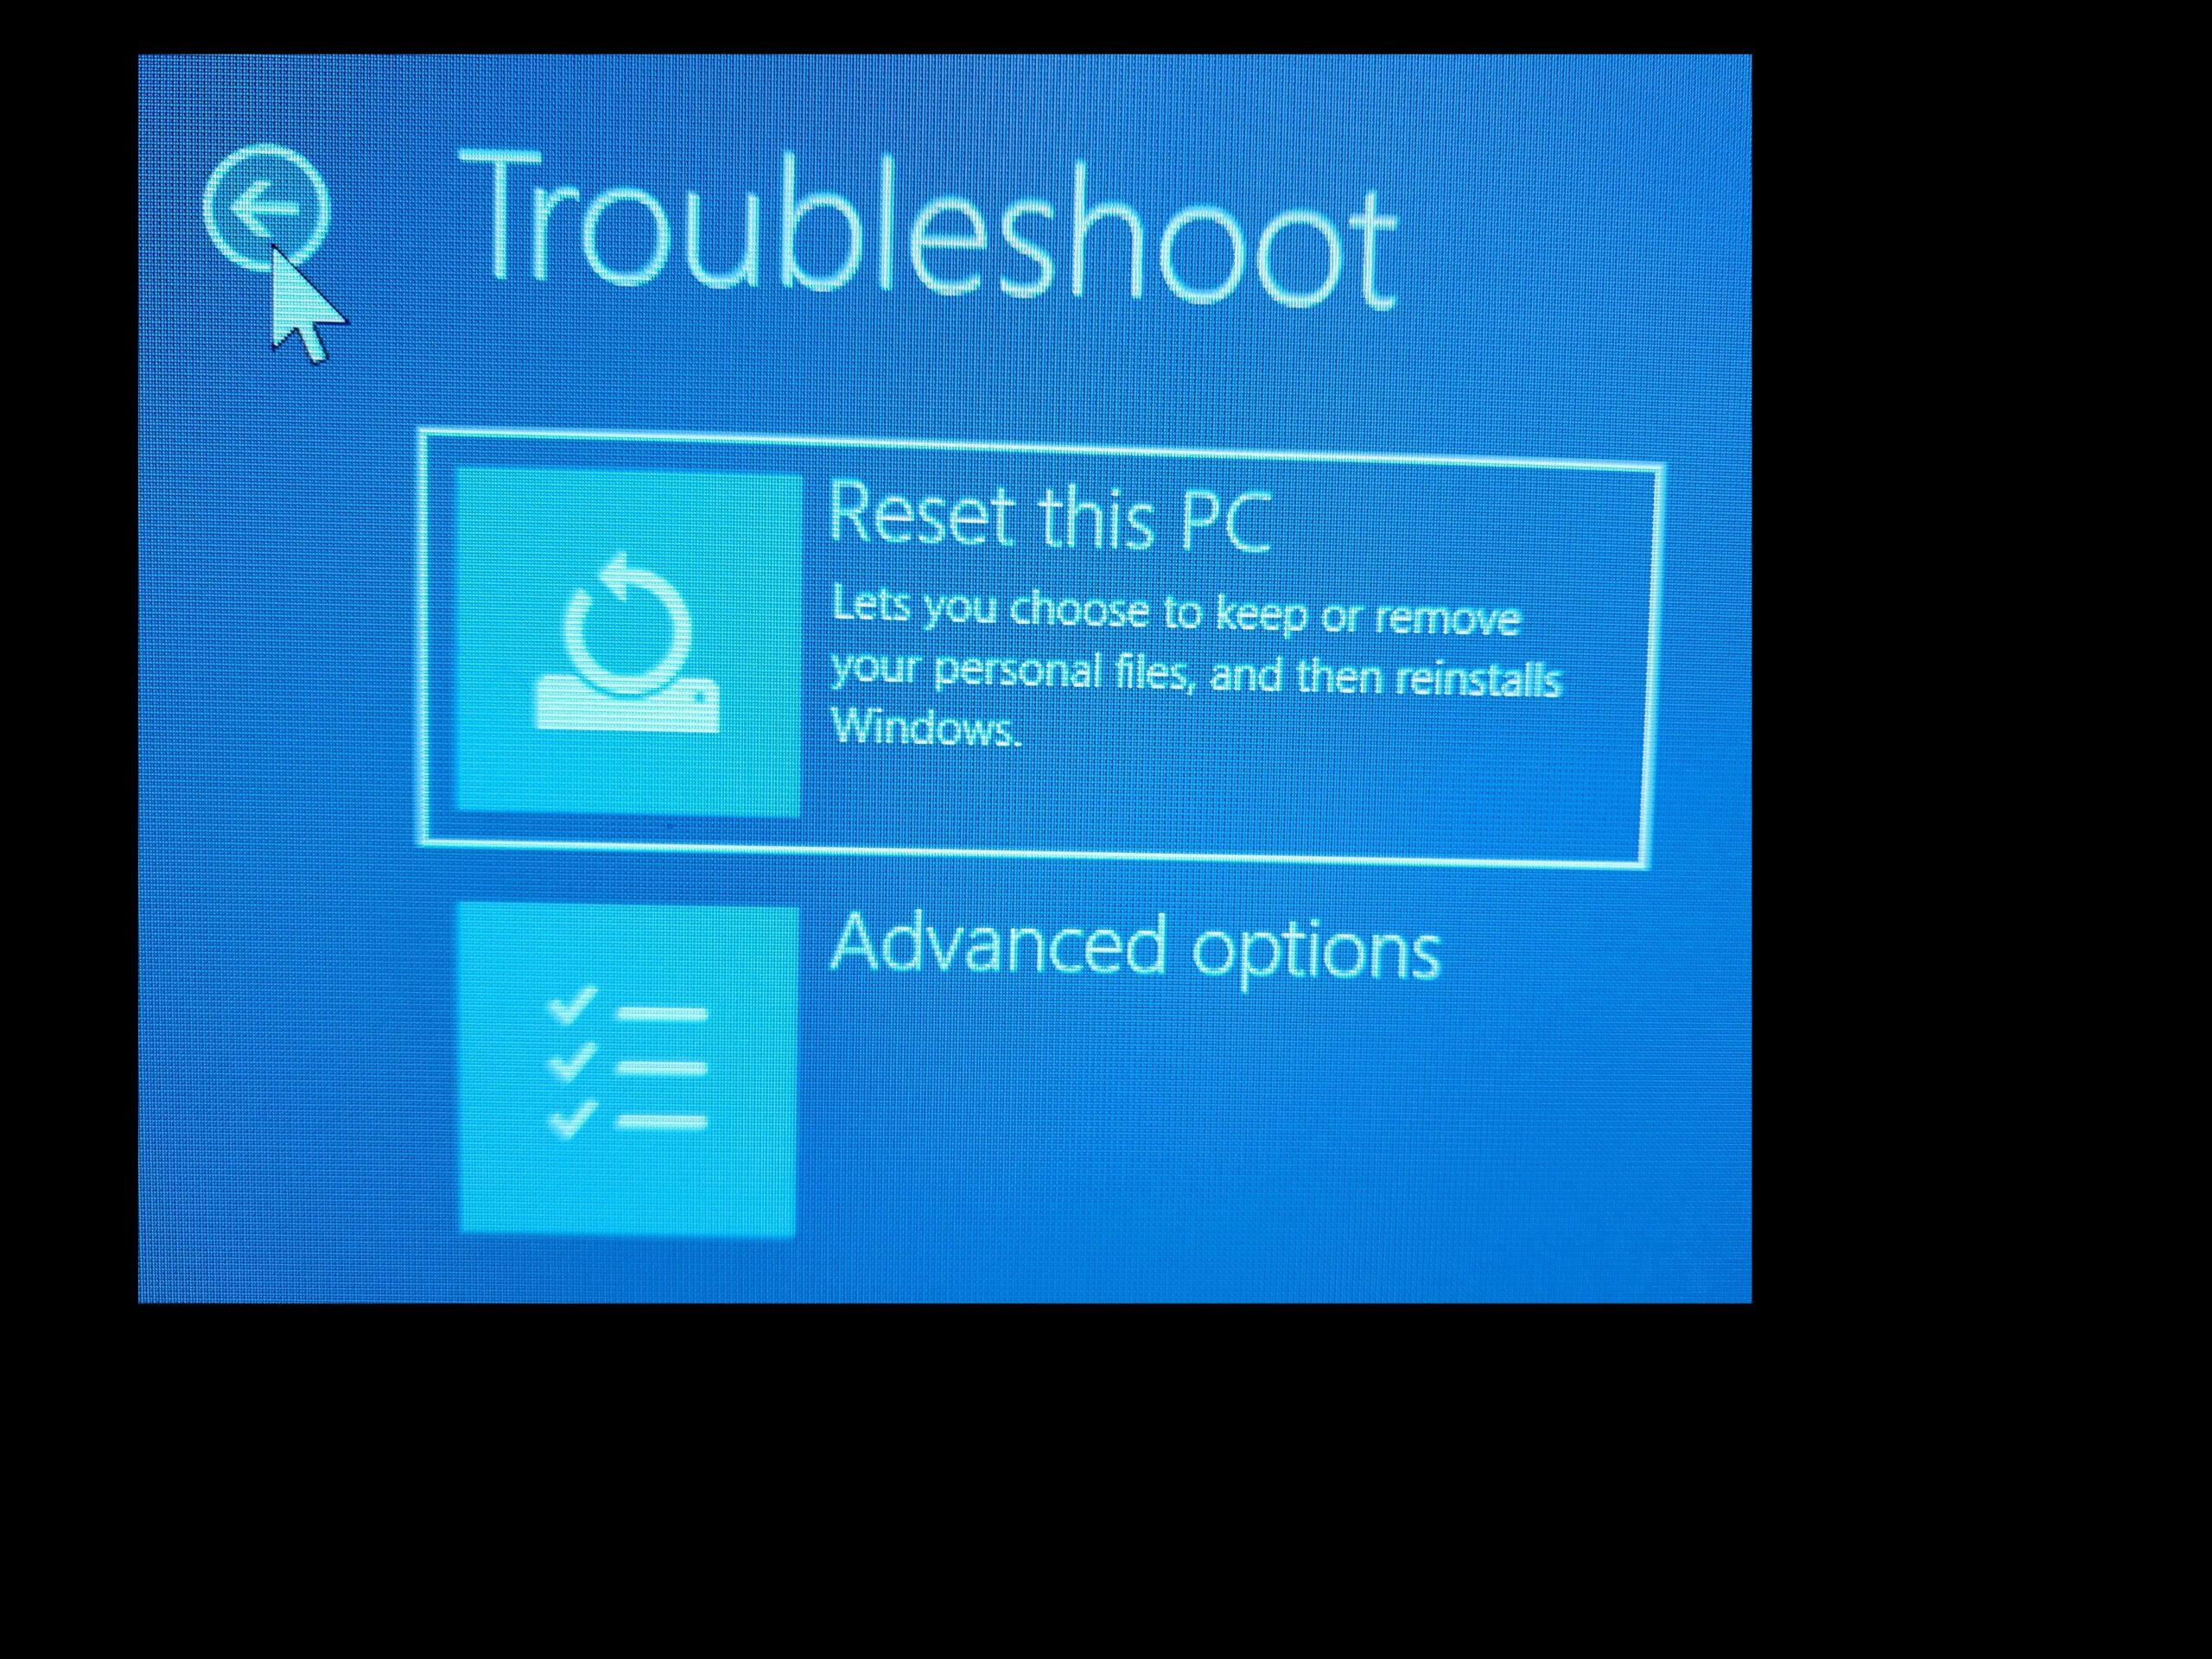
    Yet I can boot up into a recovery mode using Shift+Restart. When I go to the command prompt option in the recovery mode I see an entire Windows PE installation running on drive X:. It is labeled MININT-xxxxxx and as a Boot drive.

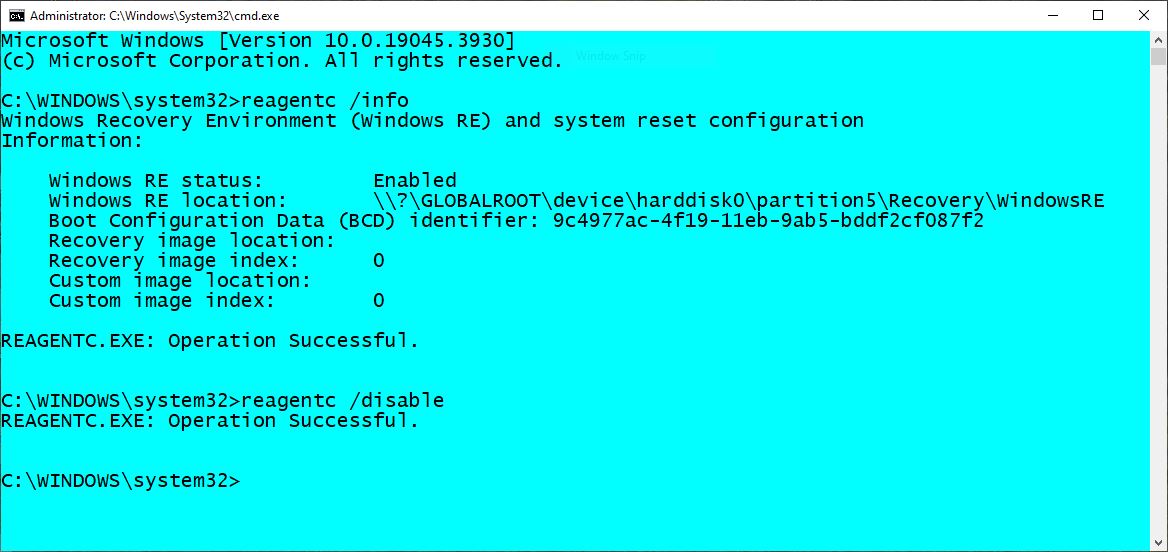
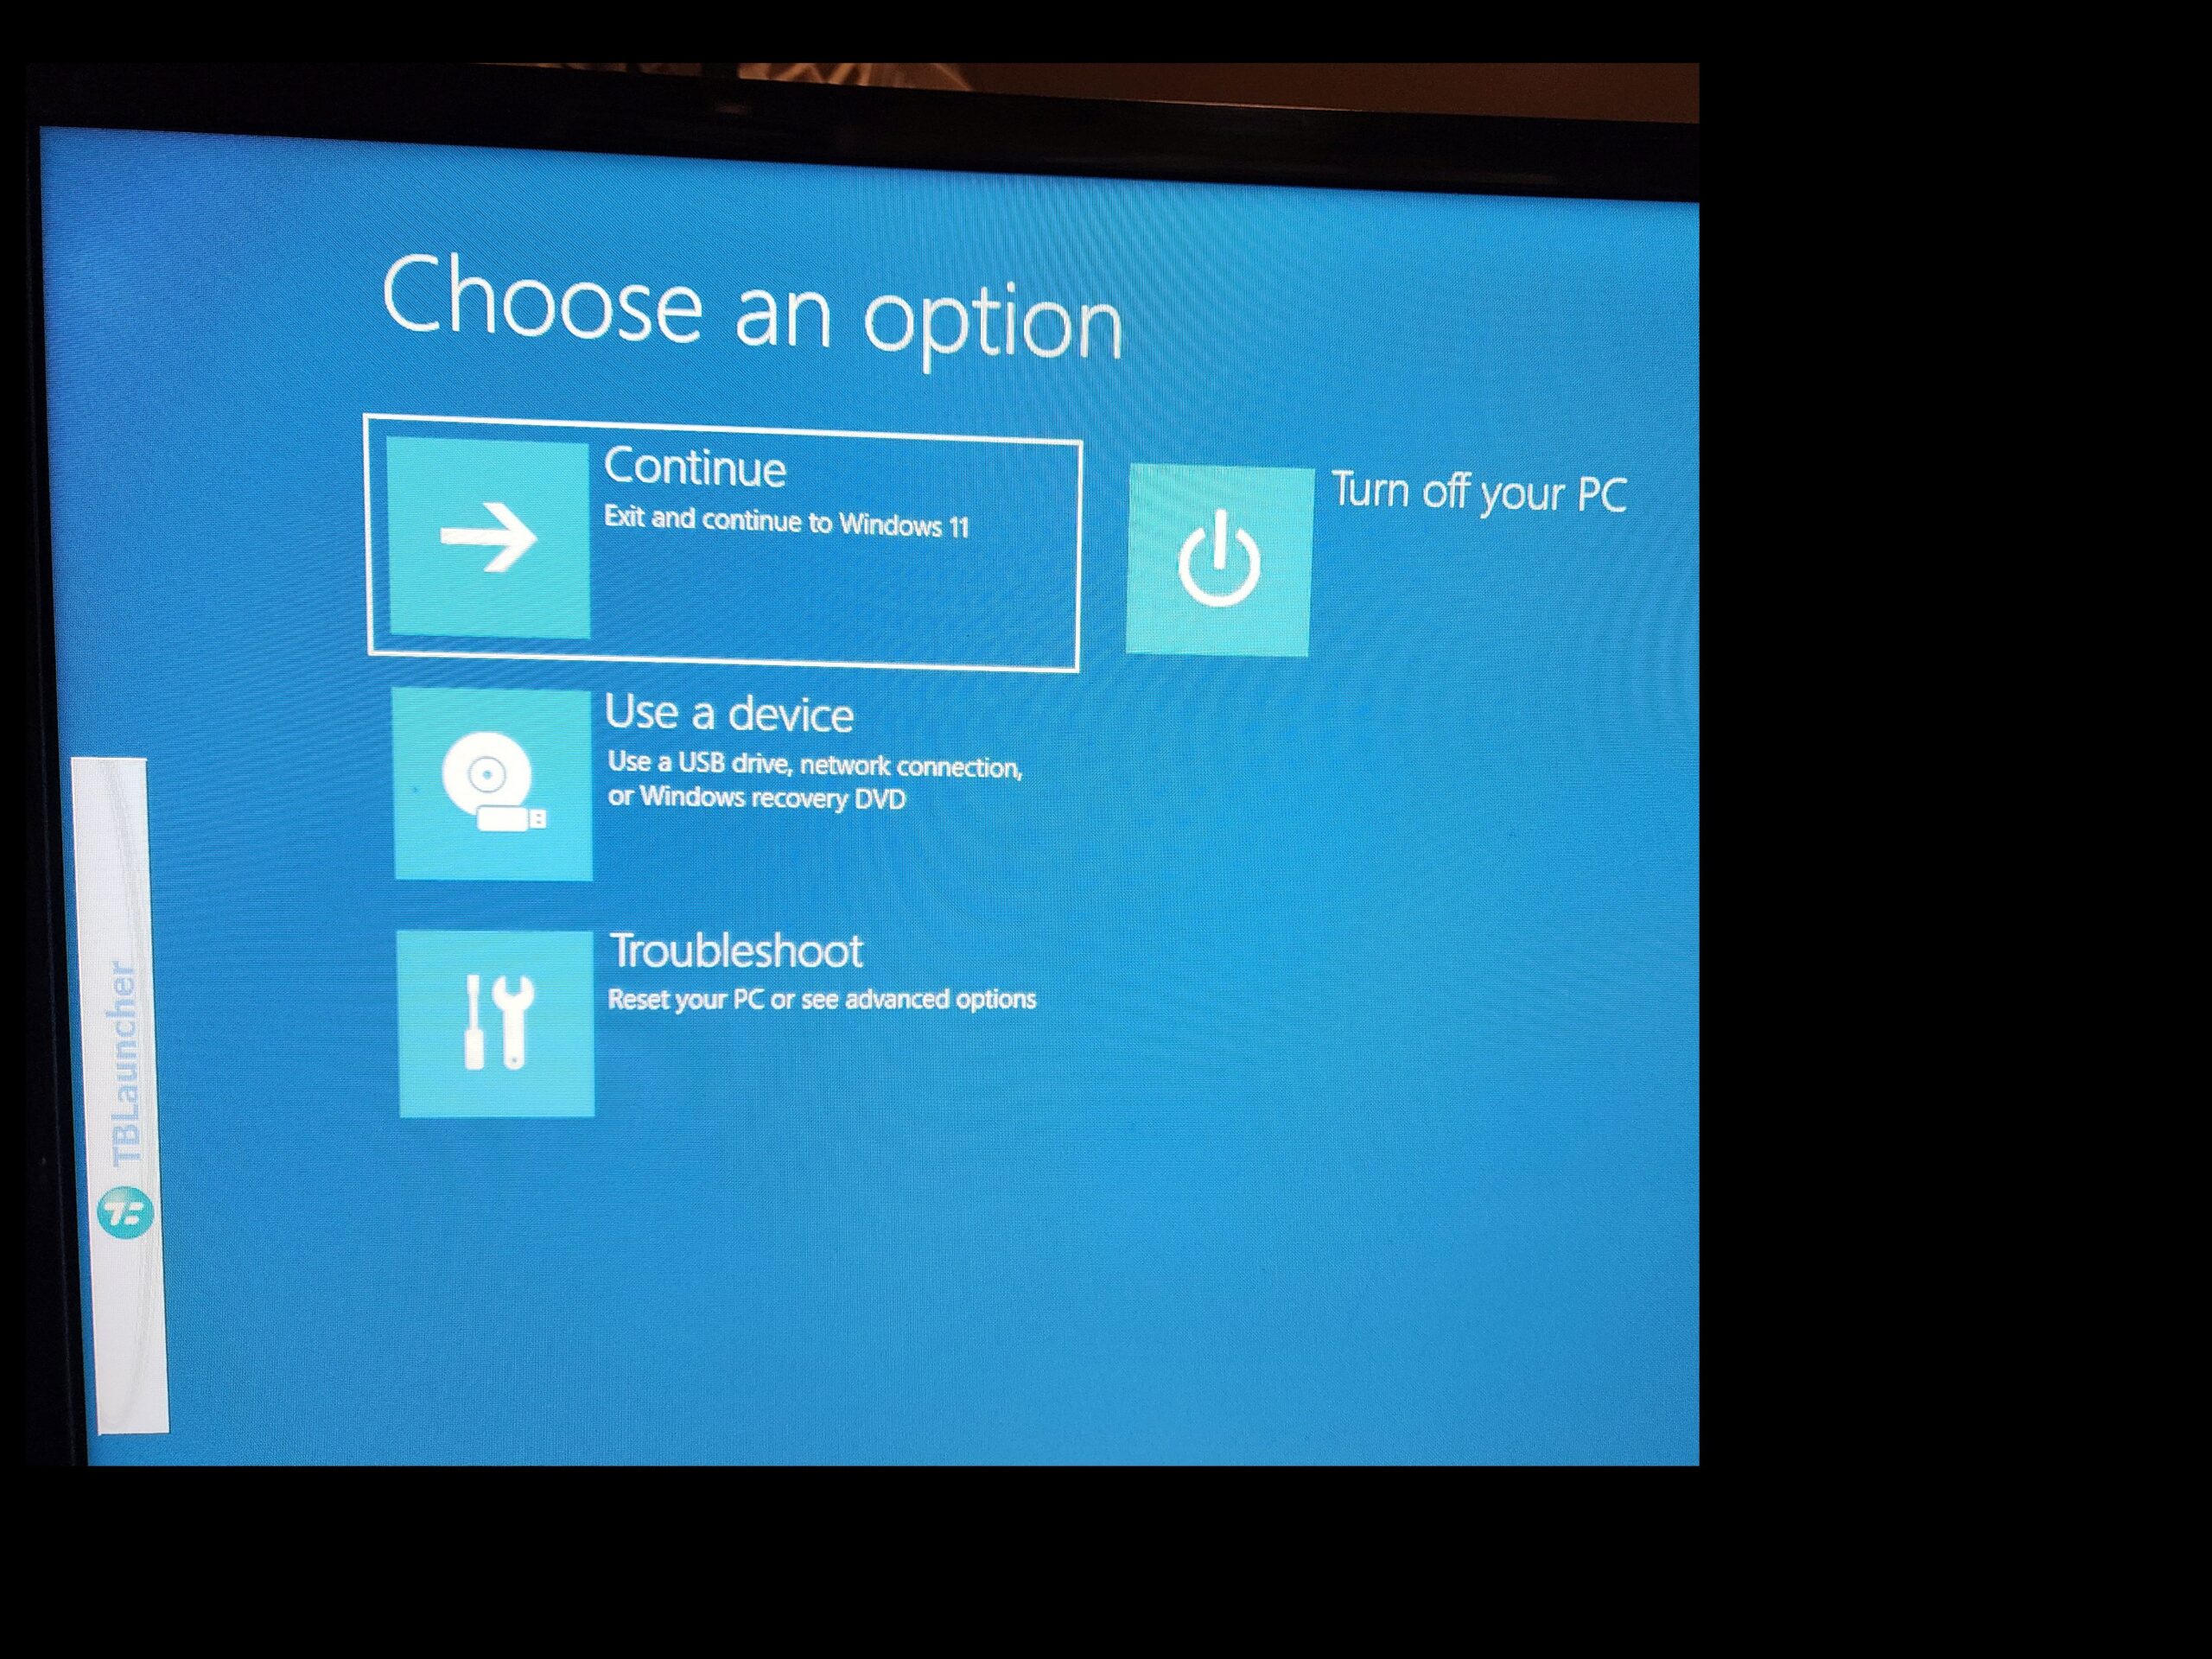
    To check into this scenario, I disabled my Windows RE using “reagentc /disable” in an elevated Command Prompt.  Then I used Shift+Restart to see what would happen.  And it booted into the Windows Recovery Environment.

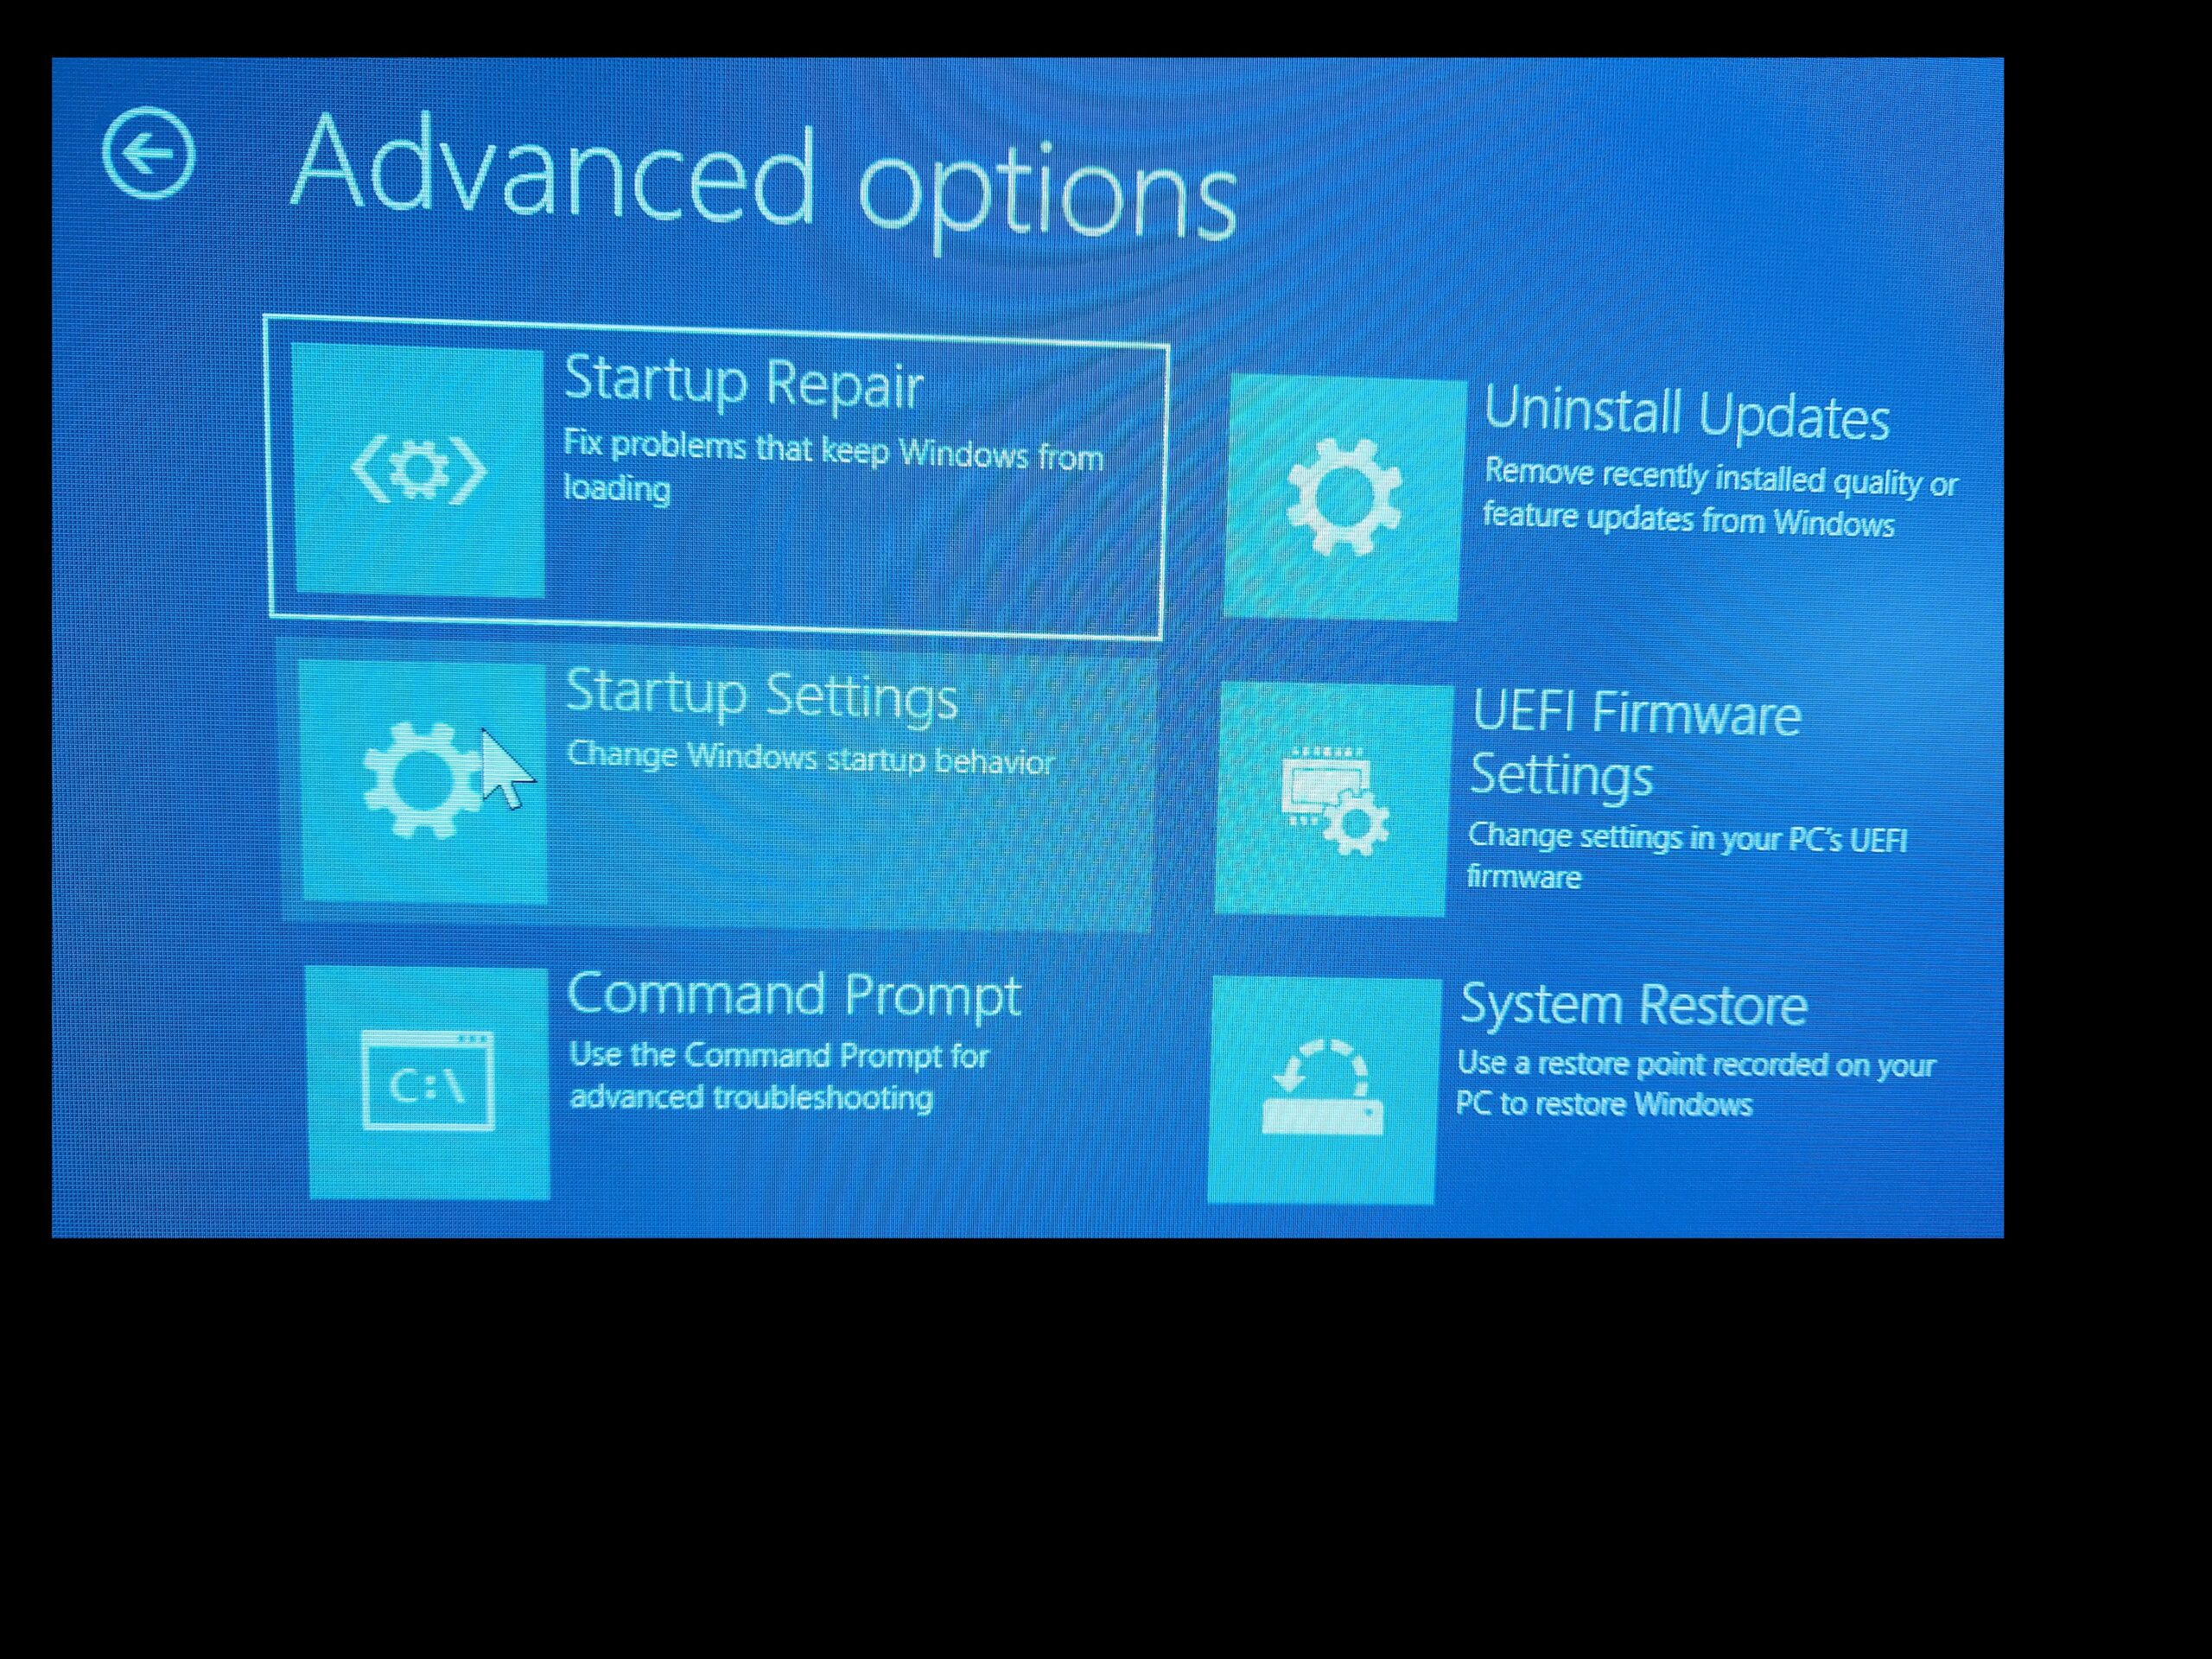
    But not my Windows Recovery Environment.  Mine has Image For Windows incorporated into it, and an Image For Windows splash screen comes up first, then IFW becomes a sidebar (from which other tools can be launched) and the typical Recovery Environment options are presented.

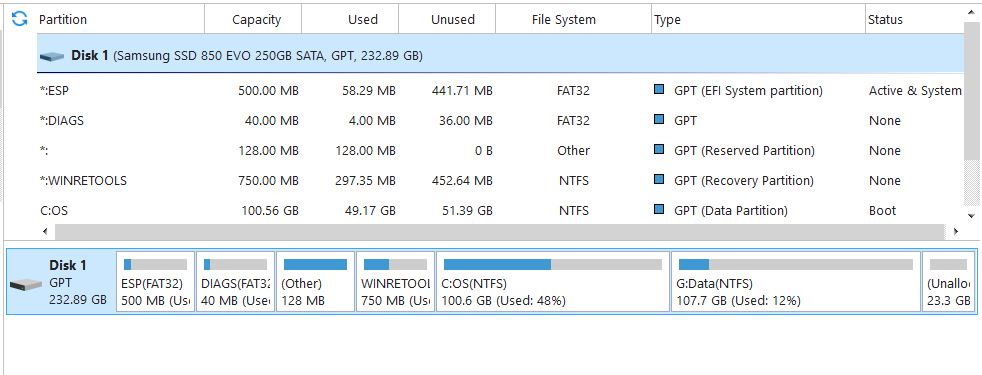
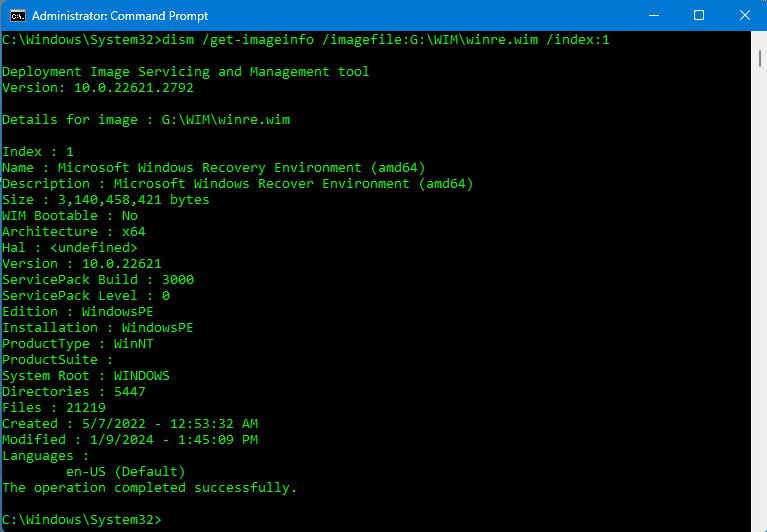
    But with my Windows RE disabled, Shift+Restart still brought up Windows Recovery Environment, the Windows standard, no IFW.  I know that there is no WinRE.wim file in any system folder anywhere on this PC other than the modified file in the Windows RE partition.

    I continued into Windows using that option, and then did Shift+Restart once again, just to double check.  Sure enough it rebooted into a generic Windows RE.  I continued into Windows.

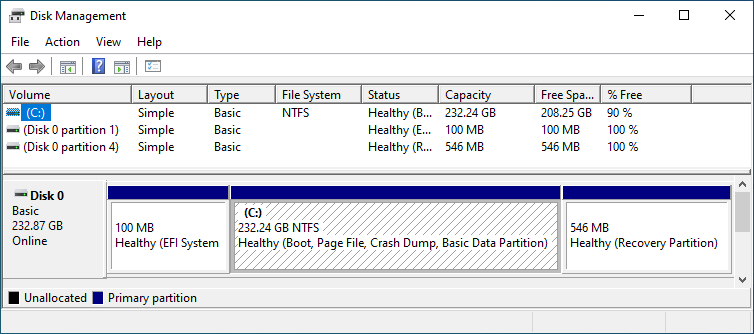
    Curious, I used Diskpart to give my Windows RE a drive letter, went in and stripped the attributes off winre.wim and renamed it winre.old.  I then did another reboot, and then once more did Shift+Restart and it booted into a generic Windows RE.

    I intend to continue down this rabbit hole and try to figure out where Windows has stashed a WinRE.wim that isn’t named WinRE.wim, because that Recovery Environment is coming from somewhere.  And yes, Windows RE does create a Windows PE on a RAM Disk from which it runs, but it has to have a seed file somewhere, somehow.  My first guess is that it is in the WinSXS folder, but it isn’t named winre.wim.

    Always create a fresh drive image before making system changes/Windows updates; you may need to start over!
    We all have our own reasons for doing the things that we do with our systems; we don't need anyone's approval, and we don't all have to do the same things.
    We were all once "Average Users".

    6 users thanked author for this post.
    Viewing 14 reply threads
    Author
    Replies
    • #2633191

      I booted into the B side of my dual boot desktop, disabled Windows RE, did Shift+Restart, and got a generic Windows RE.

      I tried it on my laptop, Dell Latitude E5420 also running Windows 11 23H2.  Disabled Windows RE, Shift+Restart, booted into a generic Windows RE.  My laptop Windows RE also has Image For Windows incorporated.

      I have yet to find an explanation.  I have found no seed file from which to launch a Windows PE RAM Disk.

      I’m beginning to wonder if the recent update to WinRE has introduced this new behavior.  I may restore a pre-update drive image and check it out.

      Always create a fresh drive image before making system changes/Windows updates; you may need to start over!
      We all have our own reasons for doing the things that we do with our systems; we don't need anyone's approval, and we don't all have to do the same things.
      We were all once "Average Users".

      4 users thanked author for this post.
      • #2635067

        Very important:
        When ReAgentC is run an entry is appended to C:\Windows\Logs\ReAgent\ReAgent.log
        That log will help you understand what is going on. It is very verbose.

        Portions of C:\Windows\Logs\ReAgent\ReAgent.log following a ReAgentC /enable:

        2024-02-06 16:14:50, Info [ReAgentc.exe] –Partition info–
        2024-02-06 16:14:50, Info [ReAgentc.exe] VolumeName: \\?\Volume{b26f97dc-0000-0000-0000-10d1ff010000}, PartitionName: \\?\GLOBALROOT\device\harddisk0\partition3
        2024-02-06 16:14:50, Info [ReAgentc.exe] Partition number: 3, offset: 2198235774976, free space: 769089536, total space: 786427904
        2024-02-06 16:14:50, Info [ReAgentc.exe] DiskNumber:0, DiskSignature:-1301309476, NTFS:1, Mbr:1, Active:0, Boot:0, BitlockerEnabled:0
        2024-02-06 16:14:50, Info [ReAgentc.exe] MBR partition id: 0x27
        2024-02-06 16:14:50, Info [ReAgentc.exe] DiskId: {00000000-0000-0000-0000-000000000000}
        …
        2024-02-06 16:14:50, Info [ReAgentc.exe] Checking partition at offset 2198235774976, partition number: 3
        2024-02-06 16:14:50, Info [ReAgentc.exe] MeetPartitionRequirements Partition details: {Offset: 2198235774976, Free space: 769089536, Total space: 786427904}
        2024-02-06 16:14:50, Info [ReAgentc.exe] MeetPartitionRequirements WinRE WIM size: 471185238
        2024-02-06 16:14:50, Info [ReAgentc.exe] MeetPartitionRequirements Required free space: 525711190
        2024-02-06 16:14:50, Info [ReAgentc.exe] partition meets requirements
        2024-02-06 16:14:50, Info [ReAgentc.exe] NOTE: select partition because it meets WinRE requirements
        …
        2024-02-06 16:14:50, Info [ReAgentc.exe] Copying WinRE from C:\Windows\system32\Recovery to staging location on \\?\GLOBALROOT\device\harddisk0\partition3
        

        Any recovery partition must be identified as Recovery(Type:27) not Primary(Type:7) and be large enough to be suitable.
        When not in use it should be empty. Use diskpart’s set id=27 command to change it.

        ReAgentC /disable moves everything from the recovery partition’s NTFS filesystem under \Recovery\WindowsRE to C:\Windows\system32\Recovery.

        ReAgentC /enable moves everything from C:\Windows\system32\Recovery to a suitable recovery partition under \Recovery\WindowsRE.
        If there is no suitable recovery partition, everything is moved into C:\Recovery\WindowsRE.

        You must use DIR /A to look at hidden and system files at an Administrator command prompt.

        DISKPART> select disk 0
        
        Disk 0 is now the selected disk.
        
        DISKPART> list partition
        
        Partition ### Type Size Offset
        ————- —————- ——- ——-
        Partition 1 Primary 50 MB 1024 KB
        Partition 2 Primary 2047 GB 51 MB
        Partition 3 Recovery 750 MB 2047 GB
        
        DISKPART> select part 3
        
        Partition 3 is now the selected partition.
        
        DISKPART> detail partition
        
        Partition 3
        Type : 27
        Hidden: No
        Active: No
        Offset in Bytes: 2198235774976
        
        Volume ### Ltr Label Fs Type Size Status Info
        ———- — ———– —– ———- ——- ——— ——–
        * Volume 3 Windows RE NTFS Partition 750 MB Healthy Hidden
        

        I ran sysinternals Process Monitor while KB5034441 was installing and took some notes:

        Command: C:\Windows\TEMP\IXP000.TMP\WinREUpdateInstaller.exe
        Read: C:\$WinREAgent\Scratch\update.wim
        Write: C:\$WinREAgent\Scratch\exported.wim
        Logging: C:\Windows\Logs\WinREAgent\setupact.log
        
        C:\Windows\system32>DIR /A /S C:\$WinREAgent
        
        Directory of C:\$WinREAgent
        
        02/05/2024 09:24 PM <DIR> .
        02/05/2024 09:24 PM <DIR> ..
        02/05/2024 09:19 PM <DIR> Rollback
        02/05/2024 09:24 PM 81 Rollback.xml
        02/05/2024 09:24 PM 343 RollbackInfo.ini
        02/05/2024 09:23 PM 3,935 WinREServicingManager.xml
        3 File(s) 4,359 bytes
        
        Directory of C:\$WinREAgent\Rollback
        
        02/05/2024 09:19 PM <DIR> .
        02/05/2024 09:19 PM <DIR> ..
        0 File(s) 0 bytes
        
        Total Files Listed:
        3 File(s) 4,359 bytes
        
        HP Compaq 6000 Pro SFF PC / Windows 10 Pro / 22H2
        Intel®Core™2 “Wolfdale” E8400 3.0 GHz / 8.00 GB

        HP ProDesk 400 G5 SFF PC / Windows 11 Pro / 23H2
        Intel®Core™ “Coffee Lake” i3-8100 3.6 GHz / 16.00 GB
        1 user thanked author for this post.
        • #2635218

          Any recovery partition must be identified as Recovery(Type:27) not Primary(Type:7) and be large enough to be suitable. When not in use it should be empty. Use diskpart’s set id=27 command to change it.

          That only works if your disk uses MBR and legacy boot!

          If it uses GPT and UEFI, you have to use set id=”de94bba4-06d1-4d40-a16a-bfd50179d6ac” instead and, to prevent “automatic” drive letter assignment, you should also set gpt attributes=0x8000000000000001.

          2 users thanked author for this post.
          • #2635237

            Yes! See #2635064 at the end:

            To just change the primary partition back into a recovery partition use set id=27 (or for GPT set id=de94bba4-06d1-4d40-a16a-bfd50179d6ac)
            See PARTITION_INFORMATION_GPT structure (winioctl.h)

            PARTITION_BASIC_DATA_GUID ebd0a0a2-b9e5-4433-87c0-68b6b72699c7
            The data partition type that is created and recognized by Windows.
            Only partitions of this type can be assigned drive letters, receive volume GUID paths, host mounted folders (also called volume mount points)
            
            PARTITION_MSFT_RECOVERY_GUID de94bba4-06d1-4d40-a16a-bfd50179d6ac
            The partition is a Microsoft recovery partition.
            This value can be set for basic and dynamic disks.
            

            See also UEFI/GPT-based hard drive partitions and Overview of Disk Management.

            HP Compaq 6000 Pro SFF PC / Windows 10 Pro / 22H2
            Intel®Core™2 “Wolfdale” E8400 3.0 GHz / 8.00 GB

            HP ProDesk 400 G5 SFF PC / Windows 11 Pro / 23H2
            Intel®Core™ “Coffee Lake” i3-8100 3.6 GHz / 16.00 GB
    • #2633201

      In the other thread Susan says the WinRE update applies only to 21H2 for Win 11. I suspect the change from partition to folder was introduced in 22H2.

      The best way to find the winre.wim file is from a command prompt window. If you do a cd C:\Recovery\WindowsRE and then dir /a you’ll see it. It is a system hidden file. Also check C:\Windows\System32\Recovery folder, although all I find in that folder is a reagentold.xml file.

      On my Mobile Home Hag machine there was a recovery partition with 0 used on drive 0. The boot drive is #1. I found winre.wim, boot.sdi, and ReAgent.xml in C:\Recovery\[class id type filename]. I removed the S and H attributes and copied them to a new WindowsRE folder I created in the Recovery folder. I had to then enable WinRE. It wouldn’t enable until I created the WindowsRE folder and populated it. The WinRE restart brought up the complete WinRE option list.

      1 user thanked author for this post.
      • #2633219

        The best way to find the winre.wim file is from a command prompt window.

        I know that there is no WinRE.wim file in any system folder anywhere on this PC other than the modified file in the Windows RE partition.

        From my website: “Winre.wim is essential for the operation to succeed, and of course, you need the version that matches your Windows installation. The best place for it is in a 450MB Microsoft Reserved partition right behind the Windows partition, but mine was not there. It can be located in C:\Recovery\WindowsRE (which is a protected folder), but mine was not there, either. It can be in C:\Windows\System32\Recovery (also a protected folder), but mine wasn’t there, either. If you should find Winre.wim in any of those locations, be sure to check the file date; it may be from an earlier version of Windows 10/11, and you need the file version to match your installation of Windows 10/11.”

        I’ve been tinkerin’ with Windows RE since Windows 7.  I’m not a stranger to where it should be, can be, or how it works.  Mine is in a 1GB partition on a separate NVMe from my Windows drive, and it has Image For Windows incorporated into it.

        This thread is about a Windows RE that I cannot yet find, and how it is launched, which I have not yet determined.

        Always create a fresh drive image before making system changes/Windows updates; you may need to start over!
        We all have our own reasons for doing the things that we do with our systems; we don't need anyone's approval, and we don't all have to do the same things.
        We were all once "Average Users".

        1 user thanked author for this post.
    • #2633204

      bbearren – very interesting thread.  I’m turning on notifications.

      Desktop Asus TUF X299 Mark 1, CPU: Intel Core i7-7820X Skylake-X 8-Core 3.6 GHz, RAM: 32GB, GPU: Nvidia GTX 1050 Ti 4GB. Display: Four 27" 1080p screens 2 over 2 quad.

    • #2633256

      My NAS has a single mSATA SSD OS drive and a RAID 10 array on 4 HDD’s.  The OS is a vanilla Windows 11 23H2, Windows RE on an 850MB partition tucked in behind the OS partition.  I created a fresh drive image with IFW, then restored the earliest 23H2 image available, 12-9-2023, and pulled the Ethernet cable so no updates would download in the background.

      Next I disabled my Windows RE, deleted the C:\Recovery folder and renamed winre.wim to winre.old in the Windows\System32\Recovery folder.  Then Shift+Restart, and it booted into a generic Windows RE.  My Windows RE on my NAS also has IFW incorporated into it, like my desktop.  There is no winre.wim on the NAS other than in the Windows RE partition, and it’s not pulling that one up.  Then with Windows RE still disabled, I launched the IFW Utilities and tried to update TBWinRE WIM, and IFW couldn’t find it, either.  The script started the search for winre.wim, then aborted.

      I’m beginning to suspect that its part of 23H2 in Settings\Windows Update, tucked into a dll file somewhere, and I’m only noticing it now because of all the issues with KB5034441, finagling around with Windows RE, running the ps1 script for @RetiredGeek, etc.  I didn’t go all the way back to 22H2 yet, but I may do that tomorrow.  I can keep backing up quite a bit to see when/if that generic Windows RE goes away.

      Always create a fresh drive image before making system changes/Windows updates; you may need to start over!
      We all have our own reasons for doing the things that we do with our systems; we don't need anyone's approval, and we don't all have to do the same things.
      We were all once "Average Users".

      5 users thanked author for this post.
      • #2633390

        How big is the winre.wim file? Would a search on files around that size help locating it?

    • #2633385

      @bbearren,

      I’m so glad you posted this as I was going nuts last night trying to get my W10 laptop to boot into the IFW recovery environment. I ran the script to return the WinRE info and found that it was located in the same partition as my C: drive. So it seems that IFW can’t cope with the Windows Recovery being located in the C: drive.

      Have you posted this as a question on the Terabyte forum?

      I’ll be looking at my older Macrium Reflect Images to see if I have one that has a physical recovery partition and run some tests if I can find one.

      Are we having FUN YET???

      May the Forces of good computing be with you!

      RG

      PowerShell & VBA Rule!
      Computer Specs

      • #2633398

        Hey Y’all,

        Unfortunately the oldest of my 9 Image disks does not show a separate WinRE partition.

        Now I guess I’ll have to research how to get the separate WinRE partition back.

        May the Forces of good computing be with you!

        RG

        PowerShell & VBA Rule!
        Computer Specs

      • #2633430

        How big is the winre.wim file?

        Winre.wim is ~780MB.

        Always create a fresh drive image before making system changes/Windows updates; you may need to start over!
        We all have our own reasons for doing the things that we do with our systems; we don't need anyone's approval, and we don't all have to do the same things.
        We were all once "Average Users".

        • #2633431

          Look for files around that size?

          • #2633443

            Look for files around that size?

            Good thought.  If I can pin down that it’s inherent in 23H2, that’s probably where I’ll go next.

            Always create a fresh drive image before making system changes/Windows updates; you may need to start over!
            We all have our own reasons for doing the things that we do with our systems; we don't need anyone's approval, and we don't all have to do the same things.
            We were all once "Average Users".

      • #2633437

        I’m so glad you posted this as I was going nuts last night trying to get my W10 laptop to boot into the IFW recovery environment. I ran the script to return the WinRE info and found that it was located in the same partition as my C: drive. So it seems that IFW can’t cope with the Windows Recovery being located in the C: drive.

        The peculiarities are from Windows RE, not IFW.  Winre.wim must be located in a specific nested folder location, \Recovery\WindowsRE\Winre.wim.  And you have to use Reagentc.exe to set the path in order for IFW to find it.  It looks like this:

        Reimage-Path

        Once you get that setup, Reagentc.exe can then enable it.  It will write a new .xml file and the boot.sdi file.  Then IFW can find it.  The finished product will look like this:

        WindowsRE

        I also think that setting the folder attributes for \Recovery to system and hidden has something to do with it, as well.

        Always create a fresh drive image before making system changes/Windows updates; you may need to start over!
        We all have our own reasons for doing the things that we do with our systems; we don't need anyone's approval, and we don't all have to do the same things.
        We were all once "Average Users".

    • #2633475

      My oldest NAS OS drive image is 6-1-2023, Windows 11 Pro Version 22H2 (OS Build 22621.1778).  I restored that one, disabled Windows RE, then Shift+Restart, and it boots into a generic Windows RE.

      I don’t have any Windows 10 drive images to try, I don’t think.  I’ll scrounge around in my junk and see what I can turn up.

      Always create a fresh drive image before making system changes/Windows updates; you may need to start over!
      We all have our own reasons for doing the things that we do with our systems; we don't need anyone's approval, and we don't all have to do the same things.
      We were all once "Average Users".

      • #2633478

        See my DM

        1 user thanked author for this post.
      • #2633700

        My oldest NAS OS drive image is 6-1-2023, Windows 11 Pro Version 22H2 (OS Build 22621.1778). I restored that one, disabled Windows RE, then Shift+Restart, and it boots into a generic Windows RE.

        So this behavior has been in Windows 11 22H2 even before 6-1-2023, which means that it did not come about in a recent 23H2 update.  Perhaps all the weirdness with Windows 10 4441 is Microsoft trying to get Windows 10 users prepared for upgrading to Windows 11 which incorporates this method of invoking Windows RE.

        Can anyone confirm whether or not Windows 10 will reboot into Windows RE with Windows RE being disabled via reagentc /disable?  I’m still looking for a Windows 10 drive image, no luck so far.

        Always create a fresh drive image before making system changes/Windows updates; you may need to start over!
        We all have our own reasons for doing the things that we do with our systems; we don't need anyone's approval, and we don't all have to do the same things.
        We were all once "Average Users".

        • #2633764

          Studio XPS 1340, Core-2 Duo P9600, 6GB RAM (OLD), Win10 Pro
          Confirm:
          reagentc /disable
          Shift restart
          Generic WinRE with Troubleshoot\Advanced Options
          Startup Settings only (Enable low-res, Enable debugging, Enable boot logging, Enable Safe Mode, Disable driver signing, Disable early-launch malware protertion, Disable auto restart on system failure)

          Boot back to Win10 Pro
          reagentc /enable
          RE back in partition2
          Shift restart
          Normal WinRE

          IMG_0287

          1 user thanked author for this post.
          • #2633792

            Studio XPS 1340, Core-2 Duo P9600, 6GB RAM (OLD), Win10 Pro Confirm: reagentc /disable Shift restart Generic WinRE with Troubleshoot\Advanced Options

            Thanks for the confirmation @PKCano.  I was just before doing a full drive restore on my Latitude E5420, because that particular image predates Windows 11 and was Windows 10; you saved me that effort and satisfied my curiosity to the extent that that behavior was also in Windows 10.

            There appears to be a hidden Windows Recovery Environment, and I am suspecting more and more that it is somewhere in Settings.  However, being a belt and suspenders kinda guy, I prefer to have the Recovery Environment on a separate drive from the Windows installation.

            I’m still curious, but I’ll let that simmer on the back burner for awhile.

            Always create a fresh drive image before making system changes/Windows updates; you may need to start over!
            We all have our own reasons for doing the things that we do with our systems; we don't need anyone's approval, and we don't all have to do the same things.
            We were all once "Average Users".

            1 user thanked author for this post.
    • #2633698

      @PKCano pointed out to me in a PM that they found a C:\$WinREAgent\Scratch\ folder.  There isn’t one on the A side of my dual boot, but I found one on the B side.  The folder was empty, but a C:\Recovery system folder had reappeared.   It wouldn’t open in File Explorer, so I went into it through an elevated Command Prompt, and there was a WindowsRE sub folder with WinRE.wim.

      Apparently during an update, Windows put the necessary files in C:\$WinREAgent\Scratch to rebuild C:\Recovery during the normal reboot process for an update.  I also checked my NAS, and it has a C:\Recovery system folder as well.  But this hasn’t solved the mystery.

      This RE works, but somehow it doesn’t seem to be registered through reagentc, because Image For Windows can’t find the winre.wim in this folder after I disable my formerly enabled original RE.  I have some more digging to do before I can get to the bottom of this.  Good thing I like puzzles.

      I’m not sure about Windows reasoning for this move, but it makes sense for future Windows RE updates, because the RE runs in a RAM Disk, and having it located in a folder in the Windows root drive eliminates any need to mess with partition sizes, and only takes up exactly enough room for a Windows RE update, without needing/creating any extra free space in a partition.

      Always create a fresh drive image before making system changes/Windows updates; you may need to start over!
      We all have our own reasons for doing the things that we do with our systems; we don't need anyone's approval, and we don't all have to do the same things.
      We were all once "Average Users".

      • #2633913

        Information shared with @bbearren :

        This from my Dell XPS 1340 (OLD laptop) originally Win7Pro converted to Win10 Pro for testing.

        The Recovery partition (2) was 14.65GB (see #2628205). Although the Build is 19041, it seems that it got updated with the Jan updates and KB5034441.

        But what interested me was the Rollback. I think it did the actual update in the
        C:\$WinREAgent\Scratch\ folder, then exported it to partition2. Perhaps this is what MS came up with for Win11 if the Recovery partition is big enough for the end product, but not big enough to perform the update within the Recovery partition. (C:\$WinREAgent\Scratch\ is hidden.)

        1340Rollback

        1340DISM

        1 user thanked author for this post.
        • #2634014

          I also got the hidden C:\$WinREAgent\Scratch\ folder after successfully installing KB5034441 (see my thread #2633906, below).

          WinREAgent-Folder

          The contents of my RollbackInfo.ini aren’t quite the same as yours; my file doesn’t have the DestNewWimPath line.

          The main difference between our successful installations of KB5034441 is that your Recovery partition was 14.65GB (presumably with plenty of free space) and mine was only 549 MB with just 89.8 MB free.

          This makes me wonder what residual folders and files are left after unsuccessful installations. Could there be some clues there as to why some installations succeed and others don’t?

          I’ve posted my replies in this “Windows RE — Curiouser and Curiouser” topic because the success/failure of the installation of KB5034441 is a curiosity in itself. However, I suspect this aspect might be slightly off-topic in this particular discussion, in which case, please feel free to relocate as appropriate.

    • #2633906

      I thought I’d throw this information into the fray…

      I resumed updates for Win 10 22H2 on 31 January and successfully installed CU (KB5034122), .NET (KB5034582) & MSRT (KB890831)

      KB5034441 failed to install.

      I decided to try again on 1 February and KB5034441 successfully installed.

      Prior to updating, reagentc /info returned:

      Windows RE status: Enabled
      Windows RE location: \\?\GLOBALROOT\device\harddisk0\partition2\Recovery\WindowsRE
      Boot Configuration Data (BCD) identifier: f9f77195-098e-11eb-9315-00188bb3b27c
      Recovery image location:
      Recovery image index: 0
      Custom image location:
      Custom image index: 0

      Following the successful installation of KB5034441 I ran:

      Dism /Get-ImageInfo /ImageFile:\\?\GLOBALROOT\device\harddisk0\partition2\Recovery\WindowsRE\winre.wim /index:1

      which returned:

      Details for image : \\?\GLOBALROOT\device\harddisk0\partition2\Recovery\WindowsRE\winre.wim
      Index : 1
      Name : Microsoft Windows Recovery Environment (x86)
      Description : Microsoft Windows Recovery Environment (x86)
      Size : 1,918,989,072 bytes
      WIM Bootable : No
      Architecture : x86
      Hal : <undefined>
      Version : 10.0.19041
      ServicePack Build : 3920
      ServicePack Level : 0
      Edition : WindowsPE
      Installation : WindowsPE
      ProductType : WinNT
      ProductSuite :
      System Root : WINDOWS
      Directories : 3527
      Files : 16954
      Created : 07/12/2019 – 05:23:06
      Modified : 01/02/2024 – 18:02:55
      Languages :
      en-US (Default)
      The operation completed successfully.

      This confirmed that the version number of my winre.wim image was Version 10.0.19041 / ServicePack Build 3920 (last modified 01/02/2024 – 18:02:55)

      The following image shows several screenshots:

      Partition-Screenshots

      1. Macrium Reflect screenshot showing the contents of the image taken immediately before resuming updates on 31 January. The System Reserved partition is 549.0 MB with 89.8 MB free.
      2. Macrium Reflect screenshot showing the contents of the image taken after installing KB5034441 on 1 February. The System Reserved partition is still 549.0 MB, but now with 71.6 MB free.
      3. Disk Management confirms that the System Reserved partition is still 549.0 MB.
      4. The Recovery Partition script confirms successful update of WinRE.wim to Version 10.0.19041, ServicePack Build 3920, modified on 1 February 2024. It resides on harddisk0\partition2, size 549 MB with free space 72 MB.

      Allegedly, this partition did not have enough free space to install KB5034441. Nevertheless, it seems to have done so successfully.

      Curiouser and curiouser?

    • #2633910

      Hey y’all,

      Sorry I’ve been away from this thread but my 2015 Dell 137000 laptop I was doing testing on decided to go haywire big time! I was trying to reset the location of the Recovery Partition according to instructions here and it started blue screening on me.

      I restored from my Terabyte IFW Image which was successful but upon reboot blue screened.
      So I restored from my Macrium Reflect Image which was also successful but also blue screened upon reboot. BTW: I had MR delete everything on the SSD before the restore just to start with a “clean slate.”

      Over the next couple of hours I tried everything I could think of including changing the Secure Boot and Legacy Boot settings. But it just got worse until it wouldn’t even boot from the MR or IFW boot USB keys w/o the dreaded blue screen.

      Time for the Nucular Option! I downloaded a fresh W10 22H2 on my main driver to a “bootable” USB drive. Guess what it Blue Screened too!

      It’s now 12:30am, I’m just about to toss the laptop out the window so I figured it’s time to just turn it off and get some rest, although it was not easy to get to sleep.

      This afternoon I went to tackle it again. Turning it on I got a BS! So I went into the startup options and set them for GUID boot w/Secure Boot OFF (required for the Macrium boot USB) and viola it booted into MR. I restored the image successfully and wonder of wonders it booted. I then went in and set the startup options to GUID w/Secure Boot ON and once again it started. So at least I’m back to where I was 16 hours prior.

      So here’s the current Recovery Situation:
      Dekk137000-RecoveryInfo1
      So the above graphic shows that the Recovery Partition is on disk 0 partition 5 and active. Partition 5 is the C: (Boot) partition on this machine. Partition 4 is the Recovery Partition as shown below:
      Dell137000-MiniTool-DiskLayout

      So at this point with Recovery DISABLED both Shift+Restart and Ctrl+Shift bring up the generic Windows recovery options it does NOT boot into the generic recovery environment with the IFW side bar as it should. Note: the behavior is the same if I Enable the Recovery Environment.

      FYI: Both my desktops running Win11 Pro open up the Recovery options properly with the IFW side bar. Both of these machines also show the correct Recovery Partition when REAGENTC /INFO is executed. They do NOT point to the C: partition. Also the Laptop is the only one that has the Recovery Partition BEFORE the C: drive!

      So Obviously IFW modified the files in Partition 4!

      So my question is how do I get Windows to recognize Partition 4 as the Recovery Environment?

      Sorry for the excessively long post but I wanted to give you the whole picture.

      May the Forces of good computing be with you!

      RG

      PowerShell & VBA Rule!
      Computer Specs

      1 user thanked author for this post.
      • #2633946

        So my question is how do I get Windows to recognize Partition 4 as the Recovery Environment?


        @RetiredGeek
        , first, use reagentc /disable to turn partition 5 loose. Then follow the steps in #2633437.  You would use

        reagentc /setreimage /path \\?\GLOBALROOT\device\harddisk0\partition4\Recovery\WindowsRE

        to set the path.  Then reagentc /enable.

        Then run reagentc /info to see if it was truly successful.  If so, IFW will be able to find it.  Setting the path using reagentc writes the Windows RE GUID in the “recoverysequence” in the BCD store, and that’s how IFW finds it.

        Since it’s already there, if you run the IFW Utilities script to update it, you’ll get a dialog popup telling you it’s already updated and doesn’t need it.

        Always create a fresh drive image before making system changes/Windows updates; you may need to start over!
        We all have our own reasons for doing the things that we do with our systems; we don't need anyone's approval, and we don't all have to do the same things.
        We were all once "Average Users".

      • #2634350

        Hey Y’all,

        Well the time has come…
        WhiteFlag

        I’ve now had more weird things happen then I’ve ever seen. Twice my machine got so bad it wouldn’t even boot from USB keys even official Win 10 22H2 downloads.

        I did an over-the-top repair install and got the dreaded BSD!

        Today I had 3 different Reflect Images load successfully load only to BSD on reboot.

        I finally deleted the Recovery Partition I’ve had for years and it had no effect of course Reagentc was pointing to the C: partition!

        I’ve even played around with BCDEdit trying to get things fixed.

        At this point I have a workable machine that will boot into the Standard Windows Recovery screen but what I don’t have is the Terabyte Image For Windows sidebar.

        I’ll just have to live with using a Bootable USB Key, which I have to disable Safe Boot to use.
        BTW:
        updates-kb5034441

        Don’t know why this laptop is so messed up since IFW installed just fine on my 2 Win 11 desktops!

        It may be time for a new computer as soon as I get back from Norway to hopefully see the Northern Lights.

        May the Forces of good computing be with you!

        RG

        PowerShell & VBA Rule!
        Computer Specs

        • #2634366

          I did an over-the-top repair install and got the dreaded BSD! Today I had 3 different Reflect Images load successfully load only to BSD on reboot.


          @RetiredGeek
          , your BCD store is corrupt.  I’ve dealt with that myself on more than one occasion.  Reagentc.exe writes to the BCD store as part of its machinations.

          BootIt Bare Metal and BootIt UEFI include a BCD Edit function, and it’s a straight-forward menu driven utility.  There is a fully functional 30 free trial download available.  Boot into BootIt, navigate to the EFI partition, and click the BCD Edit button.

          Alternatively, you can boot into the Standard Windows Recovery Environment, open Command Prompt and then DISKPART and nuke your EFI partition (create an EFI partition image first!).  Then run the boot repair options, which will re-write the BCD store in your EFI partition.  That should clean things up, and you can get back into the fray.

          And I hope you get to see the Northern Lights.  Good luck with that.


          Always create a fresh drive image before making system changes/Windows updates; you may need to start over!
          We all have our own reasons for doing the things that we do with our systems; we don't need anyone's approval, and we don't all have to do the same things.
          We were all once "Average Users".

          • #2634466

            Curiouser and Curiouser is right.

            I decided to take the second option and get into the recovery environment and from there to a command prompt.

            Well guess what popped up…the TBI side bar!

            So Now I’m wondering if I should continue with the EFI Nuke or just know that I have an alternative way to get into IFW.

            Nah, I’ll NUKE it and see if I can make it more straight forward since I have Images taken in both Macrium and IFW.

            Stay tuned…

            May the Forces of good computing be with you!

            RG

            PowerShell & VBA Rule!
            Computer Specs

            1 user thanked author for this post.
          • #2634540

            Ok so here’s where we are now.

            I nuked the EFI partition using a Partition Editor.
            Computer refused to boot so I couldn’t get to the Repair Boot Options.
            Restored EFI partition, booted couldn’t get back to the IFW screen as per last post.
            Restored the entire drive, booted and I can now get back to the IFW screen via this process:

            Shift+Restart
            Choose-an-Option
            Click on Troubleshoot
            Advanced-Options
            Click on Advanced options
            Command-Prompt
            Click on Command Prompt
            TBW-Sidebar

            I can now start IFW!

            However on my desktops

            Shift+Restart results in
            Desktop-Option-Screen

            So what do I have to change in my Boot loader to fix this:

            Microsoft Windows [Version 10.0.19045.3930]
            (c) Microsoft Corporation. All rights reserved.
            
            C:\WINDOWS\system32>reagentc /info
            Windows Recovery Environment (Windows RE) and system reset configuration
            Information:
            
                Windows RE status:         Enabled
                Windows RE location:       \\?\GLOBALROOT\device\harddisk0\partition5\Recovery\WindowsRE
                Boot Configuration Data (BCD) identifier: 63868537-c445-11ee-9190-605718ae57d5
                Recovery image location:
                Recovery image index:      0
                Custom image location:
                Custom image index:        0
            
            REAGENTC.EXE: Operation Successful.


            C:\WINDOWS\system32>bcdedit /enum all
            
            Firmware Boot Manager
            ---------------------
            identifier              {fwbootmgr}
            displayorder            {bootmgr}
                                    {2461525b-c37d-11ee-9187-806e6f6e6963}
                                    {2461525c-c37d-11ee-9187-806e6f6e6963}
            timeout                 0
            
            Windows Boot Manager
            --------------------
            identifier              {bootmgr}
            path                    \EFI\Microsoft\Boot\bootmgfw.efi
            description             Windows Boot Manager
            locale                  en-US
            inherit                 {globalsettings}
            default                 {current}
            resumeobject            {9c4977a6-4f19-11eb-9ab5-bddf2cf087f2}
            displayorder            {current}
            toolsdisplayorder       {memdiag}
            timeout                 30
            
            Firmware Application (101fffff)
            -------------------------------
            identifier              {2461525b-c37d-11ee-9187-806e6f6e6963}
            description             EFI Network 0 for IPv4 (00-24-27-FE-9F-80)
            
            Firmware Application (101fffff)
            -------------------------------
            identifier              {2461525c-c37d-11ee-9187-806e6f6e6963}
            description             EFI Network 0 for IPv6 (00-24-27-FE-9F-80)
            
            Windows Boot Loader
            -------------------
            identifier              {0cb3b571-2f2e-4343-a879-d86a476d7215}
            device                  partition=\Device\HarddiskVolume1
            path                    \EFI\Microsoft\Boot\SecConfig.efi
            description             DGOptOut
            loadoptions             DISABLE-LSA-ISO,DISABLE-VBS
            nx                      OptIn
            
            Windows Boot Loader
            -------------------
            identifier              {63868537-c445-11ee-9190-605718ae57d5}
            device                  ramdisk=[C:]\Recovery\WindowsRE\Winre.wim,{63868538-c445-11ee-9190-605718ae57d5}
            path                    \windows\system32\winload.efi
            description             Windows Recovery Environment
            locale                  en-US
            inherit                 {bootloadersettings}
            displaymessage          Recovery
            osdevice                ramdisk=[C:]\Recovery\WindowsRE\Winre.wim,{63868538-c445-11ee-9190-605718ae57d5}
            systemroot              \windows
            nx                      OptIn
            bootmenupolicy          Standard
            winpe                   Yes
            
            Windows Boot Loader
            -------------------
            identifier              {current}
            device                  partition=C:
            path                    \WINDOWS\system32\winload.efi
            description             Windows 10
            locale                  en-US
            inherit                 {bootloadersettings}
            recoverysequence        {63868537-c445-11ee-9190-605718ae57d5}
            displaymessageoverride  CommandPrompt
            recoveryenabled         Yes
            isolatedcontext         Yes
            allowedinmemorysettings 0x15000075
            osdevice                partition=C:
            systemroot              \WINDOWS
            resumeobject            {9c4977a6-4f19-11eb-9ab5-bddf2cf087f2}
            nx                      OptIn
            bootmenupolicy          Standard
            
            Windows Boot Loader
            -------------------
            identifier              {9c4977a8-4f19-11eb-9ab5-bddf2cf087f2}
            device                  ramdisk=[unknown]\Recovery\WindowsRE\Winre.wim,{9c4977a9-4f19-11eb-9ab5-bddf2cf087f2}
            path                    \windows\system32\winload.efi
            description             Windows Recovery Environment
            locale                  en-US
            inherit                 {bootloadersettings}
            displaymessage          Recovery
            osdevice                ramdisk=[unknown]\Recovery\WindowsRE\Winre.wim,{9c4977a9-4f19-11eb-9ab5-bddf2cf087f2}
            systemroot              \windows
            nx                      OptIn
            bootmenupolicy          Standard
            winpe                   Yes
            
            Resume from Hibernate
            ---------------------
            identifier              {9c4977a6-4f19-11eb-9ab5-bddf2cf087f2}
            device                  partition=C:
            path                    \WINDOWS\system32\winresume.efi
            description             Windows Resume Application
            locale                  en-US
            inherit                 {resumeloadersettings}
            recoverysequence        {63868537-c445-11ee-9190-605718ae57d5}
            recoveryenabled         Yes
            isolatedcontext         Yes
            allowedinmemorysettings 0x15000075
            filedevice              partition=C:
            filepath                \hiberfil.sys
            bootmenupolicy          Standard
            debugoptionenabled      No
            
            Windows Memory Tester
            ---------------------
            identifier              {memdiag}
            device                  partition=\Device\HarddiskVolume1
            path                    \EFI\Microsoft\Boot\memtest.efi
            description             Windows Memory Diagnostic
            locale                  en-US
            inherit                 {globalsettings}
            badmemoryaccess         Yes
            
            EMS Settings
            ------------
            identifier              {emssettings}
            bootems                 No
            
            Debugger Settings
            -----------------
            identifier              {dbgsettings}
            debugtype               Serial
            debugport               1
            baudrate                115200
            badmemoryaccess         Yes
            
            RAM Defects
            -----------
            identifier              {badmemory}
            
            Global Settings
            ---------------
            identifier              {globalsettings}
            inherit                 {dbgsettings}
                                    {emssettings}
                                    {badmemory}
            
            Boot Loader Settings
            --------------------
            identifier              {bootloadersettings}
            inherit                 {globalsettings}
                                    {hypervisorsettings}
            
            Hypervisor Settings
            -------------------
            identifier              {hypervisorsettings}
            badmemoryaccess         Yes
            hypervisordebugtype     Serial
            hypervisordebugport     1
            hypervisorbaudrate      115200
            
            Resume Loader Settings
            ----------------------
            identifier              {resumeloadersettings}
            inherit                 {globalsettings}
            
            Device options
            --------------
            identifier              {63868538-c445-11ee-9190-605718ae57d5}
            description             Windows Recovery
            ramdisksdidevice        partition=C:
            ramdisksdipath          \Recovery\WindowsRE\boot.sdi
            
            Device options
            --------------
            identifier              {9c4977a9-4f19-11eb-9ab5-bddf2cf087f2}
            description             Windows Recovery
            ramdisksdidevice        unknown
            ramdisksdipath          \Recovery\WindowsRE\boot.sdi
            
            C:\WINDOWS\system32>
            

            I apologize for these long posts but it’s the only way to show the entire situation.

            May the Forces of good computing be with you!

            RG

            PowerShell & VBA Rule!
            Computer Specs

            • #2634586

              I nuked the EFI partition using a Partition Editor. Computer refused to boot so I couldn’t get to the Repair Boot Options.

              You have to nuke the EFI partition while booted into Windows Recovery Environment.

              … boot into the Standard Windows Recovery Environment, open Command Prompt and then DISKPART and nuke your EFI partition (create an EFI partition image first!). Then run the boot repair options, which will re-write the BCD store in your EFI partition.

              In DISKPART use sel vol to give focus to your EFI partition, then

              format fs=fat32

              to clear it.  It should retain the EFI label.  Then exit DISKPART, but stay in Command Prompt and run the command (bootrec is only available in Windows RE; it is not a recognized command in Windows cmd.exe)

              bootrec /rebuildbcd

              When that finishes, run

              bootrec /fixmbr

              And then run

              bootrec /fixboot

              You may get “Access denied” on that last one.

              Exit Command Prompt, and boot into Windows.  If Windows fails to boot, restore your drive image, reboot, then go back into Windows Recovery Environment.  Open DISKPART and assign a drive letter to your EFI partition (I usually use z), then exit DISKPART.  In Command Prompt, keep changing drive letters until you find your Windows partition.  That’s the “x” you’ll use in this command

              bcdboot x:\windows /s z: /f uefi

              Exit the Command Prompt and boot into Windows.  If Windows boots okay, you can open an elevated Command Prompt, open DISKPART and remove the drive letter from your EFI partition.

              Always create a fresh drive image before making system changes/Windows updates; you may need to start over!
              We all have our own reasons for doing the things that we do with our systems; we don't need anyone's approval, and we don't all have to do the same things.
              We were all once "Average Users".

              1 user thanked author for this post.
            • #2634769

              @bbearren,

              Sorry to say I’ve tried it all and I’m right back where I started.

              I just uninstalled the Suite to see if I could solve another problem that when booting into the Recovery Environment and finally getting to IFW it won’t accept my User Name or License Key!

              After the uninstall the IFW side bar is still in the Recovery Environment?

              Not sure where to go from here. I’ll probably try the nuke it method if I can get the W10Pro 22H2 USB key to boot.

              Thanks for all your help!!!!

              May the Forces of good computing be with you!

              RG

              PowerShell & VBA Rule!
              Computer Specs

            • #2634781

              I just uninstalled the Suite to see if I could solve another problem that when booting into the Recovery Environment and finally getting to IFW it won’t accept my User Name or License Key!

              The verification process only works in the Windows online environment.

              After the uninstall the IFW side bar is still in the Recovery Environment?

              Does TBWinRE work?

              Always create a fresh drive image before making system changes/Windows updates; you may need to start over!
              We all have our own reasons for doing the things that we do with our systems; we don't need anyone's approval, and we don't all have to do the same things.
              We were all once "Average Users".

              1 user thanked author for this post.
            • #2634949

              Not sure where to go from here. I’ll probably try the nuke it method if I can get the W10Pro 22H2 USB key to boot.

              I have a not too dissimilar situation with my E5420 laptop.  There is a small (16MB) partition in front of my OS partition.  It used to be the MSR (Microsoft System Reserved) partition that is not actually required, even though Microsoft says otherwise.  I’ve successfully eliminated that particular partition on all of my systems except for my laptop.

              I have deleted it, tried to edit my BCD store via BootIt Bare Metal, but to no avail.  I have successfully deleted it, then re-created it as a non-system partition, and my laptop happily boots and runs normally.  I have had no success in completely deleting that partition and reclaiming the space.  All indications are that I have a corrupted BCD store that refuses to be edited successfully.

              I’ve let it go for the time being, since it’s only 16MB, but now I see it as a replication (of sorts) of your situation.  I’m creating a new full drive image of my laptop as I type this, and once that completes, I’m going to follow my own instructions and see what I can come up with.  I’ll follow up here.

              Always create a fresh drive image before making system changes/Windows updates; you may need to start over!
              We all have our own reasons for doing the things that we do with our systems; we don't need anyone's approval, and we don't all have to do the same things.
              We were all once "Average Users".

            • #2634956

              @bbearren,

              I’m currently running an image also and plan to test a restore as the system currently stands. If that works I may just leave things as they are.

              ———————————— UPDATE ——————————–
              After completing the Whole Drive Image I immediately attempted to restore that image. Of course since it contained the currently active partition it requested a reboot to complete the operation. IFW SUCCESSFULLY booted in recovery mode and did NOT request UserID or License Code as it had previously when I attempted to do it manually. So for Now I’ll leave things as they are but I may mess around with the BootIt Bare Metal BCD Editor JFK!
              ———————————————————————————–

              If not, I plan to do the following:

              1. Install Bootit package I bought with IFW and see if I can successfully edit the Boot Records.
                ———————————— UPDATE 2 ——————————
                I’ll admit it this was WAY ABOVE my pay grade. Reminds me of when learning a couple of programming languages I decided to give Assembler a go, BIG MISTAKE!
                ———————————————————————————–
              2. Nuke the whole system and see if I can load W10 Pro 22H2 from scratch.

              If all that fails I’ll just reload the image I’m currently making and call it a day!

              Thanks again for all your help on this. I’ve learned quit a bit along the way about BCDEdit and DiskPart.

              May the Forces of good computing be with you!

              RG

              PowerShell & VBA Rule!
              Computer Specs

              1 user thanked author for this post.
            • #2635334

              This is a long one. After completing the full drive image, I booted my E5420 into BootIt Bare Metal, deleted the 16MB partition, used Slide to get its free space behind the OS partition, used Resize to extend the OS partition, edited the BCD store, and rebooted.

              “Your device ran into a problem and failed to start. We’ll restart for you.” Twice. Next, “Preparing Automatic Repair”. Automatic Repair gave me the options of Restart or Advanced options. I chose Restart. It failed to start again, but went into Automatic Repair next, skipping the second try.

              My TBWinRE was still intact, so I used the TBLauncher to open Command Prompt.

              bootrec /rebuildbcd completed successfully, found C:\Windows, and I typed “Y” to add it to the BCD store.
              bootrec /fixmbr completed successfully.
              bootrec /fixboot got “Access denied”, so I booted into my TBWinRE USB thumb drive and launched Command Prompt.

              First I changed directory to C: to see if that was shown as my OS partition. Depending on how many partitions are on a PC, C: might not always be Windows from the Recovery Environment. On my dual boot daily driver it’s never on C:, and I have to go down the alphabet to find it. On my laptop, it was indeed C:.

              I ran the bootrec /fixboot and got the “… completed successfully.” But when I tried to boot into Windows, “No bootable device was found.” I started going back and forth, but I kept having issues with my USB thumbdrives not getting recognized. Many a false start later, the bootrec /rebuildbcd could find my Windows installation, but after typing “Y” it couldn’t be found.

              After all the fiddling with thumbdrives and repeatedly going into the UEFI setup, I decided to do a clean install of Windows to get the EFI and BCD sorted, and then restore my original OS. The Windows 11 installation thumbdrive would not boot. I decided that heat could very well be an issue (I’d been at this a couple or three hours) and shutdown for the night.

              The next morning my laptop booted the installation thumbdrive just fine, but I got the unsupported PC rejection. On this laptop I had gotten to Windows 11 23H2 via Windows update by way of some registry fixes; I’d never tried a clean install. So I prepared a freshly downloaded ISO with Rufus v3.17 (v4.4 doesn’t have the necessary options). I had a hiccup, mainly due to the age of my Dell Latitude E5420 purchased in 2011, and forgot to change boot settings for the first reboot. It tried to boot back into the thumbdrive, so I started over, and kept an eye on it this time. The “no@thankyou.com” Microsoft account dodge still works, so I got Windows 11 23H2 installed.

              Next I booted my TBWinRE thumbdrive and restored the original OS. Now I could start again on removing the MSR partition (yes, the installation put it back). I was looking for better luck this time after all the practice I just got in. Alas, it was not to be. The restored OS image would not boot, either. I shut down, pulled the SSD from the laptop and stuck it in my NAS drive dock (faster than going through my LAN). I restored the full drive image to it, put it back in the laptop, powered up, and it would not boot into Windows. Of course it is unsupported hardware, over thirteen years old, but that was the installation, same EFI partition that was indeed working. I was booted into it when I created the full drive image.

              It has been a lot of years since I’ve done a clean install for keeps (I’ve done some just to be able to restore a drive image over it), but that’s what I’ve decided to do. The E5420 shipped with a dual BIOS/UEFI, factory installed with Windows 7 Pro in BIOS/MBR. I changed over to UEFI when Windows 8 dropped, so I could upgrade but mainly to get comfortable with UEFI. The laptop has been a real workhorse for me, so I’m going to keep it going with a clean install of Windows 11 Pro 23H2. I have all of my data and software installation files to get it back to where it was.

              That venture will be in another thread; how I’ll set it up, what I’ll keep and what I’ll trash, along with the why and how.

              I’m still intrigued by the phantom WindowsRE, and where it’s coming from. I’m not giving up on that, just taking a detour for a while.  Maybe I’ll get some inspiration/insight along the way.

              Always create a fresh drive image before making system changes/Windows updates; you may need to start over!
              We all have our own reasons for doing the things that we do with our systems; we don't need anyone's approval, and we don't all have to do the same things.
              We were all once "Average Users".

              2 users thanked author for this post.
            • #2635472

              It has been a lot of years since I’ve done a clean install for keeps (I’ve done some just to be able to restore a drive image over it), but that’s what I’ve decided to do.

              Well, partly.  I slept on it, and when I woke up this morning, I got a nagging feeling that there was something I had overlooked.  Image For Windows has never failed me, so the failure point must have been me, which is almost always the case in my spelunking into Windows innards.  I already had a clean install of Windows 11 Pro 23H2, so I decided to start from there.

              First, I installed Image For Windows in the clean install.  Next, I incorporated IFW into the fresh WindowsRE.  Which, for the curious, is 768MB with a clean installation of an ISO downloaded 2/6/2024.  Then I did Shift+Restart and booted into the TBWinRE.  I restored the OS image from my NAS (took only 8 minutes for just the OS restore) and after the restore, exited IFW and clicked on the “Continue to Windows” button.

              I was expecting it to fail to boot, and it did fail, but the fallback was still in the TBWinRE.  I clicked through to open Command Prompt, and used the following steps instead of the steps in #2634586.

              I used DISKPART to assign a drive letter (Z) to the EFI partition, then exited DISKPART.  Back in X:\Windows\System32, I typed “z” (WTQ) and hit Enter.  The prompt was now Z:>.  From there I used cd to get to Z:\EFI\Microsoft\Boot>.  That’s where BCD is located.  Here are the steps (I’ve included the prompt for emphasis on where you need to be):

              Z:\EFI\Microsoft\Boot> bootrec /fixmbr
              Z:\EFI\Microsoft\Boot> bcdedit /export c:\bcdbackup
              Z:\EFI\Microsoft\Boot> attrib bcd -h -r -s
              Z:\EFI\Microsoft\Boot> ren bcd bcd.old
              Z:\EFI\Microsoft\Boot> bootrec /rebuildbcd

              You’ll get acknowledgement on some, not on others.  On the last command, it found my Windows installation, I typed “y” (WTQ) and this time it completed successfully.

              I exited Command Prompt, clicked on the “Continue to Windows” button, and my restored drive image booted successfully.  I haven’t tackled removing that 16MB partition yet, but I’m thinking that if I use this same procedure, it should be successful.

              ———————————— UPDATE ——————————–

              Nope.  For whatever reason, my E5420 has to have that partition.  I could not get it to boot.  I tried 16MB of free space between the EFI partition and the Windows partition, and that wouldn’t boot.  So I created a partition, no format, no System Reserved state, just a RAW partition.  Windows boots up just fine.  Another puzzle, but I’m just gonna leave this one be.
              ———————————————————————————–

              I’m reasonably sure that removing the attributes from BCD was the key to success in getting my restored OS to boot.

              Always create a fresh drive image before making system changes/Windows updates; you may need to start over!
              We all have our own reasons for doing the things that we do with our systems; we don't need anyone's approval, and we don't all have to do the same things.
              We were all once "Average Users".

              1 user thanked author for this post.
            • #2635478

              Well, I’m glad it wasn’t only me having these weird problems with thing booting.

              May the Forces of good computing be with you!

              RG

              PowerShell & VBA Rule!
              Computer Specs

    • #2633950

      For Windows 11 22H2 and 23H2, the WinRE update came in KB5034123.

      WindowsRE-1

      Note that the modified date is 1-31-2024.  That is when I ran the Image For Windows utility to incorporate IFW v3.64 update into Windows RE.  Before I started all of this finagling to try to figure out what was going on with two different Recovery Environments, I tucked away a copy of WinRE.wim from my Recovery Environment, as well as creating a fresh drive image in case I threw a clod in the churn.

      WinRE-File

      This file already has IFW in it, which was done back in December when IFW had updated to v3.63.  Note that the modified date is 1-9-2024, when I ran Windows Update.  The creation date of 5-7-2022 puts its heritage with Windows 11 22H2.

      Always create a fresh drive image before making system changes/Windows updates; you may need to start over!
      We all have our own reasons for doing the things that we do with our systems; we don't need anyone's approval, and we don't all have to do the same things.
      We were all once "Average Users".

    • #2634362

      bbearren,

      I reorganized the OP as it made it look like I was showing the updates for W11 when they were for my W10 laptop.

      May the Forces of good computing be with you!

      RG

      PowerShell & VBA Rule!
      Computer Specs

      1 user thanked author for this post.
    • #2635481

      After the failure of KB5034441 I got Winre.wim in C:\$WinREAgent\backup

    • #2635511

      Ok, based on @bbearren recent post I decided to try a complete reinstall of W10 Pro 22H2. In the process I discovered an interesting quirk in Windows Setup.

      I had to turn off Safe Boot to get my Dell Laptop to recognize the USB 3.0 thumb drive I had created with the Media Creation Tool. Once installed Windows FAILED to boot saying it couldn’t find a boot drive. Scratching my head I thought what if I turned Secure Boot back on? Sure enough the machine booted.

      And the adventure continues!

      May the Forces of good computing be with you!

      RG

      PowerShell & VBA Rule!
      Computer Specs

      1 user thanked author for this post.
    • #2635585

      Ok here’s the progress so far:

      • Successfully reinstalled Win 10 22H2 from scratch, deleted everything in the install process.
      • Loaded Home…Changed the product key to get Pro.
      • Installed IFW immediately and tested.

      So here are the test results.

      • Windows installed a 546MB Recovery partition #4.
        SSD-Setup-on-Windows-Install
      • Booted into the recovery environment and successfully got to IFW.
        However, the process is the same as when I thought things were broken, e.g.:

      Screens in order:

      • Chose an Option
      • Troubleshoot
      • Advanced Options
      • Command Prompt
      • System Restarts
      • Command Prompt with the IFW side bar.
      • Starting IFW asks for the license credentials…at least now they are accepted!

      However on my 2 Windows 11 machines:

      • Choose an Option screen contains the IFW sidebar.
      • Starting IFW does NOT ask for license info.

      I have no idea why the process is different…

      Next steps:

      • Resizing C: to make room for my Data Partition and Expanding the Recovery Partition.
      • Testing that the RC still works.
      • Restoring the Data partition.
      • Installing all my software, will mostly be done with PowerShell using WinGet.
      • Re-establishing my scheduled tasks which will again be done using a Powershell program I created.
      • Of course testing as I go and creating periodic Images.

      May the Forces of good computing be with you!

      RG

      PowerShell & VBA Rule!
      Computer Specs

      1 user thanked author for this post.
      • #2635601

        Starting IFW asks for the license credentials…at least now they are accepted!

        RG, in \Program Files\TeraByte Drive Image (or \Program Files (x86)\TeraByte Drive Image, if that’s where you installed it) look for ifw.ini, right click & select Edit.  It should have an entry

        [LICENSE]
        ProductKey=<your product key>
        User=<your licensed name>

        If those lines aren’t populated, that’s why it’s asking for your credentials.  For me, when I’m running an IFW script, if the license screen comes up, those are filled in with my name and product key, and I just click Next.

        If your ini file is missing your credentials, you can edit them in, then re-run the script to create TBWinRE.  It will say up to date, but you have the option to run it again.

        It doesn’t ask for your license and key in Windows because the registry has them.

        I have no idea why the process is different…

        Check my update in #2635472.  My dual boot desktop and my NAS run just fine without the MSR partition, but my laptop will not boot Windows without a partition between the EFI partition and the OS partition.  Could be because of the dual BIOS/UEFI firmware it was built with.

        Always create a fresh drive image before making system changes/Windows updates; you may need to start over!
        We all have our own reasons for doing the things that we do with our systems; we don't need anyone's approval, and we don't all have to do the same things.
        We were all once "Average Users".

    • #2635604

      Ok Y’all,

      To continue from 2635585

      Using Niubi Partition Editor Pro for partition adjustments:

      • Shrank C: to make room for my Data Drive (G:) and increase the Recovery Partition to 1Gb.
      • Increased the Recovery Partition from 546Mb to 1Gb.
      • Tested that I could still get into the recovery environment and start IFW. Successs!
        SSD-Setup-on-Windows-after-Repartitioning
      • From the recovery environment IFW will not see my USB drive dock!.
      • IFW sees the USB drive dock just fine from both Windows and the IFW USB recovery drive!
      • Used IFW to restore the G: (Data) drive.
      • Loaded MS 365.
      • Imaged the entire drive.

      Enough for tonight off to bed don’t want to make any of those late night mistakes!

      May the Forces of good computing be with you!

      RG

      PowerShell & VBA Rule!
      Computer Specs

    Viewing 14 reply threads
    Reply To: Windows RE — Curiouser and Curiouser

    You can use BBCodes to format your content.
    Your account can't use all available BBCodes, they will be stripped before saving.

    Your information: