
WINDOWS 7 SYSPREP RECOVERY AND INSTALL MEDIA FOR CLEAN INSTALL POST WIN7 EOL
Well most of you have seen the OEM system reinstall disks that retail for your machine to its original “left the factory” state but they aren’t updated at all and sell for about $40-50 plus shipping. Well you can make your own for a clean install if disaster should strike and fully updated with or without the Patches or updates for telemetry that you don’t need etc.
Whilst I am not expecting that M$ will move updates from Win 7 from availability, a clean install will typically take about 4 hours of updating and just north of 2.3GB’s of patches to install. Which is not good if you need to be up and running quickly and that’s on an x64 Machine. Yes of course you can use Macrium and other recovery Software but there are times when a clean install is the best way forward. Whilst this is typically “Machine Specific” method it will work on similar Machines in an OEM’s product range or other brands with similar system Arch.
UEFI users already know you will have to DISABLE Secure Boot from here on in during install and testing phase
Create a partition on your Win 7 Machine (any version or any x86 or x64) or VHD for the more adventurous of you (will only work for Ultimate and Enterprise editions) of about 40-50GB’s especially if your going to test later (advisable) Smaller HDD or SSD machines see later on in this topic.
Ingredients: Choose as required: –
https://www.7-zip.org/download.html
https://www.autoitconsulting.com/site/software/gimagex/ (Gimagex)
https://www.stahuj.cz/utility_a_ostatni/zalohovani/vdism/?&g%5Boz%5D=2.0 (VDISM)
https://www.microsoft.com/en-ca/software-download/windows10 (Win7 UEFI Installs only)
(Win 10 .ISO en-us x64 Any Home or Pro pretty much all the same install media preferred here for Win7 UEFI install as it side steps the USB3 Drivers and looking for Drivers stalled install and can actually boot UEFI with Secure Boot disabled of course)
Install Win 7 or Apply with DISM to that partition or VHD (Note Win 7 Does not support VHDX’s) Boot to this Screen (fig1) (DISM will need to use the bcdboot cmd’s to get the applied image to work)
Fig 1
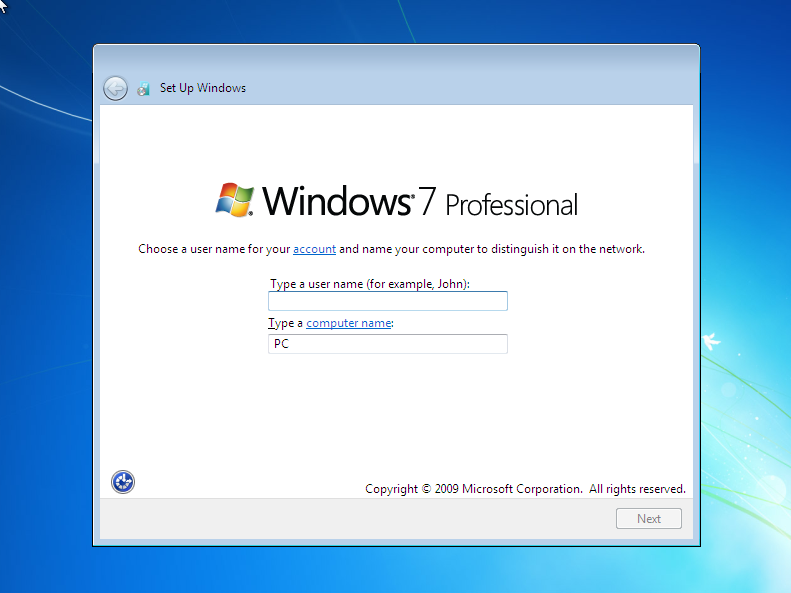
When you reach the above Screen (fig1)
Press CTRL+SHIFT+F3 that will take you, via a reboot straight to the desktop without creating a USER account.
**LEAVE THE SYSPREP OPTIONS BOX ALONE YOUR NOT READY FOR THAT JUST YET, IGNORE IT UNTIL LATER**
You can reboot many times as many times as you need the SYSPREP Options will come back each time. (if you lose it or you inadvertently hit cancel you can bring it back looking in Windows->system32->Sysprep folder.
This where you customise your image how you want to and update as you see fit.
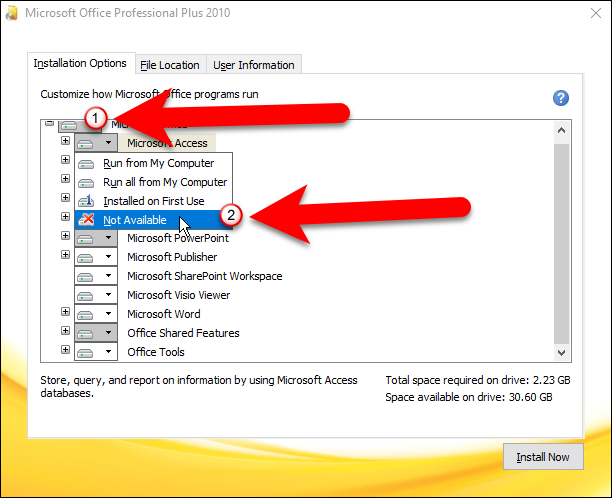
Office 2010, 2013, 2016 Note Office 2019 is Win 10 Only, to install so as to keep the “Captured Image” to a minimum Select “Installed on first Use.” (see fig2) To Check Install and get updates Install Word Normally, open after install, Select “UPDATE” (This will change your Windows update Settings to M$ Defaults) So if you’re not ready to install Office Updates, or you wish to update the Win 7 OS 1st, then leave it to later, Or if you do, go IMMEDIATELY to Windows update page and reset to your favoured settings. There will be plenty to install, adding Office updates makes for a lot at one go to go through. Needless to say, to keep the image size down select only the features you will use, or want to use in the future.
Goes without saying, when you start the Update Search you can exclude what you wish albeit Telemetry, Snoops your own reviled patch’s or the patch’s that simply come with a health Warning, those that used kb3125574 for convenience or to simply to get the System to boot or install UEFI will be along for the ride alas. No doubt most people will be hiding the 15 or so Iterations of Silverlight well as many get offered before you capture, kb971033 is a must miss as well, not really a problem but more of a potential problem down the road even for legitimate users with Keys.
Fig2
DRIVERS
Your own 3rd Party self-executable’s that can be run from the desktop.
For folks having problems looking for Drivers for a specific Machine try this site:
https://www.driverscape.com/
Look up your machine, OS and Drivers, its free however avoid the Driver utility and virus malware check all downloaded Items as a matter of course. It’s pretty good but not infallible however.
http://www.julien-manici.com/windows_7_logon_background_changer/
Change your log in Screen appearance.
WIN 7 UPDATES SPEED UP
https://www.catalog.update.microsoft.com/Search.aspx?q=3138612 (from Desktop NET OFF)
https://www.catalog.update.microsoft.com/Search.aspx?q=947821 (from Desktop NET OFF)
http://wu.krelay.de/en/ (alternative method windows update speed up to the above)
Using kb312557 aka unofficial SP2 roll up
https://www.catalog.update.microsoft.com/Search.aspx?q=3020369
install 1st from Desktop (NET OFF)
https://www.catalog.update.microsoft.com/Search.aspx?q=3125574
install 2nd from Desktop (NET OFF)
IE11 & MSIE .NET DOWNLOAD LINKS
https://support.microsoft.com/en-ca/help/18520/download-internet-explorer-11-offline-installer
https://docs.microsoft.com/en-us/dotnet/framework/install/on-windows-7
https://support.microsoft.com/en-ca/help/14210/security-essentials-download
https://support.microsoft.com/en-ca/help/4054530/microsoft-net-framework-4-7-2-offline-installer-for-windows
AV’s MALWARE ETC
Needless to say, if you install your own favourite AV or Malware Progs you’ll have to check if it’ll install in a SYSPREP image, in all likely hood Microsoft Security Essentials Support will end with Win 7 EOL save the odd occasional update.
https://www.howtogeek.com/howto/15788/how-to-uninstall-disable-and-remove-windows-defender.-also-how-turn-it-off/
https://www.raymond.cc/blog/download/did/1984/ (Removal)
Well there’s a few steps for you’ll need to save those customised Drivers or 3rd Party Drivers for your image just set the following REG key:
HKEY_LOCAL_MACHINESOFTWAREMicrosoftWindowsCurrentVersionSetupSysprepSettingssppnp set PersistAllDeviceInstalls to 1. (see link below)
https://social.technet.microsoft.com/Forums/en-US/6054fb2b-df43-4c8a-a1f1-e811360f2d5b/sysprep-delete-all-custom-drivers?forum=w7itproinstall (See 2nd post for correct Registry location)
Admin CMD prompt type WINSAT PREPOP to preserve your Win Aero settings.
Disable Windows Media Player Network Sharing Service Run-> Services-> Windows Media Player Network Sharing Service, set to disabled (can cause problems strangely not this time, just remember to enable after install in the future)
Delete the M$ Pictures, Sounds and Videos optional to save space.
A complete Deep clean of all the update files, Temp and Log files etc You can use the Windows Utility (select all options) which takes a while or a free Utility, I use a Glary Free Version its quicker, and you seriously can be rid of, in my case, 4GB of old updates log files etc. Results in a bigger image later if you don’t, so why waste the time capturing stuff you don’t need?
Optional step, delete any Network access accounts or connections you have set up in the interim. I normally do if I am going to use on any other similar machines.
Make Sure your SYSPREP image is booting, rebooting in your preferred mode especially UEFI users and everything’s to your satisfaction. Last chance!!
Now you’re ready to close out and prepare your Win 7 Image for capture, you will have noticed the SYSPREP box floating around every reboot (fig3), now it’s time to use.
Fig3

1.You can select System Audit mode here but leave the enter OOBE (Out of Box Experience) Mode.
2.Generalise, if you tick this Box. That creates a base image that keeps your preferred image, customisations, updates BUT strips out all the useless stuff Hibernate folder deleted files etc. In effect a bare base customised image, if you wanted to save your image with a or your USER Account and customisations then don’t tick the Box (this will make for a bigger captured image however) I Generally tick or select this Box.
3.Reboot or Shut Down, your call here if you’re going to be poised or waiting by the machine then select Reboot, if you’re going to wander off for a Coffee or something then select shutdown. Nothing will happen until you get back and fire the machine up when it’s done.
Once it’s Started DON’T TOUCH ANYTHING let it do its thing, any last-minute thoughts, or changes, you may have. Then you need to boot back in to Audit Mode again (as above fig1) at the first OOBE Screen.
CAPTURE THAT IMAGE
For those on small HDD, SSD Machines its Decision time, you obviously have no space to create an additional partition, you can either put your Machine in Audit Mode, Delete your user account and capture as below by booting from a USB install Media with GIMAGEX copied to the root of that drive as per (fig4) or you can capture your image without the “Generalise” option selected.(fig3) this will make for a way bigger image and take longer.
Should any of you want to capture to a USB Stick make sure its large enough figure about 16GB’s (advised for all, especially small HDD and SSD users) as per (fig4) and you think your going to be running out of space, a little tip here just boot from the USB and go in your “Sources” folder and delete the install.wim file but NOTHING ELSE other wise it may not boot from the USB. Either way create an empty folder on the root of your USB call it “WIN7CAPTURE” anything you like and the file must be saved as install.wim .
Fig4
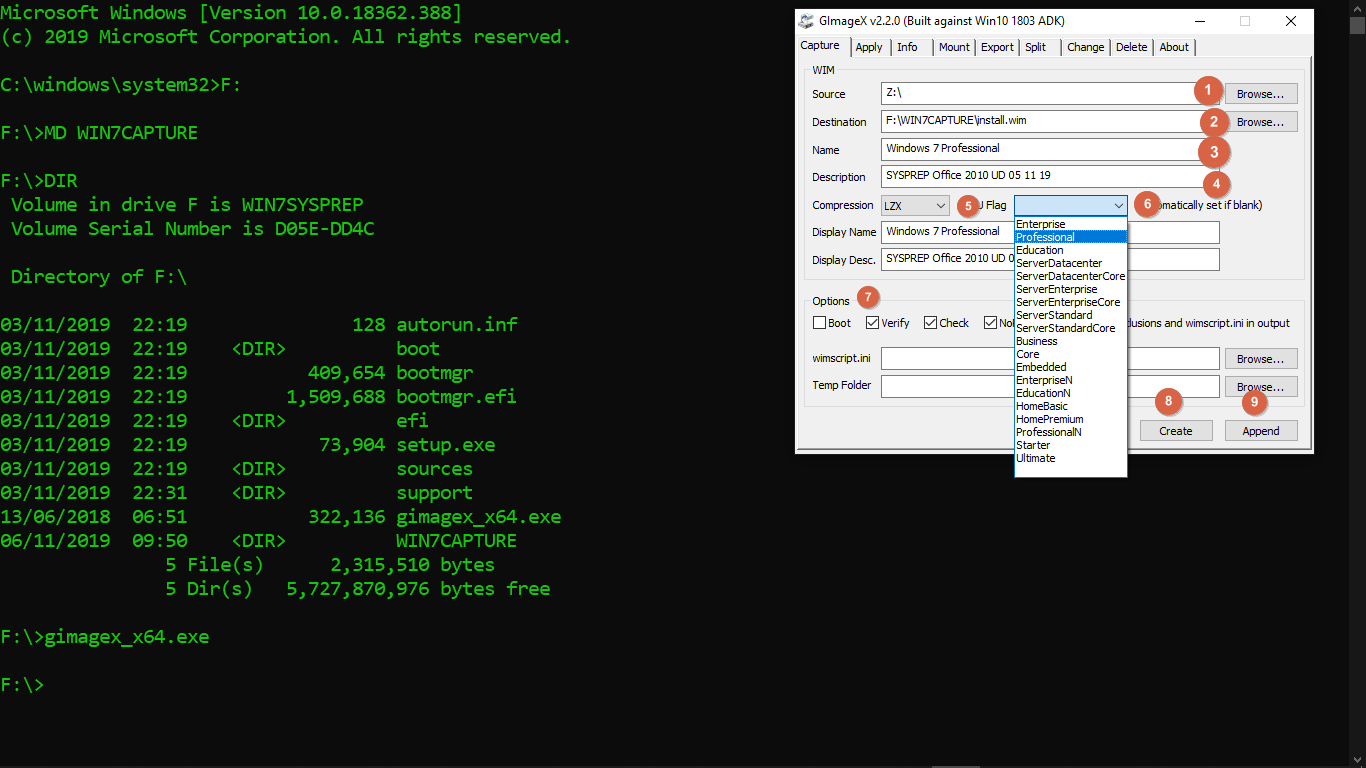
To get to the X:\ prompt boot from your USB stick, at the very first Screen, press SHIFT + F10 (done above in Win10 for clarity) Identify your Drive letter for the USB, F: (in this case)
Type MD WIN7CAPTURE (creates Directory or folder) then type gimagex_64.exe (in my example) or whichever gimagex version you have (after typing DIR) and DIR just shows the contents of the drive.
1. Partition or VHD to be captured.
2. Save location (file on your OS or folder on your USB browse to select) must be saved as install.wim
3. Name mirrored below if you wish
4. Description mirrored below if you wish (3 + 4 I always do prevent confusion later)
5. Compression leave LZX or select MAX
6. Set SKU I generally do although apparently its set by default.
7. Select Verify, Check, NoRPfix, not selecting Verify or Check will speed up the capture, but means capturing a potentially flawed image.
8. Create makes and install.wim
9. Advanced users who just wish Append or export to another WIMFILE.
For every one else who went the dual Boot way you can run GIMAGEX or VDISM capture from your Desktop in your original OS. Pretty much the same as the GIMAGEX settings above in (fig4) with either method it will take a while depending how much you have in your image. With Win7 Pro and Office 2010 fully updated it came to about 8GB’s (about a third less than 8GB’s for x86) and took about 90 mins.
That’s pretty much it apart from various caveats and nuances.
For Win 7 x86 and x64 users that wish to boot MBR, extract your Win7 media to a folder, copy your new WIMFILE to the Sources folder, taking care to delete, the existing ei.cfg, all the .CLG (catalogue files) and the original install.wim. Make in to an .ISO and you can use Rufus with MBR settings to create a USB.
Win7x64 UEFI there’s a few more hoops to jump through. I know Rufus is supposed to be able to handle files over 4GB’s, but here it doesn’t and a suspect on a great many other machines as well. So, you’ll have to SPLIT the WIMFILE, either with GIMAGEX or VDISM can do that effortlessly and quick too, files must be saved with the install.swm (.SWM extension) can even be in the same folder if you wish.
Copy the install.swm files to your extracted Win10 media, taking care to delete the original install.esd or install.wim. Make in to an .ISO and Create a USB stick with UEFI GPT (fat32) settings.
Using a Win10 media it may ask for a key during install, you can safely select “I don’t have a key” and it should carry on installing.
For users wishing to SYSPREP multiple images, say Professional and Ultimate, run the SYSPREP method above on the LOWEST version, then copy the resulting WIMFILE to another folder, create an empty folder call it “Mount” Mount the (copied) WIMFILE and use VDISM, “Get Target Editions” then select Set the Edition you wish (note from Professional you will only be able to select Ultimate but Home Basic you’ll have a choice of 3 higher Editions to change to) then set Edition you wish (enter manually), labelling as you require, unmount and COMMIT (important don’t select discard as the changes won’t be saved) then export or Append to the original Captured WIMFILE. On a clean install you should be presented with the choice of versions.
Happy testing.
-
This topic was modified 5 years, 7 months ago by
.
-
This topic was modified 5 years, 7 months ago by
-
This topic was modified 5 years, 7 months ago by
-
This topic was modified 5 years, 7 months ago by
.
-
This topic was modified 5 years, 7 months ago by

