• HP all-in-one printer in Mint

    Home » Forums » AskWoody support » Linux for the Home user » Linux – all distros » HP all-in-one printer in Mint

    Author
    Topic
    #2012808

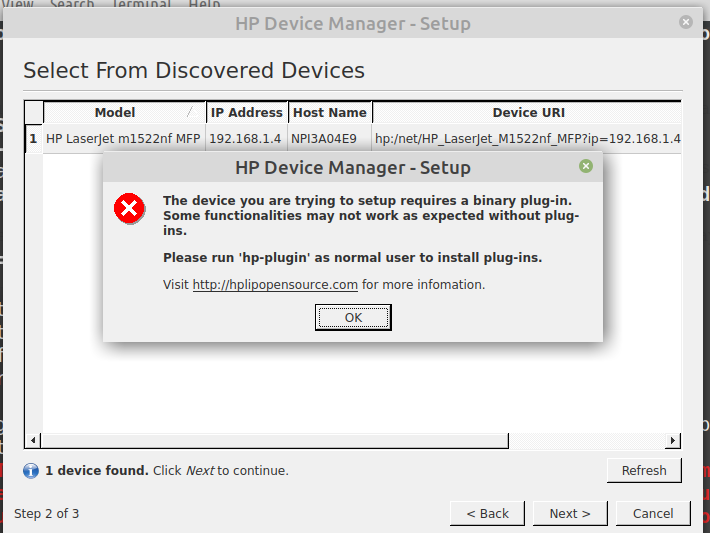
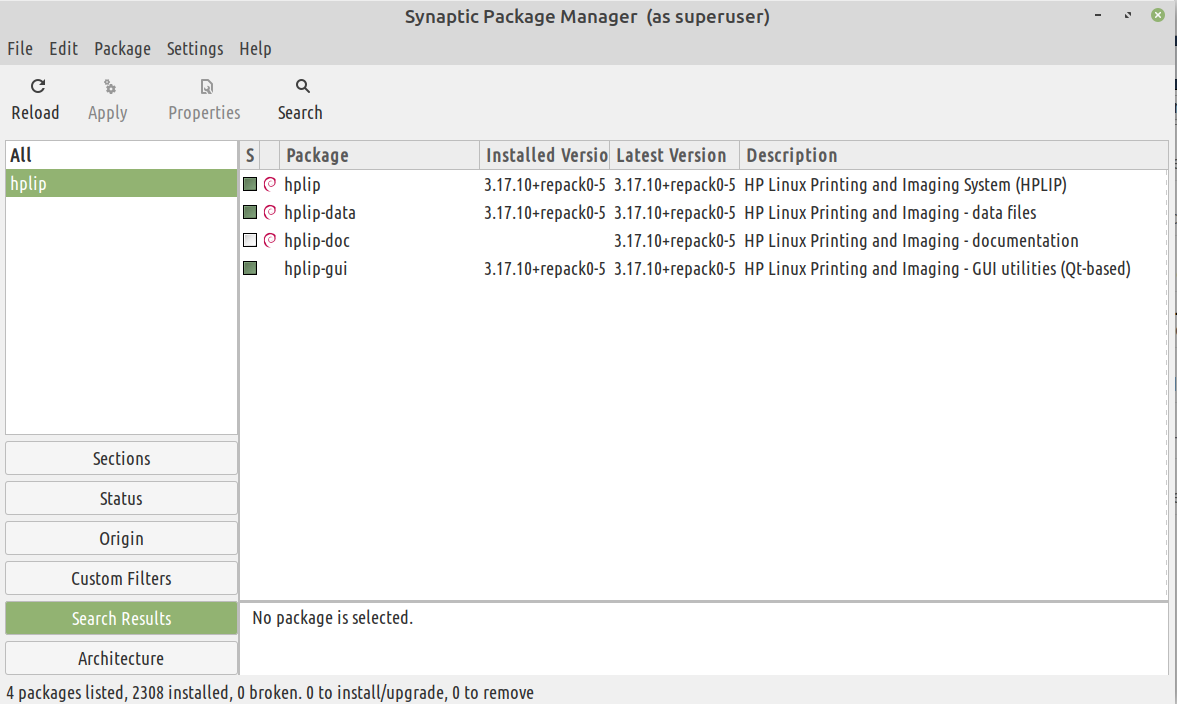
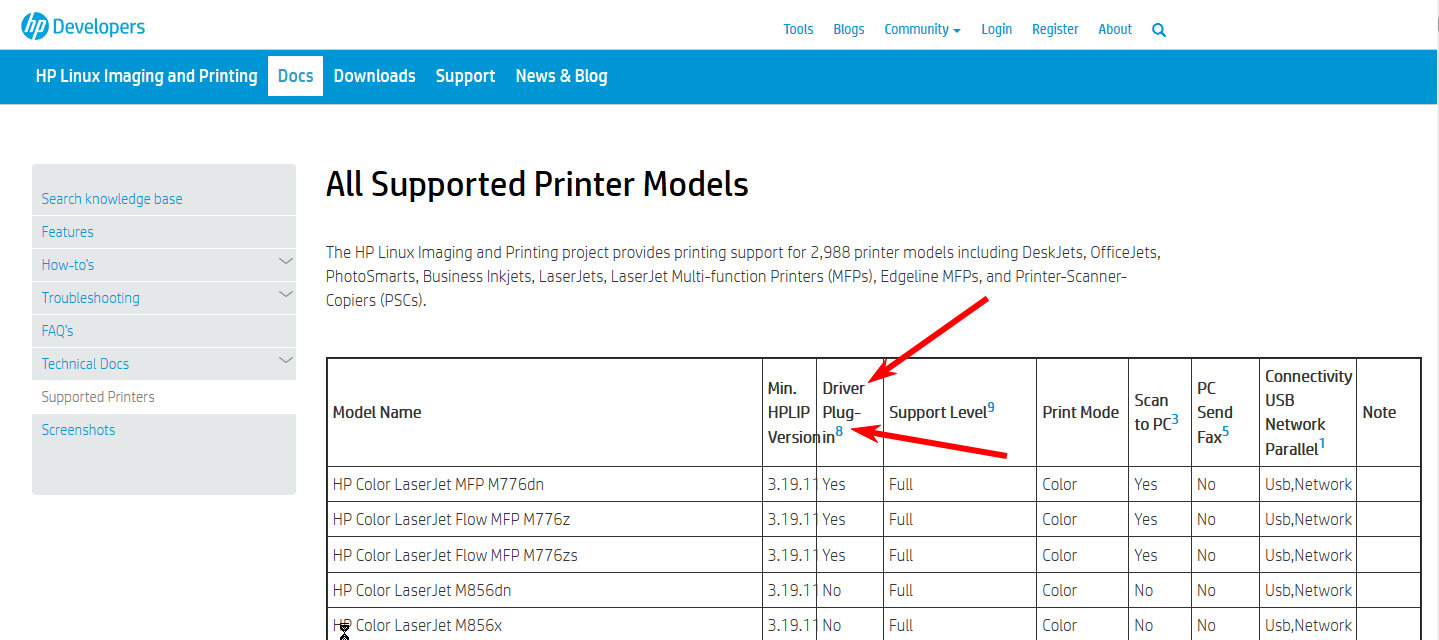
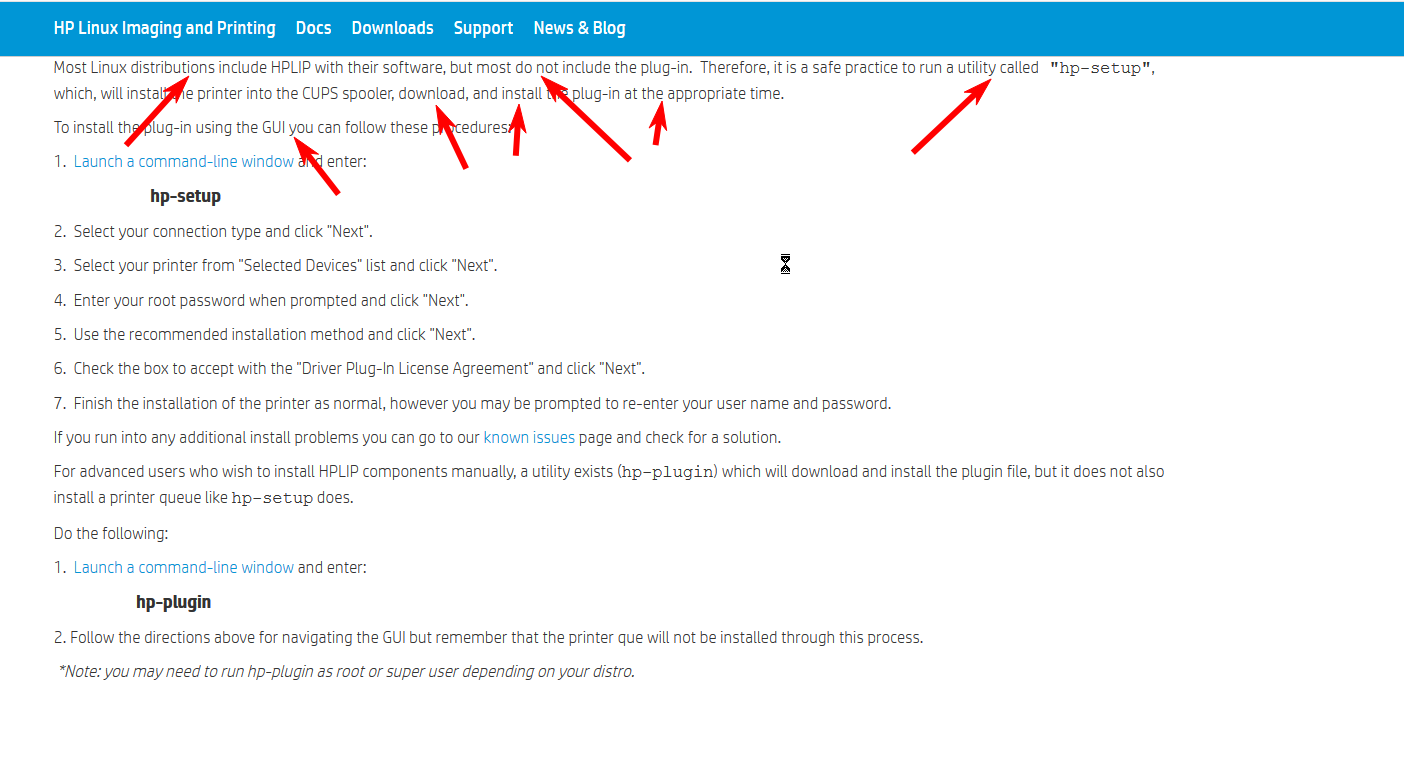
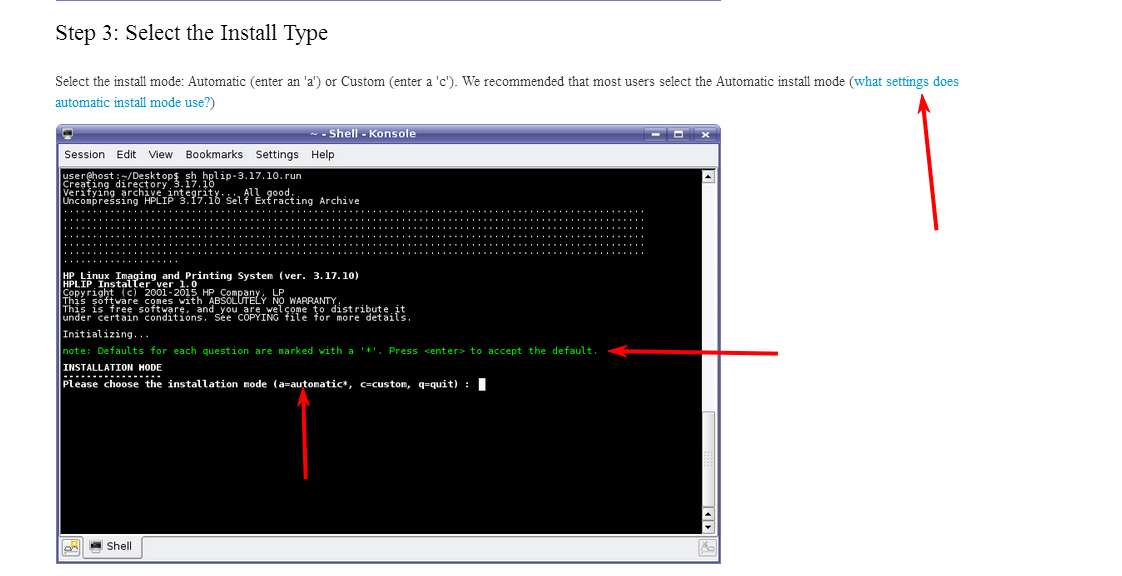
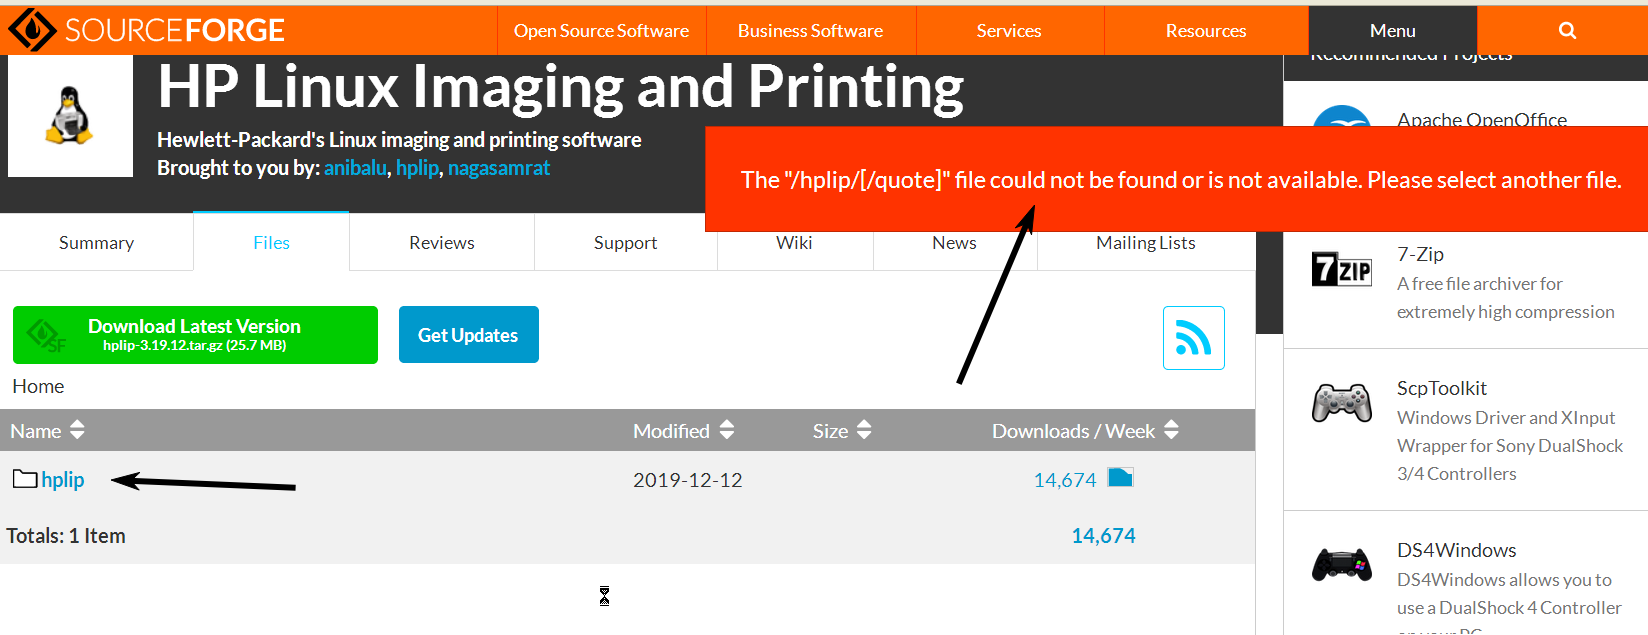
    As a newcomer to Mint (and a “never 10″ user), I’m finding a lot to like, even as I occasionally struggle to get fully up and running.  Mint automatically found our network HP LaserJet M1522nf multifunction printer and installed the printer driver from the repository, but a plugin is needed, per the HP site, to enable scanning for this model.  There are instructions on the site to do this:

    HP-printer-plugin


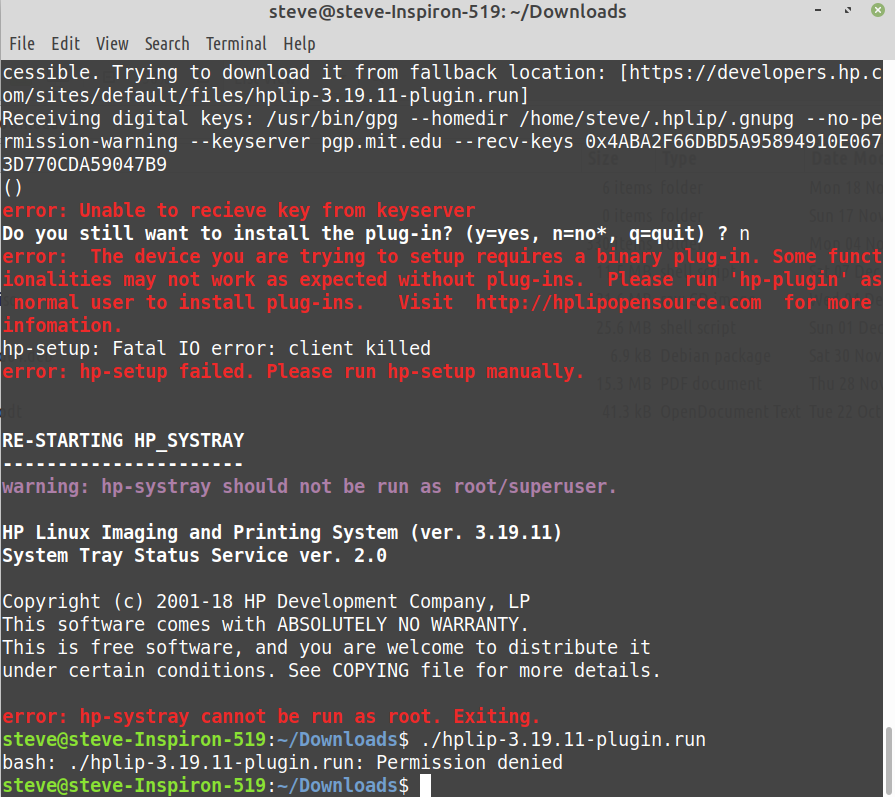
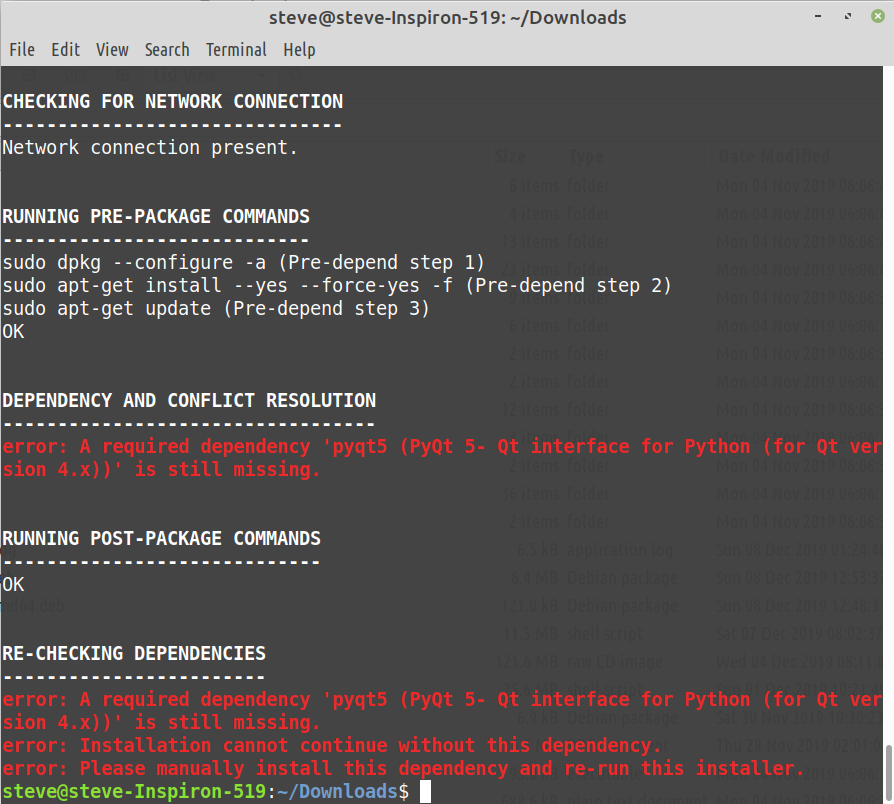
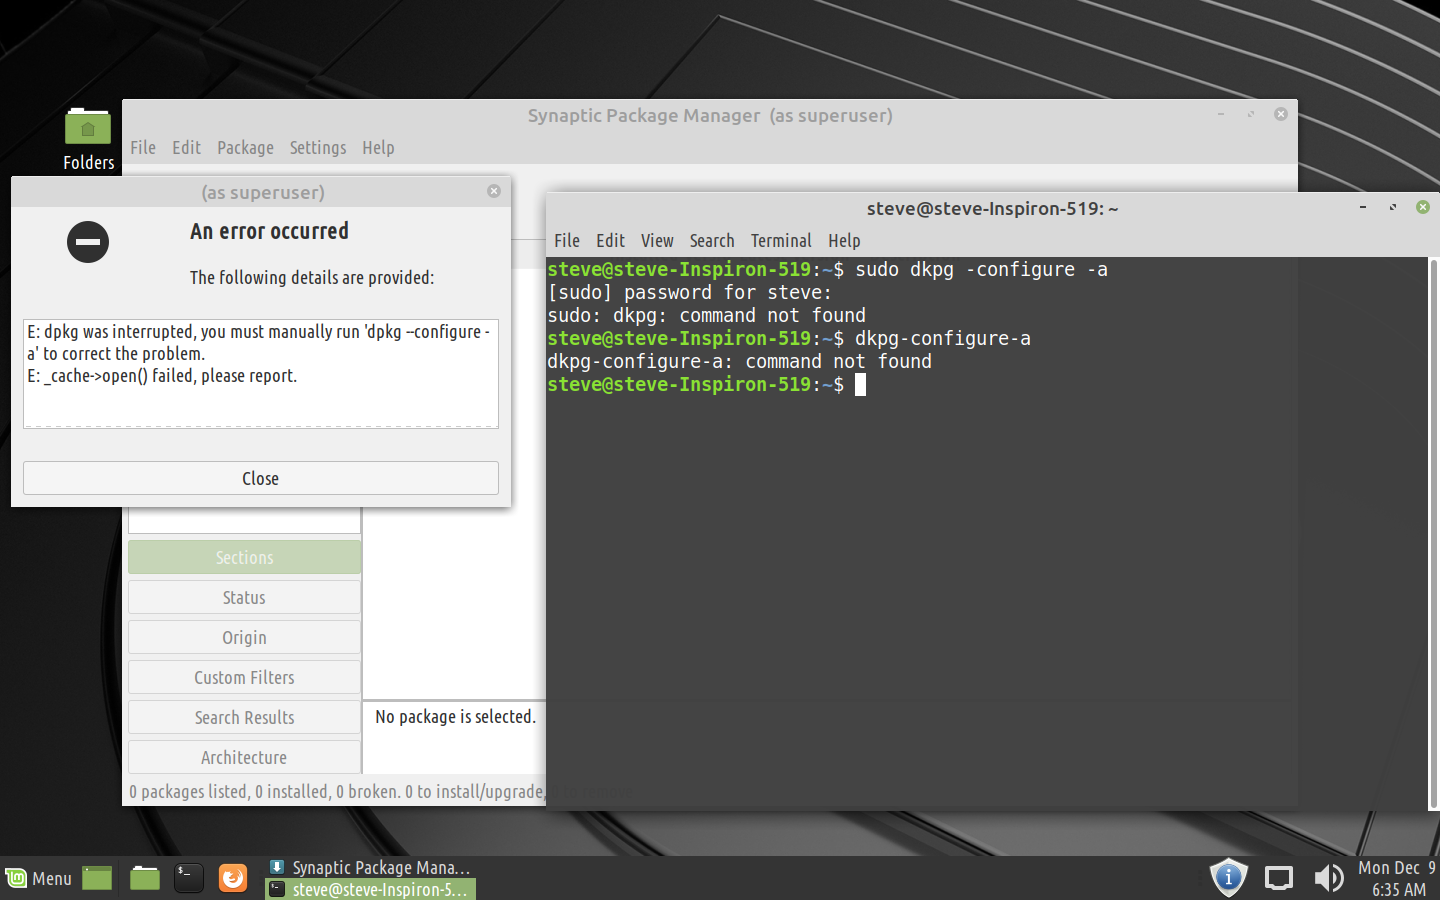
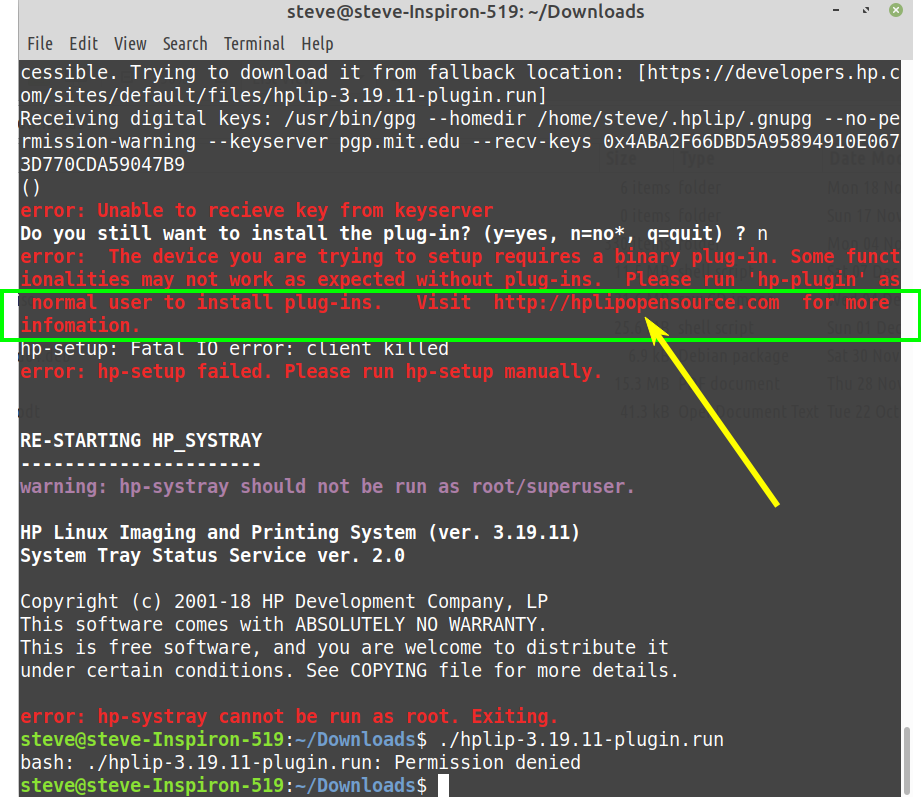
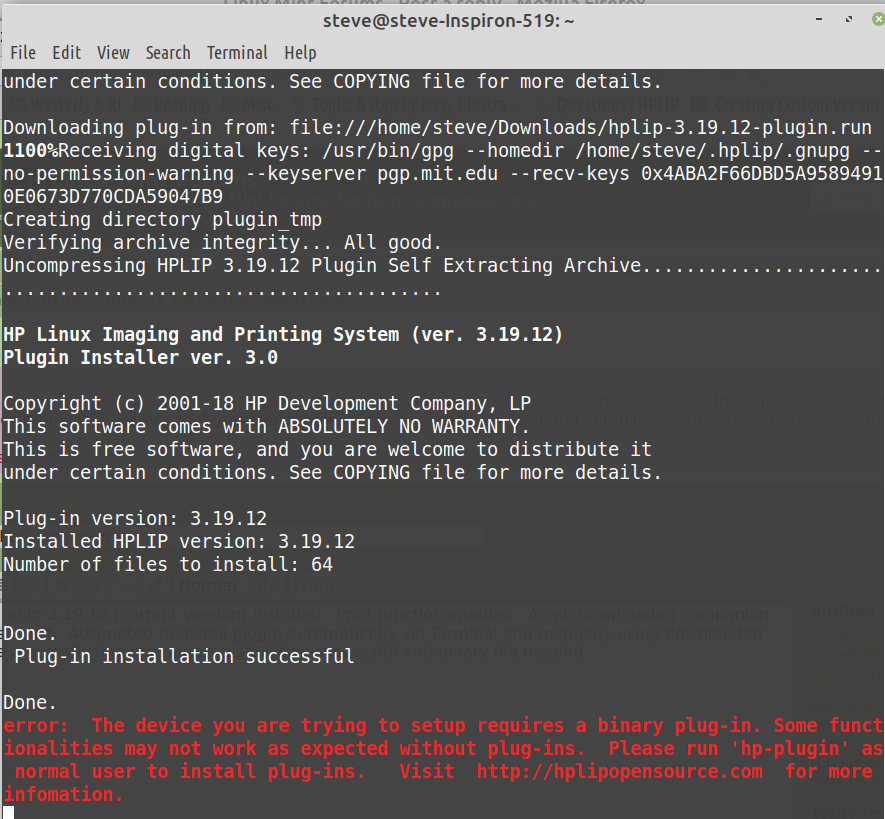
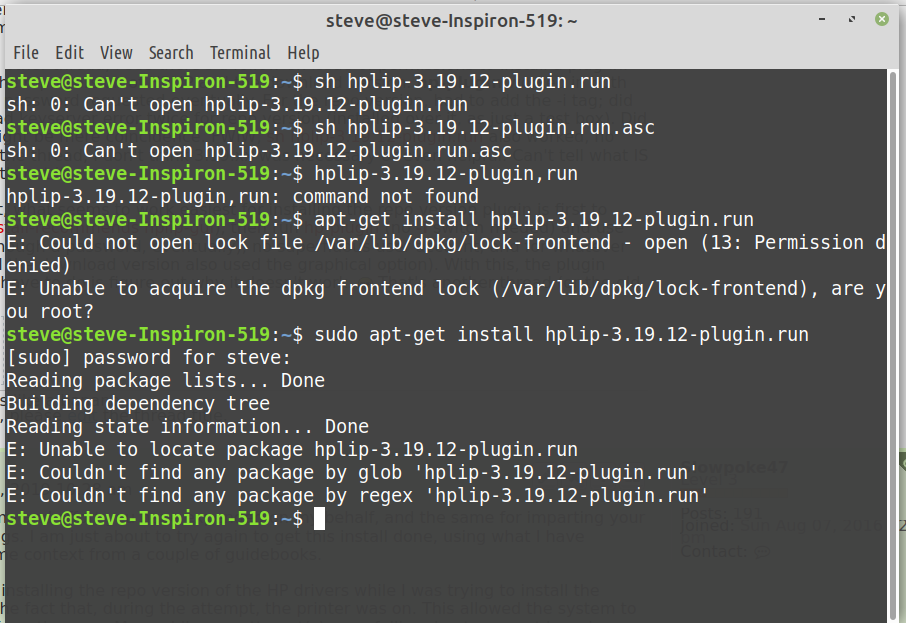
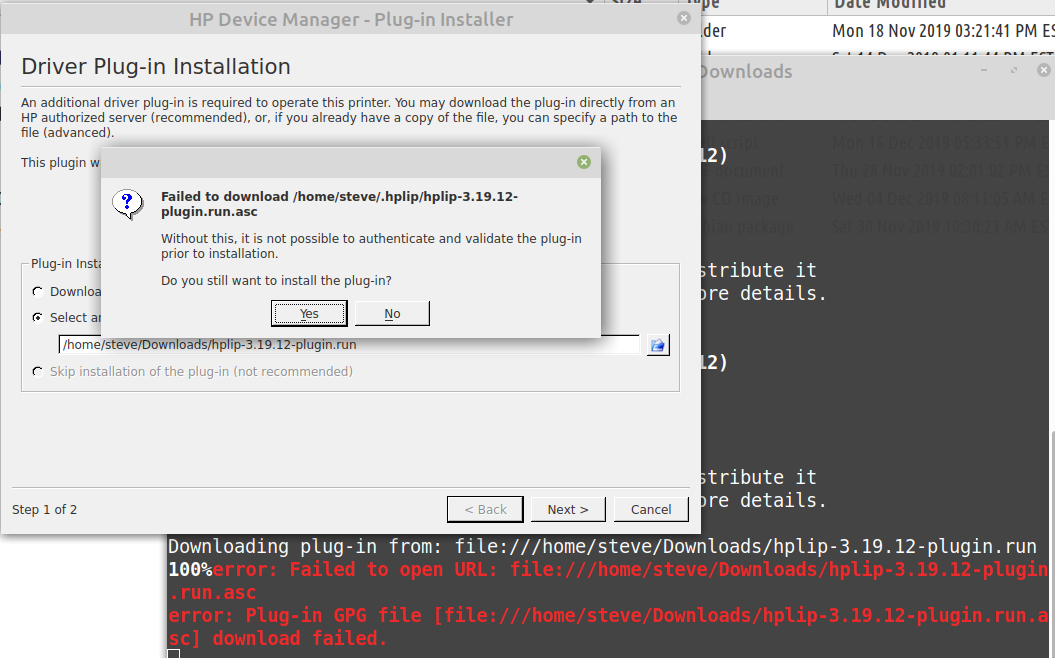
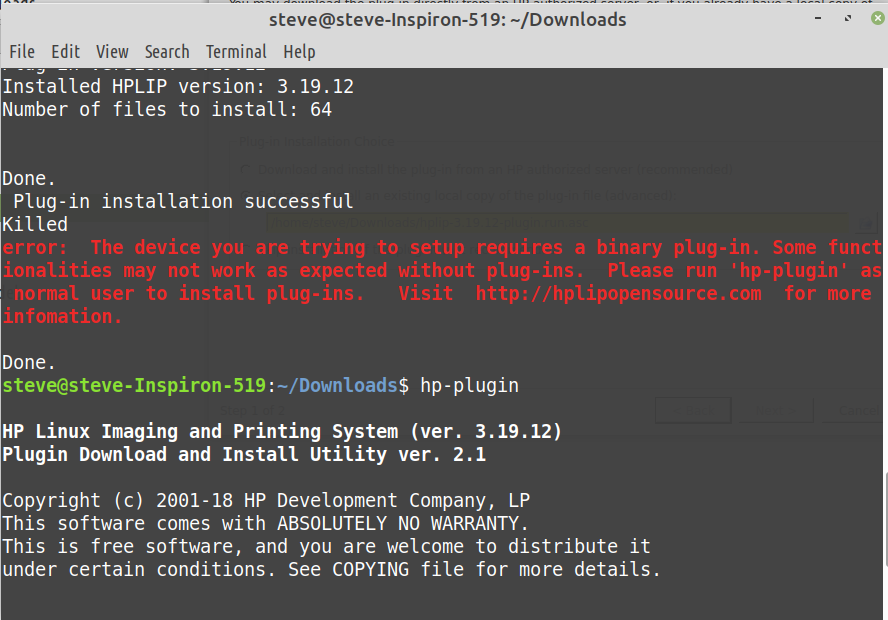
    However, when executing the Terminal commands, the result was:

    Terminal-re-plugin
    This page on the HP site has a 10 year old date, so the stated sequence apparently is obsolete.  Anyone have a suggestion?

    1 user thanked author for this post.
    Viewing 97 reply threads
    Author
    Replies
    • #2012901

      Can you see the installer “hp-setup”? Use ls to view files.
      Does “hp-setup” have executable status? (rwx)

      cheers, Paul

      1 user thanked author for this post.
      • #2012925

        Thanks for posting- not savvy enough to understand what you are saying:-(

    • #2012908

      Yep, that is the correct version. Can you in the terminal window type hp-se and press the tab key to see if it will autocomplete?

      Do you also have the hplip-data package?

      Have you tried using Mint’s image scanning program to see it that already works?

      1 user thanked author for this post.
      • #2012926

        Thanks for the suggestions.  hp-se (tab) goes nowhere.  (enter) from there shows command not found.

        hplip-data not found in search of package manager.

        Scan function not enabled.

        Most recent printer driver is v.3.19.11, per HP site.  But, also per HP, the version currently installed should support scanning with the plugin added.

        • #2013190

          Strange that nothing shows up, 3.17.10 is the latest version for Ubuntu 18.x Long Term Support based distributions.

          Usually in given instructions repository packages are installed with the ‘apt-get install‘ command, but apt should have installed something.

    • #2012981

      Perhaps someone with a greater level of understanding than mine could look at this link, which refers to plugins and installation options, and offer some wisdom…

      https://developers.hp.com/hp-linux-imaging-and-printing/KnowledgeBase/Class_Driver

      • #2013389

        This appears to give you the printing capability, but not the scanning capability.

        Just so you know, scanner functionality is usually the last thing to come along. That’s how it was with Windows, and that’s how it is with Linux.

        I have a Canon multifunction machine. Once I installed the printer driver on a Windows machine on my network, my Linux Mint machine could see it, and it was simply a matter of adding the printer. I didn’t have to install anything.

        Scanning was a different matter. I found a close-enough scanner driver for Debian Linux (that’s what Mint is based on) at the Canon Thailand website. I downloaded it and installed it, carefully following the instructions. Once I did that, I was able to scan by opening a terminal window and running the scanner command, so I created a launcher (a shortcut) on the desktop which runs the scanner command. It now works like a champ, simply by clicking on the launcher I created.

        Let me look around to see if I can find something for you.

        In the mean time, you could download and install VueScan in order to use your scanner:
        https://www.hamrick.com/vuescan/hp_laserjet_m1522.html

        I used it for my Canon, and it worked like a champ. You can use the free version as a test program to make sure your scanner will work with Linux; the free version puts a watermark on all scanned images. Or you can pay for the software to eliminate the watermark.

        Group "L" (Linux Mint)
        with Windows 10 running in a remote session on my file server
        1 user thanked author for this post.
    • #2013128

      Version 3.17.10 is not the latest version. The latest version is 3.19.11

      I had to manually upgrade to the latest version to get the scan function of my Office Jet Pro to work.

      Follow the instructions in the link.  The process takes a little while…

      https://developers.hp.com/hp-linux-imaging-and-printing

      1 user thanked author for this post.
    • #2013137

      Version 3.17.10 is not the latest version. The latest version is 3.19.11

      Yes, I discovered that as well.  I’ll give it another try tomorrow, but our printer is on the list of machines that require another plugin for scanning to work.  I dug into the HP site re that plugin until I got to some stuff about which I had not a clue.

    • #2013316

      our printer is on the list of machines that require another plugin for scanning to work.

      Possibly if I can get that most recent file installed, the scan element will have been baked in and the plug in won’t be necessary.  Wishful thinking?

    • #2013348

      Just today downloaded and installed the current driver.  All good until the error message, plugin needed.  Tried several ways to get it, no joy.

      Screenshot-at-2019-12-01-10-45-09
      plug-in-install-failed
      Eventually brought to “Ubuntu one” where I had to create an account and then ask a question re the missing plugin.  Several others have the same issue there.

      • #2013355

        This might help.  I got it from one of the posts at Ubuntu, and some other people reported it worked.  Copy and paste these lines in one by one.  It’s not good to get in the habit of just entering commands you don’t understand, so here’s what they do.

        The first line installs Apparmor Utilities from the Ubuntu repo, which lets you have some control over the Apparmor feature that is part of Ubuntu and its descendants (like Mint).  Apparmor is a security feature, but when it gets in the way, it has to be turned off.

        The second one disables it for the plugin installer.  The third is probably the line you used already to run the installer, which hopefully will now work.

        sudo apt-get install apparmor-utils

        sudo aa-disable /usr/share/hplip/plugin.py

        hplip-plgin

        Dell XPS 13/9310, i5-1135G7/16GB, KDE Neon 6.2
        XPG Xenia 15, i7-9750H/32GB & GTX1660ti, Kubuntu 24.04
        Acer Swift Go 14, i5-1335U/16GB, Kubuntu 24.04 (and Win 11)

        • This reply was modified 5 years, 5 months ago by Ascaris.
        • This reply was modified 5 years, 5 months ago by Ascaris. Reason: formatting mistake
        1 user thanked author for this post.
    • #2013382

      This might help. I got it from one of the posts at Ubuntu, and some other people reported it worked.

      Maybe you could tell those other people to stop by here?  Just kidding, of course.  For the final command, I wasn’t sure if it was a typo, so tried both ways, no joy.Command-not-found

      • #2013555

        Use hp-plugin as the correct command.

        1 user thanked author for this post.
    • #2013391

      This appears to give you the printing capability, but not the scanning capability. Just so you know, scanner functionality is usually the last thing to come along. That’s how it was with Windows, and that’s how it is with Linux.

      Thanks for your post.  After my re-installation, the system ignored my command to install the downloaded latest version, but re-installed the version that came with the distro, even though I had removed that one.

    • #2013460

      This link to the HP site lists plugins by driver version:

      https://developers.hp.com/hp-linux-imaging-and-printing/plugins

      But there’s a snag- see above posts, in spite of my efforts to the contrary, the system reloaded v.3.17.10, the version included in the repository, and the list on this link goes only to v.3.17.11.  And if it seems ok to use that plugin, there are two items shown, one with .asc and one without.  Which one?

      Edit- here’s what the system installed:

      Pkg-Mgr

      Is there a way to force the system to install the current drivers?  What happened today was 1. uninstalled original drivers, 2. downloaded/installed newest version, 3. system re-installed older drivers from repository.

      • #2013575

        But there’s a snag- see above posts, in spite of my efforts to the contrary, the system reloaded v.3.17.10, the version included in the repository, and the list on this link goes only to v.3.17.11. And if it seems ok to use that plugin, there are two items shown, one with .asc and one without. Which one?

        One of the posters in the thread I saw about this issue said that he got it to work by installing the 3.17.10 version from the Ubuntu repo, which Mint also uses, and the 3.17.11 plugin from HP, but he had to rename the plugin to 3.17.10 (whatever format the filename had, he changed that 1 to a 0), and it worked.

        As for the updating of the driver… it should always keep the newer version, but maybe somehow the naming scheme was different in a way that made it believe the one in the repo was newer.  You can lock in the version you want, though. I see you are using Synaptic Package manager, so all you have to do is install the version you want, then go to Synaptic and find that package, but don’t have it upgrade anything.  Highlight the package you want to lock, select the Package menu, then check the box for Lock version.  Repeat that for each of the three packages shown.

        There’s a command line method to do that too, of course:
        sudo apt-mark hold hplip hplip-data hplip-gui
        To unmark them, in Synaptic, simply unselect the checkbox for each, or use ‘unhold’ in place of ‘hold’ in the terminal command.

        Dell XPS 13/9310, i5-1135G7/16GB, KDE Neon 6.2
        XPG Xenia 15, i7-9750H/32GB & GTX1660ti, Kubuntu 24.04
        Acer Swift Go 14, i5-1335U/16GB, Kubuntu 24.04 (and Win 11)

        1 user thanked author for this post.
        • #2013689

          Eek!  In the first paragraph, I meant “changed the 1 to a 0,” not the other way round.

          Dell XPS 13/9310, i5-1135G7/16GB, KDE Neon 6.2
          XPG Xenia 15, i7-9750H/32GB & GTX1660ti, Kubuntu 24.04
          Acer Swift Go 14, i5-1335U/16GB, Kubuntu 24.04 (and Win 11)

    • #2013696

      Eek!  In the first paragraph, I meant “changed the 1 to a 0,” not the other way round.

      Not to worry- I just now got here.

    • #2013702

      At this point, with a potential source of the elusive plugin bookmarked, my best bet seems to be to start over and try to install the newest driver.  While I do have it downloaded, perhaps I’m better advised to install it directly from HP?  Either way, can someone give me the command to enter- still a little unsure.

      My guess would be sudo apt-get install hplip3.19.11.run but not ready to guess…

    • #2014226

      Downloaded most recent drivers from HP site.  Didn’t know how to format the terminal command, so tried the double-click method directly on the downloaded file.  This process took quite a while, and when finished, generated this error message:HP-printer-drivers
      So, still stuck on this.

    • #2014297

      One of the posters in the thread I saw about this issue said that he got it to work by installing the 3.17.10 version from the Ubuntu repo, which Mint also uses, and the 3.17.11 plugin from HP, but he had to rename the plugin to 3.17.10 (whatever format the filename had, he changed that 1 to a 0), and it worked.

      Just now tried this workaround, saw the same error message as in my last post.

      At this point, looks like we’ll have to keep Win7 in both computers to have the scan function enabled- works as expected in that OS.

      • #2014375

        The terminal command you will need is probably

        sudo sh ./hplip-3.19.11.run

        from the directory where the file is stored.

        You can just use Windows for printing if you want, but if you want to keep trying, this is solvable… it’s just a pain in the butt.

        I don’t completely grasp the issue you’re having, since I don’t have a HP printer and I can’t replicate the issue on my end… if I could, I could probably give you more information.  I do know I’ve seen people on the web who have had the issue and have said it was resolved, though!

        With Linux, it can be tricky sometimes, as hardware manufacturer support for Linux is not always the greatest. If they packaged the driver in a .deb format, it would be really simple, but .deb only works with Debian and related distros (like Ubuntu and Mint), but not others.  The .run files are cross-distro, but they don’t always handle dependencies as well as the .deb would have.

        Sometimes you get lucky– my Canon printer/scanner (MF3010) works out of the box as far as scanning, with no additional driver required, and the printer driver from Canon installed and worked without any issues at all.  I bought the unit when I was a Windows-only user, so I was lucky when it came to Linux support.

        The VM method MrJimPhelps suggested would be more convenient than using the Windows bit of the dual-boot to print.  With the VM, you can run Windows and do your printing while your Linux session is still active, so you don’t have to reboot twice.  Just an option to keep in mind!


        Dell XPS 13/9310, i5-1135G7/16GB, KDE Neon 6.2
        XPG Xenia 15, i7-9750H/32GB & GTX1660ti, Kubuntu 24.04
        Acer Swift Go 14, i5-1335U/16GB, Kubuntu 24.04 (and Win 11)

        1 user thanked author for this post.
        • #2014585

          I would love to get this fixed.  Just about to go through the whole Mint install project with the other computer, hoping it will be a little smoother, but I wound up at multiple dead ends with this one.  If I get stuck, I will review these threads as well as my pile of scratch notes.  I can see through these teething difficulties that Mint, once cleaned up, is a better system than Win7.

          from the directory where the file is stored.

          Does this mean there is more to it than just entering the terminal command?

          I don’t completely grasp the issue you’re having

          The way I understand it, the system repository includes (generic) drivers for HP printers, but the scan function requires an additional plugin to be functional.  This is above and beyond the related problem re installing the current driver version in place of the old one in the repository, gory details in previous posts in this thread.

          I’ve been trying to proceed on my own, and my efforts to install the new driver and the plugin have been via a double-click on the respective downloads, since I couldn’t come up with the correct command.  As you probably know, this takes approximately forever, which would have been ok, but the results were error messages, as posted.


          • #2015674

            Ascaris wrote: from the directory where the file is stored. Does this mean there is more to it than just entering the terminal command?

            Yes, there is. I will try as much as I can to not make this confusing.  If you understand how to navigate to different levels of folders, this is the same thing, just in typed form instead of with clicking.

            In a command line system, the commands you enter are interpreted in the context of the current working directory.  In most distros, the current working directory is shown in the prompt:

            username@pcname:working-directory$

            so, steve@steve-inspiron-519:~$

            would mean your username is steve, your PC name is steve-inspiron-519, and your working directory is ~.  That symbol (tilde) is a shortcut for your home directory, or /home/steve/, in canonical form.  Canonical form doesn’t refer to the maker of Ubuntu, but instead just means the “real” path.

            The dollar sign at the end means you are running with standard user privileges.  A # sign means you you are running with root privileges.  That is seldom necessary or advisable… sudo usually works, and it only executes what is after ‘sudo’ as root, whereas the # prompt executes everything as root.

            The command ‘pwd’ will tell you the working directory.  It is short for ‘print working directory.’

            When you want to run a program or script, like the .run file in the previous example, you would have to tell the PC where the file you want to run is located.  You can do this in two ways.

            The first way is to change directory to the place where the file is located.  If the file is in your downloads folder, that means the file is in ~/Downloads (in short form) or /home/steve/Downloads (in canonical form).  If the working directory is already where the file is located, you can just copy the command and use it.

            If the working directory is not where the file is located, you can cd, or change directory, to where it is.  Remember, a directory is the same as a folder.

            If you are already in /home/steve, and you want to be in /home/steve/Downloads, you could simply type:

            cd Downloads

            and then the working directory would change to /home/steve/Downloads.  (Be aware that it is case-sensitive, so enter the capitals just as they are when you look at them.)

            You can specify the whole path at once too.  /home/steve/Downloads is a path, because it is kind of like written directions to get to a file if you were talking about roads instead of directories.

            If you are in / (called the root directory), you can get to /home/steve/Downloads in more than one way.  You could type these commands, one by one (enter after each):

            cd home

            cd steve

            cd Downloads

            and you’d be there.  Alternately, you could type

            cd /home/steve/Downloads

            and it would mean the same as those three commands.  The path starts with /, so that means to start at root… then go to home, then to steve inside home, then Downloads inside steve.

            So, now that this has been covered… I said there were two ways to specify how to run the file.  Instead of changing directory to the place where the file is, you can just specify where it is on the same line where you run it:

            sudo sh /home/steve/Downloads/hplip-3.19.11.run

            That would execute the .run file from any working directory, because you’ve specified the absolute location of the file.  When people are helping on web sites like this one, though, they don’t usually specify the absolute path like this because they don’t know where you’ve put the file that we want to run.

            The ./ path simply means “the file is in the current working directory.”  The single dot is a shortcut to mean the current directory, so if you enter ./ in the /home/steve/Downloads directory, it means /home/steve/Downloads.  It tells the shell (think of that as the command line) that you’re talking about a file in this directory.

            So, that is how you would execute the .run file.  ‘sh’ means to have the shell execute the command; this is only necessary because you’re using sudo to run the command as a superuser.  If you were running the command as a regular user, you could just enter

            ./hplip-3.19.11.run

            and it would execute the run file.  ‘sh’ is assumed in this case, but when using sudo, you have to specify the sh.  For installing a printer driver, this usually won’t work.  It would work for things that don’t make modifications to system files, but things like installing drivers usually put them in the system folders, so you need the sudo command to run the command with superuser (administrator) privileges.

            I hope this made things better and not more confusing!

            If you do find you are confused, there’s a ‘cheat’ you can use.  Navigate to the location with the file using your file manager (Caja, in MATE, though it’s probably just called “Files” in the title bar or menu), then select the option to open a command prompt right there.  That will start the command line with the working directory set to the place you have selected in Files.  You could go to the place where you downloaded the .run file this way.  Then you could use the command I specified in the email above, which was:

            sudo sh ./hplip-3.19.11.run

            Dell XPS 13/9310, i5-1135G7/16GB, KDE Neon 6.2
            XPG Xenia 15, i7-9750H/32GB & GTX1660ti, Kubuntu 24.04
            Acer Swift Go 14, i5-1335U/16GB, Kubuntu 24.04 (and Win 11)

            • This reply was modified 5 years, 5 months ago by Ascaris.
            1 user thanked author for this post.
        • #2020167

          The VM method MrJimPhelps suggested would be more convenient than using the Windows bit of the dual-boot to print. With the VM, you can run Windows and do your printing while your Linux session is still active, so you don’t have to reboot twice. Just an option to keep in mind!

          There are two things you will need in order for the “VM method” to work well for you:

          1. A “retail” Windows license. Without a retail Windows license, you won’t be able to install and run Windows in the VM.

          2. A shared drive, or at least a shared data folder. In this way, you can work on the same stuff in Windows that you are working on in Linux. I have two shared folders on my Linux Mint machine: one for documents, and one for videos and pics. I made these two folders (and all subfolders) accessible in my Windows 8.1 VM; in this way, I can easily work in the VM, because everything I work on (or download) is always available in Linux and in Windows. Without that, it would be a major hassle to have to copy files to a flash drive or move them from one side to the other in some other way.

          Group "L" (Linux Mint)
          with Windows 10 running in a remote session on my file server
    • #2014300

      If you’re tired of messing with it, you might want to just go with VueScan

      Thanks for the suggestion- in our case, we might just as well keep both computers’ dual-boot config, see previous post.

    • #2016030

      Attempted newest driver install via terminal using Ascaris’ detailed guide:

      https://www.askwoody.com/forums/topic/hp-all-in-one-printer-in-mint/#post-2015674

      Newest driver is v.3.19.11.  Repository had 3.17.10, auto-installed during Mint install.  During today’s installation, terminal text generated, 3.19.11 exists, may interfere with this installation, ok to remove?  I responded yes.

      From there, process seemed ok until error message re plugin, which system automatically looked for.  See screenshot:

      Plugin-error
      Note that system would not let me install plugin manually as su, so I tried to do it as reg. user- “permission denied.”

      Looked in Pkg Mgr for hplip entries- shows old version installed, no returns when looking for new version.

      I’d be ok with using the old version, except there is no plugin offered for that driver file, and the plugin is needed to enable scanning.  So, end result is no change from status quo- printing works, scan function AWOL.  Previously tried removing the old version as shown in the repository before trying the new install, but the result was the same- old version reinstalled, no scan function available.

    • #2016055

      The HP site offers “advanced” methods to install the driver software:

      https://developers.hp.com/hp-linux-imaging-and-printing/KnowledgeBase/Class_Driver#_Toc499306388

      These methods call for the removal of any existing hplip drivers, then the installation of, in this case, an “older new version” of the driver file.  This version does have a companion plugin offered elsewhere on the site, but there is no reason to think, since the process is in fact the same one I used (previous post) that the outcome would not be the same.

      • #2016087

        Just had an idea.  The version in the 18.04 LTS Ubuntu repo is one version too old to work for your application, so anything newer should work.  What if we downloaded the file from the Ubuntu repo for 18.10 instead?

        It’s the scanner portion of the unit we are working on, right?  Scanning function is handled in Mint by SANE, so perhaps the libsane-hpaio is the right file.  The one listed in the 18.04 repo is the too old one, but a newer one is is available here:

        https://packages.ubuntu.com/cosmic/amd64/libsane-hpaio/download

        and the data file:

        https://packages.ubuntu.com/cosmic/all/hplip-data/download

        Any of the mirrors should work.  I used the first one listed, mirrors.kernel.org/ubuntu.  Whichever one you use, these links will take you to the actual Ubuntu files, ready to install with a double click from the package manager.

        I’m using a distro also based on 18.04, and I tried to install the file, and it worked… I can’t verify that the driver it installed works, as I do not have a HP printer, but it didn’t have a problem installing.


        Dell XPS 13/9310, i5-1135G7/16GB, KDE Neon 6.2
        XPG Xenia 15, i7-9750H/32GB & GTX1660ti, Kubuntu 24.04
        Acer Swift Go 14, i5-1335U/16GB, Kubuntu 24.04 (and Win 11)

        1 user thanked author for this post.
        • #2016129

          Those links both have the same title:
          <h2>Download Page for <kbd>hplip-data_3.18.7+dfsg1-2ubuntu2_all.deb</kbd></h2>
          If the 3.18.7 designation refers to a version of the hplip driver file, does the rest of this line lead you to believe that my system will accept the command to remove (or, not re-install) the old version and replace with this one?  This seems to be the sticking point, as my system re-installs the old version instead of a newer one, various strategies tried.

          A possibly related side issue- notice in the last lines of the screen shot posted earlier, the line “permission denied.”  This message and similar, e.g. “you don’t have permission to…” show up on occasion, even though there is only one user- me- by default, a su.  Cannot find anything in Main Menu that addresses this.

          • #2016191

            If you tell it to install a .deb, it will do so using whatever the distro’s default .deb installer is (I seem to remember it being the GDebi package installer in Mint), overwriting the existing installation of that package if there is one.

            I am not really sure about what happened with it replacing the one you installed with its own.  That’s not how Synaptic works, unless somehow the version numbers are specified inconsistently and it believes the new one is actually older.

            If you installed a package via means other than the package manager, which is what is happening if you run a script or .run file, the package manager is not nominally aware of it, so some weird things can happen.  In these cases, it’s best to remove the package with Synaptic/APT first, to avoid conflicts.

            A .deb package uses the package manager to install it, so Synaptic/APT will be aware of it.  In the case of those from the 18.10 repo, they’re newer than the ones in the normal (18.04) repo, which would make the package manager want to keep the manually installed version instead of the one in the repo.

            If you’re in doubt, you can lock the new package (after it is installed) by the means I described above in post 2013575.  It should not be necessary, though.

            Dell XPS 13/9310, i5-1135G7/16GB, KDE Neon 6.2
            XPG Xenia 15, i7-9750H/32GB & GTX1660ti, Kubuntu 24.04
            Acer Swift Go 14, i5-1335U/16GB, Kubuntu 24.04 (and Win 11)

            1 user thanked author for this post.
    • #2016452

      Today I’m about to try Ascaris’ suggestion above: https://www.askwoody.com/forums/topic/hp-all-in-one-printer-in-mint/#post-2016087

      A possible theory about the old vs. new driver problem:

      I am not really sure about what happened with it replacing the one you installed with its own.

      The Mint system is supposed to find printers that are connected to it and automatically install the driver from the repository.  In this case, the repo has a   substantially outdated version.  Meanwhile, I’m trying to install the newest version, an effort that has not completed several times.  But each time, an HP icon appears in the tray, which, when right-clicked, produces a pop-up that, among other text, tells me that the 3.19.11 driver I have been trying to install, is in fact, installed.  Pkg Mgr does not show this software.  Conclusion- that program is partially installed.  Notice the install date shown, from my first effort-

      HP-Device-Manager


      I think the two events may not be related.  When the repo version of the driver is uninstalled and the printer then turned on, the system automatically re-installs it.  But my attempts to install the new version have never completed, so it is MIA in Pkg Mgr.

      For my next attempt, I will leave the printer off unless specifically directed otherwise by the terminal.  Perhaps this will prevent Pkg Mgr from re-installing the old driver.

      • This reply was modified 5 years, 5 months ago by Slowpoke47. Reason: sp
      • This reply was modified 5 years, 5 months ago by Slowpoke47. Reason: screenshot added
      • This reply was modified 5 years, 5 months ago by Slowpoke47.
    • #2016558

      Several attempts, still no joy… Removed old printer drivers.  Printer turned off. Downloaded and tried to install the files from post #2016087 above.   Here’s the result:

      libsane-hplip

      This seems to be a dead end.

      Then tried again with the hplip-3.19.11 downloads, driver plus plugin- the system ran me around in a circle- would not install the driver without the plugin, and wouldn’t install the plugin without the driver:

      error-message

      Also tried custom 3.19.11 install instead of automatic, with option to choose installed elements- specifically did not select enabling scan function- system still called for the same dependency as before.

      I’m re-posting this link in case someone can tell me whether there is a workaround on this page-  hp’s Developer Portal | Class Driver guide for Advanced HPLIP Users

      At this point, I’m stuck.  But the HP tray icon is still there, see above post, even though the HP software is supposedly removed.  Also, the Downloads folder now has two screens’ worth of new entries resulting from my efforts today.

      • #2016653

        The .deb files don’t use the sh command.  Just launch them with the file manager by double clicking them, and Mint should launch them in the Gdebi package installer.  If you wanted to run those on the command line, you could try the same command, except with ‘gdebi’ in place of the sh.

        The .tar.gz files are tarballs.  It’s like a .zip file… if you double click those in the file manager, it should launch whatever archive program Mint uses by default, and you can then extract them to wherever you wish.  I don’t know what program that is, but you should be able to use the command line version too if you like once you know the name of it.

        Edit: The pyQt5 package should be in the Ubuntu repo.  Generally, it’s better to get things from the official repo if you can, and install them from an external source only if the package you need is not there, or if the official one is too old.  The question is which one exactly is needed, as there are several!  I am guessing it’s python-pyqt5, which you can install using Synaptic graphically, or

        sudo apt install python-pyqt5

        from the command line.

        Dell XPS 13/9310, i5-1135G7/16GB, KDE Neon 6.2
        XPG Xenia 15, i7-9750H/32GB & GTX1660ti, Kubuntu 24.04
        Acer Swift Go 14, i5-1335U/16GB, Kubuntu 24.04 (and Win 11)

        • This reply was modified 5 years, 5 months ago by Ascaris.
        2 users thanked author for this post.
    • #2016644

      Followup- currently, repo drivers re-installed.  Error message in terminal names PyQt5 as the missing dependency.  Online search found PyQt5_gpl-5.6.tar.gz which I downloaded and tried to install.  Attempt failed, but perhaps there is a clue here.

      Plugin-error-1

      • #2016664

        I don’t have a lot of experience extracting archived files in Linux, so I’m not sure if it’s applicable in your case, but you might be able to extract (unzip) that archived file by navigating your Mint file manager to the directory where the archive file is located and double-clicking on the file, the same way as you might do it in Windows. If that doesn’t do it, you might try right-clicking on the filename and see if you’re offered a choice to extract the file.

        Once that PyQt5 file is extracted (uncompressed), it may become possible to install it. Right now, you’re doing the equivalent of trying to install a program from within a ZIP file in Windows, which isn’t likely to work.


        1 user thanked author for this post.
    • #2016670

      The pyQt5 package should be in the Ubuntu repo.

      Searched pyqt5 in Pkg Mgr, 72 entries offered, all with various added text.  Nothing with just that designation.  Can you tell from my earlier screenshot what exactly I’m looking for?

      EDIT: screenshot:

      pyqt

      • This reply was modified 5 years, 5 months ago by Slowpoke47.
      • This reply was modified 5 years, 5 months ago by Slowpoke47.
    • #2016678

      AArgh- missed the timing for another edit- could the entry I need be the 7th from the top in that Pkg Mgr screenshot?

      Edit- just found this:  Install pyqt | Python Tutorial

      • This reply was modified 5 years, 5 months ago by Slowpoke47. Reason: link added
      • #2016780

        Did you try again with those two .deb files from the 18.10 (Cosmic) repo?  That looks like the easiest path forward at the moment, if it works.

        The one

        AArgh- missed the timing for another edit- could the entry I need be the 7th from the top in that Pkg Mgr screenshot?

        That was my guess in post 2016653, but it could also be the python3-pyqt5 package suggested by the link you provided (the Debian/Ubuntu one is the one for Mint also).

        But if the .deb files from before work, you may not need that.

        Dell XPS 13/9310, i5-1135G7/16GB, KDE Neon 6.2
        XPG Xenia 15, i7-9750H/32GB & GTX1660ti, Kubuntu 24.04
        Acer Swift Go 14, i5-1335U/16GB, Kubuntu 24.04 (and Win 11)

        1 user thanked author for this post.
        • #2016854

          From Downloads, double clicked /home/steve/Downloads/hplip-data_3.18.7+dfsg1-2ubuntu2_all.deb

          Message, already installed.  Looked in repo, showed as installed, but I’m sure it was not there earlier.

          Next, tried  /home/steve/Downloads/libsane-hpaio_3.18.7+dfsg1-2ubuntu2_amd64.deb    Saw this:

          libsane
          Selected install, process ran for a while, then seemed hung up.  Selected “Details” on progress pop-up, got this:

          Installing-file
          Didn’t know where to go with that, so selected cancel on the progress pop-up.  Nothing happened on screen for 1/2+ hour, so restarted.  Bad move, apparently. Now cannot get into Pkg Mgr:

          Screenshot-at-2019-12-09-06-35-52

          UPDATE:  Recovered from that blunder to find that the libsane package is also already installed.  So- current status is, two files in this post already installed, no hplip drivers installed.  Pondering next move.


          • This reply was modified 5 years, 5 months ago by Slowpoke47.
          • This reply was modified 5 years, 5 months ago by Slowpoke47. Reason: update
    • #2016825

      Once that PyQt5 file is extracted (uncompressed), it may become possible to install it. Right now, you’re doing the equivalent of trying to install a program from within a ZIP file in Windows, which isn’t likely to work.

      Also this is likely a source code bundle. That means installing from it probably requires several intermediate steps and also other tools.

      I wouldn’t expect something like this to require anything exotic so it’s extremely likely that the necessary packages are in the repositories somewhere.

      But… Then again the HP installer seems to be just plain confused, anyway. In that one screenshot it says it wants PyQt5 for Qt version 4.x… but PyQt5 is specifically for Qt 5.x and for Qt 4 you use PyQt4. And a .deb package really should include *actual* dependencies in the package definition (and not in random scripts and error messages) so the package management could resolve them.

      2 users thanked author for this post.
    • #2016838

      Ran <sudo apt-get update> to see if newer HP printer drivers were picked up by the repo- answer to that is, no.  Since the repo (outdated) drivers are currently installed, I installed the python-pyqt5 file from the repo.  Printer turned on, no scanner detected by Simple Scan or Xsane Image Scanning, so I removed that python file.  Looked in repo for python3-pyqt5- it’s already installed.

      The HP tray icon, which was associated with my earliest attempt to install the newest drivers back in August, now no longer appears.

      My next move will be to remove the repo-supplied drivers and retry installing the 18.10 version as suggested by Ascaris previously:  https://www.askwoody.com/forums/topic/hp-all-in-one-printer-in-mint/#post-2016087

      For this move, printer will be off.

    • #2016917

      Persisting on this- started over with v.3.19.11 (newest) via terminal, as superuser.  Error, strongly advise running as regular user, but couldn’t proceed, “permission denied.”  Continued as s. u.

      Next message, already installed- remove?  Typed y for yes- installation continued to message, Build Complete.  From there, configure printer? yes.  Printer now on.  All good until the fateful message re unable to download plugin.  I then specified a path to my download, no joy there, but the issue seems to be that, on the plugin download site, each plugin version has two entries, one with .run (the one I downloaded), and the one the Terminal wants, .run.asc.  I tried to download that one, the only response I could get, whether single- double- or right-click, was this text:

      PGP-signature

      Obviously, no download opportunity there. Tried to download the previous version, .run.asc., same result.

      I have not yet closed that Terminal window, and as yet there is no hplip software in Pkg Mgr showing as installed, old or new.

      • #2017044

        I have not yet closed that Terminal window, and as yet there is no hplip software in Pkg Mgr showing as installed, old or new.

        It won’t appear there if you didn’t use apt (or one of the frontends for it, such as Synaptic) to install it.  If you install from the command line with ‘apt’ or ‘apt-get’, or if you use the Mint software installer, Synaptic, or another similar program, or if you download and install a .deb file, you’re using apt, and it will appear in the list when it is properly installed.  An installation with a .run or .sh script won’t, and neither will one from an archive file where you simply extract the program into its working directory (which is how you would install Waterfox, for example, if you were not using the PPA).

        Manual or scripted installations are outside of the scope of the package manager, and they can be installed and working (or not working, as the case may be) without ever appearing in Synaptic.  If you’re going to go the non-apt way, it’s best to remove the apt version to avoid conflicts.  This is apparently the situation you were in when you wrote this, since nothing is showing up as installed in Synaptic, which is as it should be for a manual installation.  The problem is that somehow the plugin failed to install again, of course.

        Is the .run file for the plugin the .run file you already used, or was that hplip?

        The permission denied message when not running as root, when the program suggested not running as root, could suggest that the permissions have become messed up (that files are owned by root in a folder that should be owned by ‘steve’, your username).  Since it doesn’t work anyway, the simplest way to fix that would be to go to root (you can use the context menu in Caja/”Files” to do this too) and delete the hplip folder and redo it as non-root.  There’s probably a clue somewhere about where this folder is… probably

        /home/steve/.hplip

        or

        /home/steve/.config/hplip

        or

        /home/steve/.local/hplip

        Don’t delete anything if you’re not sure it’s hplip!  You might want to rename it instead of deleting it, in case it isn’t the right thing.  Renaming it hides the folder but leaves it there if it turns out you didn’t want to delete it, since you can just rename it back.

        Dell XPS 13/9310, i5-1135G7/16GB, KDE Neon 6.2
        XPG Xenia 15, i7-9750H/32GB & GTX1660ti, Kubuntu 24.04
        Acer Swift Go 14, i5-1335U/16GB, Kubuntu 24.04 (and Win 11)

        1 user thanked author for this post.
    • #2017050

      The deal breaker for this install is that the plugins are not actually available, at least not from the page provided to me.  All those .run,asc entries are in the same format as the s/shot I posted, nothing to download.  So, even if I got a non-repo hplip version to install, I still couldn’t scan, as stated (in red) during the attempts via the Terminal.  In a previous post I speculated that the newest version hplip might have the plugin baked in, but now I realize that if so, that version would not be listed on the plugin page.  I can’t see HP doing anything for a few Linux users (likely non-business at that) who are using antique scanning equipment.  The stockholders would revolt!

      MrJimPhelps posted a workaround, but, since we plan to dual-boot with Win7 for the foreseeable future, we’ll resort to scanning with Windows when needed, and then open the file in Mint.  We’ll be staying off the Internet with Win7, and if we do, I don’t think there are any downsides to keeping that OS.

      My grateful appreciation to all who took the time and effort to help with this problem, I think we beat it to death, but no solution has emerged.  Thanks to everyone!

      • #2017077

        I thought also that the plugins would be part of the .deb files, from what I’d seen.  Did you try it?  It won’t hurt to give it a shot.  The kinds of issues you’re having with the universal .run files are quite common, and that’s why there is so much emphasis on using repo releases where possible.  The distro maintainers package things differently than the maintainers of the .run files, and they are expected to work out of the box with no more intervention needed.

        There are several people on the Ubuntu site that said they got it to work… it’s just that the ability of people like me to help (when I don’t actually have a HP device to test on) is limited, unfortunately!

        Dell XPS 13/9310, i5-1135G7/16GB, KDE Neon 6.2
        XPG Xenia 15, i7-9750H/32GB & GTX1660ti, Kubuntu 24.04
        Acer Swift Go 14, i5-1335U/16GB, Kubuntu 24.04 (and Win 11)

        1 user thanked author for this post.
        • #2017078

          I decided to throw in the towel because I don’t know what further I can do.  You probably noticed that the two links you posted a while back were not the answer, as they were already installed.  And the forceful “suggestion” to install as a regular user during the Terminal process got me nowhere- “permission denied” even though there are no other user accounts of any kind on this OS.

          I will say that I am by now somewhat less fearful of the Terminal!

          I have run out of options.  If you have a further initiative, I’m game.  Not optimistic, but game.

      • #2020171

        MrJimPhelps posted a workaround, but, since we plan to dual-boot with Win7 for the foreseeable future, we’ll resort to scanning with Windows when needed, and then open the file in Mint. We’ll be staying off the Internet with Win7, and if we do, I don’t think there are any downsides to keeping that OS.

        If you have an old Windows 7 computer that you are considering retiring, use it for scanning only, and use a USB flash drive to copy the scans from the W7 computer to one of your Linux machines. In this way, you won’t have to shut everything down and reboot everytime you want to do a scan.

        Either that, or get VueScan for Linux.

        Group "L" (Linux Mint)
        with Windows 10 running in a remote session on my file server
    • #2017421

      Well… Ascaris has moved me to give this issue another shot.  I do have some fresh ammo- a pair of guidebooks for help with context re the Terminal, and some possibly helpful hits on a Duck search (no Google anything at our house!).  I now have a real chance of turning a fender-bender into a multi-car pile-up:-)

    • #2017545

      @ Slowpoke47

      I now have a real chance of turning a fender-bender into a multi-car pile-up:-)

      Are you making OS image backups for your Mint OS using Veeam?

      Have you created Rescue Media for the Veeam imaging program? (Any backup image files created with Veeam are of no use if you do not have the Veeam Rescue Media available to restore the backup image files.)

      Or, are you using Macrium Reflect (either the program on the Macrium Rescue Media, or the Win7 installed program) to make backup image files of your two OS hard drives, Mint and Win7?

      If you make an OS image file before beginning any major installs (like installing Microsoft Office, or installing monthly Updates, etc.), making any major program setting changes (like changing how your Mint printer drivers are configured), deleting a large number of files (like you did using Mint–deleting your Win7 boot files), experimenting with programs that you are not familiar with–installing and uninstalling many different versions and using command line changes (like what you have been doing above to the Mint printer driver installation files), you can at any point in time restore that original OS image file and be back to where you were before all those changes were attempted–no worse for the wear.

      You can then use what you have learned to go back and begin again–avoiding the problems and pitfalls that you experienced while doing those above *at risk* procedures the first time through.

      You can be as cavalier as you wish–but, it does not have to end in a *fender-bender* or *multi-car pile up* outcome!

      1 user thanked author for this post.
    • #2017583

      You can then use what you have learned to go back and begin again–avoiding the problems and pitfalls that you experienced while doing those above *at risk* procedures the first time through.

      NightOwl- I do try not to make the same mistake twice- more often, I find new mistakes to make.  Not sure how familiar you are with Mint, but I did (on my own) recover from an erroneous command line entry, alluded to above, a couple of days ago.

      With considerable help from Ascaris, I am using Veeam for Mint backups.  Currently still using Macrium for Win7 backups, although those will become superfluous soon, as the Veeam full backups are the bare-metal variety, and since Mint mounts the Win7 HDD (as I learned the hard way), the Veeam backups cover that OS as well.

      I took the lesson I learned, with your help, regarding my recent Win7 blunder and used it as context in setting up Veeam.  I give myself credit for being conscientious about making backups, but never had to use them before.  I’ve made a copy of the generic Veeam Recovery Media, and if I ever get the printer driver issue resolved, I plan to convert that media to a custom version.

      • This reply was modified 5 years, 5 months ago by Slowpoke47. Reason: sp
    • #2017744

      @ Slowpoke47

      although those will become superfluous soon, as the Veeam full backups are the bare-metal variety, and since Mint mounts the Win7 HDD (as I learned the hard way), the Veeam backups cover that OS as well.

      I believe you have a mistaken understanding here! Yes, Mint mounts your Win7 HDD–which means that when you are in Mint, it shows you the files and folders that are on your Win7 HDD–and allows you to copy, paste, move, delete (as *you* learned the hard way), etc. those files and/or folders. Back when you were using Win7 on one HDD, and had Vista on a separate HDD, you could also see the Vista files and folders when you were booted to Win7–the Vista HDD was *mounted* in Win7. And when you were booted to Vista, you could see the Win7 files and folders–the Win7 HDD was *mounted* in Vista.

      When a HDD is mounted, it means you can access the files and folders on that HDD.

      But, when creating an image backup file of a HDD, that’s not the same as *mounting* a HDD. So, even though your Win7 HDD may be mounted in Mint, when you tell Veeam to make a backup image of the Mint HDD–that’s what Veeam will do–but it will not make a backup image file of the Win7 HDD unless you specifically instruct Veeam to make a backup image of the Win7 HDD. A Win7 mounted HDD will not be included in a backup image file of your Mint HDD.

      I’ve made a copy of the generic Veeam Recovery Media, …

      Have you booted to that Recovery Media, and tested the process of restoring a backup image file to the HDD it came from so you know what to do if and when you need to use it for that purpose?

      • #2017859

        But, when creating an image backup file of a HDD, that’s not the same as *mounting* a HDD. So, even though your Win7 HDD may be mounted in Mint, when you tell Veeam to make a backup image of the Mint HDD–that’s what Veeam will do–but it will not make a backup image file of the Win7 HDD unless you specifically instruct Veeam to make a backup image of the Win7 HDD.

        If he uses the option in Veeam to back up the entire machine, it should back up the entire machine.  I did a test run backing up my Acer Swift to verify this.  It has one drive with Windows 10 on it (the built-in eMMC drive) and one with Linux (the M.2 SSD), and when I selected to back up the entire machine, it did indeed image the eMMC drive with Windows 10 along with the Linux SSD.


        Dell XPS 13/9310, i5-1135G7/16GB, KDE Neon 6.2
        XPG Xenia 15, i7-9750H/32GB & GTX1660ti, Kubuntu 24.04
        Acer Swift Go 14, i5-1335U/16GB, Kubuntu 24.04 (and Win 11)

        • This reply was modified 5 years, 5 months ago by Ascaris.
    • #2017780

      @ Slowpoke47

      Previously tried removing the old version as shown in the repository before trying the new install,

      After my re-installation, the system ignored my command to install the downloaded latest version, but re-installed the version that came with the distro, even though I had removed that one.

      Several attempts, still no joy… Removed old printer drivers.

      But the HP tray icon is still there, see above post, even though the HP software is supposedly removed.

      Out of curiosity, what do you mean by the terms *removing* and *removed*? Are you doing an *uninstall* of the old drivers? Or, are you highlighting and hitting a *Delete* key or function?

      Reason I’m asking–if you have *deleted* files–you may have deleted the file *hp-setup* which is needed to install the plug-in file when using the *Automated* option to download and install that plugin. (More to come in next post.)

      Possibly if I can get that most recent file installed, the scan element will have been baked in and the plug in won’t be necessary. Wishful thinking?

      Yes–*wishful thinking*! The plugin needs to be downloaded and installed as a separate procedure. (More to come in next post.)

      I thought also that the plugins would be part of the .deb files, from what I’d seen.

      Nope, not part of *.deb* files. (More to come in next post.)

    • #2017801

      @ Slowpoke47

      I think I finally found where your screenshot that’s in the first post of this topic came from. It has the outline of what you are supposed to do–but it is not in the context of where the information is coming from–but let’s get there step by step ….

      From there, process seemed ok until error message re plugin, which system automatically looked for. See screenshot:

      So, I looked at this screenshot, and put this website into my browser *http://hplipopensource.com*:

      Unable-to-Load-Plugin-help-website

      And, it redirected me to this webpage: https://developers.hp.com/hp-linux-imaging-and-printing

      On that page, I clicked on *More Information*–and it took me to this new page: https://developers.hp.com/hp-linux-imaging-and-printing/downloads

      This new page asked three questions:

      1. Is my HP printer supported by HPLIP?

      2. Is HPLIP already installed on my system?

      3. Do I need a newer version of HPLIP?

      Initially I went to the *Supported Printers* page: https://developers.hp.com/hp-linux-imaging-and-printing/supported_devices/index

      Here’s a screen shot showing the top row of column labels:

      Supported-Printers-Column-Headers

      Typed in *Ctrl + f* in Firefox to bring up the *Search* function, put @ Slowpoke’s printer model number into the search box (M1522nf), and found this item on the webpage:

      printer-model-number

      So, Plug-in is *Required*, and the Minimum HPLIP Version Number is 2.8.10.

      Now jumping down to the bottom of the page to see the Footnotes–looking at the #8 it says:

      8 (“Required”) A downloadable driver plug-in is required for printing support. (“Optional”) A downloadable driver plug-in is optional for printing support and may increase the speed, quality, or other aspect of printed output. (“No” or “None”) A driver plug-in is not required nor available. Driver plug-ins are released under a proprietary (non-open) license and are not part of the HPLIP tarball release. For more information, please refer to this KB article

      Clicking on the link *KB article* at the end of the footnote take one here: https://developers.hp.com/hp-linux-imaging-and-printing/binary_plugin.html

      At the top of this page it says:

      What is the HPLIP Binary Plug-In and How Do I Install It?

      Binary Plug-in Information

      Some HP printers require proprietary software technologies to allow full access to printer features and performance. Unfortunately, these technologies cannot be open sourced, but to resolve this HP uses a binary plug-in for these printers. This plug-in works in conjunction with our Linux Open Source Printing Software to improve the printing experience for HP’s Linux Printing Customers. Additionally, it requires the user to read and agree to a license agreement at the time of driver installation.

      And, at the bottom of this page is the following:

      Plugin-Is-Separate-from-Printer-Drivers

      Every phrase within these two sentences is *important*.

      Most Linux distributions include HPLIP with their software, but most do not include the plug-in. Therefore, it is a safe practice to run a utility called “hp-setup”, which, will install the printer into the CUPS spooler, download, and install the plug-in at the appropriate time.

      To install the plug-in using the GUI you can follow these procedures:

      1. Launch a command-line window and enter:

      hp-setup

      It does not state explicitly that the command needs to be done with the command-line window focused in the directory where the HP driver was downloaded to, but my suspicion is that it should be–so if the directory where the HP driver was downloaded to was *desktop*, then that’s the directory that the command-line should also be focused to as well.

      But, the above sequence is *out of order*! First the HP Driver has to be installed so the the *hp-setup* program is available to be run.

      So, I’ll go over that in the next post! Out of screenshots at this point.

      1 user thanked author for this post.
    • #2017816

      @ Slowpoke47

      That last screenshot was the same one you posted at the beginning of this topic–but you left out the top sentence that I included in my screenshot–it offered important information …

      So, as I said at the end of my last post–installing the *plug-in* procedure is *out of order*. First the printer driver must be installed. So, going back to the page I mentioned above:

      On that page, I clicked on *More Information*–and it took me to this new page: https://developers.hp.com/hp-linux-imaging-and-printing/downloads

      Further down the page it says:

      Automatic or Manual Installation?

      HPLIP downloads are available as an Automatic Installer package and as a Manual Install Tarball package. We recommend that most users use the Automatic Installer

      So, click on the *Download HPLIP* link, it will take you here: https://developers.hp.com/hp-linux-imaging-and-printing/gethplip

      Download-HP-Driver

      It will take you to a new *Download* page. Select *Linus Mint*, and then click on the *Download HPLIP*. Save it to your *Desktop*.

      Select-Linux-Mint

      Follow the instructions that were on the previous page and screenshot:

      To use the Automatic Installer, follow these steps:

      1. Download the file to a convenient location (e.g., home directory or desktop, etc)
      2. Open a console/terminal and cd to the location where the installer was downloaded. (e.g., cd ~/Desktop)
      3. Type in and run this command: ‘sh hplip-3.19.11.run

      So, download to *Desktop* as I mentioned before, make sure the console/terminal is focus on the *Desktop* directory, and then type in the command: sh hplip-3.19.11.run

      Once that’s done, you will now be working your way through this *Walk-through*: https://developers.hp.com/hp-linux-imaging-and-printing/install/install/index

      When the time comes, you will be typing in the *hp-setup* command (again, be sure to be in the *Desktop* directory)–as you step through that procedure, when you select your printer, that should trigger the need to download the plug-in, you should have to agree to a licensing agreement, and the plug-in install should proceed.

      Follow the steps to the end of the *Walk-through*, and fingers crossed, you will have your printer driver installed that includes scanning ability.

      1 user thanked author for this post.
      • #2017868

        NightOwl, that was a great find.  Thanks for that!

        I like how HP wrote, as excerpted above:

        Unfortunately, these technologies cannot be open sourced, but to resolve this HP uses a binary plug-in for these printers.

        They’re using a similar meaning of “cannot” that Microsoft and lots of others use with “supported.”  HP makes the printers; HP writes the drivers; HP writes the binary blobs in the plugins.  How is it true that they “cannot” open source that?  Unless there is some code in the plugin whose copyright is held by some other entity, what they mean is that they will not open source the code.  If they’re going to refuse to do so, like so many other vendors (nVidia, for one), own up to it… don’t pretend it’s something you can’t do.

        Dell XPS 13/9310, i5-1135G7/16GB, KDE Neon 6.2
        XPG Xenia 15, i7-9750H/32GB & GTX1660ti, Kubuntu 24.04
        Acer Swift Go 14, i5-1335U/16GB, Kubuntu 24.04 (and Win 11)

        2 users thanked author for this post.
        • #2017873

          The HP site(s), many pages, was where I started this odyssey.  Seems like HP has little or no interest in supporting Linux, as it amounts to a sliver of the consumer market, and likely none of the business market- which is where the profits are.

          By late yesterday, I got several potentially helpful hits on another, rephrased  search, plan to follow up today.

          Before I run another installation effort, I want to create a regular account, as the installer asks for that during the process.  As of now, I have added no accounts beyond the initial Mint install.  Do you know if I can omit setting a password and still have this new account functional?

    • #2017874

      NightOwl- thanks for your research and posts.  I have seen everything you found and more.  Turns out that this issue with the HP plugin is widespread.  See my previous post- HP is apparently not interested in the Linux sliver of the consumer market, not lucrative enough.  Remember- they are not missionaries!

      As mentioned above, I have some new leads, following up today.

    • #2017909

      See my previous post- HP is apparently not interested in the Linux sliver of the consumer market, not lucrative enough.

      Well yes. And it’s not just HP.

      And for businesses it’s often so that the cheapest variants of a given “business grade” printer/MFP chassis also don’t have Linux support… or proper Windows Server version support either.

      Unless there is some code in the plugin whose copyright is held by some other entity,

      That and patent licensing. Plenty of both to go around.

      1 user thanked author for this post.
      • #2017929

        Since MS owns something like 80% of the computer market, they get to call the shots.  If a business adopts Linux, it will have compatibility issues when dealing with the majority, who are more-or-less forced to go the Win10 route.

        And, looks like building computers is not even the main revenue stream for MS, either- note the recent multi-BILLION government contract for data handling that they won, with Google now hollering, “Unfair!”

    • #2017922

      Here are the sites I’m currently looking at- there is a bit of conflicting info between them, though.  Note the advice to completely remove any remnants of HP drivers before starting.  Also note on the sourceforge page that the last several versions of HP drivers are only a few months old.  Planning to try installing perhaps the .10 or .8 version on the theory that the latest, .11, may not be fully baked.

      http://ubuntuhandbook.org/index.php/2019/08/hplip-3-19-8-released-linux-mint-19-2-debian-10-support/

      https://sourceforge.net/projects/hplip/files/hplip/

      https://www.askmetutorials.com/2019/08/install-hp-linux-imaging-and-printing.html

      https://askubuntu.com/questions/1070470/how-should-i-install-hplip-binary-proprietary-plugin-driver-for-my-hp-printer-or/1070471

      https://askubuntu.com/questions/1056077/how-to-install-latest-hplip-on-my-ubuntu-to-support-my-hp-printer-and-or-scanner/1056078#1056078

      NightOwl- which distro are you using?

    • #2017969

      Finding advice to uninstall packages from previous HP installation attempts- are these from HP or supplied as entries in repo?  If uninstalled, would these entries remain, showing unchecked boxes, or vanish completely?

      lisane-pkgs-installed

      Even though I have uninstalled all the hplip packages, the HP icon in the tray is still there.

      • #2018944

        Finding advice to uninstall packages from previous HP installation attempts- are these from HP or supplied as entries in repo? If uninstalled, would these entries remain, showing unchecked boxes, or vanish completely?

        That depends.

        Anything you installed by a .run or other script file won’t appear in Synaptic in any case, even when it is installed and running.  A .deb you downloaded and installed yourself will disappear from the list if there is not a package by the same name in the repo.  If there is a package by the same name in the repo, it will appear in the list, but be unchecked, and it will refer to the repo package, not to the one you installed.

        The advice about removing the results of previous installation attempts would mean all of it, whether installed by a package manager or by a script.  The .run files I’ve used have had built-in uninstallers, but I don’t know if that’s always the case.

        For those packages that do appear in Synaptic, you can mark for complete uninstall (program and all config files) from the context menu for the package listing, then hit Apply.

        About being down on HP… well, on the one hand, many software or hardware vendors have a painstakingly step-by-step guide to installing stuff in Windows, and for Linux, they just kind of throw these things at you and let you work it out for yourself.  HP is not as bad as some in that way, as the text that NightOwl quoted is pretty clear, all things considered.  Still, it does seem that they are assuming Linux users are more technical in general than Windows users, which is probably true a good part of the time, but not always (as you well know). It’s made worse by the fractionation of Linux distros, with lots of them having different package management systems.

        It’s better than if HP just didn’t bother making any Linux drivers at all, though, which is how a lot of hardware manufacturers do it.


        Dell XPS 13/9310, i5-1135G7/16GB, KDE Neon 6.2
        XPG Xenia 15, i7-9750H/32GB & GTX1660ti, Kubuntu 24.04
        Acer Swift Go 14, i5-1335U/16GB, Kubuntu 24.04 (and Win 11)

        1 user thanked author for this post.
    • #2018116

      Decided to try again with v.3.19.11 downloaded from:  https://sourceforge.net/projects/hplip/files/hplip/.

      Downloaded four files:

      Screenshot-at-2019-12-11-15-52-36

      First tried to follow the directions here:  https://developers.hp.com/hp-linux-imaging-and-printing/install/step3/index  to open the .tar file- got multiple error messages as superuser and permission denied as regular user.  Checked permissions on this file via right click> Properties> Permissions.

      Screenshot-at-2019-12-11-16-04-33

      Next, tried the .run file as superuser, same warning in red- run as regular user.  Tried again as regular user, permission denied.

      Tried earlier today to add a regular user account, got a name <all-users> and password set- but stuck on setting up user directory and, apparently, permissions.


    • #2018367

      Update to previous post- directory for new user <all-users> was in fact automatically created when I added the new user.  Now on startup there is a choice of which account to open.  Since there will be only two users, and we have always shared the Win7 folders with no problems, we’ll be using just one account here.  I’ll want to set up permissions for complete access to all folders for both users.  This all needs to be as uncomplicated as possible.  I do have a new guidebook on command line use (470 pages’ worth), looks like the answer to this is in there.  Perhaps that’s a topic for a new thread, if needed, but here I still need to get this scanner to work.

    • #2018928

      @ Slowpoke47

      NightOwl- which distro are you using?

      Had to go out of town for the last couple days–no computer or time to respond.

      And, I have to work tomorrow and the next day too–so my replies will be limited or non-existent.

      But, to answer your question–currently I am using only WinXP, Win7, and Win8.1–no Linux distros for the time being. I’m considering taking the plunge, which is why I’m watching and participating in these topics–I’m learning from the endeavor.

      I’m curious … why have you not tried the outline I posted several days ago–it’s the outline from the *horses mouth*–HP’s recommended way to install the most recent printer driver in place of whatever version is originally included with the Mint version you have installed, and how to automate getting the plug-in downloaded and installed.

      Seems like HP has little or no interest in supporting Linux, as it amounts to a sliver of the consumer market, and likely none of the business market- which is where the profits are.

      Not sure why you are being so *down* on HP. They seem to have a very large listing of HP printers that are supported by their Linux printer driver, and there are multiple webpages dedicated to instructing users how to get and install the driver.

      I’m betting that most of the *bad press* regarding the HP Linux printer driver and its install is coming from folks who are not accustom to the Linux command line environment. It’s not a *one click and done* operation. One has to know how to correctly enter the necessary commands, in what order, in what directory, and using a *normal user* vs a *super-user* mode at the appropriate time. Lots of variables–and they all have to be correct in order to have the results be successful!

      1 user thanked author for this post.
      • #2018970

        Well, part of my frustration, which apparently shows, has nothing to do with Linux or Windows.  I am still forced to type left-handed (and attempt to write left-handed as well), since two months ago now I semi-crippled my right hand and arm through over-use.  Last week or so, slight improvement, but I’m still the “one-armed paper hanger” of legend.

        In spite of my tales of woe, I am more than pleased with the path I have taken re Linux.  Of course, I’m posting only the holes in the doughnut here, but the doughnut itself is a better OS than anything MS has produced.  Yes, it’s more technical, especially in using the Terminal, but as your computer background is much more extensive than mine, your initiation should go more smoothly.

        In addition to the help here, notably from Ascaris, there is an active Linux Mint forum which has been a big help to me as well.  View it at https://forums.linuxmint.com/viewforum.php?f=126&sid=089ed1dcb7e967b156edc6f3c40baa3e

        You can “try before you buy” by downloading the OS of your choosing to a thumb drive and booting into it.  It won’t be as lightning fast as a true installation, but it would be an introduction.  If you like what you see, you can proceed with the installation- ours, as you may recall, is dual boot with Win7.

    • #2018971

      I’m curious … why have you not tried the outline I posted several days ago–it’s the outline from the *horses mouth*–HP’s recommended way to install the most recent printer driver in place of whatever version is originally included with the Mint version you have installed, and how to automate getting the plug-in downloaded and installed.

      I actually did try that- since you haven’t actually seen a Mint OS, you may not have understood the outcome.  Linux distros come with a huge repository of software, most uninstalled but available to users.  Many printer drivers are included, and the OS detects a connected printer and auto-installs the drivers.  However, in this case, the version in the repo is so far out of date that the needed plugin to enable scanning is no longer available.  The installer gets confused when I try to install the current version using the HP site, and reinstalls the version in the repo, giving me print function only.

      • #2018989

        However, in this case, the version in the repo is so far out of date that the needed plugin to enable scanning is no longer available. The installer gets confused when I try to install the current version using the HP site, and reinstalls the version in the repo, giving me print function only.

        That’s not exactly what’s happening.  You should either use the version in the repo or the .run version– they are not compatible with one another.  If you tell the package manager to install hplip, it will install the most recent version it knows about, and that’s not the .run one.

        If you’re going to use the .run, don’t try to use the package manager for that same thing.  When you install it via the .run, the package will show up as not installed in Synaptic, and that’s as it should be, even though it is installed through other means.

        The reason the version in the 18.04 repo is old is that 18.04 is a LTS release, and LTS puts stability up front, with having the latest versions of things not being a priority.  Sometimes that doesn’t suit us as consumers… I’ve got a lot of things installed that are newer than what the Ubuntu repo offers.

        The version of the .deb installers I linked before should be new enough to work with the plugin you need, but apparently that plugin isn’t included with that version either, so you’re still going to have to get that installed.

        It doesn’t have to be that way in Ubuntu, as they have no problem distributing closed software via the repo.  They have Intel microcode for CPUs and binary blobs for all kinds of devices, including nVidia video drivers.  Debian goes so far as to editing Firefox to remove the copyrighted artwork and icons just because they’re copyrighted, but I suppose that’s one of the reason Ubuntu (which is based on Debian) exists.  Not everyone running Linux is a “closed software is unethical” ideologue like Richard Stallman.

        I don’t know why Ubuntu doesn’t have the plugins in their repo.  Maybe some kind of licensing thing doesn’t allow distribution by non-HP means, or something like that.  Whatever it is, the procedure NightOwl cited looks to be the best way to get the plugin installed and working.

        It would be nice if HP would package the plugin into a .deb and make things easy…

        Dell XPS 13/9310, i5-1135G7/16GB, KDE Neon 6.2
        XPG Xenia 15, i7-9750H/32GB & GTX1660ti, Kubuntu 24.04
        Acer Swift Go 14, i5-1335U/16GB, Kubuntu 24.04 (and Win 11)

        1 user thanked author for this post.
    • #2018972

      Today I plan to try a new strategy to sidestep the permissions issue which I am not yet fluent in.  I have discovered that my attempt to add a regular user was in fact successful, just didn’t know how to open that home directory.  But I can do that on boot- so I’ll try downloading the HP driver and plugin as the new user and attempt to install them.  I’ll post back with the outcome.

      • #2018999

        I have discovered that my attempt to add a regular user was in fact successful, just didn’t know how to open that home directory.

        You would find it in /home/user, where ‘user’ is the name of the new user you created.  You would not have permissions to look around in there, though, unless you elevated to superuser, and that can cause issues of its own (and could be behind the permissions issues you’re having… doing things in user folders as root can end up with those files owned by root, so when you try to modify them as a regular user again, it won’t allow it).  What you could do is log into the new account and set the permissions on your user files to allow everyone to read and modify them.

        I suspect that the problem with your ‘steve’ account will end up being some files in /home/steve that are owned by root.  I have the ‘owner’ field turned on in my file manager, so I can easily see if any files are owned by root inappropriately (it has happened with mine).

        I am not actually sure if it is a good idea… maybe someone like mn- can say, but there is a fairly easy way to change everything in the /home/steve folder to be owned by steve instead of root.

        sudo chown -R steve:steve /home/steve

        chown means change owner.  -R (capital R) means to recurse directories, meaning it will change the owner of everything inside them too, and everything inside the ones inside, and so on.  steve:steve means to change owner to steve (the first one) and the group to steve (second one), and /home/steve is the directory/folder you want to take ownership of.  If the files are already owned by steve, nothing will change.

        I think everything in your home folder should be owned by you, but I don’t know for certain that this is universally true.

        Dell XPS 13/9310, i5-1135G7/16GB, KDE Neon 6.2
        XPG Xenia 15, i7-9750H/32GB & GTX1660ti, Kubuntu 24.04
        Acer Swift Go 14, i5-1335U/16GB, Kubuntu 24.04 (and Win 11)

        2 users thanked author for this post.
    • #2018990

      and Win8.1–no Linux distros for the time being. I’m considering taking the plunge

      If you decide to try one of the Mint distros, a helpful primer to get some basic context is “Linux in Easy Steps” by Mike McGrath.  Borrowed this from my local library for a test drive and then bought a copy.  If there are no book stores near you, it’s available here: https://www.amazon.com/s?k=Linux+in+easy+steps&i=stripbooks&ref=nb_sb_noss

      You’d want the 2018 edition.

      1 user thanked author for this post.
    • #2018998

      That’s not exactly what’s happening. You should either use the version in the repo or the .run version– they are not compatible with one another. If you tell the package manager to install hplip, it will install the most recent version it knows about, and that’s not the .run one.

      The repo version auto-installed when I first installed the OS.  My own attempts at installation were all the newest version from the HP site, which I found myself before originally posting about my problems.  The system overrode my attempt to install the new version and reinstalled the repo version.  Currently AFAIK, all the printer software is uninstalled.  The tray icon no longer shows.  Later today I plan to boot the Mint OS as the new regular user and try to download and install the current driver package and plugin from HP.

      I have been a repeat visitor to that HP page that NightOwl found and linked.

      1 user thanked author for this post.
    • #2019004

      I have discovered that my attempt to add a regular user was in fact successful, just didn’t know how to open that home directory.

      You would find it in /home/user, where ‘user’ is the name of the new user you created.  You would not have permissions to look around in there, though, unless you elevated to superuser, and that can cause issues of its own (and could be behind the permissions issues you’re having… doing things in user folders as root can end up with those files owned by root, so when you try to modify them as a regular user again, it won’t allow it).  What you could do is log into the new account and set the permissions on your user files to allow everyone to read and modify them.

      I suspect that the problem with your ‘steve’ account will end up being some files in /home/steve that are owned by root.  I have the ‘owner’ field turned on in my file manager, so I can easily see if any files are owned by root inappropriately (it has happened with mine).

      I am not actually sure if it is a good idea… maybe someone like mn- can say, but there is a fairly easy way to change everything in the /home/steve folder to be owned by steve instead of root.

      sudo chown -R steve:steve /home/steve

      chown means change owner.  -R (capital R) means to recurse directories, meaning it will change the owner of everything inside them too, and everything inside the ones inside, and so on.  steve:steve means to change owner to steve (the first one) and the group to steve (second one), and /home/steve is the directory/folder you want to take ownership of.  If the files are already owned by steve, nothing will change.

      I think everything in your home folder should be owned by you, but I don’t know for certain that this is universally true.

      I’m a little confused- I thought that, since steve was the only user, it was automatically a superuser, and the same as root.  Before I try to understand that distinction, what do you think of my plan to try the printer setup with the new regular user?

      • #2019401

        I’m a little confused- I thought that, since steve was the only user, it was automatically a superuser, and the same as root. Before I try to understand that distinction, what do you think of my plan to try the printer setup with the new regular user?

        I have addressed this indirectly in some other posts, but I just reread this line, and I thought I should address it directly.  No, ‘steve’ is not the same as ‘root’.  ‘root’ can do anything without ‘sudo’ or entering a password.  When in root mode, the prompt will end with a #, not a $.  The root account is not enabled by default in Ubuntu, and its use is discouraged by Ubuntu and others, as running with full rights all the time means any malware runs as root also.

        When you type ‘sudo’, you are temporarily becoming the root user for the execution of that command.  You may have noticed that things like themes, font choices, and the like change when you run something with escalated privileges… it’s because you’re ‘root’ for the moment, and the settings like themes and fonts are for the user ‘steve’.

        The reason I suggested the chown command is to make sure everything in your home directory is owned by ‘steve’ and not ‘root’, because those things owned by root can only be modified when you have escalated privileges, which seems to be the problem you are having with the printer driver installer.

        It is a good idea to try the procedure with a new user and see how it goes.  Edit: I wouldn’t make it a limited user, though… the printer installer does ask to escalate privileges at times, even though it wants to be run as a regular user, and a regular user could not do that.

        NightOwl does have a point about ending in the same place, but if my hypothesis about some of your ‘steve’ files being owned by root is accurate, if you do not run the .run file as root, it might work better, and the privilege problem will be confirmed.

        Please let us know how it goes!

        Dell XPS 13/9310, i5-1135G7/16GB, KDE Neon 6.2
        XPG Xenia 15, i7-9750H/32GB & GTX1660ti, Kubuntu 24.04
        Acer Swift Go 14, i5-1335U/16GB, Kubuntu 24.04 (and Win 11)

        • This reply was modified 5 years, 5 months ago by Ascaris.
    • #2019031

      @ Slowpoke47

      I’m a little confusedI thought that, since steve was the only user, it was automatically a superuser, and the same as root. Before I try to understand that distinction, what do you think of my plan to try the printer setup with the new regular user?

      I was beginning to realize that there probably was a gap in understanding what a *superuser* vs *normal* user was. When you started talking about creating another *user* so it would be a *normal* user, is when I started to wonder about this ….

      … what do you think of my plan to try the printer setup with the new regular user?

      Until you have a good understanding as to the differences between the *superuser* vs *normal user*, you most likely will end up in the same place as you find yourself now.

      I have a question for you: When you installed Mint, did you have to set up *Two* passwords-one would have been for the *superuser* that would allow you access to the *root* functions. The other should have been for a user account–that would have been so you can log on and use the functions available to a *normal* user.

      I saw something to the effect that Linux automatically sets up those two *accounts*, and by default has you run as a *normal* user so you do not have the *powers* of the *superuser* that can destroy your OS with a single click of a button. Linux forces you to elevate to the *superuser* only when necessary–in an attempt to protect the OS. (I can not remember where I saw that webpage.)

      I can not continue further this morning–off to work, but below are some links that may help:

      https://www.control-escape.com/linux/users-groups.html#linux-users-identity-and-permissions

      https://www.cyberciti.biz/faq/linux-login-as-super-user/

      https://www.howtogeek.com/111479/htg-explains-whats-the-difference-between-sudo-su/

      I would read these over, maybe a hundred times or so–I’m still not completely sure that I understand the issues–but they should give you a starting point–there are other websites with information that you can find with a search engine listing …

      1 user thanked author for this post.
    • #2019052

      I have a question for you: When you installed Mint, did you have to set up *Two* passwords

      No, just one.  When installing the OS, there has to be a user.  AFAIK, that user is by default a superuser, AKA administrator.  I ‘ve had various clues toward that conclusion, including the error messages during the attempts to install the HP drivers and plugin, that the account named steve is not a regular user.  I find that I am able to make various changes in function and appearance in the steve account.

      If my understanding of this is wrong, I hope someone sets me straight.

      I saw something to the effect that Linux automatically sets up those two *accounts*

      This may be in another distro- Linux comes in many flavors.

      • #2019166

        @slowpoke47, it’s important to bear in mind that, in this regard, Linux works differently from Windows. When you first set up a new Linux installation, the user that’s created is not an administrator account as is the case with Windows, but rather what in the Windows world we would call a “standard” account. New Windows installations default to an “administrator” account, while new Linux installations default to a “standard” account.

        To add to the confusion, in Linux you don’t have separate administrator and standard accounts; instead, you have a single “standard” account that you then elevate as needed to “administrator” level by using the SUDO command with the password. At least, that’s my understanding of it.

        I hope this helps in sorting things out with your printer issue. I have to admit my head hurts when trying to follow the twists and turns above!  🙂


        2 users thanked author for this post.
        • #2019368

          For what it might be worth: When, in July, I had Mint installed in double-boot with Windows 7 in my 8 1/2 years old Laptop, a friend of mine that maintains a number of Linux computers at NASA did me the favor of taking care of that. While he was about to get started with the setting up, he asked me if I wanted to have root privileges, adding that he did not recommended it. I shrugged my shoulders and said: “OK” (I was doing something else at the time and had my mind was  busy with it; also I am allergic at doing brain surgery on the OS – this has been a life-long condition and it’s clear that it has become pretty much incurable, by now.)

          The whole thing has to do, as I understand it, with having an Administrator password to login as “root”. Without that, the equivalent to right-clicking an icon in Windows and choosing “Run as an Administrator”, is to prefix a line command with the string “sudo”, hit return and, when requested, enter one’s login password. This limits the elevation of privilege to the execution of that particular line-command, that actually can be a command to execute one action or a series of separate actions, if the line includes multiple actions (where the output of one is the input of the next, for example), or when the command is to launch a script.

          Same as with Windows 7 “Run [this particular job] as Administrator” option, that temporary and limited elevation of privilege in Linux is likely to be enough for practically all I need to do, based on my own long time experiece. If this is not enough, in some rare occasion, what are friends for?

          Ex-Windows user (Win. 98, XP, 7); since mid-2017 using also macOS. Presently on Monterey 12.15 & sometimes running also Linux (Mint).

          MacBook Pro circa mid-2015, 15" display, with 16GB 1600 GHz DDR3 RAM, 1 TB SSD, a Haswell architecture Intel CPU with 4 Cores and 8 Threads model i7-4870HQ @ 2.50GHz.
          Intel Iris Pro GPU with Built-in Bus, VRAM 1.5 GB, Display 2880 x 1800 Retina, 24-Bit color.
          macOS Monterey; browsers: Waterfox "Current", Vivaldi and (now and then) Chrome; security apps. Intego AV

      • #2019392

        No, just one. When installing the OS, there has to be a user. AFAIK, that user is by default a superuser, AKA administrator.

        It’s a superuser or administrator account because you are able to escalate to superuser rights, but unless you do, you’re operating with user-level privileges.  A user that is not a member of the “wheel” group (as in “a big wheel”) on some old-school Unix systems (and carried to FreeBSD, if I remember), or “sudo” in Ubuntu and descendants, can’t escalate the privileges to do admin stuff.

        The nomenclature may be a little confusing, but think of this.  “sudo” means superuser do, as it escalates privileges to the superuser level for that command.  Your account is a superuser account all the time, since you have that ability to escalate privileges, but you’re not using those superuser rights all the time, nor would you want to.  You don’t want things like your browser running with superuser privileges.

        Ubuntu only has the user create one account at install time, as you noted, Slowpoke47.  It’s a standard admin account… neither a root account (which runs at full privilege all the time, and is not a good idea) nor a limited user account (which can’t use sudo), but a happy medium.  There has to be at least one administrator account created, as admin work is necessary sometimes, but after that, you can create user accounts.  Those are optional, so Ubuntu doesn’t have you make one right off the bat.

        Windows uses a very similar system… the special account named “Administrator” is disabled by default, while the first account a person creates after installing Windows or first booting up a brand new PC is an administrator account of the same type as in Linux, where it is running with user privileges most of the time, but escalates privileges via UAC when an admin task needs to be done.  Windows does have a way of escalating privileges on some things that don’t trigger the automatic prompt… memory is fuzzy, as I have not had to do it in a while, but I think if you hold CTRL down while you right click an icon (like in the Control Panel) it will give a context menu that has an extra option to run as administrator.

        You can also run the Command prompt window as Admin from the Start menu and launch the program from the command line, and it will be about the same as using ‘sudo x’ where x is the command in question in Linux.  As always, only escalate privileges when you need to.

        Dell XPS 13/9310, i5-1135G7/16GB, KDE Neon 6.2
        XPG Xenia 15, i7-9750H/32GB & GTX1660ti, Kubuntu 24.04
        Acer Swift Go 14, i5-1335U/16GB, Kubuntu 24.04 (and Win 11)

        1 user thanked author for this post.
    • #2019213

      I have to admit my head hurts when trying to follow the twists and turns above!

      Yeah- leave it to me to provide the entertainment:-)

      Is there a command that I can use to ask the all-knowing terminal what kind of account I have?

      2 users thanked author for this post.
      • #2019221

        As far as I know, there’s no need to find out what kind of account you have: you’re always a regular User until you SUDO yourself into Superuser. (Maybe the Terminal could show an “S” shield to indicate this, like when Clark Kent goes into a phone booth to change…)

        Yeah- leave it to me to provide the entertainment:-)

        LOL

        1 user thanked author for this post.
        • #2019307

          Well, if you have UAC enabled in Windows as by default, you can think of that like being the same as ‘sudo’ or the graphical forms of privilege escalation. In both cases, you have to give extra authorization to do administrative tasks.  It’s just that one of them asks for a password and the other (by default?) just asks the user to hit “Allow,” which simply trains people to always hit “allow” when they see it (even I’ve had that happen, though with a third-party security application, even though I’m aware of what the prompts mean).  This is the account type that is created by Windows and graphical tools for Linux.  It’s an admin account, but not a root account that has maximum privileges all the time.

          It is possible to have such an account in Linux and Windows, but it’s not usually needed and carries with it inherent risks.

          In Linux, I don’t think there is a defined “admin” account (other than root itself) or a defined “user” account.  I think it’s all about the user groups the user is a part of, and the permissions and privileges afforded to each group.  There can be infinitely varying steps between a “can’t do anything” user and the root account.

          I don’t know if Windows is like that, but I know that with group policy, it is possible to have fine-grained control over user permissions too.

          Interestingly, in KDE Neon, a standard user can’t use sudo, but some or all of the privilege escalations that take place through polkit (the latest graphical version of sudo in use by Ubuntu and derivatives) are still permitted.  I was able to start Synaptic package manager and KDE Partition Manager, though if I tried to use sudo from the command line, I got a “not allowed” message, complete with a snarky “this incident has been reported” message.  Reported to whomI’m the administrator, and I didn’t see anything!  (I am sure it’s in a log somewhere, but I’m not looking for it!)

          Dell XPS 13/9310, i5-1135G7/16GB, KDE Neon 6.2
          XPG Xenia 15, i7-9750H/32GB & GTX1660ti, Kubuntu 24.04
          Acer Swift Go 14, i5-1335U/16GB, Kubuntu 24.04 (and Win 11)

          2 users thanked author for this post.
          • #2019346

            Huh, I’m on Kubuntu 18.04 LTS (kernel version 4.15.0-70-generic) and I haven’t (yet) run into any limitations like that on sudo.

            1 user thanked author for this post.
            • #2019391

              Was it with a limited account?  In the KDE User Manager (in the System Settings menu as “Account Details,” at least in Plasma 5.17.4), I just created a new user account with the “Enable administrator privileges for this user” box unchecked, so I could see what it does.  I expected it to deny everything that required privilege escalation, but surprisingly, it allowed the PolKit escalations without a peep.  I don’t know if that’s a Neon peculiarity or not.


              Dell XPS 13/9310, i5-1135G7/16GB, KDE Neon 6.2
              XPG Xenia 15, i7-9750H/32GB & GTX1660ti, Kubuntu 24.04
              Acer Swift Go 14, i5-1335U/16GB, Kubuntu 24.04 (and Win 11)

            • #2019410

              /facepalm

              I figured it out.  I used my same password for the temporary test account, so when it asked for a password (it did not state whose password!), I entered what I thought was the temp user password, but it was actually asking for the password of the adminstrator (my main account).

              Dell XPS 13/9310, i5-1135G7/16GB, KDE Neon 6.2
              XPG Xenia 15, i7-9750H/32GB & GTX1660ti, Kubuntu 24.04
              Acer Swift Go 14, i5-1335U/16GB, Kubuntu 24.04 (and Win 11)

      • #2019388

        Well you could try “id -u” – a 0 means you have root permissions. Just “id” lists your user and group ids.

        Typically sudo is restricted to a group, could be “admin” or “sudo” or some such, but could also be used to grant specific other groups permission to specific commands… there’s no specific limit.

        Note, the ACL support is in addition to the traditional uid/gid access controls, as is policykit.

        I don’t know if Windows is like that, but I know that with group policy, it is possible to have fine-grained control over user permissions too.

        Well in Pro and up editions of Windows, you by default do have fine-grained control even without going into policies. Some of that is available on Home editions too but the usage methods are just crippled. See all the *other* local groups you have by default if you check with “net localgroup”…

        I tried to use sudo from the command line, I got a “not allowed” message, complete with a snarky “this incident has been reported” message. Reported to whom? I’m the administrator, and I didn’t see anything! (I am sure it’s in a log somewhere, but I’m not looking for it!)

        You probably haven’t done the system-level mail configuration like it’s traditional to do on a server. Once you do, you’ll start getting these in the mail.

        Oh and a funny thing about root accounts in Unix/Linux type systems… the numeric id determines your file ownership, access rights and such. The text id determines your starting home directory, shell and… so you could have the normal “root” set up with a scripting-only shell and then have something else that you can actually log in as to do admin tasks. This was more common before the prevalence of sudo.

        • #2019390

          You probably haven’t done the system-level mail configuration like it’s traditional to do on a server. Once you do, you’ll start getting these in the mail.

          Yes, that’s the thing though… I haven’t done that because it isn’t a server, but a personal computer that is used by one person exclusively.  There’s nothing to report to me because I already know I did it!  I just think it’s funny that it would snarkily say the incident will be reported when it has no idea if that is actually the case.

          Dell XPS 13/9310, i5-1135G7/16GB, KDE Neon 6.2
          XPG Xenia 15, i7-9750H/32GB & GTX1660ti, Kubuntu 24.04
          Acer Swift Go 14, i5-1335U/16GB, Kubuntu 24.04 (and Win 11)

    • #2019359

      Try using the package manager to install simple-scan and see if it works.

    • #2019424

      Linux works differently from Windows. When you first set up a new Linux installation, the user that’s created is not an administrator account

      Finally have a modicum of clarity re user levels, between the guidance here and this thread:  https://forums.linuxmint.com/viewtopic.php?f=90&t=307095&sid=722fff83f5890105d20084a89593407f.  On initial installation of my Mate 19.2 OS, one account is, of course, created, and it is, in fact, an Administrator account.  I know this because if I open the users menu entry, the only account shows my user name and labels it Administrator.  How’s that for detective work?

      Again, in Mate- the root account is by default disabled and a password is needed to invoke it. But with the Admin account, and the ability to elevate to root privileges via the sudo command, I don’t need access to the root account.  You might say that Mint in its wisdom is protecting the system from fools like myself.  Good thing, too, considering my record!

      Looks like, going forward, we won’t need any additional accounts.  I like “simple.”

      1 user thanked author for this post.
      • #2019641

        Slowpoke: as I mentioned in my earlier comment, what you describe is the way ‘sudo’ works in LINUX, not just in its Mint variety. I have the same idea as you do about ‘sudo” being sufficient for me. For more than that, and only if I find it absolutely necessary, I’ll try to get some friendly expert to take care of whatever needs full ‘root’ privileges to be done. So far, over a number of years, that has not been necessary for me, yet.

        Ex-Windows user (Win. 98, XP, 7); since mid-2017 using also macOS. Presently on Monterey 12.15 & sometimes running also Linux (Mint).

        MacBook Pro circa mid-2015, 15" display, with 16GB 1600 GHz DDR3 RAM, 1 TB SSD, a Haswell architecture Intel CPU with 4 Cores and 8 Threads model i7-4870HQ @ 2.50GHz.
        Intel Iris Pro GPU with Built-in Bus, VRAM 1.5 GB, Display 2880 x 1800 Retina, 24-Bit color.
        macOS Monterey; browsers: Waterfox "Current", Vivaldi and (now and then) Chrome; security apps. Intego AV

        1 user thanked author for this post.
    • #2019429

      Try using the package manager to install simple-scan and see if it works.

      Simple Scan is installed by default.

    • #2019522

      Was it with a limited account?  In the KDE User Manager (in the System Settings menu as “Account Details,” at least in Plasma 5.17.4), I just created a new user account with the “Enable administrator privileges for this user” box unchecked, so I could see what it does.  I expected it to deny everything that required privilege escalation, but surprisingly, it allowed the PolKit escalations without a peep.  I don’t know if that’s a Neon peculiarity or not.


      @ascaris
      , it was whatever type of account is created upon the installation of Kubuntu.

      This discussion got me curious, so just now I went into Kubuntu’s System Settings –> Account Details –> User Manager to see what’s up. There is a single user (me), who somehow has both a name and then a “Real Name” (separate fields). There are additional fields, currently blank, for “Email Address” and “Password”. Finally, below these fields there are two check-boxes: “Enable administrator privileges for this user,” and “Log in automatically”. The former is checked, while the latter is not checked.


      • #2019661

        Gotcha.  I was talking about the type of account with the administrator box unchecked.  If I were ever to loan my computer to someone, I would not simply log into my account and let them have at it.  I’d create a limited user account and give them their own password, and switch to that before handing over control.  I have done exactly this in Windows XP when I had a friend who wanted to use my PC.  It only takes a second, and prevents them from seeing anything maybe I don’t want them to, or making changes that I definitely don’t want them to (even if by mistake).

        In the case where the user does not have admin rights (in Ubuntu and derivatives, this would mean not being part of the ‘sudo’ user group, or ‘admin’ in older versions of Ubuntu), attempts to use ‘sudo’ do not work (and result in that snarky message I mentioned), while attempts to elevate privileges graphically (like if you open Synaptic Package Manager or GParted) will ask for a password, but it’s actually asking for the administrator’s password, not the password of the account then in use.  As a standard user won’t have the admin password (if they do, they can just log in as the admin!), they won’t be able to get the escalated privileges.

        Dell XPS 13/9310, i5-1135G7/16GB, KDE Neon 6.2
        XPG Xenia 15, i7-9750H/32GB & GTX1660ti, Kubuntu 24.04
        Acer Swift Go 14, i5-1335U/16GB, Kubuntu 24.04 (and Win 11)

        1 user thanked author for this post.
    • #2019695

      A final opinion or three that might interest Slowpoke47:

      Keep it simple while still learning Linux, meaning, in this case: to have Mint setup with a single account, Slowpoke47’s, so there are no other accounts around, this account being the one accessed at booting up time with the user name and password you have chosen for yourself. Also either there is no Root Administrator password, or there is one, but you do not know it, or you know it but you are most firmly determined not to use it for at least one full year, while using, meantime, the command line fairly frequently and for a considerable variety of purposes during the first year.

      Then here it goes:

      Login into Mint, open Terminal and start a session using the line command there. If you need to do something that requires “sudo”, then do that and, when the system prompts you to enter a password, enter the same password you logged into your (unique) account, hit return, and the command will be executed. Anything else about being the administrator and, or having or acquiring administrator privileges shall be of no interest, for the time being.

      O real interest to those new to Linux, like SP47:

      There are books, tutorials on line and the PDF versions of whole books explaining the basic and most necessary to know ins and outs of Linux and also, in more detail, of shells and scripts. (I would recommend learning the Bash shell that, it seems to me, is very widely used.)

      It would be most helpful to give SP47, and those in the same situation that might visit this thread, a few good book titles and URLs where that kind of basic to intermediate materials can be found, but where they are presented in a reasonably pedagogic way and not as an indigestible melange of abstruse technical jargon sprinkled with some super-terse explanations. Or concentrating on some microscopic detail of dubious interest to most users, particularly those new to Linux.

      This site, found after a brief search, looks like it has a decent Bash primer:

      https://dev.to/awwsmm/101-bash-commands-and-tips-for-beginners-to-experts-30je#first-commands

      This might be a decent basic generic primer for the Linux system:

      https://dev.to/awwsmm/101-bash-commands-and-tips-for-beginners-to-experts-30je#first-commands

      (I would recommend to read and practice the materials up to Chapter 8 and looking into 9 (“Networking”) if there is a real need to tussle with connections from the command line, rather than, more conveniently from the Mint graphic user interface (GUI) also known as “Desktop” and “folders”.

      Finally, there is this fat book that has a description, with examples, of what they are for and how to use a great number of Linux commands and that I find is a very good thing to have at hand when working from the line command:

      “Linux in a Nutshell” by Matt Welsh, and Lar Kaufman; published by O’Reilly & Associates, Inc. (Available in Amazon.)

      Now, ye helpful souls, add your own recommended reading materials for Slowpoke47 and others also new to Linux, but keen to learn and even master it! But keep it simple.

      Ex-Windows user (Win. 98, XP, 7); since mid-2017 using also macOS. Presently on Monterey 12.15 & sometimes running also Linux (Mint).

      MacBook Pro circa mid-2015, 15" display, with 16GB 1600 GHz DDR3 RAM, 1 TB SSD, a Haswell architecture Intel CPU with 4 Cores and 8 Threads model i7-4870HQ @ 2.50GHz.
      Intel Iris Pro GPU with Built-in Bus, VRAM 1.5 GB, Display 2880 x 1800 Retina, 24-Bit color.
      macOS Monterey; browsers: Waterfox "Current", Vivaldi and (now and then) Chrome; security apps. Intego AV

      2 users thanked author for this post.
    • #2019787

      Still beating myself up with this all-in-one printer install.  No problem installing either the repo version or the current (from HP) version driver pkg .  The snag remains getting the scan function enabled, which requires a matching plugin.  No such is available for the repo file, and the installation of the plugin for the newest file apparently does not complete.Binary-plugin-needed

      Perhaps someone can answer these questions

      1.  On this download page, what are the .asc entries for?  hp’s Developer Portal | Plugins
      2.  What are the chances that, with newer drivers, HP would drop older  printers from the list of supported devices?
      3. Where might I look for previous (older) drivers?
      4. The plugin for the latest driver pkg appears to do a partial install (see s/shot above) and generates conflicting installed/ not installed messages.  Does that seem like a computer problem or related to the specific printer?


      • #2019801

        The plugin for the latest driver pkg appears to do a partial install (see s/shot above) and generates conflicting installed/ not installed messages. Does that seem like a computer problem or related to the specific printer?

        It seems to be related to the installer itself.  It is contradictory to say that the installation was successful, then to say that a plugin is required.  Did you try entering the hp-plugin command after the above sequence from the screenshot?  I saw the above sequence where it non-helpfully told you that to use hp-plugin, you’d have to install hplip, which was already installed, as you noted.  Something’s not right!


        Dell XPS 13/9310, i5-1135G7/16GB, KDE Neon 6.2
        XPG Xenia 15, i7-9750H/32GB & GTX1660ti, Kubuntu 24.04
        Acer Swift Go 14, i5-1335U/16GB, Kubuntu 24.04 (and Win 11)

        1 user thanked author for this post.
        • #2019803

          Did you try entering the hp-plugin command after the above sequence from the screenshot?

          Yes, and I tried manually every way my (inexperienced) imagination could conjure up to do an installation from the Downloads folder.

          Plugin-install-attempts
          I’ve asked on the Mint forum, had somewhat conflicting answers, and been beaten about the head and shoulders, crime being, incompetence.

          Just now looking for older versions of the hplip driver pkg, nothing found.  Do you know anything about that .asc extension?  Appears to be a 198 byte text file that doesn’t download without some extra steps, it just displays.  Why would those files be there if they weren’t needed for something?

          Looks like back to a dead end.


          • This reply was modified 5 years, 5 months ago by Slowpoke47.
          • This reply was modified 5 years, 5 months ago by Slowpoke47. Reason: correction
          • #2019833

            @slowpoke47, I see in your screenshot that the most recent attempt to install was the one that got the furthest along in the process (at least in that series of tries), but then it failed because the “hplip-3.19.12-plugin.run” file could not be found.

            Might it help for you to first navigate (in Terminal) to the folder where this file is located, and once there run the same “sudo apt-get install” command?


            1 user thanked author for this post.
          • #2019839

            Yes, and I tried manually every way my (inexperienced) imagination could conjure up to do an installation from the Downloads folder.

            The screenshot shows that the working directory was ~, or /home/steve, not /home/steve/Downloads.

            Dell XPS 13/9310, i5-1135G7/16GB, KDE Neon 6.2
            XPG Xenia 15, i7-9750H/32GB & GTX1660ti, Kubuntu 24.04
            Acer Swift Go 14, i5-1335U/16GB, Kubuntu 24.04 (and Win 11)

            1 user thanked author for this post.
    • #2019812

      @ Slowpoke47

      Again, in Mate- the root account is by default disabled and a password is needed to invoke it. But with the Admin account, and the ability to elevate to root privileges via the sudo command, I don’t need access to the root account.

      Looks like that pretty well sums it up. Yes, there is a second account (root) that is created by Mint when installing the program. It’s hidden, and by default it is not available unless special commands are given. So the install program only sets up the *normal user* account and you are required to create a password for just that one account.

      The above is *required* by Mint because they want to force the use of the *sudo* command that elevates a *normal user* to a *superuser* status which can then make changes to *root* information when needed.

      You might say that Mint in its wisdom is protecting the system from fools like myself.

      Well, don’t kid yourself. If you have used *sudo* to elevate your privileges to make changes to the *root* files, you have enough *superpower* to wreak havoc on your Mate OS if you enter the *wrong* command(s)!

      So, use with caution–as always!

      2 users thanked author for this post.
    • #2019813

      So the install program only sets up the *normal user* account and you are required to create a password for just that one account.

      Don’t know about other cases, but here, the account established with the install is an Administrator account- between the root and regular user privilege-wise.

    • #2019834

      @ Slowpoke47

      Looking at the screenshot above located here:

      Reply 2019803

      It looks like you are still trying to *manually* install the plugin for your printer.

      Unable-to-open-find-plugin-pkg

      Where did the *command line* come from that is showing in the top command:

      sh hplip-3.19.12-plugin.run

      Looking at the other output statements, the results of the *command* is stating that the terminal program is unable to *find* or *locate* the file you have specified–if the terminal program can not find the file, then it logically follows that the terminal program can not *open* the file as well.

      Can you show a screenshot of the Terminal window showing what directory it is *focused* on? And can you show a screenshot of what files are located in the directory that the Terminal window is focused on?

      A *manual* install was highly discouraged for inexperienced Linux users.

      Have to be gone for awhile. I’ll return later today with new suggestions.

      • #2019847

        If hplip-3.19.12-plugin.run is a script then then command should be changed to:

        sh ./hplip-3.19.12-plugin.run

        1 user thanked author for this post.
    • #2019851

      @slowpoke47, I see in your screenshot that the most recent attempt to install was the one that got the furthest along in the process (at least in that series of tries), but then it failed because the “hplip-3.19.12-plugin.run” file could not be found.

      Might it help for you to first navigate (in Terminal) to the folder where this file is located, and once there run the same “sudo apt-get install” command?


      I have done that as more than one of my attempts.  BTW- learned on the Mint forum that this should not be run as sudo.  That’s how I got the driver package installed- with sudo there were several warnings not to use that designation, and finally, failure to complete, when the ./ command worked.

      • #2019854

        Very well, but bear in mind that you first need to navigate to the folder where the “hplib-3.19.12-plugin.run” file is located, and only then try to install it.

        In that screenshot, you’d made four previous attempts to install the file. How about navigating in Terminal to the folder that contains your file and then, once there, trying each of those four commands to see if they work?

        You might also try the suggestion by “Anonymous” in post 2019847.


        1 user thanked author for this post.
        • #2019860

          Learned a couple of days ago to use sh ./ or just ./ from the folder with the file in it.

          In that screenshot, you’d made four previous attempts to install the file. How about navigating in Terminal to the folder that contains your file and then, once there, trying each of those four commands to see if they work?

          Instead of opening Terminal in that folder?  Isn’t that the same syntax?

          Edit- need to surrender this machine to the other user (aka, wife) for an hour or two.  I can respond to the forum on the other computer, But can’t do anything with Mint as that machine does not yet have that OS installed.

          • This reply was modified 5 years, 5 months ago by Slowpoke47.
    • #2019853

      Yes, and I tried manually every way my (inexperienced) imagination could conjure up to do an installation from the Downloads folder.

      The screenshot shows that the working directory was ~, or /home/steve, not /home/steve/Downloads.

      I didn’t notice that- good catch.  I thought any attempts I made that didn’t start with apt-get install were run from the Downloads folder- made so many in various forms that I can’t remember this one- looks like it’s worth doing over.

    • #2019855

      Yes, and I tried manually every way my (inexperienced) imagination could conjure up to do an installation from the Downloads folder.

      The screenshot shows that the working directory was ~, or /home/steve, not /home/steve/Downloads.

      Just ran this:

      Plugin-install-12-15

      Result, “No scanners found”  Not surprised because “installation” was instant- not what you’d expect for 25MB.

    • #2019868

      Did you try entering the hp-plugin command after the above sequence from the screenshot?

      Yes, if not this particular time, then in a different attempt.  I have so many s/shots saved at this point, that it seemed like overkill to post all of them.  And, some of them generated pop-up messages “successful” and “not successful” (or suchlike) one atop the other.  Those pop-ups disappear when opening the s/shot utility.

      Interesting that, on both the driver and plugin files, several gui pop-ups appeared re disclaimers (check accept) and type of connection (usb or network) in a format that I recognize as HP format.  So, somewhere the train goes off the track.

      Next week I plan to install Mint on our other machine, also as dual boot with Win7.  When that’s up and running, I’ll try these same HP installs and report back.  Meanwhile, I’d like to keep pursuing the installs on the desktop.

      BTW- turns out you can still buy this model printer on Amazon- $800+ with shipping.  Guess it’s not as obsolete as I thought!  (Pricey, too! Don’t recall what we paid new but it couldn’t have been that much- I would have fainted dead away!)

    • #2019880

      Instead of opening Terminal in that folder? Isn’t that the same syntax?

      I am unfamiliar with the concept of “opening Terminal in a folder.” Not sure what that means. My line of thinking is, “open Terminal, then change directories to reach the one where the installer file is, and then run the installer.”

      The bottom line is to make sure that, in your Terminal window, you have navigated to the folder where the file that you want to install is located. From looking at nearby posts, it seems that this would be your Downloads folder, as @ascaris noted. But then, it also appears that you’ve already tried installing that problem file while “being in the right place.”

      Thus, I’m wondering if this scanner plug-in either simply won’t work in Mint, or is broken altogether. Whatever the cause, obviously you have tried to install it six ways from Sunday and it still refuses to install. If your pending alternative Mint installation doesn’t do the trick either, then maybe a trip to HP Support might be in order, to give them a piece of your mind.


      1 user thanked author for this post.
      • #2020084

        I guess it’s possible there is a glitch in that plugin file.  But I think it’s more likely that the problem lies with the user.  All it takes is one erroneous step or keystroke.  Although I like this new OS, I’m still working my way up the learning curve.

        If this install continues to fail, I might try to go back one or more versions and try installing an older driver/ update set.  If that also fails, then- I’ll know that the problem lies with that face that stares back at me in the mirror.

    • #2019961

      @ Ascaris

      If he uses the option in Veeam to back up the entire machine, it should back up the entire machine.

      Have you instructed @ Slowpoke47 how to use that *option*?

      The way @ Slowpoke47 talked about using Veeam in Mint was associated with the concept of the Win7 hard drive (HDD) being *mounted* in Mint–and that would take care of backing up both of the HDD’s.

      If he understands that each HDD has to be selected (in this case by selecting *the entire machine* option, then there’s no problem using just the Mint Veeam software to backup both HDD’s.

      How does one separate which HDD to restore if that becomes necessary?

      How does one see what’s inside a backup to know that both HDD’s have been backed up?

      (Don’t answer the above questions here–they are rhetorical questions–should create a new topic to discuss these details.)

      • #2020011

        Have you instructed @ Slowpoke47 how to use that *option*?

        Yes indeed– that was the option I indicated in the step-by-step tutorial on using Veeam.  It has nothing to do with whether the Windows drive was mounted at the time, but instead that the correct option was used.  Backing up individual volumes or directories would require extra steps; by far the easiest option is to use the entire machine option.

        Dell XPS 13/9310, i5-1135G7/16GB, KDE Neon 6.2
        XPG Xenia 15, i7-9750H/32GB & GTX1660ti, Kubuntu 24.04
        Acer Swift Go 14, i5-1335U/16GB, Kubuntu 24.04 (and Win 11)

        1 user thanked author for this post.
    • #2019976

      @ Slowpoke47

      I thought I would point out an *update* to my previous recommendations and outline for installing the print driver using the recommended HP automated procedure.

      HP just recently released an Updated driver, version 3.19.12 . In my post above, I stated:

      To use the Automatic Installer, follow these steps:

      1. Download the file to a convenient location (e.g., home directory or desktop, etc)
      2. Open a console/terminal and cd to the location where the installer was downloaded. (e.g., cd ~/Desktop)
      3. Type in and run this command: ‘sh hplip-3.19.11.run

      So, download to *Desktop* as I mentioned before, make sure the console/terminal is focus on the *Desktop* directory, and then type in the command:

      sh hplip-3.19.11.run

      So, just to be clear, the terminal command has to be updated to reflect the new version number of the driver. So, instead of sh hplip-3.19.11.run, it needs to be:

      sh hplip-3.19.12.run

      if you have downloaded that newer version of the print driver.

    • #2020003

      @ Slowpoke47

      I’m curious … why have you not tried the outline I posted several days ago–it’s the outline from the *horses mouth*–HP’s recommended way to install the most recent printer driver in place of whatever version is originally included with the Mint version you have installed, and how to automate getting the plug-in downloaded and installed.

      I actually did try that- since you haven’t actually seen a Mint OS, you may not have understood the outcome. …. The installer gets confused when I try to install the current version using the HP site, and reinstalls the version in the repo, giving me print function only.

      In all of the various screenshots that you have posted, I have seen many commands that have been entered into the terminal command line entry box, and seen the screenshots of the results. Many of the commands have been incorrect, and the resultant output gives errors. You may have entered similar commands to the ones in the HP outline, but they probably were incorrect in some way. But, none of screenshots show evidence that you actually tried the outline that HP has recommended in order to perform an *automated* install of the print driver. (HP states that the *automated* install is recommended, and only advanced users should consider the *manual* install option.)

      If you did follow the HP outline, the first step is to download the driver version of your choice. If you use the HP outline you can only download the current most recent version of the driver. But, you have a link you shared above which allows you to download any version you wish to use: https://sourceforge.net/projects/hplip/files/hplip/

      Available-print-driver-versions

      There are 103 different versions listed. If you click on a given version, for instance the one the red arrow is pointing at, then you get this–the version 3.19.10 of the hplip print driver:

      Select-the-.run-file

      The driver file you want to download will be the * .run * file–the one the red arrow is pointing to–in this case it’s the hplip-3.19.10.run file.

      It appears that you prefer downloading the files to the *Download* file directory (as opposed to the *Desktop*–and that’s fine–just need to know where the driver file gets put.

      So, humor me–have your printer turned on–download the print driver file of your choice, put it in the *Download* directory. Then open your terminal program. Make sure it shows that the terminal is focused on the *Download* directory. Assuming you downloaded the 3.19.10 version, you should type in the following command (if you download a different version, just change the version number to what you have downloaded):

      sh hplip-3.19.10.run

      Before you do the above–this is the result you should get: https://developers.hp.com/hp-linux-imaging-and-printing/install/install/index

      (Clicking on the image, at least on my system, opens the image in a separate *tab* and the image is much easier to see–better quality.)

      Run-Automatic-Installer

      Just for the record, the HP outline emphasizes that you must be in the correct directory where the printer file is located. And note, HP has updated it’s latest file version to the 3.19.12, but they have not updated the screenshot of the terminal command, which shows version 3.17.10–oh, well, they’re lazy!

      So, once you enter the command and press *enter*, you get this opening screen–this screenshot is of very poor quality–so I’m going to copy and paste the image file below this so it’s clearer. But, before I do, note the link in the top right end of the text: *(what settings does automatic install mode use?)*. This takes you to the following webpage: https://developers.hp.com/hp-linux-imaging-and-printing/KnowledgeBase/AutomaticInstaller.html I’m going to copy and paste the relevant text:

      Required Steps:

      Many Linux distributions are equipped with a pre-packaged version of HPLIP software, therefore, you may already have HPLIP installed on your system.

      Even though HPLIP is already installed on your system, you may wish to upgrade to a newer version. Additionally, you may wish to have the latest version if you have a newer printer, a need for a new feature, or would like a bug fix that is contained in the newest version. If so, click HERE to find out how to auto-install HPLIP.

      A few items to note about what the Automatic Installation process provides:

      Automatic compilation and installaton of the HPLIP package (to the /usr/share directory)
      Installation of all options
      Removal of previous installations of HPLIP and HPOJ packages
      Assumes that all optional dependencies will be downloaded and installed
      Provides installation of required dependencies
      Asks to confirm Linux distribution
      Automatically runs the hp-setup tool to finish installation and configure your printer

      (Note: The *hp-setup* tool should be the item that automatically downloads and installs the *plug-in* that you have been unsuccessfully attempting to *manually* install.)

      Opening-Screen-after-intering-the-terminal-command

      So, hopefully here’s the better image of the screenshot:

      Better-Screenshot-of-the-opeing-screen

      Just keep stepping through the installation steps–I would probably accept the recommended *default* settings–and if your printer uses a USB connection to your computer, be prepared to unplug and then re-plug the USB connection when directed to.

      Any questions?

      1 user thanked author for this post.
    • #2020075

      I am unfamiliar with the concept of “opening Terminal in a folder.”

      In our distro, Mint Mate 19.2, you navigate to the folder, right click brings up menu, select “open in terminal” and the terminal that opens has the correct path to the folder that you have opened. From there, command the terminal as usual.

      It dawned on me this morning that, in the attempts visible in the s/shot in post# 2019803 above, that I must have expanded the Downloads folder in the home directory, then tried the installation.  Once again living up to my name:-(

      1 user thanked author for this post.
      • #2020105

        It dawned on me this morning that, in the attempts visible in the s/shot in post# 2019803 above, that I must have expanded the Downloads folder in the home directory, then tried the installation. Once again living up to my name:-(

        Mistakes are much better teachers than immediate success, though!

        The downloads folder usually is in the home directory (folder and directory both meaning the same, in context).  Inside /home/steve you would usually find Downloads (remember Linux is case sensitive… I believe it is capitalized in Mint as it is in Neon).

        If you downloaded the .run file in the form of a .tar.gz file (a tarball), it could have been expanded into the Downloads folder  (since that’s where the .tar.gz file is), or the archive program could be remembering the last place it expanded an archive to, which could be anywhere.  In the above screenshot, you were in the home directory, so it would have worked to use the .sh hplip*.run command there if that was where the .run file was located.  Remember that the ~ symbol means your home, so it is the same as /home/steve if it is by itself, while you are on your ‘steve’ account.

        It might be helpful to do things in the Desktop folder (I think the HP guide suggested this too), since you can easily see the icons for the files on the desktop.  If you use the command prompt and the working directory is ~/Desktop, that is the same as the actual desktop you see in Mint.  If the guide says to do something and you’re not sure what it means, don’t skip the step… find out how to do it before you forget it.  I’ve done that kind of thing too… I don’t know what something means, so I put it aside to figure it out later, then I forget about it and wonder why things aren’t working.  I think it’s human nature to do that.

        Don’t be down on yourself for making mistakes!  I’ve made tons of them, not just with computers, but with all kinds of other things too.  The goal is not to never make mistakes, but to be able to think about why they happened and what you can do better the next time.  It’s hard sometimes not to get discouraged, but each time something doesn’t work, it’s valuable information that the thing you just tried wasn’t the answer.

        As NightOwl mentioned, the manual installation is an advanced technique that isn’t recommended for beginners (though it may also be the only real choice to get it working), so this is bound to be hard.  The nVidia graphics drivers come from nVidia as .run files too, and I avoid those and wait for them to arrive in the Ubuntu graphics-drivers PPA instead, just because it’s so much less of a pain in the butt to let the package manager handle it.  Sometimes there isn’t a PPA, so you just have to figure it out!

        Dell XPS 13/9310, i5-1135G7/16GB, KDE Neon 6.2
        XPG Xenia 15, i7-9750H/32GB & GTX1660ti, Kubuntu 24.04
        Acer Swift Go 14, i5-1335U/16GB, Kubuntu 24.04 (and Win 11)

        • This reply was modified 5 years, 5 months ago by Ascaris.
        2 users thanked author for this post.
    • #2020092

      If you did follow the HP outline, the first step is to download the driver version of your choice. If you use the HP outline you can only download the current most recent version of the driver. But, you have a link you shared above which allows you to download any version you wish to use: https://sourceforge.net/projects/hplip/files/hplip/

      Yes, I thought that would be helpful.  However, turns out, if you select any of those older versions, the HP downloads page that results defaults to the current version.

    • #2020134

      @ Slowpoke47

      However, turns out, if you select any of those older versions, the HP downloads page that results defaults to the current version.

      (The formating of your reply got messed up–the text is not in the quote like it’s supposed to be, and the web page link doesn’t go to the listing of the versions–here’s the link again: https://sourceforge.net/projects/hplip/files/hplip/ )

      Not sure what you mean by *the HP downloads page that results defaults to the current version*. Here’s my experience:

      Clicked on the link and got this:

      Different-hplip-versions-step-one

      Clicked on the * hplip * link at the far left, and got this listing:

      Different-hplip-versions-step-two

      Are you referring to the green *Download Latest Version* button at the top?

      Clicked on the 3.19.5 link in the left hand column and got:

      Different-hplip-versions-step-three

      Clicked on the * hplip-3.19.5.run * file and got this download dialog box:

      Different-hplip-versions-step-four

      At least for me, it did not *default to the current version*–it’s giving me the version I selected.

      So, what are you doing?

      1 user thanked author for this post.
    • #2020166

      In our distro, Mint Mate 19.2, you navigate to the folder, right click brings up menu, select “open in terminal” and the terminal that opens has the correct path to the folder that you have opened. From there, command the terminal as usual.

      Fascinating! I just tried (harder) in Kubuntu, and it turns out that this is indeed possible: for example, in the file manager I would navigate to the Home folder, then right-click on the Downloads icon over in the right panel, then hover the mouse pointer over “Actions,” and the first item in the context menu is “Open Terminal Here.” Very cool.

      So you see, I learned something from you today. Thank you!  🙂


      1 user thanked author for this post.
    • #2020177

      At least for me, it did not *default to the current version*–it’s giving me the version I selected.

      Just did this again today, short of actually downloading the file, and it looks like my results are the same as yours.  I have this page previously bookmarked, and the last time I selected an older version, the result was as I stated above.  Could this have been “corrected” by the site owner?  Even I can do a download like this, no problem, so I do think the result is now different.

      Once I finish with the current effort, if still unsuccessful, I thought if I tried an earlier version, I could then tell if the problem was mine or not.  That was my reason for saving a bookmark for that page.

    • #2020178

      So you see, I learned something from you today.

      Astounding.

      1 user thanked author for this post.
    • #2020360

      Another attempt to install plugin.  Conflicting messages again, but different ones.Plugin-installation-done
      Error-code-8-1
      I’m going to download the plugin file again to replace the current one.  Maybe that will help.

    • #2020361

      Another attempt to install plugin.  Conflicting messages again, but different ones.Plugin-installation-done
      Error-code-8
      I’m going to download the plugin file again to replace the current one.  Maybe that will help.

    • #2020397

      Another try, another different set of error messages.  I think I’ve been conscientious with the syntax, but…

      asc-needed
      Note that this is the first time I’ve seen an error message related to the .run.asc file I have wondered (and, asked) about.  This file, hplip-3.19.12-plugin.run.asc does not download when selected, it displays.  It is only about 200 bytes and maybe that’s what the chksum error was about previously.  I have managed to get it into the Downloads folder, but have no idea what to do with it.

      When I opt to let the terminal download the hplip file, it always comes back, cannot download or sometimes, file not found.  If I enter the absolute path in the proper field, the process continues, various errors appear.  One of those errors was, can’t download the ,asc file.

      I was pretty sure those .asc files, one for each version, were there for a reason.  Perhaps someone knows how to proceed from here.

      • #2020468

        This file, hplip-3.19.12-plugin.run.asc does not download when selected, it displays.

        If you right click it and select “Save link target” (in Firefox, or whatever the equivalent option would be in Chrome/Chromium/etc), you can download a file that wants to display instead.

        You could try putting it in the same folder from which you’re running the installer, but I don’t know if that would work.  It says it tried to download the .asc file, so I don’t know if it will look for it in the working directory first.  It could simply be listed on the download server so that the installer itself can downloading (something it’s failing to do).

        You could just tell it to install the plugin anyway (select “Yes” in the above dialog).  The .asc file is a signature file to make sure they plugin has not been tampered with.  It’s good to have verification, and it’s your choice, of course, but if it were me, I’d just take the leap of faith and do it anyway, trusting that HP has not been compromised, considering all the difficulty this has presented.

        Dell XPS 13/9310, i5-1135G7/16GB, KDE Neon 6.2
        XPG Xenia 15, i7-9750H/32GB & GTX1660ti, Kubuntu 24.04
        Acer Swift Go 14, i5-1335U/16GB, Kubuntu 24.04 (and Win 11)

        1 user thanked author for this post.
        • #2020544

          If you right click it and select “Save link target” (in Firefox, or whatever the equivalent option would be in Chrome/Chromium/etc), you can download a file that wants to display instead.

          And if it’s what an .asc file should usually be, from the displayed state you should be able to use “save as”, or even copy it all to clipboard and from there to your favorite text editor and then save.

          I mean, .asc usually means 7-bit ASCII plain text.

          1 user thanked author for this post.
    • #2020547

      If you right click it and select “Save link target” (in Firefox, or whatever the equivalent option would be in Chrome/Chromium/etc), you can download a file that wants to display instead.

      Yes, I did get this downloaded after that post.

      Just now tried to install the plugin using the sh ./ syntax.  Usual “accept terms” and “password” pop-ups.  “Done.”  Ran the .run.asc file, got ‘syntax error- “(” unexpected’

      Yet another conflicting result- note text “successful” and “killed”  From here, entered “hp-setup”, no response.  Entered “hp-plugin”, also no response. (not shown, below s/shot)killed

      • #2020550

        You can’t run an .asc file, even if it has .run before that.  That .run is simply part of the name of the file for which the .asc file is a signature.

        As to why it keeps saying it succeeded, but then that it was killed, or that you need a plugin (that you just installed?), I do not know.

        It may be a silly question, but have you tried using the printer/scanner and seeing if it actually did work one of these times?

        Dell XPS 13/9310, i5-1135G7/16GB, KDE Neon 6.2
        XPG Xenia 15, i7-9750H/32GB & GTX1660ti, Kubuntu 24.04
        Acer Swift Go 14, i5-1335U/16GB, Kubuntu 24.04 (and Win 11)

        1 user thanked author for this post.
    • #2020551

      A menu item has been added “HP Device Manager.”  Selecting this item generates “no devices found.”  But then, says, run “hp-setup” in Terminal- goes through the same pop-up sequence re license, etc. and finds printer. Each time this sequence of pop-ups appears, it freezes partway along.  Shows pop-up “HP Device Manager has stopped working.”  Options, wait or exit program.  I’ve seen this sequence multiple times before, waiting a considerable time goes nowhere.  Also generates this:success-killed

    • #2020554

      It may be a silly question, but have you tried using the printer/scanner and seeing if it actually did work one of these times?

      Yes, no scan.

    • #2020555

      You can’t run an .asc file, even if it has .run before that. That .run is simply part of the name of the file for which the .asc file is a signature.

      What should I do with the .asc file?

    • #2020599

      Ran command ‘hp-check’ which generated a long sequence, ending with:

      results-of-hp-check

      Not sure what to do with this new message.  I don’t know how to post the whole terminal session, if I figure it out, I’ll do that.

    • #2020614

      Should have mentioned- the HP Service Manager, accessed via tray icon, reports, no devices found.  But the printer prints fine.  Still no scan.

      • #2020620

        About the .asc file– just have it in the same directory as the .run file by the same name (except the .asc bit, of course).  It may be something that the installer script itself is supposed to download, so there’s nothing specific you would need to do with it.  It’s just there to get rid of the “can’t verify the plugin” message, which you can choose to ignore also.

        I read a blurb from someone who said that there is an unlisted dependency for the hplip package, and without it, the download and installation of the plugin will fail.  Perhaps, try this:

        sudo apt install avahi-daemon

        If it says it’s already installed… well, it was something to try.  If not, maybe it will work (try following the installation guide once again after avahi-daemon is installed.  I don’t know if that will necessarily start it, and the simplest way of making that happen would be to simply reboot back to Mint and try the installation of the plugin again.

        Here’s another guide that is specific to Mint/Ubuntu if you have not already seen it.


        Dell XPS 13/9310, i5-1135G7/16GB, KDE Neon 6.2
        XPG Xenia 15, i7-9750H/32GB & GTX1660ti, Kubuntu 24.04
        Acer Swift Go 14, i5-1335U/16GB, Kubuntu 24.04 (and Win 11)

        • This reply was modified 5 years, 5 months ago by Ascaris.
        1 user thanked author for this post.
    • #2020656

      Turns out copy-and-paste works fine for pasting here.  Didn’t discover how to save it to a file, yet.  Maybe I don’t need to.

      steve@steve-Inspiron-519:~$ hp-check
      Saving output in log file: /home/steve/hp-check.log

      HP Linux Imaging and Printing System (ver. 3.19.12)
      Dependency/Version Check Utility ver. 15.1

      Copyright (c) 2001-18 HP Development Company, LP
      This software comes with ABSOLUTELY NO WARRANTY.
      This is free software, and you are welcome to distribute it
      under certain conditions. See COPYING file for more details.

      Note: hp-check can be run in three modes:
      1. Compile-time check mode (-c or –compile): Use this mode before compiling the
      HPLIP supplied tarball (.tar.gz or .run) to determine if the proper dependencies
      are installed to successfully compile HPLIP.
      2. Run-time check mode (-r or –run): Use this mode to determine if a distro
      supplied package (.deb, .rpm, etc) or an already built HPLIP supplied tarball
      has the proper dependencies installed to successfully run.
      3. Both compile- and run-time check mode (-b or –both) (Default): This mode
      will check both of the above cases (both compile- and run-time dependencies).

      Check types:
      a. EXTERNALDEP – External Dependencies
      b. GENERALDEP – General Dependencies (required both at compile and run time)
      c. COMPILEDEP – Compile time Dependencies
      d. [All are run-time checks]
      PYEXT SCANCONF QUEUES PERMISSION

      Status Types:
      OK
      MISSING – Missing Dependency or Permission or Plug-in
      INCOMPAT – Incompatible dependency-version or Plugin-version

      —————
      | SYSTEM INFO |
      —————

      Kernel: 4.15.0-72-generic #81-Ubuntu SMP Tue Nov 26 12:20:02 UTC 2019 GNU/Linux
      Host: steve-Inspiron-519
      Proc: 4.15.0-72-generic #81-Ubuntu SMP Tue Nov 26 12:20:02 UTC 2019 GNU/Linux
      Distribution: 22 19.2
      Bitness: 64 bit

      ———————–
      | HPLIP CONFIGURATION |
      ———————–

      HPLIP-Version: HPLIP 3.19.12
      HPLIP-Home: /usr/share/hplip
      HPLIP-Installation: Auto installation is supported for linuxmint distro 19.2 version

      Current contents of ‘/etc/hp/hplip.conf’ file:
      # hplip.conf. Generated from hplip.conf.in by configure.

      [hplip]
      version=3.19.12

      [dirs]
      home=/usr/share/hplip
      run=/var/run
      ppd=/usr/share/ppd/HP
      ppdbase=/usr/share/ppd
      doc=/usr/share/doc/hplip-3.19.12
      html=/usr/share/doc/hplip-3.19.12
      icon=/usr/share/applications
      cupsbackend=/usr/lib/cups/backend
      cupsfilter=/usr/lib/cups/filter
      drv=/usr/share/cups/drv/hp
      bin=/usr/bin
      apparmor=/etc/apparmor.d
      # Following values are determined at configure time and cannot be changed.
      [configure]
      network-build=yes
      libusb01-build=no
      pp-build=no
      gui-build=yes
      scanner-build=yes
      fax-build=yes
      dbus-build=yes
      cups11-build=no
      doc-build=yes
      shadow-build=no
      hpijs-install=no
      foomatic-drv-install=no
      foomatic-ppd-install=no
      foomatic-rip-hplip-install=no
      hpcups-install=yes
      cups-drv-install=yes
      cups-ppd-install=no
      internal-tag=3.19.12
      restricted-build=no
      ui-toolkit=qt4
      qt3=no
      qt4=yes
      qt5=no
      policy-kit=no
      lite-build=no
      udev_sysfs_rules=no
      hpcups-only-build=no
      hpijs-only-build=no
      apparmor_build=yes
      class-driver=no

      Current contents of ‘/var/lib/hp/hplip.state’ file:
      [plugin]
      installed = 1
      eula = 1
      version = 3.19.12

      Current contents of ‘~/.hplip/hplip.conf’ file:
      [upgrade]
      notify_upgrade = true
      last_upgraded_time = 1576334976
      pending_upgrade_time = 0
      latest_available_version = 3.17.10

      [installation]
      date_time = 12/17/2019 07:53:57
      version = 3.19.12

      <Package-name> <Package-Desc> <Required/Optional> <Min-Version> <Installed-Version> <Status> <Comment>

      ————–
      | COMPILEDEP |
      ————–

      gcc gcc – GNU Project C and C++ Compiler REQUIRED – 7.4.0 OK –
      make make – GNU make utility to maintain groups of programs REQUIRED 3.0 4.1 OK –
      libtool libtool – Library building support services REQUIRED – 2.4.6 OK –

      ————————
      | General Dependencies |
      ————————

      libcrypto libcrypto – OpenSSL cryptographic library REQUIRED – 1.1.1 OK –
      python-xml Python XML libraries REQUIRED – 2.2.5 OK –
      libnetsnmp-devel libnetsnmp-devel – SNMP networking library development files REQUIRED 5.0.9 5.7.3 OK –
      sane-devel SANE – Scanning library development files REQUIRED – – OK –
      pil PIL – Python Imaging Library (required for commandline scanning with hp-scan) OPTIONAL – 5.1.0 OK –
      pyqt4-dbus PyQt 4 DBus – DBus Support for PyQt4 REQUIRED 4.0 4.12.1 OK –
      libpthread libpthread – POSIX threads library REQUIRED – 2.27 OK –
      python-devel Python devel – Python development files REQUIRED 2.2 2.7.17 OK –
      cups-devel CUPS devel- Common Unix Printing System development files REQUIRED – 2.2.7 OK –
      python-dbus Python DBus – Python bindings for DBus REQUIRED 0.80.0 1.2.6 OK –
      cups-ddk CUPS DDK – CUPS driver development kit OPTIONAL – – OK –
      reportlab Reportlab – PDF library for Python OPTIONAL 2.0 3.4.0 OK –
      pyqt4 PyQt 4- Qt interface for Python (for Qt version 4.x) REQUIRED 4.0 4.12.1 OK –
      libusb libusb – USB library REQUIRED – 1.0 OK –
      cups-image CUPS image – CUPS image development files REQUIRED – 2.2.7 OK –
      python2X Python 2.2 or greater – Python programming language REQUIRED 2.2 2.7.17 OK –
      python-notify Python libnotify – Python bindings for the libnotify Desktop notifications OPTIONAL – – OK –
      libjpeg libjpeg – JPEG library REQUIRED – – OK –
      sane SANE – Scanning library REQUIRED – – OK –

      ———————-
      | Scan Configuration |
      ———————-

      scanext Scan-SANE-Extension REQUIRED – 3.19.12 OK –
      hpaio HPLIP-SANE-Backend REQUIRED – 3.19.12 OK ‘hpaio found in /etc/sane.d/dll.conf’

      ————————-
      | External Dependencies |
      ————————-

      gs GhostScript – PostScript and PDF language interpreter and previewer REQUIRED 7.05 9.26 OK –
      scanimage scanimage – Shell scanning program OPTIONAL 1.0 1.0.27 OK –
      cups CUPS – Common Unix Printing System REQUIRED 1.1 2.2.7 OK ‘CUPS Scheduler is running’
      network network -wget OPTIONAL – 1.19.4 OK –
      policykit PolicyKit – Administrative policy framework OPTIONAL – 0.105 OK –
      xsane xsane – Graphical scanner frontend for SANE OPTIONAL 0.9 0.999 OK –
      dbus DBus – Message bus system REQUIRED – 1.12.2 OK –
      avahi-utils avahi-utils OPTIONAL – 0.7 OK –

      ———————
      | Python Extentions |
      ———————

      hpmudext IO-Extension REQUIRED – 3.19.12 OK –
      cupsext CUPS-Extension REQUIRED – 3.19.12 OK –

      ——————————
      | DISCOVERED SCANNER DEVICES |
      ——————————

      No Scanner found.

      ————————–
      | DISCOVERED USB DEVICES |
      ————————–

      No devices found.

      ———————————
      | INSTALLED CUPS PRINTER QUEUES |
      ———————————

      HP-LaserJet-M1522nf-MFP
      ———————–
      Type: Unknown
      Device URI: socket://192.168.1.4:9100
      PPD: /etc/cups/ppd/HP-LaserJet-M1522nf-MFP.ppd
      warning: Failed to read /etc/cups/ppd/HP-LaserJet-M1522nf-MFP.ppd ppd file
      PPD Description:
      Printer status: printer HP-LaserJet-M1522nf-MFP is idle. enabled since Sat 07 Dec 2019 07:37:23 AM EST
      warning: Printer is not HPLIP installed. Printers must use the hp: or hpfax: CUPS backend for HP-Devices.

      ————–
      | PERMISSION |
      ————–

      ———–
      | SUMMARY |
      ———–

      Missing Required Dependencies
      —————————–
      None

      Missing Optional Dependencies
      —————————–
      None

      Total Errors: 0
      Total Warnings: 1

      Done.
      steve@steve-Inspiron-519:~$ hp-systray

      HP Linux Imaging and Printing System (ver. 3.19.12)
      System Tray Status Service ver. 2.0

      Copyright (c) 2001-18 HP Development Company, LP
      This software comes with ABSOLUTELY NO WARRANTY.
      This is free software, and you are welcome to distribute it
      under certain conditions. See COPYING file for more details.

      warning: No hp: or hpfax: devices found in any installed CUPS queue. Exiting.
      steve@steve-Inspiron-519:~$

    • #2021152

      Can anyone add any explanatory comments to the suggestions in this thread?

      https://forums.linuxmint.com/viewtopic.php?f=90&t=307295

      Much of the advice is beyond my understanding…

    • #2021155

      Can anyone add any explanatory comments to the suggestions in this thread?

      https://forums.linuxmint.com/viewtopic.php?f=90&t=307295

      Much of the advice is beyond my understanding…

      Maybe try the new Mint 19.3 “Tricia” in hope it will solve your HP compatibility.

      https://blog.linuxmint.com/?p=3838

      https://www.linuxmint.com/release.php?id=36

      1 user thanked author for this post.
    • #2021158

      Maybe try the new Mint 19.3 “Tricia” in hope it will solve your HP compatibility.

      So you think this is a Linux issue rather than my own errors, or an HP problem?  I have been thinking about going back to an older version of hplip files.  Someone has suggested a possible mismatch in versions of python- no idea what that is.

    • #2021843

      These links were posted elsewhere as being the possible root of my scanner problem.  Much of it is, as they say, Greek to me, but perhaps the solution is here.

      SaneOverNetwork – Debian Wiki

      Scanner – Debian Wiki

      • #2021952

        This is one area where the Windows world is still light-years ahead of Linux. To offer an analogy: basically, they are “offering” you the scanner parts all jumbled together in a bag and you are welcome to assemble the machine yourself, “guided” by a set of jargony instructions that skip steps and assume you know to fill in the missing steps, and how.

        I would start with the second link that you listed above, specifically this paragraph:

        The first step on the road to successful scanning is to install libsane, which has the central library for operating scanners. The package also provides SANE’s collection of scanner backends. If the scanner is not supported by SANE, the backend (and other files) will have to be obtained from the Debian archives or the vendor. A notable free backend source requiring this step is the one for the all-in-one machines from HP.

        The trouble is (and this is a missing step), they tell you in the last line that you’ll need to go to that HP driver page, but they don’t tell you what exactly you’ll need to get from that page: is it just one from “Package hplip” at the top, or do you also need the matching items from Package hplip-data, Package hplip-doc, Package hplip-gui, etcetera???

        Also, and before we go any further, please note what it says in the HP section further down on that Debian Scanner page:

        Be aware that not all aios support scanning from a computer over USB or the network.

        Reading the thread that’s linked to in that sentence, it’s entirely possible that we (OK, you 🙂 ) have been attempting something that simply cannot be done with the software that HP has provided. See in particular this post and then this post:

        …A quick look at /usr/share/<wbr />hplip/data/<wbr />models/<wbr />models.<wbr />dat shows that almost the complete class of Enterprise multifunctions has “scan-src=0” and “scan-type=0”. My understanding of these two parameters is that they indicate a scan from computer-enabled device. “=0” says they are not enabled. There are non-Enterprise devices like this too.

        Someone deep in the bowels of HP must know the reason for this; I’m intrigued with the reason. Perhaps HPLIP support could help us out and use their resources to seek out the cause. Is it technical? Is scan to a network folder thought to be good enough for anyone? Is scan from a PC not wanted with such high-end machines? Basically, is the device designed to scan from a computer? And if not, why not?


        @slowpoke47
        , please navigate on your Mint system to the folder mentioned there (I assume that you still have hplip installed) and see if there is a file named models.dat, then see if your printer is listed there and what it gives for those two parameters “scan-src” and “scan-type”.

        • This reply was modified 5 years, 4 months ago by Kirsty.
        • This reply was modified 5 years, 4 months ago by Cybertooth.
        1 user thanked author for this post.
        • #2022121

          @slowpoke47, please navigate on your Mint system to the folder mentioned there (I assume that you still have hplip installed) and see if there is a file named models.dat, then see if your printer is listed there and what it gives for those two parameters “scan-src” and “scan-type”.

          Just now able to get back to this.  Thanks for reviewing these- lots of detail there.  I haven’t yet studied these pages, but at the beginning of this odyssey I did confirm that the hplip drivers support our printer via this page:

          https://developers.hp.com/hp-linux-imaging-and-printing/supported_devices/index

          The list is a long one, but on scrolling thru the entries, I found our model listed with the caveat that a plugin is needed to enable scanning.  Hope to spend time today looking at the links in my last post.

    • #2022142

      @ Slowpoke47

      steve@steve-Inspiron-519:~$ hp-check
      Saving output in log file: /home/steve/hp-check.log

      HP Linux Imaging and Printing System (ver. 3.19.12)
      Dependency/Version Check Utility ver. 15.1

      etc. ….

      Nice program for trouble shooting your HP printer installation.

      Note the highlighted line above: The program saves a copy of this program’s output to the file listed–*hp-check.log* , in the directory */home/steve/* .

      You might want to see if you can find that file (i.e. navigate to it), and see if you can *open* it. A *.log* type file is really just a *.txt* file–in Windows one can open a *.log* file with Notepad or Wordpad–or basically any word processing program that can deal with the *.txt* type file. I don’t know what program in the Mint OS does the same. Maybe someone who knows can chime in here?

      You might have to *rename* the file from hp-check.log to hp-check.txt in order to open it in a *Notepad* like program for your Mint OS.

      Also, if you want to save this *.log* file for future reference, you should *rename* the file to something other than hp-check.log so it’s protected from being over written if you run the *hp-check* program again.

      Programs that create a *.log* file will do one of two things–1. it may *add* to an existing file the next logged event (i.e. running of the program), possibly placing a *time/date* stamp to show the next event that’s being recorded, or 2. it may simply over write the existing *.log* file and the original one will be *gone*, and no longer available for referencing.

      So renaming the current *.log* file to something like hp-check#1.log, and the next time you run the program, rename that next file to hp-check#2.log, and so on each time you run the *hp-check* program, you will then have a series of logged events that you can look at and see what changes have occurred as you attempt to make changes to your printer driver installation. Might come in handy … !?

      To test to see if the *hp-check* program adds to the *.log* file, you could leave the *original* file, hp-check.log, in the directory where it is currently located. Instead of renaming that file, use your Mint file program to create a *copy* of that file, and renaming the copy with a different name (such as hp-check#1.log, and now saving that renamed copy to either the same directory (folder), or to a different directory (folder) for safe keeping.

      Now that you have the renamed copy in safe keeping, you can run the *hp-check* program, and then look at the hp-check.log to see if it has that second event recorded in the *.log* file, or if it has been over written with the current single event.

      Basically, the above is one way to use *.log* files for trouble shooting installation issues–if you save them with file names that show the order in which they were created, you can see the progression of what has happened over time. And if you keep a notepad where you write down what you did (i.e. what *command line* you used) prior to running the *hp-check* program, you can see what effect that *command line* had on your installation.

    • #2022161

      @ Slowpoke47

      So you think this is a Linux issue rather than my own errors, or an HP problem?

      Looking at your output from the *hp-check* program, I think it is *saying* that the installation did not complete correctly–I will go over that shortly.

      But, the *.log* file is pointing towards *user error*. You are a new user of Linux. You are just now learning how a *command line* works. You are learning what it means to be a *normal user* vs a *super user*. You are leaning when to use *sudo* in the command line, and when not to use it. You are learning that the *terminal* program has to be using the correct directory (folder) to run a *command* if you expect the command line to find the correct file that the command is being addressed to.

      But, I don’t think you have completely understood that one command line is not the same as another command line if you have added additional characters–no matter what you think about the importance of various ways to enter and run a command–if you change something (anything) from what was shown to what you *think* is best–you are no longer entering the *same* or correct command!

      Until that *sinks in*, you’re going to be in trouble getting Linux to respond correctly! (I will comment more on this in the next reply–first I will comment on the *.log* file.)

      So, why do I say the *.log* file points to an *user error*?

      HPLIP-Installation: Auto installation is supported for linuxmint distro 19.2 version

      The driver installation is saying that the driver can be installed using *Auto installation* on the Mint v19.2. Okay–good to know.

      HP-LaserJet-M1522nf-MFP
      ———————–
      Type: Unknown
      Device URI: socket://192.168.1.4:9100
      PPD: /etc/cups/ppd/HP-LaserJet-M1522nf-MFP.ppd
      warning: Failed to read /etc/cups/ppd/HP-LaserJet-M1522nf-MFP.ppd ppd file
      PPD Description:
      Printer status: printer HP-LaserJet-M1522nf-MFP is idle. enabled since Sat 07 Dec 2019 07:37:23 AM EST
      warning: Printer is not HPLIP installed. Printers must use the hp: or hpfax: CUPS backend for HP-Devices.

      This is stating that your installation of the HP printer driver did not do an *Auto installation*–only the files were extracted from the *.run* file, and installed–but the HPLIP installation did not *install* your Printer! So, the software files for the printer driver were extracted and installed, but the connection between the software and the hardware (your printer) did not occur.

      HP-LaserJet-M1522nf-MFP
      ———————–
      Type: Unknown
      Device URI: socket://192.168.1.4:9100
      PPD: /etc/cups/ppd/HP-LaserJet-M1522nf-MFP.ppd
      warning: Failed to read /etc/cups/ppd/HP-LaserJet-M1522nf-MFP.ppd ppd file
      PPD Description:
      Printer status: printer HP-LaserJet-M1522nf-MFP is idle. enabled since Sat 07 Dec 2019 07:37:23 AM EST
      warning: Printer is not HPLIP installed. Printers must use the hp: or hpfax: CUPS backend for HP-Devices.

      The above bold line states that the *HP-LaserJet-M1522nf-MFP.ppd* file was not *read*. This file is the *Profile* regarding your printer model. This HP Printer Driver includes the needed commands to operate hundreds of HP printers–not just yours. Each printer that is being supported has a *profile* that tells the printer driver what your printer is capable of doing, and which driver commands to use to make those capabilities work. If the capabilities of your printer is not connected between the driver software and the printer hardware–well, the driver will not be configured to run your printer.

      That’s why the following has occurred:

      ——————————
      | DISCOVERED SCANNER DEVICES |
      ——————————

      No Scanner found.

      So, somewhere along the line, when you installed your Mint OS, you were walked through the installation of your HP printer. Don’t have any idea of how that occurred, and what actually happened. You probably don’t remember the details either. Maybe it *just happened*, and you had little to do with it. So, basic printer functions are installed and working, but the more advanced functions (that require the plug-in) have not been correctly installed as of yet.

      I have to be away from the computer for awhile, so will continue this discussion when I’m back later.

      1 user thanked author for this post.
    • #2022163

      You might want to see if you can find that file (i.e. navigate to it), and see if you can *open* it. A *.log* type file is really just a *.txt* file–in Windows one can open a *.log* file with Notepad or Wordpad–or basically any word processing program that can deal with the *.txt* type file. I don’t know what program in the Mint OS does the same. Maybe someone who knows can chime in here?

      It depends on which edition of mint @slowpoke47 has. According to the Mint project’s user guides, the default program in Linux Mint Cinnamon is Gedit, whereas in Linux mint Mate it’s Text Editor.


      1 user thanked author for this post.
    • #2022164

      @ Cybertooth

      … whereas in Linux mint Mate it’s Text Editor.

      Good to know–thank you! @ Slowpoke47 will have to experiement to see what works ….

      1 user thanked author for this post.
    • #2022171

      @slowpoke47, please navigate on your Mint system to the folder mentioned there (I assume that you still have hplip installed) and see if there is a file named models.dat, then see if your printer is listed there and what it gives for those two parameters “scan-src” and “scan-type”.

      Just now able to get back to this.  Thanks for reviewing these- lots of detail there.  I haven’t yet studied these pages, but at the beginning of this odyssey I did confirm that the hplip drivers support our printer via this page:

      https://developers.hp.com/hp-linux-imaging-and-printing/supported_devices/index

      The list is a long one, but on scrolling thru the entries, I found our model listed with the caveat that a plugin is needed to enable scanning.  Hope to spend time today looking at the links in my last post.


      @slowpoke47
      , I still would recommend that you make your way to that models.dat file using your file manager, and then open it to find the settings for the parameters scan-src and scan-type. Over the years, I’ve seen enough discrepancies between what is purported to be the case in some database, and what is actually the case in the real world out there, to have developed a distrust of the former relative to the latter. So please take a minute and make your way to:

      /usr/share/hplip/data/models/models.dat

      and see what it says there for those two parameters, and report the findings.


      1 user thanked author for this post.
    • #2022186

      EDITED – Quote removed

      Had to find that folder via Menu search box.  There are two entries, but they are the same file.  A week or so ago, while looking at my home folder (steve) somehow the name of that folder got changed in the left pane. Haven’t tried to fix that yet.  This mouse is apparently going belly-up, weird responses, etc.  Something happened with that folder name, I assume it can be fixed.

      models.dat-at-2019-12-22-13-23-23

    • #2022200

      @slowpoke47, I still would recommend that you make your way to that models.dat file using your file manager, and then open it to find the settings for the parameters scan-src and scan-type. Over the years, I’ve seen enough discrepancies between what is purported to be the case in some database, and what is actually the case in the real world out there, to have developed a distrust of the former relative to the latter. So please take a minute and make your way to: /usr/share/hplip/data/models/models.dat and see what it says there for those two parameters, and report the findings.

      Somehow my reply to this post wound up at the end of your next one.  The command line you cited returned permission denied.

      • #2022212

        @slowpoke47, when you say that…

        The command line you cited returned permission denied.

        …what exactly did you do? The line of text that I supplied,

        /usr/share/hplip/data/models/models.dat
        

        isn’t a command but a location in your file structure.

        This is not a command to enter in the command line, but a file location to reach and open. The easiest way to reach this location is by using your file manager (the Mint equivalent of Windows Explorer); if you’re using Mint Mate, a quick read around the Web says your file manager is called Caja but it could be something else.

        You can also reach this location by using Terminal, but that involves a lot of typing of unfamiliar character sequences, and is thus prone to typos and errors. I highly recommend that you use your file manager to reach that models.dat file and then right-click on it (once you have a working mouse again 🙂 ) to open it in your text editor and see what those scan-src and scan-type parameters say for your HP printer.

        Again, the goal is to see if HP has even made it possible to use the scanner function within your Linux: if not, then we can stop now and save time trying to do something that would turn out to be undoable anyway. But if the answer is positive, then the procedure that @nightowl recommends could lead you to the buried treasure.


        • This reply was modified 5 years, 4 months ago by Cybertooth.
        1 user thanked author for this post.
        • #2022214

          OK, new attempt, new mouse.

          There is just one account in this OS.  Whether I enter <models.dat> in the Menu search box or the address bar at the top of the Documents folder, I get the same error message.  Where should I be looking for this folder?

          could-not-display-at-2019-12-22-14-45-03

          EDIT- I’ve been given a series of commands on the Mint Forum to install the repo version of hplip, which they assure me does in fact have a matching plugin.

          I’m about to remove the current hplip software, which has been acting erratically anyway, and reinstall the repo files.

          Code: Select all

          sudo apt install hplip

          then this because I needed these dependencies

          Code: Select all

          sudo apt install hplip-doc hplip-gui python3-notify2

          then because I always do after I install packeges

          Code: Select all

          sudo apt update

          then

          Code: Select all

          hp-setup

          and then

          Code: Select all

          hp-plugin

          to check everything to fix my error I had to install

          Code: Select all

          sudo apt install python3-dev

          and

          Code: Select all

          chmod a+rwx HP_Officejet_Pro_8610.ppd

          to clear the warning

          • This reply was modified 5 years, 4 months ago by Slowpoke47.
          • This reply was modified 5 years, 4 months ago by Slowpoke47.
          • #2022289

            Here is a tip for you: Unless there is a specific given reason (perhaps a manual preparation for a distribution upgrade), you do not usually need to run apt update during any attempted software installation.

            Note: Good to see you have a working scanner so far! Merry Christmas!

            1 user thanked author for this post.
            • #2022391

              …from a pre-existing repository. As in installing with apt or apt-get.

              If you add a direct package (with dpkg, a .deb file, …), many of those nowadays come with repository definitions of their own, so in those cases you really do need to do “apt update” too.

              And it’s most certainly needed if you add a repository but don’t get an automatic update. Current versions do an update automatically after adding a repository with apt commands, but older ones didn’t – and of course there’s no automation if you add one manually, as in add a file into /etc/apt/sources.list.d/ or manually edit /etc/apt/sources.list …

              1 user thanked author for this post.
    • #2022202

      Mouse has basically failed.  Off to buy a new one, back shortly.

    • #2022223

      see what those scan-src and scan-type parameters say for your HP printer.

      Both values “0”.

      For some reason, my previous post is awaiting moderation.

      I’m going to remove the current HP programs with  apt-get purge remove hplip3.19.12.

      I have a series of commands from the Mint Forum for installing the repo package of drivers, which they assure me, HP to the contrary, does indeed have a companion plugin for scanning.  That’s next.

    • #2022269

      Update:  Tried to follow the guidance from the Mint Forum as mentioned above, starting with removing all HP-related programs.  The “remove” command came from a beginner guidebook I’m using, but was in error, confirmed by a Mint Forum member, and returned error messages.  At that point I tried to determine the HP status.  The tray icon was still there.  The printer printed a page on request.  And, for the first time today- the scanner worked using either scan program in the system.

      No idea where all this leaves me, but if these results stick, that’s all we need.  I’ll see if it all still works tomorrow.

      1 user thanked author for this post.
    • #2022384

      @ Slowpoke47

      At that point I tried to determine the HP status. The tray icon was still there. The printer printed a page on request. And, for the first time today- the scanner worked using either scan program in the system.

      Well, that is an unexpected surprise! But, don’t argue with *Mother Linux*. Relax, enjoy, rejoice, and celebrate!

      And for those who celebrate this current holiday–Merry Christmas!

      2 users thanked author for this post.
    • #2022497

      Today, I’m pleased to report that, on booting up, scan function is present and accounted for.  The Simple Scan app is as good as its name and basically intuitive.  The xsane app comes with a daunting learning curve vis-a-vis terminology but for our purposes, Simple is all we need.

      The HP Task Manager menu item is gone, as is the tray icon, but I don’t think we need them, since print commands and setup are available via Ctrl+P or the print option in a document.  Most importantly, scan is now enabled.  Couldn’t ask for a better Christmas present!

      Seems like saying “thank you” is not enough for the patience and perseverance of all who have contributed to solving this problem.  In recognition of that group effort, I will be sending Woody an additional donation today.

      To all on the forum, warm wishes for an enjoyable holiday season, and all the best for the year to come.

      Steve

      2 users thanked author for this post.
    • #2636051

      This is want I needed!

    Viewing 97 reply threads
    Reply To: HP all-in-one printer in Mint

    You can use BBCodes to format your content.
    Your account can't use all available BBCodes, they will be stripped before saving.

    Your information: