• How to use the forum

    Author
    Topic
    #2452787

    Here are some basic guidelines about how to use the forum.

    Susan Bradley Patch Lady/Prudent patcher

    Viewing 11 reply threads
    Author
    Replies
    • #2452790

      Step 1:  Welcome to the site

      If you are brand new to the site.  Welcome.  There are several parts to the site that may need a bit of explaining.

      First off the site is a combination of several moving parts. The main thing that you see here is a forum. If you have a computer or tech question you are at the right place to get an answer. To participate all you need to do is to find where you want to post and pose a question. If you’ve never been here before, the easiest way to jump into the forums is to look on the upper right of the column to the side and see where it says “Welcome…” and there are links to jump to various forums.  If you don’t see that those fit  your topic, then click on the forums menu

      https://www.askwoody.com/forums/

      From here you can see that the upper section – Askwoody Support is the main area for questions and answers. Click there and you can see that there are several sections for asking questions about Windows, Apple, Linux, Office, etc.  As you click on each topic section you will note that we have things subdivided so for example Windows 11 is broken down between the different versions. If you are unsure of where to post, look for the section called “Questions about….” and you can ask there.

      We also have two newsletters that come out once a week, one is a free newsletter sponsored by advertising, the other is the Plus experience. I call it the plus experience because you get all of the newsletter articles (four researched articles a week), you get alerts emailed to you when we decide it’s best for you to install – or not to install updates on your devices, and if you donate more than $50 not only do we thank you but we offer a texting service so that if you want to be notified via text message of alerts, they will be sent to you via that method as well. Those readers that are plus members get a gold ribbon in their profile and the words “Plus member” as well as our eternal gratitude. More about how to subscribe to either newsletter in a later section.

      Susan Bradley Patch Lady/Prudent patcher

    • #2452791

      Step 2:  Logging in
      You will have your best experience if you register for the site. Merely registering on the site will ensure that you are able to be alerted when someone posts a response to your question.

      To register on the site, click on the Register on the side column.

      register

      Once there, put in a username – please do not use your email address, and then your email address and leave the box checked to subscribe to the free newsletter. If you know you want to sign up for the Plus experience you can uncheck the box. The free and Plus newsletter are in two difference databases and thus signing up for one or unsubscribing from one does not affect the other.

      register2

      Click the register button.

      You will then receive an email with a link to then set a password. Click and pick a good password. We recommend to not reuse passwords on web sites.  Either write it down or use a password manager program.

      registration3
      Once you have your password, now look for the log in on the side and enter your username and password that you have set.


      Susan Bradley Patch Lady/Prudent patcher

    • #2452803

      Step 3:  Create a post

      I personally feel that just going to a forum location and posting your question is easiest, but if you’d like to compose first in either Word or notepad, just keep in mind that once you create your post, the best way to post into the forum is to copy your comments and then when you go to the forum you want to post in, look for the new topic button

      It will be at the top

      newtopic

      and then right mouse click on the forum page where you want to post and click on paste as plain text

      pasteas
      This ensures that any Word html weird stuff is stripped out

      When you are ready to post look for the Submit button at the bottom.


      Susan Bradley Patch Lady/Prudent patcher

      1 user thanked author for this post.
    • #2452811

      Step 4:  Attach an image

      To insert an image into a topic, there are two ways to add an image. The easiest way is having an image stored on your computer.

      Type up your post and then when you want to insert an image,  click at the bottom of the post – even while you are still composing – and click on “select file”.

      attachfile

      Pick the file from your computer and select it. Now that it’s in the “selection box” you can click on “Insert into content” and embed it into the post

      Insertintopost
      You will note that the contents will be in the compose box and look like

      When you hit submit, it will show up in the post in the middle of the content as you intended.

      Alternatively you can copy and paste a link to an image on another site, but be aware that if the other site removes or changes the image, your image may change as well.

      Note that guest posters cannot add images to their posts.


      Susan Bradley Patch Lady/Prudent patcher

      4 users thanked author for this post.
    • #2452981

      Step 5:  Using the edit tabs
      There are two tabs at the top of the edit box, one says visual the other says text. The first tab is the visual editor.

      Now this may be a bit confusing but as you are a normal user in the forum some of these tabs may not work for you.  I’ll be looking for a better solution in the long term.

      When you are in the visual editor there are certain options in the menu bar. On the far right is an icon that is the “toolbar toggle”. If you click it, you will note that the toolbar will go from one line to two to give you more options.

      topmenu
      NOTE: changing between paragraph styles does not work for regular users. The top box on the far left indicates the type of content/formatting. I normally keep it at “paragraph” and don’t use Header unless I really need to emphasize something.

      The next icon of a B allows you to set Bold formatting. To set Bold, highlight the word and click on that B icon and it will make the word bold. This works for normal users.

      The next is the Italics formatting icon.  Highlight your word, and choose that icon to make the format of Italics. This works for normal users.

      The next two icons are bullet points and numbered list. You can either click the button ahead of time to turn these on, or highlight what you typed and press the icons to turn on bulleting or numbering. This works for normal users.

      Next is the quote icon. If you want to quote part of a posters comment, copy the words from the prior post and press this icon. It will cause the comment to be indented and placed in a special box to indicate the words are quoted from the poster. This works for normal users.

      NOTE: justification does not work for regular users. The next three icons I tend not to use too much, as I tend to just leave my typing as left justified. The next three are left justified, centered and right justified.

      The next icon that looks like an infinity symbol is the link icon. If you want to make a link “pretty”, you type in the words, highlight the phrase, click that infinity icon and then insert the html link. This will then “hide” the https://www.domain.com link in the words you typed. This works for normal users.

      NOTE: the read more does not work for regular users.  The next is the ‘read more’ tag where you can make the post hide or shrink up the post and make the person click to read more. This one you will probably need to play around with in the test forum as it takes a bit to get used to.

      The final icon on the first row is the toggle button for the expanded menu.

      We are now on the second line of the menu.

      The first icon is the strike through icon. This is useful if you want to leave the original information and indicate that it’s been changed. This works for normal users.

      The second icon on the second row allows you to insert a horizontal line into your post. This works for normal users.

      NOTE: the colors selection does not work for regular users.  The third icon on the second row allows you to set the color of your font. If you want to choose reduse that arrow key right next to it to choose what color you want.

      The fourth icon on the second row is the paste as text button. Now normally I just do this when I use right mouse click and “paste as text” but if you want to use the menu bar, this is the button you want to use.

      The fifth icon that looks like a school room eraser clears out any erroneous formatting you decide later on you didn’t want.

      The sixth icon that looks like a horseshoe is the special character icon.  Press it and you’ll get a ton of special characters that you may need – such as Pounds symbol, copyright symbol and so on.

      The seventh and eighth icons on the second row are about indenting and then removing that indenting.

      The ninth and tenth icons on the second row are the undo and redo buttons. Handy if you decide…whoops I didn’t mean to do that.

      Finally the ? icon on the row is to showcase that rather than pressing buttons, you can do all of everything I discussed above with a combo of keystrokes.

      If you want to see the raw html, now click on the text view.  You can flip back and forth between visual and raw html text view at any time.


      Susan Bradley Patch Lady/Prudent patcher

      1 user thanked author for this post.
    • #2452984

      Step 6:  What does html look like and how do I edit it out?

      There are times – especially if you cut and paste from something else – you end up with html formatting that messes up your post. The easiest way to fix this is to actually copy and paste as text but if you forgot to do that, never fear all you need to do is go back to your post, edit the post and click on the “text” box so you can then remove out any unwanted “tags” that are causing the issue.

      HTML stands for hypertext markup language and it’s the code that the web browser uses to format.

      So for example if I turned on bold for this sentence, if you would look at this in text view you would see <strong> before the word and </strong> after the word

      boldformat

      the < > and the </> to end the formatting tells the system where to start and stop the formatting.  To remove it, just look for the brackets before and after in text view, remove them, and then flip back to visual tab to see if you’ve cleared it out.

      Susan Bradley Patch Lady/Prudent patcher

    • #2452987

      Step 7:  How to edit a post (subtitled, we are not Twitter so we don’t act like it)

      I’ve set the site to allow you to have about an hour and a half to change your mind. If you want to go back and edit the post, please feel free to do so, click to edit it.

      Also be aware that if you post a new topic that will automatically save and flag that you edited it and will log the edit whereas any responses are not logged for editing. Just an oddity of the forum software.

      Susan Bradley Patch Lady/Prudent patcher

    • #2452988

      Step 8:  How to include links

      There are several ways to include links in your post.

      “pretty links” – include highlighting the phrase or words pointing to the page or link and clicking the infinity icon up there and inserting your web link. Advantages of this method is that it’s prettier and better organized. The disadvantage is that to ensure that you aren’t being sent to a malicious site you have to hover over the links. Here in the forum, there is typically human eyeballs keeping an eye on links posted. Also if you note if you are a first time poster you are moderated, or if you haven’t posted in about six months the system moderates you – and finally if you post more than a certain number of links – of which I’m not going to tell you – the system will moderate you. In addition there is Akismet spam software in the background that scans posts as well. Humans are generally speaking much better than the machines which is why you may find your post has gone missing because the machines have pulled you into the spam filters and a human has to find it and approve it.

      Raw link – There are some in the security industry that don’t like hiding links and prefer not to use pretty links.  I don’t mind if you use “pretty links” or raw links and just post the full url in the forums. Personally I like understanding where I’m clicking on.

      I will urge you to put links in posts and indicate where you are getting your information from. Lately I’ve seen too many computer “news” sites have no links to where they got their information and thus you can’t tell if it’s from some random post from twitter or from an official source at Microsoft.  Try where you can to back up your information if you are responding to someone else.

      Susan Bradley Patch Lady/Prudent patcher

    • #2452992

      Step 9:  Adding a picture for your user account

      The site uses Gravitar to link up your image to your user account.

      Gravatar is owned by WordPress.com, which is the company that makes the software used for the Forum.

      To create an avatar, go to the web site, click on Create Your Own Gravatar, and follow the instructions to associate your email address with a picture. All it takes is a picture and a few minutes.  It will set up a wordpress.com account which will then sync up the photo you choose.


      Susan Bradley Patch Lady/Prudent patcher

    • #2454434

      Step 10:  
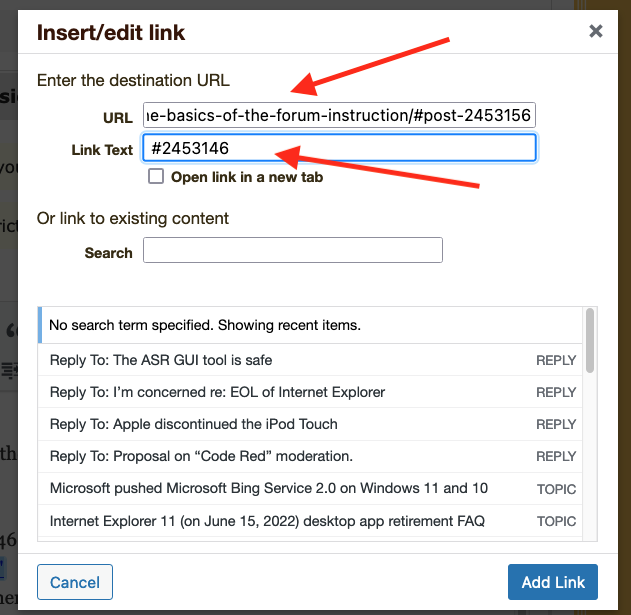
How to link to another post (courtesy of PK Cano)

      In the post you want to link:
      1. Right click on the post number in the upper right and choose “Copy link”

      In the post you are submitting:
      2. Type in the post number “#2453146” (or whatever it is)
      3. Highlight the typed in “#2453146”
      4, Click on the chain symbol in the menu, then the gear in the popup

      Screen-Shot-2022-06-14-at-6.18.00-AM

      5. Paste the Link you copied in step 1. in the URL box. The post number you typed/highlighted will be in the second box. If you want it to open in a separate window, check the box “Open link in a new tab”
      6. Click on “Add Link”

      Screen-Shot-2022-06-14-at-6.19.14-AM

      Attachments:

      Susan Bradley Patch Lady/Prudent patcher

    • #2454439

      Step 11:  Subscribing to a thread/post

      When you post, you can check the box below your comment to “Notify me of follow-up replies via email”. Note this only works for registered users.

      notifyme
      Alternatively, you can click the box at the top of the post where it indicates you can subscribe to the post.

      Subscribe
      Click on subscribe.
      Either one will work.

      Susan Bradley Patch Lady/Prudent patcher

    • #2454446

      Step 12:  Using BBcodes

      BBcodes are a simplified html for bulletin board posts.

      For this you’ll flip over to the text menu and put in “codes” to make the site do what you want.

      Geekdom has graciously put together a listing of the items that do and don’t work on the site.

      You can review the master list here.

      Susan Bradley Patch Lady/Prudent patcher

      1 user thanked author for this post.
      hjf
    Viewing 11 reply threads
    • The topic ‘How to use the forum’ is closed to new replies.