• Disabling “Allow row to break across pages”

    Home » Forums » AskWoody support » Productivity software by function » MS Word and word processing help » Disabling “Allow row to break across pages”

    Author
    Topic
    #489236

    I’m composing a document with Word 2010.

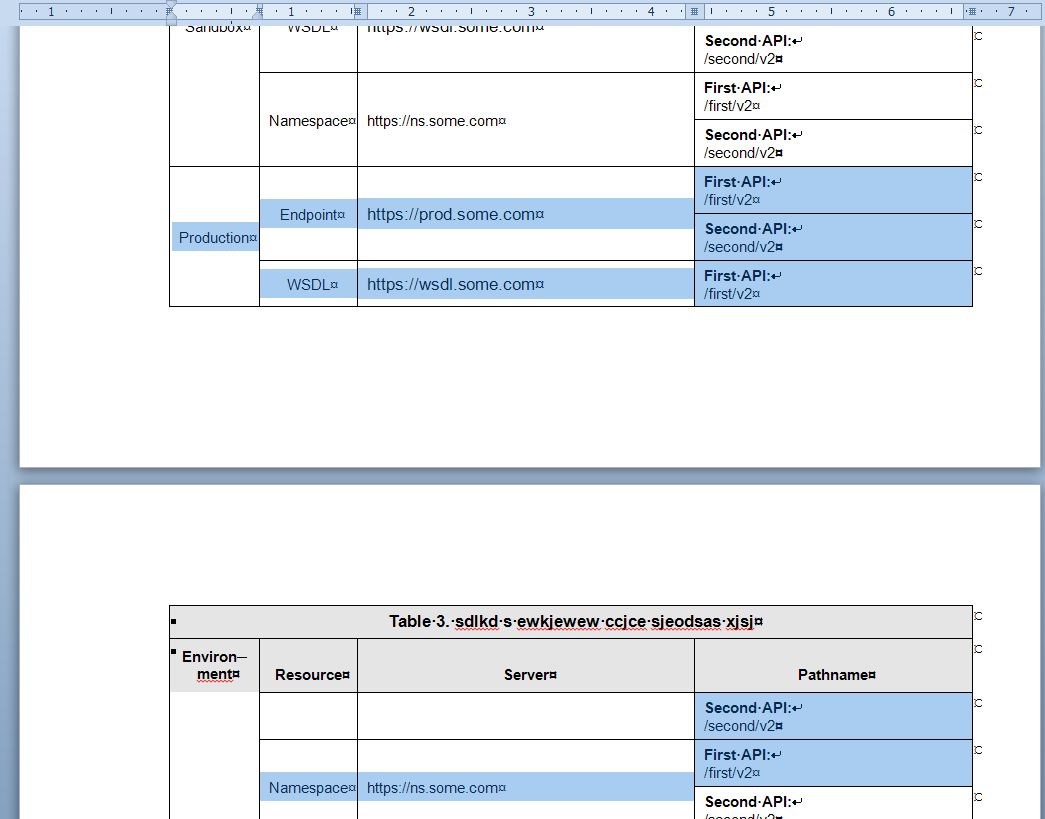
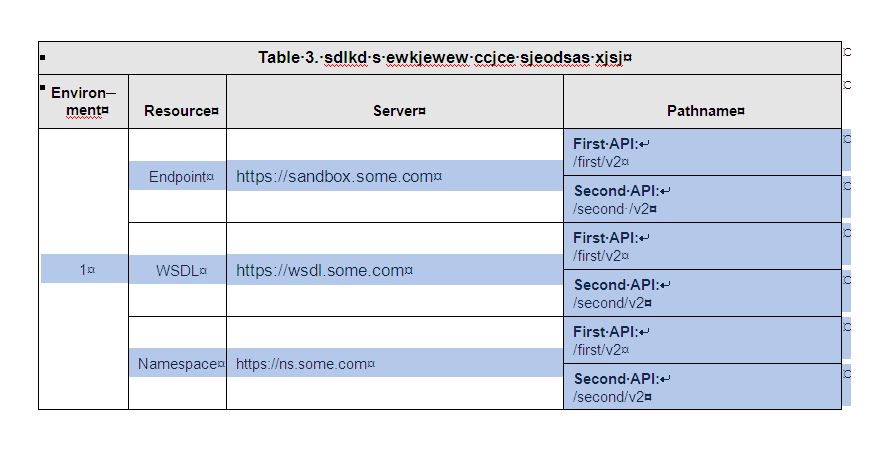
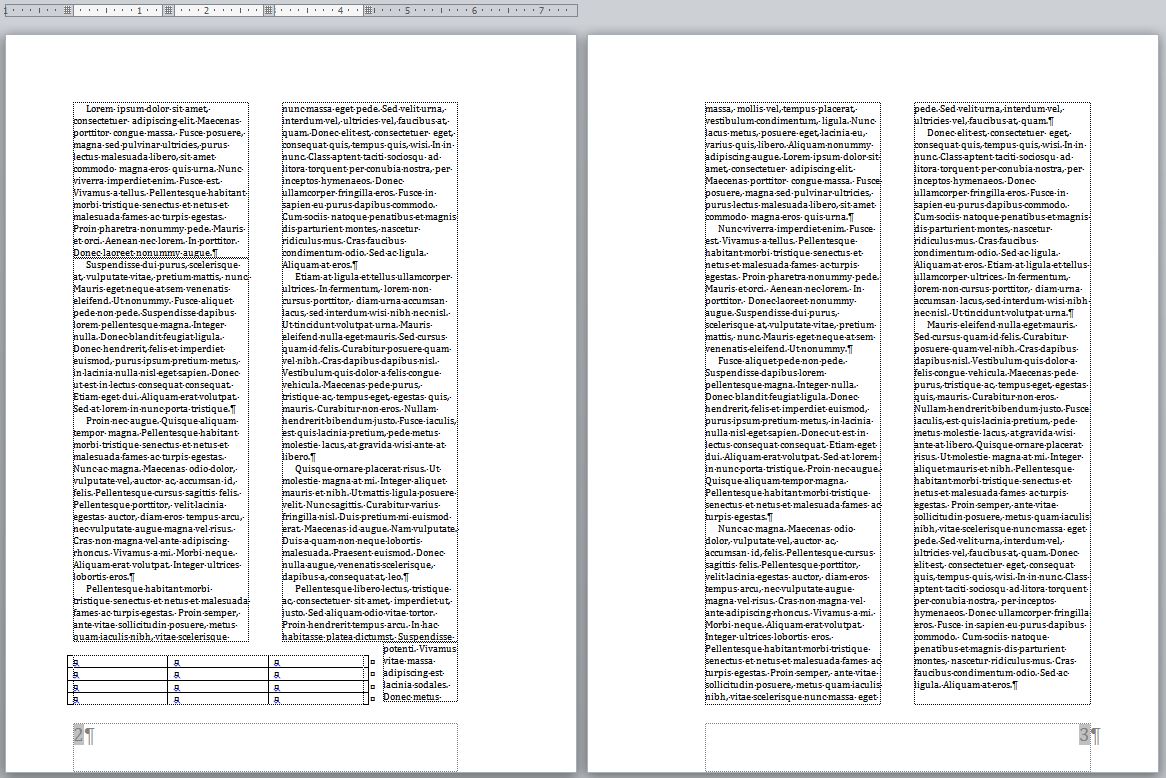
    I’ve got a table with three columns. After the heading row, there are two cells in the first column. Each cell in the first column is followed by two cells in the second column, and each cell in the second column is followed by two cells in the third column.

    Every row in the table has “Allow row to break across pages” disabled.

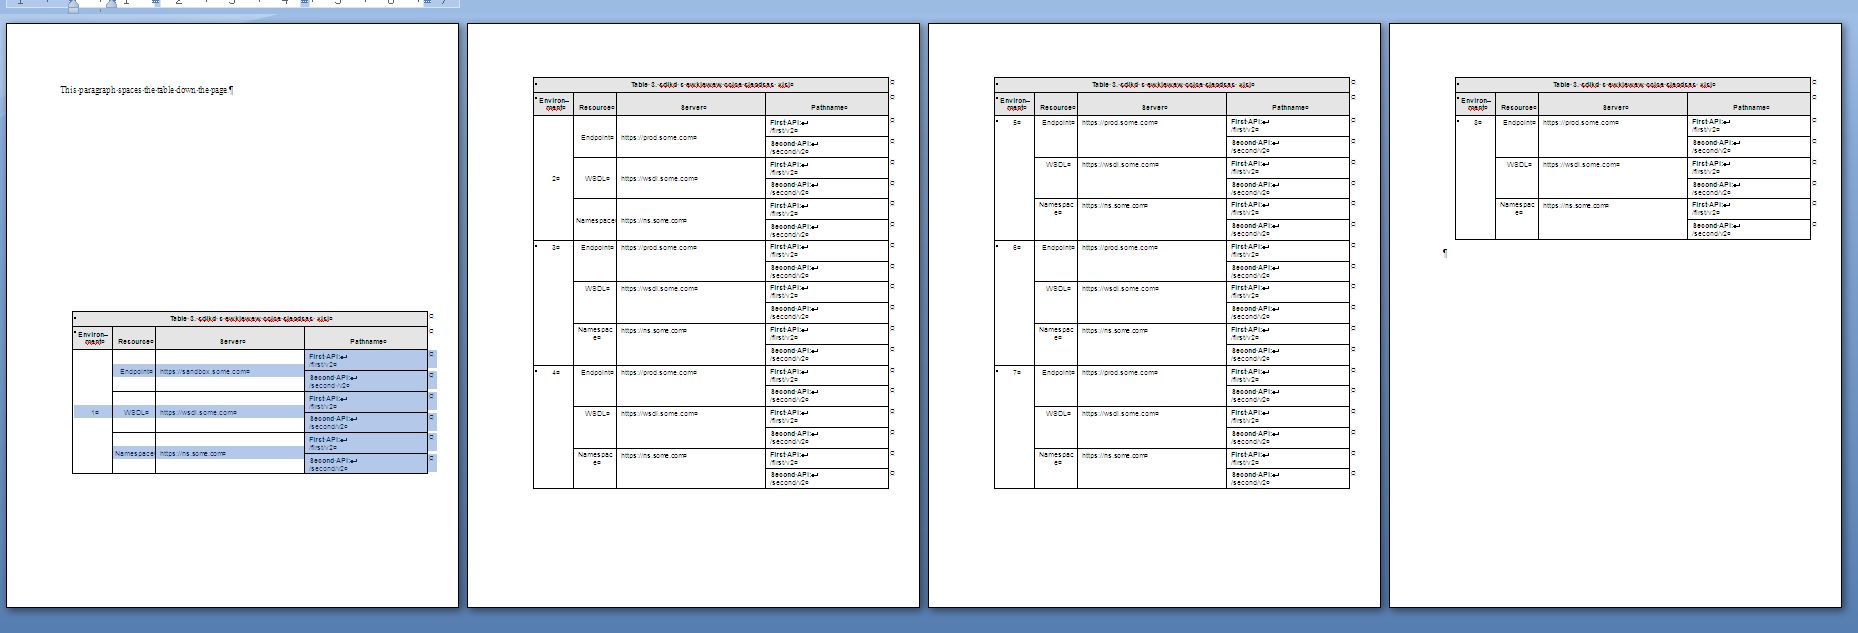
    The table spans a page break between the third and fourth cells in the third column — breaking in the middle of the second cell in the second column, and the first cell in the first column.

    Apparently the condition “don’t allow row to break across pages” is satisfied if any cell in the row is prevented from breaking across pages, and the other cells can break to their hearts’ content.

    Have anyone found a workaround for this?

    Viewing 17 reply threads
    Author
    Replies
    • #1392281

      Put a page break right before the table, so that none will occur “during” the table.

      If you don’t want a page break in the table, it should all fit on one page, that is, if it is small enough to all fit on one page.

      However, if you do want a page break in the table, put one in at that point.

      Group "L" (Linux Mint)
      with Windows 10 running in a remote session on my file server
    • #1392296

      That’s a solution in the manner of “Doc, it hurts when I laugh./Don’t laugh.” I’m hoping for something more elegant!

      The table’s length is a substantial fraction of a page, and a break between rows (that is, between rows in all of the columns) is entirely acceptable. I’m hoping for some way to make it do that.

      • #1392313

        That’s a solution in the manner of “Doc, it hurts when I laugh./Don’t laugh.” I’m hoping for something more elegant!

        The table’s length is a substantial fraction of a page, and a break between rows (that is, between rows in all of the columns) is entirely acceptable. I’m hoping for some way to make it do that.

        You asked for a workaround, not for a genuine solution.

        I’ve found that in various cases in Word, the best way is to work around the problem rather than beat your head against the wall trying to actually fix it.

        If I want to make sure that I will have the default formatting (font size and style, margins, etc.) before or after something odd like a table, I insert a few blank lines, and then I create the table in the middle of the group of blank lines. Then all I have to do is cursor up to before the table, or cursor down to after the table, and I have my default formatting available for use. The problem is that if my cursor is at the end of the table, and I hit a carriage return or two, I often am stuck with whatever formatting the table has. By putting some “space” at the end of the table before creating it, the “space” has my default formatting, and I don’t have to then fight with Word to get things back to the default way.

        Group "L" (Linux Mint)
        with Windows 10 running in a remote session on my file server
        • #1392336

          A simplified and sanitized version of the file is now attached to the thread.

    • #1392304

      J.

      Would you mind posting a test document that we could play with? Just remove any sensitive data and keep only a couple of pages before/after the table. :cheers:

      May the Forces of good computing be with you!

      RG

      PowerShell & VBA Rule!
      Computer Specs

    • #1392341

      mrjim, sorry about this misunderstanding. I ask for a “workaround” automatically when I post problems like this in forums, because I can’t expect anyone but the manufacturer to provide a solution. (In MS’s case I don’t expect the mfr to provide a solution either, but one can dream.)

      By “workaround” I meant “A possibly non-obvious way of making the stupid software do what it ought to do.” Yeah, I can put a page break before the table… or fake a table that spans pages with the break in the right place… and try to remember to check whether it has to be jiggled every time I change the preceding text… but that’s not how I like to solve problems, particularly when I’m supposed to be delivering professional work for money.

      • #1392344

        I agree with everything you just said.

        The thing is, some things are simply too much of a pain in the neck to try to figure out, especially if I have an easy “workaround”.

        The bit about putting some blank lines in my Word document, and then creating or inserting a table in the middle of the blank lines, has become a habit for me. It is an extremely easy way to avoid the problem of the object forcing me to use its formatting from that point forward in the document.

        If there was a Reveal Codes function in Word, such as was in Word Perfect, it would be easy to overcome these sorts of problems without having to resort to tricks.

        Group "L" (Linux Mint)
        with Windows 10 running in a remote session on my file server
    • #1392360

      J,

      Here’s a posibility.

      Select as shown below. I had to use Shift+arrow keys to get it right.
      33953-SelectWord
      Select Paragraph->Lin and page Breaks tab->Keep lines together->OK.
      33954-SelectWord2
      HTH :cheers:

      May the Forces of good computing be with you!

      RG

      PowerShell & VBA Rule!
      Computer Specs

    • #1392379

      Have you tried using Keep with Next paragraph formatting in the last column except the cells where you are allowing a page break immediately after it?

    • #1392420

      Retired Geek,

      Your advice is spot on except for the last command. Keep lines together works within paragraphs and, since end-of-cell and end-of-row markers are types of paragraph marks, won’t work here. Instead, Keep with next, which works between paragraphs, should be used–being careful to select up to, but not including the last row of the set.

      (I always forget why Keep lines together doesn’t work the way I first expected it to, so I had to look it up…again.)

      Pam

    • #1392426

      Pam,

      Thanks, but I don’t understand your comment. :confused: I understand the difference between between Keep Lines Together and Keep With Next, however, when I tested it on the sample table provided by the OP Keep With Next did not work! On the other hand Keep lines together with the shown highlighting did keep the entire group, defined by Col 1 moved to the next page as I think the OP required. Yes/No ? :cheers:

      May the Forces of good computing be with you!

      RG

      PowerShell & VBA Rule!
      Computer Specs

    • #1392440

      Oh, dear, and I had the opposite response–several times. Here’s where I got the info about this:

      Control pagination and Managing pagination.

      Now that I look again at your picture, though, I see that the selection did not catch the end-of-row markers. I usually select a row by clicking outside the table and to the left of it, which selects the entire row, not just all the cells in the row. That explains the difference in our results!

      Sorry for doubting you.

      Pam

    • #1392444

      Pam,

      Why should you be different? 😆 Thanks for doing the additional testing as it will give Loungers more information and options. :cheers:

      May the Forces of good computing be with you!

      RG

      PowerShell & VBA Rule!
      Computer Specs

    • #1393435

      Two points…

      1. For Mrjimphelps: Word has several “reveal formatting” options to make it easy to avoid the bad habits you cite. Press Shift-F1 to bring up the Reveal Formatting pane to be able to see many different levels of formatting. The ¶ button toggles the view of non-printing characters so you can easily see page and section breaks, spaces and tabs — but also gives you cues for where object anchors and keep conditions are set. Word Options offers several more possibilities to show formatting cues as well. In this thread, the small square block indicator will show when Keep With Next or Keep Together conditions are applied. Unlike the character-based WordPerfect, Word formatting is based on pointers to structural elements, so workarounds like using multiple Returns (or even hard page breaks) are unnecessary and actually work against efficiency in Word. (Each Return contains all of the paragraph formatting information, so using >1 increases the document size and complexity for no real benefit.)

      2. For jsachs177: Note that you can use Word’s Table Properties dialog to cause a table of <1 page to let content flow around it. In your example, you could thus have the copy flow past the table to allow it to fit on the 1st page, or set the anchor point further along and let the table occupy the top of the following page. I do understand that your sample may be a smaller portion of a larger table, but it is worth considering to keep <1-page tables together on a page.

      And re RetiredGeek's solution, selecting the cells to Keep With Next is a lot easier if you drop out of Print Layout view to the Draft view because you won't be hindered by the carry-over headings when you try to do a select with the mouse.

      • #1393468

        Good stuff. “Keep with next” looks like the easiest workaround. Sweep select everything but the last cell:

        34020-table1

        Set the Paragraph>>keep with next. (I also cleared “Widow/orphan” control, but don’t know if that contributed anything.) Then you can select the entire “bracket”:

        34021-Table2

        And copy>>past/append to your heart’s content and it will always break the way you want.

        34022-table3

    • #1393493

      Catching up on this thread, I tried the “Keep with Next” technique, which I didn’t think of when I was trying to solve the problem on my own, but it didn’t work. I also tried “Keep Together” again, but it still didn’t work. I must sadly conclude that these approaches, if they can be made to work, are not reliable, and NSFW.

      EricFletcher, you proposed a simple and elegant solution, but I’ve looked at the Table Properties dialog and I don’t see how to do that. Is it a new feature in Word 2013?

      I’ve made floating tables (that’s what they’re called) before in Word, but I had to create a frame and then put the table in the frame. Creating and maintaining a table that way takes so much work that I don’t consider doing it except in cases where I need that result at any cost.

    • #1393668

      Uh, simple answer from a simple mind? Sounds like you are concerned about format changes and table(s) moving after making changes in preceding paragraphs? Why not just type something like, “PLACE TABLE #1 HERE” when creating your document and then inserting the table after you are satisfied the rest of the document is in it’s completed form/state? At that point, you’d know whether or not the table will break across pages and that you would need to insert a page break to maintain the table’s integrity.

    • #1393673

      Well, that’s another approach, but it doesn’t match the way documents are developed in my world. A document is never simply “done” and then released. I write several drafts and release them to individuals for question-answering or informal review. Then I release a version for a formal review. Then I release a final document, but a few months or years later I’m likely to go through the whole process again for a revision. Or worse, my successor is.

      Should I put the table in for each release and take it out again after? Or distribute it for informal reviews with a separate table, which most of the reviewers will find bewildering? In either case, what have I gained over leaving the table in the document? This turns into a way of doing a lot more work and introducing more opportunities for error, without even actually solving the problem.

    • #1393674

      The “float” option has been available for tables for quite some time, but it isn’t as obvious as with other objects.

      To use it, click on the Around button in the “Text wrapping” section of the Tables Properties box. This activates the Positioning… button, which in turn allows you to set parameters for how the table is positioned.

      34037-wsTblPropa

      In my example above, I set the horizontal position = Outside relative to Margin, and vertical position = Bottom relative to Margin, to specify that the table be placed in the outer bottom corner of a page (i.e. on the right or left depending if the page is odd or even numbered). As you can see below, even though the table is larger than the column width, the text wraps around it to ensure that it is located in the lower outside part of the page.

      34038-wsTblPropb

      The OP may not be able to use this method if his table is >1 page of course, but it is very useful when you know that a table will be <1 page and when placement is not particularly critical within the flow of the content.

      I routinely use this method to manage photos and captions in duplex-printed books when the design calls for consistent image widths. I create a 2-row table and set Table Properties appropriately (i.e. fixed width, thin border around row 1, preferred position options, etc.). The 1st row is for the photo, and with the "Automatically resize to fit contents" Table Option turned OFF, an inserted image will automatically be resized to fit the table's width. The 2nd row is tagged with a suitable style for a caption. I select the table and save it to an AutoText gallery so I can access it easily whenever I need to insert a captioned floating image.

    • #1393869

      This looks like it could be the best solution suggested so far. Whether it is or not it’s a technique I didn’t know about before, and I appreciate that.

      I’m going to have to practice with it, though. Ideally I’d like the table to be at the bottom of the page containing the table anchor if possible, and the bottom of the preceding or next page (I’m not sure which) if not. I haven’t achieved that so far.

      I tried specifying a vertical position of “bottom.” After the table anchor Word put a big patch of white space — big enough to hold more text, so if Word was trying to float the table, it did it wrong. The table started after the white space, ran over the footing, skipped the next page’s heading, and finished in the next page’s body.

      That not only isn’t what I wanted; it isn’t something that anyone could possibly want. That makes me wonder whether I understand what this technique is supposed to do (or, alternately, whether Microsoft understands)!

    • #1393925

      Be sure the vertical position is Bottom of Margin, and not Page. (Page will overlap the footer.)

      Part of the problem is that MS offers options for all kinds of potential situations. Some just are very esoteric: why would you want to position an object outside of the page’s content area? Perhaps a full bleed tab block, or crop marks…

      You may need to drag the anchor up a bit to allow text to flow “past” the table if the anchor would otherwise be too close to where the table will need to start.

    • #1394308

      Apparently the condition “don’t allow row to break across pages” is satisfied if any cell in the row is prevented from breaking across pages, and the other cells can break to their hearts’ content.

      Have anyone found a workaround for this?

      Hi, jsachs177.
      The problem is each “cell” is in just ONE row. Your larger cells span across six rows, but in Word, as in Excel, the cell is considered to be in the top row of the six rows spanned. Thus, the row doesn’t break across pages, but the cell does because it spans more than one row. This is not the desired behavior, of course, but it explains why the “keep lines together” or “keep with next” paragraph options do not solve the problem.

      I’ve attached two mods of your sample file with workarounds. These work in my Word 2003, so they should work in Word 2010. Note, I reset the paragraph spacing of your first paragraph to 150 pts after so I could simply add or delete a second paragraph to force the table on or off the page.

      In “Test1,” I simply merged the cells in the columns opposite “Production” so that all info is in one big row. Had to tweak the paragraph formatting to get the spacing and alignment to resemble the untweaked “Sandbox” row above.

      In “Test2,” I used nested tables for the cells in the “Production” row. I’ve shaded the nested tables to highlight them. The blue is 3 rows by 2 cols and the green is 6 rows by 1 column. I used internal border lines only to approximate the original format.

      Either method takes a bit of tweaking to make it look right, but once formatted, additional rows (with nested subrows) can be copied and inserted. In either example, Word does not break the “Production” row accross the page.

      I agree with you that these are workarounds, not true “solutions.” Either method requires some upfront format work and may not be worth the effort. But at least you have a couple more options. Good luck!

    Viewing 17 reply threads
    Reply To: Disabling “Allow row to break across pages”

    You can use BBCodes to format your content.
    Your account can't use all available BBCodes, they will be stripped before saving.

    Your information: