
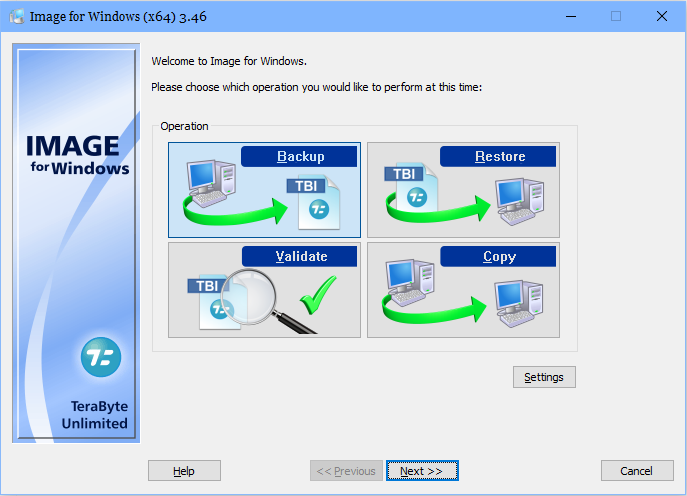
After installation and reboot, launch Image for Windows. Backup will be highlighted, so click the Settings button.
On the General tab, tick the boxes shown. These are sufficient for most any system, even a dual boot like mine.

Click the Geometry tab, and tick the box shown. This will allow IFW to default to Windows Geometry.

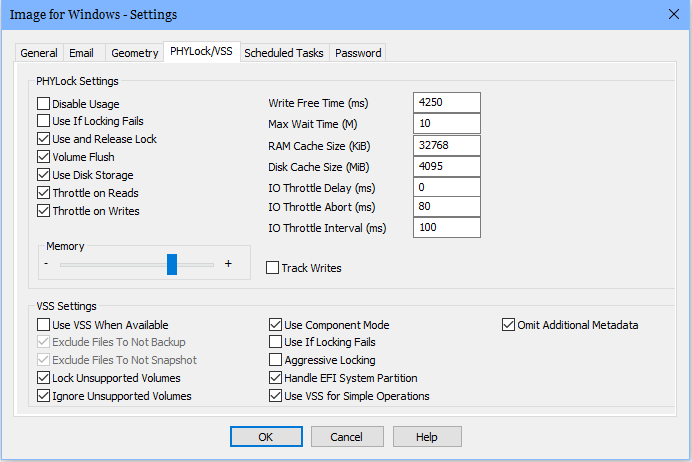
Click the PHYLock/VSS tab and tick the boxes shown, then click the OK button. These settings are now your default. They can be changed by going back through the Settings procedure the next time you run IFW.
The next screen is for selecting the backup type. “Full” will be highlighted. I suggest you leave it as “Full”, and click the Next button.

The next screen is where one chooses the drive/partition to backup. As can be seen, an entire drive can be selected, which will include all the partitions on that drive. In this screen, I have selected my OS partition. Click the Next button.

The next screen presents options for the target of the drive image you’re about to create. I have an internal 1TB drive where I store my images temporarily, and that is what is selected in this screen. If you are using a USB-connected external drive, it should appear in these options. If you are using an external drive not listed on this screen, you can try expanding Entire Network, then Microsoft Windows Network, and if that doesn’t expose your external drive, in the expanded Entire Network click on “enter unc path here” and type in the UNC “(\\ComputerName\ShareName)”. Once your target is selected, click the Next button.

As can be seen on the next screen, I have a couple of folders on my target drive. I have highlighted the folder I would normally want to use as a target. In order to use that folder as a target, I would double-click to open the folder. Otherwise, the drive image will go to the root of the target drive.

IFW uses a filenaming convention of
“K:\Backup-w4-0x2-$~YYYY$-$~MM$-$~DD$-$~HHMM$”
“K:\” is the target drive path, “Backup” is the default name, “w4” is the drive number, “0x2” is the partition number, the script between the “$” is for “YEAR-Month-Day-Hour-Minute”. Everything other than the target path (which may include a folder) can be changed to suit you. When you’re finished, click the Next button.
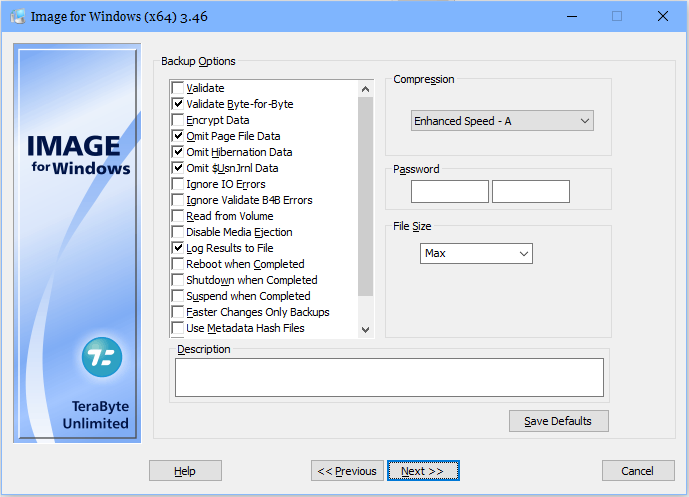
Tick the boxes as shown, click the Save Defaults button, then Next.
This is the Summary. If it matches the selections you’ve made for your drive image, click the Start button.

To be continued in the next post.

