Accidentally deleted boot manager, W7 HP x64 on Dell desktop. How can I restore it?

|
Patch reliability is unclear, but widespread attacks make patching prudent. Go ahead and patch, but watch out for potential problems. |
| SIGN IN | Not a member? | REGISTER | PLUS MEMBERSHIP |
-
Boot manager missing
Home » Forums » AskWoody support » Windows » Windows 7 » Questions: Windows 7 » Boot manager missing
- This topic has 191 replies, 10 voices, and was last updated 5 years, 5 months ago.
AuthorTopicSlowpoke47
AskWoody PlusOctober 22, 2019 at 9:48 am #1987773Viewing 164 reply threadsAuthorReplies-
Just Lurking
AskWoody LoungerOctober 22, 2019 at 10:05 am #1987780@ Slowpoke47
Accidentally deleted boot manager, W7 HP x64 on Dell desktop.
Aren’t you using the Linux Grub boot loader now from your Mint Mate installation?
Your boot loader is no longer *W7 HP x64*!
-
the_Unforgiven
AskWoody LoungerOctober 22, 2019 at 10:07 am #1987782I had this problem yonks ago, but I have to find it if he is still around. If I can’t find it, I would use this as a boot manager – https://neosmart.net/EasyBCD/ – before I found a program called Windows 7 Manager, but that only works if you can boot up, one of its programs includes a boot manager
Hopefully I will find that URL, it was a quick easy fix. I wonder if a boot repair with the W7 disk would work?
How did you lose the MBR in the first place?
Here’s another one, it even does Linux – http://www.easy2boot.com/
have a good 1 🙂 cheers
-
This reply was modified 5 years, 6 months ago by
1 user thanked author for this post.
-
This reply was modified 5 years, 6 months ago by
-
AskWoody PlusOctober 22, 2019 at 10:55 am #1987820
@ Slowpoke47
Accidentally deleted boot manager, W7 HP x64 on Dell desktop.
Aren’t you using the Linux Grub boot loader now from your Mint Mate installation?
Your boot loader is no longer *W7 HP x64*!
Here are the gory details- I saw that Mint had imported the entire Windows drive, pictures folder listed as single items, no other library folders, and everything else as folders most with alphanumeric names from non-library locations. I concluded that I didn’t want Windows drivers, etc, on the new OS and started deleting. One of those entries was boot manager, and I didn’t realize in my ignorance that it wasn’t part of the BIOS.
I hope these files are deleted from Mint only, but could be I shot myself in the foot. I’ll find out when I can open the Windows disk. If I did that, once I get into the system, I hope I can restore the files from yesterday’s backup. Also have a system image from last March.
-
Ascaris
AskWoody MVPOctober 22, 2019 at 12:12 pm #1987921Aren’t you using the Linux Grub boot loader now from your Mint Mate installation? Your boot loader is no longer *W7 HP x64*!
The bootloader is GRUB now, but dual-boot setups chain-load the Windows 7 boot manager if you select the Windows 7 option in the menu. More below!
Here are the gory details- I saw that Mint had imported the entire Windows drive, pictures folder listed as single items, no other library folders, and everything else as folders most with alphanumeric names from non-library locations. I concluded that I didn’t want Windows drivers, etc, on the new OS and started deleting. One of those entries was boot manager, and I didn’t realize in my ignorance that it wasn’t part of the BIOS.
Hoo boy, this could get a little hairy!
I don’t know of any importing anything that Mint would do. More than likely, what you saw was that Mint mounted your Windows drive and made it available in Linux. Linux would not be aware of Windows libraries, but it can access the NTFS file system that Windows uses. What you were looking at would have been the Windows disk itself.
The BIOS is not something you access from the operating system. You access the BIOS (or UEFI) setup at boot time by pressing a given key, but once the operating system is loaded, that’s not what you would be looking at. There are exceptions, but generally speaking, the only way for you (as a human user of the PC) to change the settings is to use the UEFI or BIOS setup before the system boots.
Don’t feel bad about having messed things up. It’s how we learn, to mess things up, to find out why things were messed up, and to fix them. Simply having things work is convenient and not stressful, but you don’t gain much experience that way. I’ve messed things up many, many times.
So let us get to the bit where things get fixed!
Depending on what, exactly, was deleted, restoring it could be simple or slightly less simple.
An OEM install of Windows 7 should use the MBR partition type even if the PC uses UEFI, but 7 x64 is capable of using GPT also. Just to verify that it is, in fact, a MBR disk, please enter the main menu from Linux (the same as the Windows start menu), then type “disks” into the search field. It should find a program by that same name. Start that, and select your hard drive from the left panel, if it is not already selected. In the upper right, it should say either “Master boot record” (which is what MBR stands for) or “GUID Partition Table.” This screenshot in another thread shows where to look. My example says GUID Partition Table, but on yours, it will probably say Master Boot Record.
In MBR installations of Windows, the boot manager is a file in the root directory on the boot drive, called (appropriately enough) ‘bootmgr’. If you have access to another Windows 7 PC (I am not sure if it has to be x64 or not, but if you have another x64, that would be preferred), copying the file over may work, if that was all that was deleted.
If you don’t have access to that file on another PC, or if it does not work, my normal go-to tool when Windows has booting problems is the Macrium Reflect rescue USB stick. It has a “repair Windows boot issues” function that seldom fails to get things working. If you have a Macrium bootable USB stick, this should fix Windows really quickly, unless there was more deleted.
If more was deleted, please say you have a backup!
Dell XPS 13/9310, i5-1135G7/16GB, KDE Neon 6.2
XPG Xenia 15, i7-9750H/32GB & GTX1660ti, Kubuntu 24.04
Acer Swift Go 14, i5-1335U/16GB, Kubuntu 24.04 (and Win 11)1 user thanked author for this post.
-
AskWoody PlusOctober 22, 2019 at 12:19 pm #1987928If more was deleted, please say you have a backup!
Weekly backup was yesterday, and I have a system image from last March, both on external drives. Maybe I’m not in as deep a hole as I feared. Once I get into the disk, I imagine I should use the image first, and then the backup?
I try not to make the same mistakes twice. I usually find new mistakes to make.
There is another W7 x64 computer on our network. How do I make use of that?
In the upper right, it should say either “Master boot record” (which is what MBR stands for) Yep, Master Boot Record.
-
This reply was modified 5 years, 6 months ago by
-
AskWoody MVPOctober 22, 2019 at 12:38 pm #1987955
Grab a USB thumb drive, go to the other Windows 7 machine, and turn on the ability to see hidden and system files if that is not already the case (in folder options, from the Windows Explorer). Go to the root of C:, assuming that’s the boot drive, and look for a file called ‘bootmgr’. Copy that to the USB drive.
Plug the USB drive into your PC you want to fix, and copy it to the root of the root of the Windows partition… Linux will do this for you without a problem.
Once it is copied, try booting into Windows and see if it works.
Dell XPS 13/9310, i5-1135G7/16GB, KDE Neon 6.2
XPG Xenia 15, i7-9750H/32GB & GTX1660ti, Kubuntu 24.04
Acer Swift Go 14, i5-1335U/16GB, Kubuntu 24.04 (and Win 11)1 user thanked author for this post.
AskWoody LoungerOctober 22, 2019 at 1:22 pm #1988020@ Slowpoke47
Please clarify–are you still booting successfully to Linux Mint, and have only lost the ability to boot to the Win7 OS?
***********************************************************
I’m going to make some statements about your computer skills to @Ascaris. I’m not trying to disrespect you in any way–I’m just trying to help him help you. I apologize if I say anything you find embarrassing:
***********************************************************
@ Ascaris
@ Slowpoke47 often times does not understand all the intermediate steps involved in, say for instance, *copy a file from another Win7 PC to the now broken Win7 PC*. Or “If you have a Macrium bootable USB stick,”–I doubt he has that, and may not know how to create such a USB stick (maybe he does, but you have to confirm–he often times does not report that he does not understand or know how to proceed). And, unless he confirms it, I don’t think he has ever restored an image. And I can not remember, but I don’t know if he has booted to the Macrium Rescue Media on his system–so as to confirm his ability to do so. My memory is failing, but he may have created a Rescue Media Disc on a CD or DVD–but I’m not sure.
Does Macrium have a Linux version that one can install on the Linux OS? Or is there only a Windows version? Just thinking if he can extract a file from the Image file if he needs just a replacement file–as opposed to a full Image Restore.
AskWoody LoungerAskWoody PlusOctober 22, 2019 at 1:50 pm #1988044Go to the root of C:, assuming that’s the boot drive, and look for a file called ‘bootmgr’
Which file(s)?

-
AskWoody MVPOctober 23, 2019 at 4:29 am #1989098
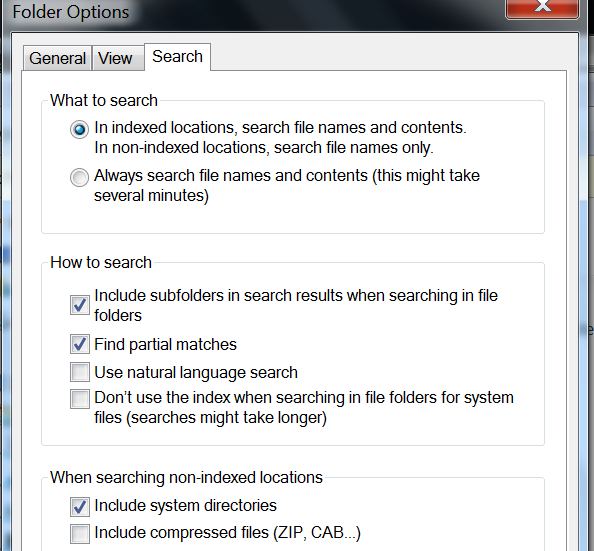
It would be bootmgr with no extension, a hidden file in the root (C:\) of the drive in question. It won’t be visible unless the operating system is set to show hidden (and system, in Windows) files. In File Explorer, select Tools, then Folder Options, and in the dialog that appears, click the View tab. Make sure that under “Hidden files and folders,” the option selected is “Show hidden files, folders, and drives.” Also, a few lines below, make sure the box for “Hide protected operating system files (Recommended) is not checked. Then select Ok.
After that, just navigate to C: and the file should be there, if this is indeed a MBR disk, which it should be.
The easiest way to copy a file to a thumb drive in Windows is to right click the file and hover over “Send to,” then select the thumb drive from the list.
Once back in Linux, you can drag and drop using your file manager (it’s Mate, right? Caja, in that case), or just highlight it, right click and copy, then go to the C:\ root in the Windows drive, then select paste from the menu bar, from the context menu (right click the background), or press Ctrl-V.
Dell XPS 13/9310, i5-1135G7/16GB, KDE Neon 6.2
XPG Xenia 15, i7-9750H/32GB & GTX1660ti, Kubuntu 24.04
Acer Swift Go 14, i5-1335U/16GB, Kubuntu 24.04 (and Win 11)1 user thanked author for this post.
AskWoody PlusOctober 22, 2019 at 1:52 pm #1988049Please clarify–are you still booting successfully to Linux Mint, and have only lost the ability to boot to the Win7 OS?
Mint still ok. I’m on it right now.
AskWoody PlusOctober 22, 2019 at 2:18 pm #1988106he often times does not report that he does not understand or know how to proceed).
You’re right about that- I try not to be too much of a pain in the butt, so I either wing it or poke around online looking for answers. Computer skills are not my strong point.
AskWoody PlusOctober 22, 2019 at 3:31 pm #1988179Tried this from How-To-Geeks:
 Didn’t work- no response from F8 key. Only options are F2 and F12. The BIOS sees the ext. drive but will not boot to it, shows as “Disabled.” This drive also appears on the Mint desktop, right-click menu offers:
Open with Autorun Prompt, Open with Other Application…, Open in Terminal
AskWoody PlusOctober 23, 2019 at 7:36 am #1989230In File Explorer,
Good morning. Can’t get to square one- unable to find anything “file explorer.”
Tried search box on Start menu, did not see this anywhere in Control Panel, didn’t appear using Control Panel search box. After my previous blunders, didn’t want to take any initiatives, better to follow your steps exactly. Prefer not to disable another computer.
Also- just to be precise, does it matter if the usb stick is connected to the working computer before or after starting?
AskWoody LoungerOctober 23, 2019 at 9:28 am #1989342@ Slowpoke47
Good morning. Can’t get to square one- unable to find anything “file explorer.”
Dang Microsoft! It’s been *File Explorer* since *forever*. It’s what we’re used to saying.
But they have now changed the name in Win7 to *Windows Explorer*!
Type that in the *Start > Search box* and it should show up as an option at the top of the list.
1 user thanked author for this post.
AskWoody LoungerOctober 23, 2019 at 9:55 am #1989362@ Slowpoke47
So, here’s some screen shots:
Windows Explorer–if you need to make changes to the *Folder Options*, click on *Tools*, and then the bottom menu item *Folder Options*:

When *Folder Options* dialog box comes up, select *View* tab:

On the *View Tab*, make the changes that have been recommended to you by *checking* or *unchecking* boxes, or selecting the option with a *dot* in the desired option:

When you’re done making the changes–select *OK*.
After making the necessary changes in how Windows Explorer shows files, select your *C:* drive, look at the list on the right hand side, and you should find *bootmgr* listed–see the top screen shot.
@ PKCano’s instructions is an alternate way to get to the *Folder Options*, but from the Control Panel, and it works just as well:
In Win7
Control Panel-Folder Options on the “View” tab.
Check “Show hidden Files”
Uncheck “Hide protected system files”1 user thanked author for this post.
AskWoody PlusOctober 23, 2019 at 9:58 am #1989367But they have now changed the name in Win7 to *Windows Explorer*!
Thanks. This brings me to the same screen as yesterday- from there, confirmed the steps taken earlier today:
Control Panel-Folder Options on the “View” tab. Check “Show hidden Files” Uncheck “Hide protected system files”
In the left pane there is the item C: (no backslash), the list from there does not include bootmgr, but C: in the search box generates what appears to be the same extensive list as yesterday, with several entries “bootmgr” no suffix.


Is one (or more) of these what I’m looking for? And, does it matter if the usb stick is connected before or after starting the machine?PKCano
ManagerOctober 23, 2019 at 10:03 am #1989372What you need looks like this with nothing after the C:\ but bootmgr:
C:\bootmgr
1 user thanked author for this post.
AskWoody PlusOctober 23, 2019 at 10:31 am #1989378@ Slowpoke47
So, here’s some screen shots:
Windows Explorer–if you need to make changes to the *Folder Options*, click on *Tools*, and then the bottom menu item *Folder Options*:
When *Folder Options* dialog box comes up, select *View* tab:
On the *View Tab*, make the changes that have been recommended to you by *checking* or *unchecking* boxes, or selecting the option with a *dot* in the desired option:
When you’re done making the changes–select *OK*.
After making the necessary changes in how Windows Explorer shows files, select your *C:* drive, look at the list on the right hand side, and you should find *bootmgr* listed–see the top screen shot.
@ PKCano’s instructions is an alternate way to get to the *Folder Options*, but from the Control Panel, and it works just as well:
In Win7
Control Panel-Folder Options on the “View” tab.
Check “Show hidden Files”
Uncheck “Hide protected system files”Thanks for the screenshots. I had done all these steps previously, but worried about not seeing the backslash. The one detail missing was to uncheck the “hide extensions for known file types” as shown in your third s/shot. Selecting C: brought up a list similar to yours, but no entry bootmgr.
AskWoody PlusOctober 24, 2019 at 5:14 am #1990313Went back over the steps outlined very carefully- no problem generating the screen analogous to the first screenshot in NightOwl’s post #1989362 above, but there is no entry “bootmgr.” The path to that screen was not exactly the same as advised above, but I found it. In that same screenshot, the left pane shows an extensive submenu below Computer which is not available in the machine I’m using to get the file I need, but I saw the address bar showing Win7_SSD (C:) so I entered that into the search box, upper right, in the Computer screen- nothing found. The only way I can get any items “bootmgr” is to enter that into the search box on the Computer screen.
Here’s the screenshot of folder options. Does anything need to be changed here?
-
AskWoody MVPOctober 24, 2019 at 7:24 am #1990379
Win7_SSD is the label (name) of the C: logical drive (partition) on that specific computer. It will be different on your system, or it might not have a label, in which case it will appear as C:\ or Local Disk (C:), depending on where you see it.
If you go to the desktop, you should see an icon named “Computer” on the desktop, if it has not been removed or renamed. If so, please click on that, then look under the heading “Hard Disk Drives.” The first entry (which may also be the only entry) in that section should be where Windows is installed. It will have the name under it… it could be any number of things, but what you’re really looking for is the drive letter, like C:. Double click that, and that will be C:\
That’s where you should look for bootmgr. If you have the options set to show hidden and system files as you mentioned, it should be in there if the disk is set up with MBR. This is the normal way that OEM Windows 7 installations are set up, even on UEFI PCs that are capable of GPT booting. It is possible that the disk in question on the newer PC is formatted GPT and the bootmgr file is not there, but if it is an OEM installation of 7, it is probably MBR. You can use your bootable USB drive in the new PC and verify its partition type in Linux as I described above, to be certain it is MBR.
Dell XPS 13/9310, i5-1135G7/16GB, KDE Neon 6.2
XPG Xenia 15, i7-9750H/32GB & GTX1660ti, Kubuntu 24.04
Acer Swift Go 14, i5-1335U/16GB, Kubuntu 24.04 (and Win 11)1 user thanked author for this post.
AskWoody PlusAskWoody PlusOctober 24, 2019 at 9:51 am #1990443If you go to the desktop, you should see an icon named “Computer” on the desktop
No icon on desktop, so used Computer in Start menu. Generates the same screen whether I expand the Hard Drives entry in the main panel there or select (C:) in the left pane.
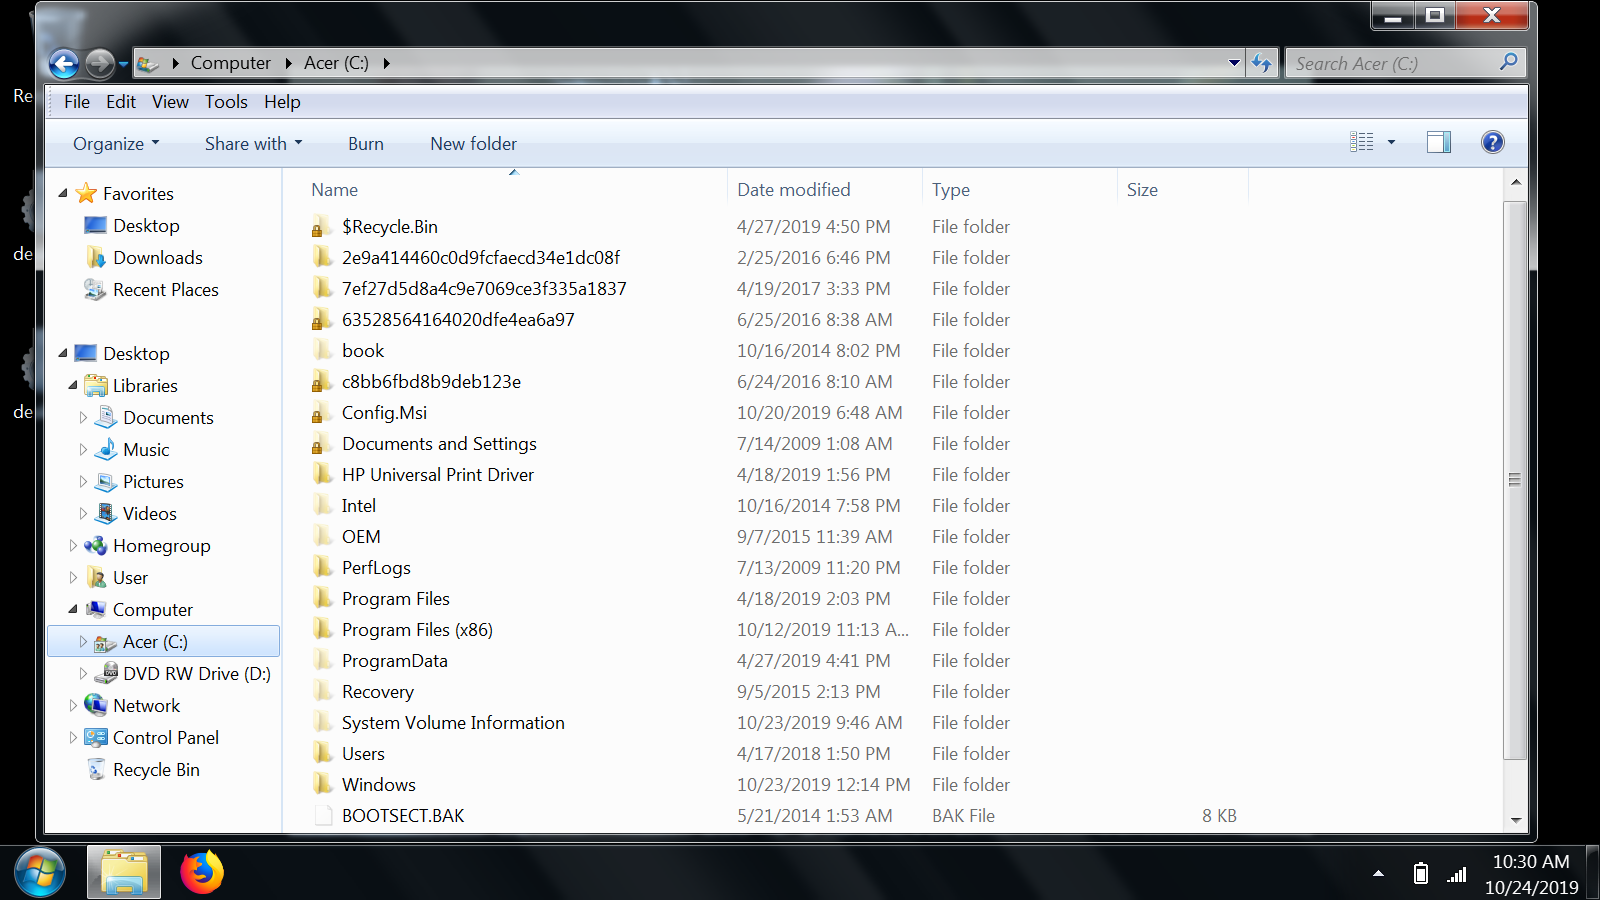
THere is no bootmgr entry in the list. The only two entries that are below the screen are hiberfil.sys and pagefile.syst.
AskWoody LoungerOctober 24, 2019 at 10:25 am #1990469@ Slowpoke47
Also- just to be precise, does it matter if the usb stick is connected to the working computer before or after starting?
And:
And, does it matter if the usb stick is connected before or after starting the machine?
You can connect the *usb stick* at any time if it is just a *data* stick –meaning the *usb stick* only holds data files and folders.
If the *usb stick* has been used to make a bootable USB drive, then if you want to boot from that USB drive, it has to be connected before you boot your computer. Then, once the boot process starts, depending on how you have your system setup, you need to select which device you want to boot from–you would need to select the USB drive instead of your boot hard drive.
If you have already booted your system, you can connect the bootable USB drive at anytime and it will act like a *data* stick. But, if you leave it connected, and then re-start, or shut down and then re-boot–then it will once again act like the bootable USB drive, and be available to boot from it. This does not happen if it’s just a *data* stick. You system should just boot as normal. (Sometimes a system will hang during boot if it *sees* an attached USB drive (this is especially true of older systems) because it’s trying to determine if the USB drive is bootable or not–if your system behaves this way, simply shut down (hold down the Power button until it forces a shut down), remove the USB thumbdrive and re-boot–the hanging problem should be solved.)
If you wish to remove a USB drive from the system while your OS is still running, then the proper way to do this is by using the *Safely Remove Hardware* icon in your system tray:

If you hover your mouse pointer over that icon, you should get the popup message shown on the screenshot: Safely Remove Hardware and Eject Media
I have *magnified* that tray and icon so you can see the *black mouse pointer* hovering over the icon:

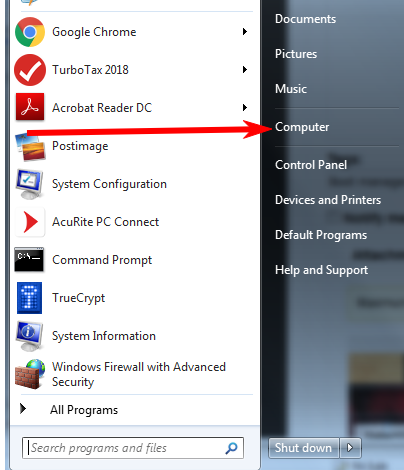
Before you use that procedure, it’s good to know ahead of time which USB device you want to remove (i.e. what the USB device name is, and/or the drive letter that your OS has assigned to it. You could find that information by using *Windows Explorer*, or by looking for *Computer* in the right column of items in the *Start* screen (Note: sometimes *Computer* is on the Desktop as a shortcut item–it gives the same results if clicked on):
Here’s what I get if I click on the *Computer* listing:

Under the *Devices with Removable Storage* I have listed two USB thumbdrive with the name and the assigned drive letters showing for each.
I’ve used up all the screen shots that I can for this reply–so will continue in the next reply ….
1 user thanked author for this post.
-
AskWoody LoungerOctober 24, 2019 at 10:42 am #1990489
@ Slowpoke47
I’ve used up all the screen shots that I can for this reply–so will continue in the next reply ….
So, this is the continuation for the above mentioned quote.
So, if I click on the *Safely Remove Hardware* icon in the system tray, this is what I get:

It shows the drive name and the drive letter.
Select the drive you wish to remove by clicking on, for example *Eject UDisk*. Shortly after that, you will get a confirmation that it’s safe to remove that drive:


1 user thanked author for this post.
AskWoody PlusOctober 24, 2019 at 10:33 am #1990487Thanks, NightOwl- I’m familiar with that procedure- same as when removing the ext drive for backups every week. This stick has never been used, but anyway from your post there’s no harm in putting it in at any point. Before I get that far, as you can see by my last post, I need to find the correct bootmgr file.
AskWoody LoungerOctober 24, 2019 at 11:39 am #1990530@ Slowpoke47
Before I get that far, as you can see by my last post, I need to find the correct bootmgr file.
You are using a different computer than your Mint/Win7 system to look for that *bootmgr* file–correct?
I’m going to bet that *other* system is set up so it’s using a “System Reserved” partition–which is *hidden* and not assigned a drive letter–so you can not directly access that information without using special procedures.
Go to your *Computer* item listed in your *Start* menu screen. Right mouse click that item and you will get a menu–select the *Manage* item and it should open the *Computer Management* dialog screen (I think you have been here before!).
In the left hand list of options, select *Storage* , and under that select *Disk Management*. (I think you have seen this output before, as well). Make the window large, and then if possible take a screenshot, and post it here.
What I expect you to see, is the listed drive that includes your (C:) drive, you will also have a *System* partition that does not have a drive letter listed–this is the “System Reserved” partition. If present, then *bootmgr* is most likely on that partition.
Here’s a couple links for information:
https://www.howtogeek.com/192772/what-is-the-system-reserved-partition-and-can-you-delete-it/
https://www.lifewire.com/windows-boot-manager-bootmgr-2625813
Where Is Windows Boot Manager (BOOTMGR) Located?
The BOOTMGR file itself is both read-only and hidden. It is located in the root directory of the partition marked as Active in Disk Management. On most Windows computers, this partition is labeled as System Reserved and doesn’t have a drive letter.
If you don’t have a System Reserved partition, BOOTMGR is probably located on your primary drive, which is usually C:.
I think there is a way to assign a drive letter to the “System Reserved” partition, so that you can *mount* that partition and have access to the files on it–but, I have not done that myself, and do not have the experience to do that procedure–hopefully someone else can step in with that information. (None of my computers have or use the “System Reserved” partition–I specifically installed my OS’s to prevent that partition from being created–and all my boot files are located on the C: partition–makes image backups much more simple–don’t have to backup both partitions to have a *complete* backup–only need to back up the C: partition.)
FYI–you want to be very careful if you do access that “System Reserved” partition–if you make any wrong changes you could loose you ability to boot that system as well!
Having a back up image of the whole hard drive (C: and the “System Reserved” partition) of that system should be a prerequisite for doing such activity.
But, what you need to do is simply *Copy* the *bootmgr* file (make sure it’s not a *Cut* procedure–that removes the file–don’t want to do that!!!!), and then *Paste* it to the USB thumbdrive–and do no other changes–so the risk should be *low*.
If you need help with the above, say so …..
anonymous
GuestOctober 24, 2019 at 12:03 pm #1990532It may be on your ‘System Reserved’ partition instead of the Windows one. That is where is mine on my (BIOS-based) MBR Windows 7. But, it is not the only copy of that file on your Windows. If you do have administrative rights on the donor machine (and I assume that you have them), it should be easy. Just open elevated command prompt and type:
copy %windir%\boot\pcat\bootmgr %userprofile%\Desktop\
It will copy the bootmgr file to your desktop. Then, you just need to place it on your USB stick.
The bootmgr files are the same (I have compared their checksums using 7-zip), as long as they are the same version. And if you have KB4474419 (SHA-2 suppert for Windows 7) installed on both machines, bootmgr files are exactly the same version.
2 users thanked author for this post.
-
AskWoody MVP
AskWoody PlusOctober 24, 2019 at 12:08 pm #1990551You are using a different computer than your Mint/Win7 system to look for that *bootmgr* file–correct?
Jeez, give me a little credit!
Here’s the s/shot:
 AskWoody PlusOctober 24, 2019 at 12:11 pm #1990557
It may be on your ‘System Reserved’ partition instead of the Windows one. That is where is mine on my (BIOS-based) MBR Windows 7. But, it is not the only copy of that file on your Windows. If you do have administrative rights on the donor machine (and I assume that you have them), it should be easy. Just open elevated command prompt and type:
copy %windir%\boot\pcat\bootmgr %userprofile%\Desktop\
It will copy the bootmgr file to your desktop. Then, you just need to place it on your USB stick.
The bootmgr files are the same (I have compared their checksums using 7-zip), as long as they are the same version. And if you have KB4474419 (SHA-2 suppert for Windows 7) installed on both machines, bootmgr files are exactly the same version.
Thanks for that info, will be able to pursue that as soon as I’m back from an appointment…
AskWoody LoungerOctober 24, 2019 at 12:38 pm #1990605@ Slowpoke47
Jeez, give me a little credit!
Just confirming! Because of the changes you previously did (some months ago), the *bootmgr* file will be on your C: of your Win7 on the Mint/Win7 system, and not somewhere on a “System Reserved” partition–that does not exist any longer on that system.
That’s where you will put the *repair bootmgr* file when you have a copy of it.
Based on your screenshot, you do have a “System Reserved” partition, and that’s most likely where your active *bootmgr* file is located.
Based on this reply:
copy %windir%\boot\pcat\bootmgr %userprofile%\Desktop\
That path is the same as the one to the file you listed in this reply:
but C: in the search box generates what appears to be the same extensive list as yesterday, with several entries “bootmgr” no suffix.boot-manager-screenshot
Is one (or more) of these what I’m looking for?
The above highlighted *bootmgr* file is the same as what *anonymous* is suggesting to use.
Maybe that’s good enough!?
I have to be away from my computer for the rest of the day, so that’s why I will not be responding for awhile ….
2 users thanked author for this post.
GuestOctober 24, 2019 at 1:28 pm #1990668Seems like you do not have KB4474419 installed on your donor machine (as it shows bootmgr’s size: 374 KB and date modified: 11/20/2010 – it it is the version that came with SP1, as I remember), so if you have installed that update (which is prerequisite for all updates since August) on your corrupted system, it will be different version.However, you will still be able to boot your machine (I have just checked it on my test system). In that case, after booting your broken Windows successfully (I hope you will), I suggest you to check if KB 4474419 is installed. If it is, you can try uninstalling and reinstalling it or downloading the update from http://download.windowsupdate.com/c/msdownload/update/software/secu/2019/09/windows6.1-kb4474419-v3-x64_b5614c6cea5cb4e198717789633dca16308ef79c.msu
and expanding it to obtain the newer version of bootmgr (which should be 390 KB with date modified: 11/18/2018).
It is also a good idea to porform the following commands:
dism /online /cleanup-image /scanhealth
and
sfc /scannow
and check their results in logs to ensure that there are no more files missing.
1 user thanked author for this post.
AskWoody PlusOctober 24, 2019 at 1:53 pm #1990747Seems like you do not have KB4474419 installed on your donor machine (as it shows bootmgr’s size: 374 KB and date modified: 11/20/2010 – it it is the version that came with SP1, as I remember), so if you have installed that update (which is prerequisite for all updates since August) on your corrupted system, it will be different version.However, you will still be able to boot your machine (I have just checked it on my test system). In that case, after booting your broken Windows successfully (I hope you will), I suggest you to check if KB 4474419 is installed. If it is, you can try uninstalling and reinstalling it or downloading the update from http://download.windowsupdate.com/c/msdownload/update/software/secu/2019/09/windows6.1-kb4474419-v3-x64_b5614c6cea5cb4e198717789633dca16308ef79c.msu
and expanding it to obtain the newer version of bootmgr (which should be 390 KB with date modified: 11/18/2018).
It is also a good idea to porform the following commands:
dism /online /cleanup-image /scanhealth
and
sfc /scannow
and check their results in logs to ensure that there are no more files missing.
We may be confusing the issue here- you joined this thread just recently- the donor machine does not have a “corrupted” system AFAIK. And the machine I’m trying to restore will not boot Windows at all- that is the dual-boot machine. Just finished checking update history on the working machine- on the Windows Update screen, entered the update number in the search box, upper right, and got a hit. If I understand this correctly, that response means the update is there. If my assumption is wrong, I can get the update from Windows Update, but just looked at it and there are multiple versions of that number listed for the W7 HP x64 OS, which is the version of Windows in both computers. But I wouldn’t know which one to select. If the update is in fact installed, I believe the update function will tell me.
We have not been too conscientious in updating the donor machine because it has no files or user-installed programs and we don’t use IE. It’s used solely for internet access with Firefox.
AskWoody PlusAskWoody PlusOctober 24, 2019 at 2:35 pm #1990808and expanding it to obtain the newer version of bootmgr (which should be 390 KB with date modified: 11/18/2018).
Don’t know what expand means in this context…
check their results in logs to ensure that there are no more files missing.
Or this either.
Now with that update installed, the search in Computer shows the bootmgr entries as 390kb instead of 374kb.
-
This reply was modified 5 years, 6 months ago by
GuestOctober 24, 2019 at 2:49 pm #1990810Well, I have tracked this thread since it’s creation. When I wrote ‘corrupted system’, I meant the system with bootmgr missing, installed on the target machine in dual-boot with Linux Mint. The ”corruption’ meant lack of ‘bootmgr’ file there. The bootmgr is still necessary, even in dual-boot scenario.
As I’ve written, you can boot Windows even with older version of bootmgr (but it still needs to be present!).
No matter if the target system has KB4474419 installed or not-it should boot normally even with the bootmgr from 11/20/2010. I have checked it on one of my systems, which has KB4474419 installed simply: by swapping (temporarily) it’s bootmgr to the 9-years old version and it booted normally, without any issue.
There are 3 versions of KB4474419 for Windows 7: the initial one, released in March, the second, intermediate, released in August and the final one (till now…), from September. You can either:
-check when it was installed. For example, if it was installed in March/April/May/June/July, it must be the initial release;
-or simply try to install the latest one, released in September, as it supersedes all it’s previous releases (though the March one is not listed under ‘replacement information in Catalog). The second way is much easier and faster. Even if you get an info that it’s been already installed on your system, you will know that it’s the September one.
But now, please focus on placing bootmgr (no matter what version) again on your target system, as described in previous posts.
1 user thanked author for this post.
AskWoody PlusOctober 24, 2019 at 2:58 pm #1990885Even if you get an info that it’s been already installed on your system, you will know that it’s the September one.
Yes, that was my conclusion as well, see my previous post. And, I absolutely appreciate your input, as you obviously know whereof you speak. If you don’t mind, could you comment on my last post? Many thanks!
AskWoody PlusOctober 24, 2019 at 3:13 pm #1990898GuestOctober 24, 2019 at 3:27 pm #1990912‘Expand’ means: downloading the .msu package to your computer and saving it for example in %userprofile%\desktop. Then, creating new, empty folder, for instance ‘new_folder’ on your desktop and performing the following commands:
expand /F:*kb*.cab %userprofile%\desktop %userprofile%\desktop\new_folder\
expand /F:* %userprofile%\desktop\new_folder\*.msu %userprofile%\desktop\new_folder\
It will allow you to access and copy the files contained in this update without installing it (for example, on other system than your target one).
‘Check their corresponding logs’ means:
-for DISM: opening %windir%\logs\cbs\checksur.log to check if there are any errors detected. And, if there were any, whether they were fixed automatically or not.
-for SFC: the results are in %windir%\logs\cbs\cbs.log and since this file is usually huge (you do also not have permissions to open it, unless you are runnig notepad as admin or you are operating from built-in ‘Administrator’ account, which is disabled by default and often mistaken with ‘Administrators’ group). To view them, type that from elevated command prompt:
<span class=”sbody-userinput x-hidden-focus”>findstr /c:”[SR]” %windir%\logs\cbs\cbs.log >%userprofile%\desktop\sfcdetails.txt </span>
Have you already copied the bootmgr from donor to your target (the one in dual-boot with Linux) system?
1 user thanked author for this post.
AskWoody PlusOctober 24, 2019 at 4:20 pm #1990991‘Expand’ means: downloading the .msu package to your computer and saving it for example in %userprofile%\desktop. Then, creating new, empty folder, for instance ‘new_folder’ on your desktop and performing the following commands:
expand /F:*kb*.cab %userprofile%\desktop %userprofile%\desktop\new_folder\
expand /F:* %userprofile%\desktop\new_folder\*.msu %userprofile%\desktop\new_folder\
It will allow you to access and copy the files contained in this update without installing it (for example, on other system than your target one).
‘Check their corresponding logs’ means:
-for DISM: opening %windir%\logs\cbs\checksur.log to check if there are any errors detected. And, if there were any, whether they were fixed automatically or not.
-for SFC: the results are in %windir%\logs\cbs\cbs.log and since this file is usually huge (you do also not have permissions to open it, unless you are runnig notepad as admin or you are operating from built-in ‘Administrator’ account, which is disabled by default and often mistaken with ‘Administrators’ group). To view them, type that from elevated command prompt:
<span class=”sbody-userinput x-hidden-focus”>findstr /c:”[SR]” %windir%\logs\cbs\cbs.log >%userprofile%\desktop\sfcdetails.txt </span>
Have you already copied the bootmgr from donor to your target (the one in dual-boot with Linux) system?
Have not copied anything yet- should I copy one of these (from Computer>(search)bootmgr? If yes, which one? Note that after installing the update, they briefly displayed the newer size and date, but when I looked back, they were as you see here.

Butt when I ran the installer again, message was, already installed.
GuestOctober 24, 2019 at 4:58 pm #1991027Judging by screenshot you posted,
the files shown on as a search result are exactly the same file that have been manually copied to your Documents library and Public user Documents library. And, as they were copied there manually and are not used by system, they have not been replaced with their newer version. But, I can see only three results on the screenshot and none of them is in neither Windows ‘Boot’ nor ‘winsxs’ subdirectory. Perharps you were searching just in C:\users\ directory?
You should start with ‘bootmgr’ file located in C:\Windows\winsxs\x86_microsoft-windows-b..re-bootmanager-pcat_31bf3856ad364e35_6.1.7601.17514_none_c5311c6f11729c15\
When you copy it and place it on your target system (to avoidance of doubt: the one in dual-boot with Linux Mint), it should allow you to boot that (target) system.
I see that you attached something, but since I am not a registered and logged-in user, I cannot see what is it.
I have to be offline for several hours, but I’ll be back.
1 user thanked author for this post.
AskWoody PlusOctober 25, 2019 at 6:18 am #1991555You should start with ‘bootmgr’ file located in C:\Windows\winsxs\x86_microsoft-windows-b..re-bootmanager-pcat_31bf3856ad364e35_6.1.7601.17514_none_c5311c6f11729c15\
Thanks for your help. Unfortunately for me, I am not technically savvy enough to know just what to do with this. I know I am to copy the bootmgr file needed from some location in the donor (“laptop”) machine and install it into the target (“pc”) machine, and I know how to copy it to a usb stick with the right-click “copy” command. Can you please tell me how to get to the file in the laptop in a little less technical terms? And then, in the same kind of terms, how to get the pc to upload the file from the stick?
The attachments to which you have referred are, in my case, the same ones shown in the body of the post. Registered members have the option of inserting attachments and I and many others do that for the convenience of those reading the post.
GuestOctober 25, 2019 at 7:00 am #1991569To get the file you just need to:
1.Paste the following patch to your addressbar (in ‘Windows Explorer’, or even in your browser, for example Firefox, IE etc.) and press ‘enter’ on you keyboard:
C:\Windows\winsxs\x86_microsoft-windows-b..re-bootmanager-pcat_31bf3856ad364e35_6.1.7601.17514_none_c5311c6f11729c15\
2.Right-click on ‘bootmgr’ (it is the only item in that location);
3.Select ‘copy’;
4.Open the USB stick you want to place the ‘bootmgr’ file on;
5.Right-clik and select ‘paste’.
Once you have done the above, let us know.
I will provide you further instructions ‘How to upload the “bootmgr” file from USB stick to your target PC’ (the one that is lacking it-the one in dual-boot with Linux Mint) in a separate post to make them clearer and easier to follow.
1 user thanked author for this post.
AskWoody PlusOctober 25, 2019 at 8:52 am #1991663Once you have done the above, let us know.
Done. FWIW, your link went to the original version of this file- but you said any version should work. File shows as loaded on the stick.
AskWoody LoungerOctober 25, 2019 at 9:00 am #1991667@ Slowpoke47
Look back at this reply:
… but C: in the search box generates what appears to be the same extensive list as yesterday, with several entries “bootmgr” no suffix.
See your screenshot:
The highlighted *bootmgr* should be an acceptable source for what you need to copy to your USB thumbdrive.
So, however you generated that screenshot listing of your *bootmgr* listing on C:–you should do that again. I think you had opened Windows Explorer, and had clicked on the C: drive listing, and then perhaps put *bootmgr* in the search box.
**************************************************************
@ anonymous — correct me if I’m wrong, but wouldn’t that *bootmgr* be an acceptable copy to use?
1 user thanked author for this post.
AskWoody PlusAskWoody LoungerOctober 25, 2019 at 9:16 am #1991675@ anonymous
As I’ve written, you can boot Windows even with older version of bootmgr (but it still needs to be present!).
Just wondering. We have not asked @ Slowpoke47 to go to his Mint OS on the Mint/Win7 computer, and give us a listing of what Mint shows is still present on the Win7 C: drive (might not have that drive letter assigned to it in Mint) to see to what extent he deleted other files.
For instance, there should be a *Boot* folder. If he deleted that folder, and/or files from inside that folder, then booting may fail regardless of the *boot.mgr* file being present.
Are there any other required files that are necessary for a successful boot?
I’m going to be out to town for the next 4 days and will not have access to a computer, so I’m going silent until I get back.
Recovery of being able to boot might require attempting to restore the image file that @ Slowpoke47 has. For the record, that will wipe out all changes you have made to the Win7 C: drive since you created that image file back in April (?), 2019. So, if there are any files that you want to save, you should use the Mint OS to transfer the files to the Mint hard drive from the Win7 hard drive before doing a restore.
1 user thanked author for this post.
AskWoody LoungerOctober 25, 2019 at 9:19 am #1991676@ Slowpoke47
@NightOwl- See my previous post- file already on stick.
Good! Wait for further instructions.
1 user thanked author for this post.
GuestOctober 25, 2019 at 10:33 am #19917571.Boot Linux Mint on your target machine.
2.Double-click on ‘computer’ icon on your desktop.
3.On the left side, you will see your partitions, listed in ‘Devices’ section. Find the one with Windows 7 (if it is labeled, it should be easier-if not, simply browse every volume to find the correct one).
4.Once you have found the proper partition, insert your USB stick and open it.
5.Select ‘bootmgr’ file you placed there.
6.Right-click on it, select ‘copy’.
7.Go back to your Windows partition.
8.Right-click and select ‘paste’. It shouldbe just on that partition, NOT in any of it’s subfolders.
9.You can eject your usb stick.
10.Shut down the computer.
11.Start your target machine again. This time, boot it with Windows 7.Once you have done the steps above, let us know the results.
Just as the NightOwl said, we are not sure if there are more files missing on your Windows, but if it is only the bootmgr missing, it will work. Good luck!
NightOwl wrote:
Are there any other required files that are necessary for a successful boot?
Yes, of course, for example BCD in the ‘Boot’ folder you mentioned. The above instructions will enable Slowpoke47 to successfully boot his Windows only if the other necessary files (except ‘bootgmr’, that we know has been deleted) are in their place-if not, Windows will not boot, so he and we will know that there is more to be done.
MODERATOR’S NOTE: To avoid automatic spam-filter capture, use “@username” instead of a created link to the profile’s URL 🙂
AskWoody PlusOctober 25, 2019 at 10:57 am #1991770For instance, there should be a *Boot* folder. If he deleted that folder, and/or files from inside that folder, then booting may fail regardless of the *boot.mgr* file being present.
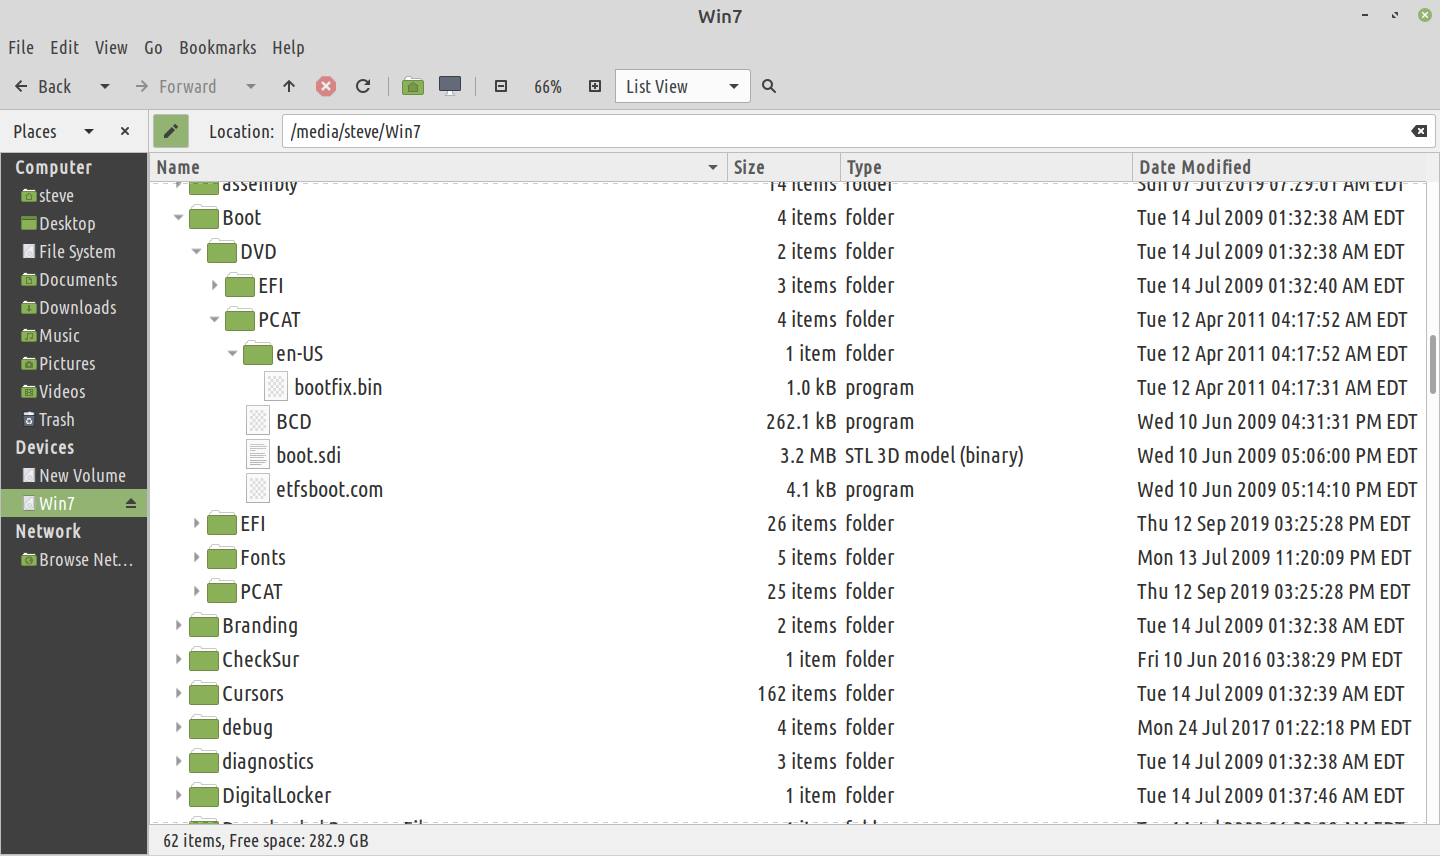
Here’s what the boot folder in Win7 on Linux shows, without opening any of the dependent subfolders:
 GuestOctober 25, 2019 at 11:55 am #1991822
@ Slowpoke47
Here’s what the boot folder in Win7 on Linux shows, without opening any of the dependent subfolders:
If you click on the *Boot* folder, is there a copy of the *bootmgr* file in that folder?
If you click on the *PCAT* folder, is there a copy of the *bootmgr* file in that folder?
1 user thanked author for this post.
GuestOctober 25, 2019 at 11:56 am #1991828Right, seems like you have the september version of KB4474419 installed, judging by dates of edition. But it appears to be the ‘Boot’ subfolder of ‘Windows’ folder. That is good for you, as Linux shows 25 items in it’s PCAT subfolder-and that is exactly as many as should be if you open it, I suppose you will see… ‘bootmgr’ file dated 11/18/2018! So, that folder is probably untouched.
You can simply copy the ‘bootmgr’ from there and paste it to yuor Windows 7 partition-NOT to any of it’s folders! When you do so, there have to be the following elements on it: ‘bootmgr’ file, ‘Boot’ folder, ‘Windows’ folder, ‘Program Files’, ‘Program Files (x86)’, ‘Users’, ‘Program Data’. There are more elements, but just don’t touch them now.
We assumed that you have deleted more copies of ‘bootmgr’, and that’s why you were told to obtain it from another machine. But, if you do have one in ‘PCAT’ folder, which is visible on your screenshot, you can use it instead. It would be even better if you do so, because it is exactly the same version that you have deleted.
And make sure that you have also ‘Boot’ folder on that partition. It is different from the one on your screenshot and it should contain 35 elements.
To sum up – copy the bootmgr to your Windows partition, shut down and boot Windows.
Don’t forget to inform us when you finish.
1 user thanked author for this post.
AskWoody PlusOctober 25, 2019 at 12:11 pm #1991850@ Slowpoke47
Here’s what the boot folder in Win7 on Linux shows, without opening any of the dependent subfolders:
If you click on the *Boot* folder, is there a copy of the *bootmgr* file in that folder?
If you click on the *PCAT* folder, is there a copy of the *bootmgr* file in that folder?
Here’s what I see with folders expanded:


 AskWoody PlusAskWoody PlusGuestOctober 25, 2019 at 12:31 pm #1991879
So, copy ‘bootmgr’ from ‘PCAT’ folder to your Windows partition, as described in the post above
You can simply copy the ‘bootmgr’ from there and paste it to yuor Windows 7 partition-NOT to any of it’s folders! When you do so, there have to be the following elements on it: ‘bootmgr’ file, ‘Boot’ folder, ‘Windows’ folder, ‘Program Files’, ‘Program Files (x86)’, ‘Users’, ‘Program Data’. There are more elements, but just don’t touch them now.
and then try to boot Windows on that machine.
1 user thanked author for this post.
AskWoody PlusAskWoody PlusGuestOctober 25, 2019 at 1:14 pm #1991903And that is right. The size is different (383,8KB instead of 374KB) because Linux calculates size in different way.
To paste to the partition:
1.Once you are in ‘PCAT’ folder, right-clich on ‘bootmgr’ and select ‘copy’
2.Above the address bar, you do have ↑ symbol, which is described ‘open parent folder’ (description appears when you move your mouse coursor on it). Click on it 3 times.
3.Now, right click and select ‘paste’.
Please do it, then shut down. On next startup, select to boot Windows 7. Let us know the results.
Good luck!
AskWoody PlusOctober 25, 2019 at 1:37 pm #1991924Click on it 3 times.
First click brings me here:

Second click:

Third click:

Looks to my untrained eye that the first click is where the file will go into the W7 parent folder…
Microfix
AskWoody MVPOctober 25, 2019 at 1:38 pm #1991929And that is right. The size is different (383,8KB instead of 374KB) because Linux calculates size in different way.
Yup, IEC: 1024bytes=1KiB compared to SI:1000 bytes=1kB, which makes a difference further up the scale factor.
Windows - commercial by definition and now function...GuestOctober 25, 2019 at 1:56 pm #1991937Yes, paste it in the ‘Win7’ element seen on your first screenshot.
Select pen symbol (described as ‘toggle between button and text-based location button’) on the left of your address bar, click on it, then type:
/media/steve/Win7
that is where you should paste ‘bootmgr’ file.
1 user thanked author for this post.
AskWoody PlusOctober 25, 2019 at 2:12 pm #1991942Yes, paste it in the ‘Win7’ element seen on your first screenshot.
Select pen symbol (described as ‘toggle between button and text-based location button’) on the left of your address bar, click on it, then type:
/media/steve/Win7
that is where you should paste ‘bootmgr’ file.
OK, well, now I’m confused. Following these directions brings me to the expanded Win7 menu as the third s/shot above. But on the first s/shot, a right click generates a context menu that includes a choice “paste into folder.” Are these the same target location? Please excuse my asking, I don’t want to screw this up.
GuestOctober 25, 2019 at 2:31 pm #1991947Yes, it shows expanded ‘Win7’ location, so you can see such elements like ‘Windows’, ‘Program Files’, ‘ProgramData’ etc., right? It is ok.
1.You can paste ‘bootmgr’ here
But on the first s/shot, a right click generates a context menu that includes a choice “paste into folder.”
2.If you get to /media/steve you will see ‘Win7′ element, what you described and what is on your first screenshot. Right-click on’Win7’ and select ‘paste into folder’.
You can do it both ways, but I think that the second one should be safer (it is harder to ‘screw this up’).
Good luck.
1 user thanked author for this post.
AskWoody PlusOctober 25, 2019 at 3:00 pm #1991988Checked Win7 tree after pasting, bootmgr now shows as an entry that wasn’t there previously.
But boot into W7 failed- black screen error message “Recent hardware or software may be the problem” and then advises to use the Windows installation disc, which I never had, because I bought the OS pre-loaded into a (legal) HDD.
Further states, “File \Boot\BCD
Status OxcOOOOOf
An error occurred when attempting to read the boot configuration”
-
AskWoody MVPOctober 25, 2019 at 3:38 pm #1992027
I’d suggest trying the Macrium USB drive’s “Fix Windows boot” function next.
Also, you can get a Win 7 .iso from MS. All you need is a product key to download it. You can use that to make a Win7 stick just like you did to make the Linux one. Mint has its own bootable USB maker too. It should appear if you search ‘usb’ in the main (Start) menu.
Dell XPS 13/9310, i5-1135G7/16GB, KDE Neon 6.2
XPG Xenia 15, i7-9750H/32GB & GTX1660ti, Kubuntu 24.04
Acer Swift Go 14, i5-1335U/16GB, Kubuntu 24.04 (and Win 11)-
This reply was modified 5 years, 6 months ago by
1 user thanked author for this post.
-
This reply was modified 5 years, 6 months ago by
GuestOctober 25, 2019 at 3:39 pm #1992025Sad to read that.
That error message with exactly the same error code appears when system cannot find file named ‘BCD’ (which is the Boot Configuration Data, essential for Windows Vista/7/8/8.1/10 startup process). It is stored in ‘boot’ folder (in your case, it should be
/media/steve/Win7/boot
when you view it from Linux). What you can see in that directory? (expanded view, + number of elements)
Normally, there should be 30 elements (24 folders+files: ‘memtest.exe’, ‘BCD.LOG’, ‘BCD.LOG1’, ‘BCD.LOG2’, ‘BOOTSTAT.DAT’ AND ‘BCD’.
1 user thanked author for this post.
AskWoody PlusOctober 25, 2019 at 4:32 pm #1992078Sad to read that.
That error message with exactly the same error code appears when system cannot find file named ‘BCD’ (which is the Boot Configuration Data, essential for Windows Vista/7/8/8.1/10 startup process). It is stored in ‘boot’ folder (in your case, it should be
/media/steve/Win7/boot
when you view it from Linux). What you can see in that directory? (expanded view, + number of elements)
Normally, there should be 30 elements (24 folders+files: ‘memtest.exe’, ‘BCD.LOG’, ‘BCD.LOG1’, ‘BCD.LOG2’, ‘BOOTSTAT.DAT’ AND ‘BCD’.
With Win7 open, the path media/steve/win7/boot can’t be found using the address bar, top of screen. The new bootmgr entry is not in the folder Windows, it is a standalone entry among the other folders in Win7. The boot folder looks just the same as the s/shot posted earlier. Remember, the file I copied came from Windows>boot>PCAT.
What about the stick with the bootmgr file from the laptop? Or, is there another place to put the current file so it can be found?
AskWoody PlusOctober 25, 2019 at 4:39 pm #1992081I’d suggest trying the Macrium USB drive’s “Fix Windows boot” function next.
The Windows volume has Macrium Reflect Free, my backup program. Of course, currently unavailable. Is this something I would get from the internet?
I don’t have a product key (pretty sure, I’ll look again) because I didn’t know about those when I bought the OS, preloaded on a HDD. It was, however, a legal copy.
-
AskWoody MVPOctober 25, 2019 at 7:22 pm #1992186
The Macrium Reflect rescue USB is something you would make with Reflect. It’s been so long since I installed it last, so I don’t remember if Reflect does this, but in general, backup programs should nag you to make one at the first run of the program. If something happens where you need to perform a restore (which may be the situation right now), you will need something that is able to read the backups and make your system usable again. That’s the role of the rescue media… mostly to sit there and do nothing, but if you ever need to restore a backup, it’s there. That same program also has a boot fixer for Windows that works very well, and that’s what we would be doing here. If that fails, we would then use the same USB rescue drive to perform the restore.
Some backup program makers have a rescue .iso that you can download, but I just searched that for Macrium, and I didn’t see anything like that. Fortunately, though, you do have another Windows PC you can use, right? If Reflect is not already on that PC, you could install it and use it to create rescue media (USB in this case, but it can also make DVDs), which you could then plug into the faulty PC and boot from it (same way you boot your Linux USB), then go to the Windows boot fixer feature and select the hard drive with Windows on it (it should already be selected, actually), and let it do its thing. It only takes a minute to perform the repair, and if it works, you’ll be back in business. I expect that it will work, but you never know for sure until you try!
Dell XPS 13/9310, i5-1135G7/16GB, KDE Neon 6.2
XPG Xenia 15, i7-9750H/32GB & GTX1660ti, Kubuntu 24.04
Acer Swift Go 14, i5-1335U/16GB, Kubuntu 24.04 (and Win 11)1 user thanked author for this post.
AskWoody LoungerOctober 26, 2019 at 12:58 am #1992358@ Slowpoke47
Don’t you have a Win7 Repair Disc from when you were switching the boot files from your Vista hard drive (HDD) to your Win7 HDD?
To repair the boot files in your current situation, maybe the Win7 Repair Disc would work.
Probably best to temporarily disconnect the Mint HDD. Make sure your system switches to your Win7 HDD as the boot HDD (the switch has to occur in the BIOS). This switch should probably be automatic if the Mint HDD is disconnected and only the Win7 HDD is connected. You should get the same boot failure you reported earlier when testing the booting.
Now insert the optical disc with the Win7 Repair programs. Re-boot to the Repair Disc, and run the *Repair Boot* program up to 3 times–attempting to boot from the Win7 HDD after each repair attempt.
If booting is still failing after the 3rd repair, then this attempt will probably not work, and you will have to move on from here.
AskWoody LoungerOctober 26, 2019 at 1:11 am #1992368@ Slowpoke47
The Windows volume has Macrium Reflect Free, my backup program. Of course, currently unavailable. Is this something I would get from the internet?
Didn’t you create a Macrium Rescue Disc, again as part of preparing to create a backup image file in preparation for switching the boot files from the Vista HDD to the Win7 HDD?
If you did, then the repair program that @ Ascaris is referring to is probably on that disc. Again, you probably should disconnect the Mint HDD, boot to the Macrium Rescue disc programs, and look for that “Fix Windows boot” function that he is talking about.
*******************************************************
I’m officially gone now for the next 4 days. Good luck!
AskWoody PlusOctober 26, 2019 at 4:07 am #1992447Normally, there should be 30 elements (24 folders+files: ‘memtest.exe’, ‘BCD.LOG’, ‘BCD.LOG1’, ‘BCD.LOG2’, ‘BOOTSTAT.DAT’ AND ‘BCD’.
None of these found via search box- same result as searching for BOOT. But BOOT and BCD display as subfolders to Windows.


As previously stated, I have a system image from some months ago- can that be of help here?
Is it possible to get the needed files from our other Win7 machine?
AskWoody PlusOctober 26, 2019 at 4:14 am #1992463Didn’t you create a Macrium Rescue Disc, again as part of preparing to create a backup image file in preparation for switching the boot files from the Vista HDD to the Win7 HDD?
I forget which backup program we used then, but it wasn’t Macrium. I didn’t make any sort of portable file then because we were dual booting Vista and Win7 and I just transferred all user files into 7.
GuestOctober 26, 2019 at 5:34 am #1992482Well, there should be 2 folders named ‘boot’:
1-The one showed on your screenshot. It is one of ‘Windows’ subfolders with patch:
/media/steve/Win7/Windows/Boot
It contains 4 subfolders: ‘DVD’, ‘EFI’, ‘Fonts’, ‘PCAT’. It seems to be OK.
2.On your Win7 volume. It is the same location where you placed your ‘bootmgr’ as
a standalone entry among the other folders in Win7
(and that is exactly where it should be-you have done it right). One of the ‘other folders’ you mentioned should be named ‘Boot’, and that is what I referred to in my previous post. It’s patch should be:
/media/steve/Win7/Boot
You wrote that you can’t find it using location bar. What elements are vivible on ‘Win7’ volume? If there is no ‘Boot’ folder mentioned above, you will not be able to boot your Windows, as it uses the ‘Boot’ folder I described in point 2 to start-up.
1 user thanked author for this post.
GuestOctober 26, 2019 at 7:54 am #1992563Have you found that folder? If not, it is possible to recreate it.
- Unplug your Linux drive.
- You mentioned that your ‘donor’ Acer machine is also running ‘Windows 7 Home Premium x64’. So, you can create a Sytem Repair Disk on it. You will need a blank CD.
- On your donor machie, open Start menu, on your right select ‘Control panel’.
- Select ‘System and Maintenance’,
- Then, click ‘Backup and Restore’ element
- On your lef, click ‘Create System Repair Disk’ and follow the instructions in dialog box.
- Insert your fresh-made ‘System Repair Disk’ to your target machine and boot it. You will be prompted to ‘press any key to boot from CD drive’. Do it (you have 30 seconds).
- Select your language and keyboard layout.
- Press ‘next’
- Now, there will appear a window and an information like ‘Searching for Windows installation’. Just wait till it finishes.
- If it will display any Windows installation found, write down it’s location, which may look like ‘(c:) Win7’ on a sheet of paper (just drive letter for instance C:)-it will be useful in further steps.
- At the bottom of he window, select ‘next’.
- Select ‘command prompt’
- Type, replacing ‘c’ letter with letter you wrote on your sheet of paper and press ‘enter’
bcdboot C:\Windows /s C:
- Remove your CD (just press button on your drive-it will not harm your CD)
- Press ‘restart’.
If it cannot detect any Windows installation, in step 13 type:
diskpart
then type:
list volume
it will display list of all volumes on your computer. Your Windos one will probably be labelled ‘Win7’. Write down it’s letter. Type:
exit
then, follow step 14.
1 user thanked author for this post.
AskWoody LoungerOctober 27, 2019 at 4:07 am #1993388the length WOW, this is getting ridiculous
@ Slowpoke47
did you do what I suggested in the 3rd post of this thread?
“I had this problem yonks ago, but I have to find it if he is still around. If I can’t find it, I would use this as a boot manager – https://neosmart.net/EasyBCD/ – before I found a program called Windows 7 Manager, but that only works if you can boot up, one of its programs includes a boot manager
Hopefully I will find that URL, it was a quick easy fix. I wonder if a boot repair with the W7 disk would work?
How did you lose the MBR in the first place?
Here’s another one, it even does Linux – http://www.easy2boot.com/”
have a good 1 🙂 cheers
AskWoody PlusOctober 27, 2019 at 4:43 am #1993413Sorry for my absence. This forum occasionally unchecks the box to notify me of responses, and I assumed you took the weekend off.
You wrote that you can’t find it using location bar. What elements are vivible on ‘Win7’ volume? If there is no ‘Boot’ folder mentioned above, you will not be able to boot your Windows, as it uses the ‘Boot’ folder I described in point 2 to start-up.
On opening the Win7 volume, the entries consist of everything from the Windows Pictures file and one other entry labelled Windows. The s/shots I have been posting are of that folder expanded.
I will be able to do the sequence you outlined in your last post in a couple of hours, will report back then.
-
jabeattyauditor
AskWoody LoungerOctober 27, 2019 at 6:27 am #1993513On opening the Win7 volume, the entries consist of everything from the Windows Pictures file and one other entry labelled Windows.
That’s all you have left – all you didn’t delete.
What exactly are you trying to save? (Seriously – what’s there?)
Copy the pictures folder to your Linux drive, then rebuild/restore/ressurect the Windows 7 drive.
You’re wasting a lot of time trying to make an almost-empty drive bootable again. If you had just reverted to your most recent backup a few days ago, you’d already be way ahead.
AskWoody PlusOctober 27, 2019 at 4:47 am #1993432the length WOW, this is getting ridiculous
@ Slowpoke47
did you do what I suggested in the 3rd post of this thread?
“I had this problem yonks ago, but I have to find it if he is still around. If I can’t find it, I would use this as a boot manager – https://neosmart.net/EasyBCD/ – before I found a program called Windows 7 Manager, but that only works if you can boot up, one of its programs includes a boot manager
Hopefully I will find that URL, it was a quick easy fix. I wonder if a boot repair with the W7 disk would work?
How did you lose the MBR in the first place?
Here’s another one, it even does Linux – http://www.easy2boot.com/”
Thanks for posting. The links you mentioned require the boot function to be working.
AskWoody PlusOctober 27, 2019 at 7:27 am #1993537ou’re wasting a lot of time trying to make an almost-empty drive bootable again. If you had just reverted to your most recent backup a few days ago, you’d already be way ahead.
There is a multitude of business-related docs that I will be hard pressed to replace. If it were as easy as using the backup, I wouldn’t have started this thread. In order to do that, I need to boot into the OS, now not possible.
-
AskWoody LoungerOctober 27, 2019 at 12:03 pm #1993727
ou’re wasting a lot of time trying to make an almost-empty drive bootable again. If you had just reverted to your most recent backup a few days ago, you’d already be way ahead.
There is a multitude of business-related docs that I will be hard pressed to replace. If it were as easy as using the backup, I wouldn’t have started this thread. In order to do that, I need to boot into the OS, now not possible.
But those documents aren’t there any more, right?
Wipe the drive. Build a new Windows 7 system. Restore your backup.
You’ll still be WAY ahead of what you’re trying to do.
AskWoody PlusOctober 27, 2019 at 9:49 am #1993656Have you found that folder? If not, it is possible to recreate it.
Substantial progress with this sequence, perhaps almost there. At step 14, command prompt reports boot files successfully loaded. Stuck at message (not black screen, shows familiar Windows background, etc.), “user profile service failed the logon- user file cannot be detected”. Two options offered- Slowpoke (this is admin account) and standard user. Either choice generates that same message.
But seems encouraging in any case.
AskWoody PlusGuestOctober 27, 2019 at 11:38 am #1993703You can try to log on using different account (and, if you succeed in it, it should be easier to fix your previous user accounts). Notice, that instructions are very similar to provious my ones:
- Unplug your Linux drive.
- Insert your ‘System Repair Disk’ to your target machine and boot it. You will be prompted to ‘press any key to boot from CD drive’. Do it (you have 30 seconds).
- Select your language and keyboard layout.
- Press ‘next’
- Now, there will appear a window and an information like ‘Searching for Windows installation’. Just wait till it finishes.
- If it will display any Windows installation found, write down it’s location, which may look like ‘(c:) Win7’ on a sheet of paper (just drive letter for instance C:)-it will be useful in further steps.
- At the bottom of he window, select ‘next’.
- Select ‘command prompt’
- Type:
net user administrator /active:yes
Press ‘enter’. That will activate your built-in Administrator account.
- Remove your CD (just press button on your drive-it will not harm your CD)
- Press ‘restart’.
Let us know the results.
1 user thanked author for this post.
AskWoody PlusOctober 27, 2019 at 12:12 pm #1993731You can try to log on using different account (and, if you succeed in it, it should be easier to fix your previous user accounts). Notice, that instructions are very similar to provious my ones:
- Unplug your Linux drive.
- Insert your ‘System Repair Disk’ to your target machine and boot it. You will be prompted to ‘press any key to boot from CD drive’. Do it (you have 30 seconds).
- Select your language and keyboard layout.
- Press ‘next’
- Now, there will appear a window and an information like ‘Searching for Windows installation’. Just wait till it finishes.
- If it will display any Windows installation found, write down it’s location, which may look like ‘(c:) Win7’ on a sheet of paper (just drive letter for instance C:)-it will be useful in further steps.
- At the bottom of he window, select ‘next’.
- Select ‘command prompt’
- Type:
net user administrator /active:yes
Press ‘enter’. That will activate your built-in Administrator account.
- Remove your CD (just press button on your drive-it will not harm your CD)
- Press ‘restart’.
Let us know the results.
Same screen as before:
“user profile service failed the logon- user file cannot be detected”. Two options offered- Slowpoke (this is admin account) and standard user. Either choice generates that same message.
AskWoody PlusOctober 27, 2019 at 7:24 pm #1993928New developments- in attempting again to boot Windows without the repair disc, the system started the CHKDSK sequence, first line said “there may be a problem with one of your disks… but this is in the Windows OS so don’t understand the reference to multiple disks.
Also, in a previous run-through of the sequence by anonymous, I was surprised to see the machine attempt to boot directly to Windows, no grub screen as I’ve come to expect since the Mint install. Looked at the BIOS on restart and BIOS no longer sees the Mint HDD. Checked the connectors, they’re tight, can’t really connect them wrong, and they’re right up in plain sight. Is there a limit to the number of items shown in the boot order?
-
GuestOctober 28, 2019 at 2:23 am #1994060
I haven’t read the whole thread (sorry) but maybe on top of everything the Mint disk went bad. That could explain both (A) chkdsk reporting “there may be a problem with one of your drives”, and (B) the BIOS not seeing the Mint drive and there no longer being a Grub screen on bootup.
That time that chkdsk ran and told you about the problem with a disk, did you manage to boot successfully into Windows afterward? Or are you now stuck with a PC that won’t boot into either Windows or Mint?
EDIT: html to text1 user thanked author for this post.
AskWoody PlusOctober 28, 2019 at 3:42 am #1994089Just tried starting the pc with W7 disk unplugged- Mint started normally. I know the Mint accesses the Windows disk, of course, but looks like Windows interferes in some way with Mint (?)
Windows still won’t open- same message- user profile not found. Any thoughts on getting past this? Possible Windows will function if we can fix this.
AskWoody Plusmn–
AskWoody LoungerOctober 28, 2019 at 4:10 am #1994113ou’re wasting a lot of time trying to make an almost-empty drive bootable again. If you had just reverted to your most recent backup a few days ago, you’d already be way ahead.
There is a multitude of business-related docs that I will be hard pressed to replace. If it were as easy as using the backup, I wouldn’t have started this thread. In order to do that, I need to boot into the OS, now not possible.
… I’d really look into alternate methods of restoring from the backup at this point. What format is that in?
(Also would make a copy of the backup, just in case.)
Can you boot Windows into safe mode? That’s supposed to need a lot less in the way of profile and such, and restoring backups is exactly the kind of thing you’re supposed to use the safe mode for…
Meh, really preferred the old method where I could go edit Windows’s BOOT.INI from Linux. (Windows Server 2003 and older)
Is there a limit to the number of items shown in the boot order?
Usually yes, and this depends on the hardware model.
Some models always have SATA in connector order, not changeable except by drive type – fixed “HDD” (includes SATA SSDs), or removable “CD/DVD”. On those if you have two HDDs, to boot from the second one you need to move cables around.
1 user thanked author for this post.
AskWoody PlusOctober 28, 2019 at 4:18 am #1994114… I’d really look into alternate methods of restoring from the backup at this point. What format is that in?
I have a system image from last March and the most recent weekly backup was the day before my self-inflicted problem. NTFS- is that what you mean?
-
AskWoody LoungerOctober 28, 2019 at 4:40 am #1994123
I have a system image from last March and the most recent weekly backup was the day before my self-inflicted problem. NTFS- is that what you mean?
I mean, what format is it stored in?
Mint can read NTFS but doesn’t know about application-specific backup formats.So since Windows now boots far enough to care about user profiles, it *could* work in safe mode. Does F8 do anything at boot now, or Shift-F8 maybe?
If Windows can go to safe mode and the restore tool can be run from there, excellent, that should get everything back.
If not, I’d look for alternate methods of accessing the backups, either whole restore or just the important documents. For that the first thing is knowing what format the backups are stored in, and from there we get to what application can process the files… including getting a fresh copy of the application if necessary.
(Potential chicken and egg problem if the backup needs to be restored with a specific application, which is stored within the backups but nowhere else… well, software archives exist)
1 user thanked author for this post.
AskWoody PlusOctober 28, 2019 at 4:26 am #1994115I see many references to F8 key for solving various problems– have never managed to get a response from that- how universal is that function? Computer is Dell Inspiron 519.
-
This reply was modified 5 years, 5 months ago by
-
AskWoody LoungerOctober 28, 2019 at 4:45 am #1994124
I see many references to F8 key for solving various problems– have never managed to get a response from that- how universal is that function?
Microsoft operating systems usually. (Well, not MS-DOS or Xenix.) The time window for it is often very short though, and sometimes the key needed is Fn+F8 or Shift+F8, maybe even Fn+Shift+F8.
See https://en.wikipedia.org/wiki/Safe_mode
I’ve seen OEM-specific changes to how that works on some Sony and Lenovo systems.
1 user thanked author for this post.
-
AskWoody MVPOctober 28, 2019 at 4:59 am #1994132
You would need to press F8 immediately after selecting Windows in GRUB, if they both were working. You can press it repeatedly (spam it) to improve the odds.
Dell XPS 13/9310, i5-1135G7/16GB, KDE Neon 6.2
XPG Xenia 15, i7-9750H/32GB & GTX1660ti, Kubuntu 24.04
Acer Swift Go 14, i5-1335U/16GB, Kubuntu 24.04 (and Win 11)
AskWoody PlusOctober 28, 2019 at 4:52 am #1994131I mean, what format is it stored in?
Image and regular backups stored on ext. drives.
Yesterday, anonymous walked me through making a repair disc from our other W7 machine. This strategy got me from unable to boot W7 to as far as the user profile not found error message. The repair disc shows a menu that includes using a prepared system image, which, as stated, I have. I’m considering using the repair disc and selecting this entry on the menu, then, if successful, using the most recent backup to update files from last March. https://www.dummies.com/computers/pcs/how-to-reinstall-windows-7-on-your-computer-from-a-system-image/#slide-1
Any thoughts?
-
AskWoody LoungerOctober 28, 2019 at 5:22 am #1994136
Image and regular backups stored on ext. drives.
Yes, that’s the “what”, I’m asking about the “how” … are the “regular backups” just straight copies of files or are they in a container of some sort, is the image a Windows .WIM file or a .img or some such?
(WIM files should be readable on Mint using the “wimtools” package.)
The repair disc shows a menu that includes using a prepared system image, which, as stated, I have. I’m considering using the repair disc and selecting this entry on the menu, then, if successful, using the most recent backup to update files from last March.
Yes, that is an excellent plan.
So rather than do things manually in a safe mode or recovery environment, just use the repair disc as the alternate method of restoring from backups.
(Just make sure you don’t overwrite the backups or anything…)
AskWoody PlusGuestAskWoody PlusAskWoody PlusOctober 30, 2019 at 4:21 am #1995315As stated above, I think my best move at this point is to unplug Mint and use the repair disc to run the system image (on an ext. drive) to overwrite the W7 OS in its current state. Then, since the image is some months old, I’ll use my most recent backup, from the day before the fiasco, to make everything current.
Comments?
AskWoody LoungerOctober 30, 2019 at 9:04 am #1995460@ Slowpoke47
Comments?
Just got back from being gone for 4 days. I have some catching up to do, but I don’t have time today–have to work, and have some quarterly taxes due that require some bookkeeping time.
use the repair disc to run the system image
1. What *repair disc* are we talking about?
system image (on an ext. drive)
What *system image* on an external USB hard drive (HDD) are we talking about?
Attach your external HDD, open your favorite file manager program (*Windows Explorer* or *Computer* (formerly *My Computer* in WinXP)), find your external HDD listing, and find the *system image* file.
Do you still have the *Folder Options* set to allow you to see the file extensions of your files?
2. If *Yes*, then what is the file extension that you see on your *system image* file?
The file extension for the Macrium Reflect image files is *.mrimg*. That extension stands for *Macrium Reflect Image*.
Macrium Reflect was the last imaging program I saw discussed back in April, 2019–so if you moved onto something else, list the file extension so we know what you need to deal with.
3. What is the *creation date* of your *system image* file?
AskWoody PlusOctober 31, 2019 at 4:59 am #1996069Used the repair disc to start W7 with Mint drive unplugged. Sequence by now familiar. Message is “Could not find system image”. On the screen that lists System Recovery Options, there is a sub-heading, “Operating System- unknown on unknown local disk”. Selected System Restore- message, must select OS- but in a previous screen, the correct OS was shown. Selected from the menu, Startup Repair” which generates the same screen as previously, User profile cannot be found.
Can’t get beyond this point.
What if I copied appropriate files from the donor machine?
-
AskWoody LoungerOctober 31, 2019 at 6:42 am #1996134
Oh dear.
That could mean that the image isn’t there, or that it’s not in the right format for whatever tools there were on the repair disc.
I’d proceed to checking that your “image” backup media actually does contain a suitable image. You should be able to do this on almost any PC, including one running Linux.
The image is usually characterized by being a particularly large file. Typical extensions include at least .img, .mrimg, .wim, .gz, .aa, .vhd, .vhdx, .tib, .ntfs, .vmdk, .raw, .ghs, .v2i; multi-file images usually have either a number sequence or a letter sequence. Folder-based images also do exist, I’m used to seeing those as folder names ending in “-img”.
The filename extension should provide a clue to determining what tools to use with it.
Then I’d check that the more recent backup media also contain readable files. That might be the more critical part in the long run – operating system installations are supposed to be reproducible, but your documents probably won’t be.
I’d also look into getting experienced local help as this is starting to look like a fairly severe problem.
What if I copied appropriate files from the donor machine?
That’ll be a fairly major undertaking in the case of user profiles. Especially the permissions, as you’ll need to have matching user definitions in the registry, path names, and the object ownership bits…
1 user thanked author for this post.
AskWoody PlusOctober 31, 2019 at 6:55 am #1996141The image is usually characterized by being a particularly large file.
Roughly how large? Mint shows this drive as 892GB free on 1TB drive.
-
AskWoody LoungerOctober 31, 2019 at 7:26 am #1996162
Roughly how large?
Well, it’s supposed to contain everything that was on the drive the image was made from, at that point in time – but in usually in compressed form. Tens to hundreds of gigabytes, most of the time; very exceptional cases may be in the single digit gigabytes but I’ve never seen an image made from an already-installed Windows 7 system be that small.
(Yes, the Windows install media counts as an exceptional case. Many of them do contain a .wim image after all that they then dump into the target device… and then they do a whole lot of hardware personalization and an initial user profile and…)
A merchant’s “1 TB” storage device will typically have approximately 931 GB usable space, but could be less.
1 user thanked author for this post.
-
AskWoody LoungerOctober 31, 2019 at 7:32 am #1996169
The image is usually characterized by being a particularly large file.
Roughly how large? Mint shows this drive as 892GB free on 1TB drive.
How big is your Windows drive – how much *was* on it?
Your recovery image file will probably be 70-90% of that size.
AskWoody PlusOctober 31, 2019 at 7:36 am #1996171Then I’d check that the more recent backup media also contain readable files. That might be the more critical part in the long run – operating system installations are supposed to be reproducible, but your documents probably won’t be.
I’m reasonably confident that the weekly Macrium backups are correct, and as stated, the most recent one was just the day before my fiasco.
In my area (small town) I’m not aware of a qualified computer help resource.
AskWoody Plus-
AskWoody LoungerOctober 31, 2019 at 8:05 am #1996179
Excellent, I see two .mrimg files in there. That’s a Macrium Reflect image file.
The default “Windows repair disk” probably didn’t include the tools to use that file type, you’ll need to use a different one that does include the Macrium tools…
https://blog.macrium.com/the-macrium-rescue-environment-cca57a4ebc61 has instructions on how to make one.
1 user thanked author for this post.
AskWoody PlusOctober 31, 2019 at 10:50 am #1996243Excellent, I see two .mrimg files in there. That’s a Macrium Reflect image file.
The default “Windows repair disk” probably didn’t include the tools to use that file type, you’ll need to use a different one that does include the Macrium tools…
https://blog.macrium.com/the-macrium-rescue-environment-cca57a4ebc61 has instructions on how to make one.
Looked at the Macrium site using your link- Does it matter that my internet access is currently via Mint? Have not as yet set up the backup for that OS, but it comes with a built in backup program. My take from the Macrium site is that I would sign up for a 30-day free trial to get the ability to make their recovery disc.
-
AskWoody LoungerOctober 31, 2019 at 11:05 am #1996260
Looked at the Macrium site using your link- Does it matter that my internet access is currently via Mint?
Hm, right, the Macrium builder probably has to be run on a Windows system that has net access.
Don’t remember offhand if Hiren’s PE version needs anything special when writing to USB. Buring the ISO to DVD-RW should work from Linux at least anyway, and it’s supposed to have some version of Macrium Reflect… https://www.hirensbootcd.org/download/
Anyone else?
1 user thanked author for this post.
AskWoody LoungerOctober 31, 2019 at 11:36 am #1996273@ Slowpoke47
My take from the Macrium site is that I would sign up for a 30-day free trial to get the ability to make their recovery disc.
No, you do not need to sign up for their premium paid product in order to create Macrium Rescue Media.
Go here: https://www.macrium.com/reflectfree

Scroll down until you see this *Download* option:
You need to download the Macrium Free Software Program. Use your spare laptop with your Win7 OS on it. Install the Macrium Reflect Program. And then you will have to go to the *Other Tasks* menu item, click on it, and then select *Create Rescue Media …*:

Alternatively, you could click on the triangle in the left hand column that has the title *Other Tasks*, and you will get a new listing that shows this:

When you’re ready, we can discuss the Rescue Media boot media options–there is a bunch to choose from.
1 user thanked author for this post.
AskWoody LoungerOctober 31, 2019 at 12:55 pm #1996306@ Slowpoke
Does it matter that my internet access is currently via Mint? Have not as yet set up the backup for that OS, but it comes with a built in backup program.
You do not have access to the Internet with your backup laptop with Win7 OS on it? You would then have to download the Macrium Free Software to your Mint system. Then using a USB thumbdrive or external USB hard drive (HDD)–copy the downloaded program to that thumbdrive or HDD, and then transfer it to you laptop with your spare Win7 OS on it. Then install the Macrium Reflect Free program on your spare Win7 laptop.
Have not as yet set up the backup for that OS, but it comes with a built in backup program.
Need to clear up a misconception here. Imaging backup programs create an *image file*. But that file is NOT a generic file that can be used by any imaging program. The file is specific to the software imaging program that created the system backup image file (i.e. it is proprietary to that specific software).
It’s not like a *.txt* file that can be opened, and used by almost any word processing program–you have to open and use the originating imaging program to access an image file created by it.
Used the repair disc to start W7 with Mint drive unplugged. Sequence by now familiar. Message is “Could not find system image”.
So, the Win7 Repair Disc is looking for a Windows system image file, and not a Macrium system image file. Win7 has a built-in imaging program, and can create a system image file, but most folks prefer other imaging software that is more flexible, and have more options available.
1 user thanked author for this post.
AskWoody PlusOctober 31, 2019 at 3:41 pm #1996353You do not have access to the Internet with your backup laptop with Win7 OS on it?
Yes, that’s mostly all we use it for. Thanks for the time and effort you spent on your posts. I’ll follow up on this tomorrow, looks promising. As you can tell by my latest s/shot, I have been using Macrium for backing up the damaged W7 OS on the pc. Never installed any backup program on the laptop, as there are no personal files on it, and we plan to replace the W7 OS on that machine with Mint once the pc is (hopefully) restored.
Since Mint includes a backup program in the software package, I plan to activate that once the dust settles.
AskWoody PlusOctober 31, 2019 at 3:46 pm #1996357When you’re ready, we can discuss the Rescue Media boot media options–there is a bunch to choose from.
I’ll post back once I get that far. Not sure if computers interfere with the rest of one’s life or vice versa.
AskWoody LoungerNovember 1, 2019 at 8:40 am #1996684@ Slowpoke47
As you can tell by my latest s/shot, I have been using Macrium for backing up the damaged W7 OS on the pc.
I strongly suspected that. Unless you had made a change from what we had been talking about last spring, and you had not mentioned it (or, it’s easy to miss things on this forum), then it was likely you were still using Macrium.
Not sure if computers interfere with the rest of one’s life or vice versa.
I’m betting on *vice versa*! If computers could *talk*, I suspect they would request that we just leave them alone!
I’ll post back once I get that far.
I’m going to be working more (a real job!) for awhile–so my ability to respond quickly on those days will be non-existent, or at least limited. I will be at work today and tomorrow, so be patient for responses.
1 user thanked author for this post.
AskWoody LoungerNovember 1, 2019 at 9:30 am #1996701@ Slowpoke47
Once you have successfully downloaded a copy of Macrium Free to the laptop, and installed the program on it, hook up your external USB hard drive (HDD) to the laptop, and fire up the Macrium program.
Your screen shot above showed two image files. I’m going to guess that one is the whole HDD image backup for your Vista HDD. And, one is your whole HDD image backup for your Win7 HDD. You need to figure out which image is which.
To view the Image files you have on your HDD, you need to go to the *Restore* function of the Macrium program:

If you click on the top Menu item *Restore*, and select the *Browse for an image or backup file to restore*, you will go to a listing of all your storage devices that you have–it should list your USB external HDD.
If you click on the tab *Restore* that’s between the *Backup* and *Log* tabs, that will take you to a new program page:

You will have three different ways to open the *Browse Box* to search for available image files–see all the arrows!
Clicking on the *Browse for ….* link, you will get this:
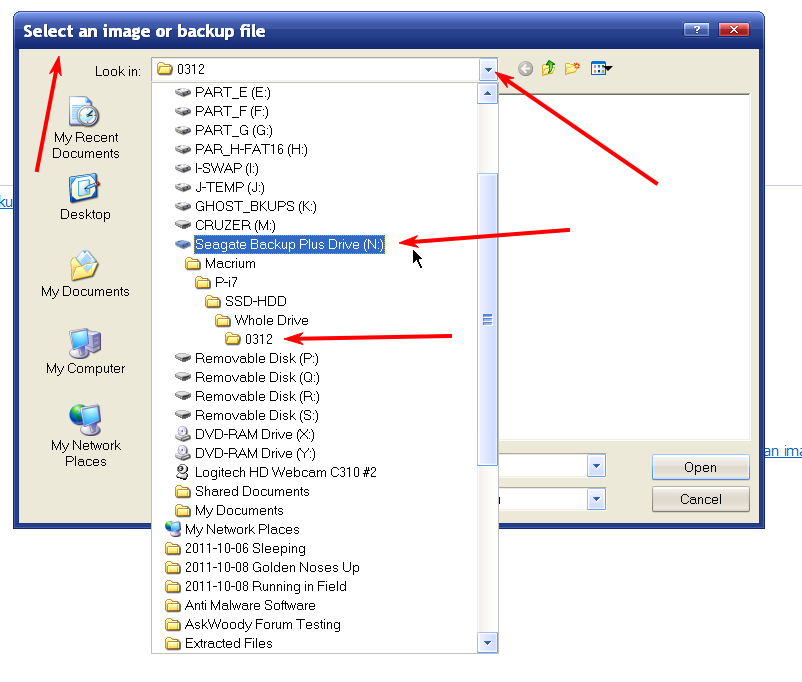
My external USB HDD is listed, and after opening the necessary sub-folders, I get to the folder labeled *0312*–that’s the folder for an image file created on *March 12th*–I would have to look at that folder in a file manager program to see when I created that folder to verify the year–but, that’s easy to do. But, I know it was March of 2019.
So, I click on the image file and it’s loaded into the Macrium program:

So, I’m at the max number of screen shots for this post, so I will continue in the next post ….
1 user thanked author for this post.
AskWoody PlusNovember 1, 2019 at 10:01 am #1996716Your screen shot above showed two image files. I’m going to guess that one is the whole HDD image backup for your Vista HDD.
Actually, we abandoned Vista years before we started using Macrium. We have scheduled incremental (not sure of term- meaning changes only) backups weekly and full backups monthly.
I have a few time slots today to attempt some headway, after today, even less. Life gets in the way, especially the last couple of weeks and next week as well. I’ll do what I can and post when I have news.
AskWoody LoungerNovember 1, 2019 at 10:07 am #1996717@ Slowpoke47
So, I’m at the max number of screen shots for this post, so I will continue in the next post ….
So, clicking on the above last screen shot, you can see it has a lot of information that might help you determine what HDD you have backed up to this image:
It shows the name of the HDD that was backed up, the size of the HDD, what partitions are on that HDD, their sizes, and if you have *named* your partitions–it shows their names as well. So, for me it’s clear what HDD this is.
But, if that information is not enough, then you can *Browse Image* to see what files and folders are on the HDD–see the arrow pointing to *Browse Image*. Click on that and you get:

So, the Macrium is going to *mount* the Win7 partition, and assign it the drive letter *L*, so I can look at the files and folders that are located in the partition that is backed up in this image file.
After putting a check in the *Win7_SSD* box, and clicking *OK*, the program mounts that partition and opens a Windows Explorer screen showing the folders and files that are within that image:

If you recall any specific details that would help you remember if it is the Vista or Win7 OS, and therefore which HDD you are looking at, then you have the information that you need. You can browse to any of the file system’s sub-folders as well ….
I have to be gone now for the rest of the day–back this evening.
Figure out which image file is which HDD. And, where are the weekly backup files–location on your external USB HDD? Screen shot showing some of the weekly backup names would be helpful.
1 user thanked author for this post.
AskWoody PlusNovember 1, 2019 at 10:28 am #1996724When you’re ready, we can discuss the Rescue Media boot media options–there is a bunch to choose from.
Ready to do this, Macrium installed in laptop. Haven’t clicked on the Rescue Media option yet. @NightOwl- do you have a comment before I go ahead?
No unused ext. drives on hand, will pick one up later, so cannot yet run a backup on the laptop.
GuestNovember 1, 2019 at 12:26 pm #1996775@ Slowpoke47
This is NightOwl posting from work:
No unused ext. drives on hand, will pick one up later, so cannot yet run a backup on the laptop.
I don’t think I ever suggested doing a backup of the laptop! I was asking you to hookup your current external USB HDD that you have been using to save your backups of your broken Win7 system, and then check out the image files on that HDD to see what they pertain to.
@NightOwl- do you have a comment before I go ahead?
I have not had a chance to go over the options in this thread that are available for creating the Rescue Media. Will not be able to do that until this evening. I would recommend waiting. Do the steps I have outlined above for verifying the image file sources, and locating and showing a listing of the weekly backups–all necessary steps before you can restore the various backup files.
1 user thanked author for this post.
AskWoody PlusNovember 1, 2019 at 4:28 pm #1996994I would recommend waiting. Do the steps I have outlined above for verifying the image file sources, and locating and showing a listing of the weekly backups–all necessary steps before you can restore the various backup files.
Burned a rescue disc this morning because I had a few minutes between commitments. If it’s incorrect, as stated above, the only loss is a now-useless CD. Just now checking in at home but shortly off again. And starting tomorrow early, I will be on a jobsite for several days, Sunday included. I’ll try to spend some time here, but it won’t be easy. Last couple of weeks and next week, I have more commitments on my agenda than I can possibly handle. As much as I need this problem solved, for the moment all I can say is I’ll do my best to check in on this thread.
AskWoody LoungerNovember 2, 2019 at 12:31 am #1997245@ Slowpoke47
Burned a rescue disc this morning because I had a few minutes between commitments. If it’s incorrect, as stated above, the only loss is a now-useless CD.
No one has said it was *incorrect* to burn a CD to create Rescue Media. I suggested waiting because I wanted to determine if there was a *universal* or *generic* Rescue Media creation option.
If you read the Macrium FAQ on Rescue Media, they emphasize that the Wizard to create the Rescue Media is going to scan your system in order to add the required drivers to support your particular system’s needs. Well, your system that needs rescuing can not boot your broken Win7, so you can not run the Macrium Rescue Media on that system. Creating Rescue Media on your laptop may not have the necessary device driver(s). The main device drivers that are needed are the SATA storage controllers, and the USB system.
The default Windows PE environment supports a good selection of hardware and you can add support for further devices. When Macrium Reflect creates a rescue CD or USB, it analyses your system hardware and tries to locate drivers for unsupported devices by looking on your system. If it can’t find appropriate drivers, Macrium Reflect prompts you to provide drivers.
But, apparently there is not a *generic* Rescue Media, as such–so you were going to have to create a bootable Rescue Media of your choice, and then try it to see if it will work. The best we can hope for is that your broken Win7 system is a member of the *good selection of hardware*.
You need to test your newly created Rescue Media to see if it’s going to work. Disconnect your Mint HDD, connect your external USB HDD that has your backup images to the system, and then boot your broken Win7 system with the Rescue Media disc in the optical drive. What you’re testing is making sure the Rescue Media can be booted successfully, can the Macrium software on the Rescue Media see your broken (i.e. can not boot) Win7 HDD, and can the Rescue Media see the connected USB external HDD.
If all of these are *Yes*, then we need to determine what image files you need to restore–which is what my recent posts above were all about–we need to see the available image files that are available–you will need to show us screen shots.
When you’re able, start testing, and passing along the backup image file information.
1 user thanked author for this post.
AskWoody PlusNovember 2, 2019 at 4:15 am #1997608If you read the Macrium FAQ on Rescue Media, they emphasize that the Wizard to create the Rescue Media is going to scan your system in order to add the required drivers to support your particular system’s needs.
Yes, I did see that. My hope is that the rescue disc will get me back into the OS in some form, from which I can try to rebuild with the system image and most recent backup.
I understand that in order to see what’s on the system image, the host machine needs to have Macrium installed. And since that program is not installed in the Mint OS, the pc cannot display the files beyond what I already posted. Also it dawned on me that, even though we stopped using Vista years ago, the HDD with Vista on it was still in the machine, so your observation that it may be on the image disk is likely correct.
When you’re able, start testing, and passing along the backup image file information.
It will be another day or two before I can address this further as I am still recovering from surgery, and as previously mentioned, my non-computer agenda is by itself all I can handle.
AskWoody LoungerNovember 2, 2019 at 9:03 am #1997689@ Slowpoke47
I am still recovering from surgery
Hey–get well–that’s a priority. Your health is definitely more important than fixing a broken computer.
I understand that in order to see what’s on the system image, the host machine needs to have Macrium installed. And since that program is not installed in the Mint OS, the pc cannot display the files beyond what I already posted.
That’s not an accurate *understanding*! Yes, Macrium needs to be installed on the Host machine in order to have the full benefit of the Rescue Media creation that has all the potential drivers of that Host machine added to the Rescue Media. But, I’m betting that the CD that you burned with the Rescue Media will work fine. Just have to test it to find out!
But, you can access whatever Macrium image files you have previously created using your now broken Win7 system by using the Macrium Reflect program that you have installed on your laptop. That’s what I have been saying in the above last few posts on using the Macrium Reflect program. You just have to hook up your external USB hard drive (HDD) to the laptop, open the Macrium program, and then browse to the external USB HDD, and look for your backup image files. You can bring that image file into the Macrium program, view the details of the image creation, mount the image so you can see the folders and files that are in that image file, etc.
There is no need to do the above things on the Host machine where those image files were created. You just have to use the imaging program (Macrium) that was responsible for creating those image files–but the program can be installed, and used on any computer running Windows–and the program should be able to access those image files just fine.
Try it–let us know the results.
1 user thanked author for this post.
AskWoody PlusNovember 5, 2019 at 3:44 pm #1999904A few moments of calm amid pandemonium… baby steps, lest I shoot the other foot… connected the ext. drive to the laptop, wasn’t quite sure how to view the contents from Macrium. Went to Start>Control Panel>Computer and selected the ext. drive, displayed this:

Selected the highlighted item and saw this:
Not clear to me whether Macrium was involved with this or not. Will check back as soon as I am able.-
Guest
AskWoody LoungerNovember 6, 2019 at 11:07 am #2000477@ Slowpoke47
I work today, so only have a brief time to respond this morning.
Not clear to me whether Macrium was involved with this or not.
As anonymous said–yes it is Macrium Reflect that is popping up that dialog box.
I see were things went wrong in following my directions:
You just have to hook up your external USB hard drive (HDD) to the laptop, open the Macrium program, and then browse to the external USB HDD, and look for your backup image files.
We use the term *browse* when we talk about using the *Computer* output to find a file on our system, or if we open the *Windows Explorer* to do the same–so I can see where you:
Went to Start > Control Panel > Computer and selected the ext. drive, displayed this: …
So, not an unexpected response by you. But, what you missed is there is also a *file manager* function that’s built into the Macrium Reflect program. I wanted you to use that *file manager* function to find your image file.
So, look back at this series of screen shots and descriptions:
To view the Image files you have on your HDD, you need to go to the *Restore* function of the Macrium program:
You will have three different ways to open the *Browse Box* to search for available image files–see all the arrows!
So, look back at those screen shots, and the arrows helping you to *see* what’s being recommended. Use that information to bring your Macrium image file into the Macrium program so you can better see what the image file is all about. It’s important that you can do this process–it will be needed when it comes time to actually select, and restore an image to your hard drive.
Just bring in each of the image files that you mentioned above into the main Macrium program screen, one at a time, make a screen shot of each, and post that information here. Don’t do anything else for now …
1 user thanked author for this post.
AskWoody PlusNovember 7, 2019 at 1:45 pm #2001130Opened Macrium on laptop- this is v7.2.4524, some details differ from your s/shots, but the needed elements are there. This is the opening screen:

Selected Restore>Browse for image or backup file to restore:
Notice the two large image files, dated 1 week apart. Selected the 3/17/19 entry and then Browse image:

On selecting the only choice, following the on-screen prompts, I wanted to select drive “E” which is the ext. HDD that has the image, but the automatic drop-down does not show E. What’s my next move?BTW, as noted, the two images are dated a week apart. I think this means that both images either have Vista or not, as opposed to one being W7 and the other Vista.
-
This reply was modified 5 years, 5 months ago by
-
This reply was modified 5 years, 5 months ago by
-
AskWoody LoungerNovember 7, 2019 at 2:14 pm #2001142
Macrium is just wanting to *temporarily* assign a drive letter to the backup contents so you can browse through them. Your E: drive letter is already taken (it’s where your backups are) so it can’t assign that.
Just pick one of the available letters and roll – if you exit the program, the backup will be dismounted and the drive letter will cease to exist.
1 user thanked author for this post.
AskWoody LoungerNovember 8, 2019 at 10:19 am #2001636@ Slowpoke47
… some details differ from your s/shots, but the needed elements are there.
Ah, you are correct. I only have the Macrium Reflect program installed on my old WinXP OS. So my screen shots of the dialog boxes will have some elements that look different.
It took me awhile to figure out what you were doing in your last reply, but it finally became clear …
Notice the two large image files, dated 1 week apart. Selected the 3/17/19 entry and then Browse image:
Browsing the Image was one step beyond where I wanted you to go. But, you were following my outline here:
So, clicking on the above last screen shot, you can see it has a lot of information that might help you determine what HDD you have backed up to this image:
Backup File Selected
It shows the name of the HDD that was backed up, the size of the HDD, what partitions are on that HDD, their sizes, and if you have *named* your partitions–it shows their names as well. So, for me it’s clear what HDD this is.
But, if that information is not enough, then you can *Browse Image* to see what files and folders are on the HDD–see the arrow pointing to *Browse Image*. Click on that and you get:
So, *Browse Image* is only necessary if you can not figure out what backup image you are looking at. That should not be a problem for your images that we are looking at just now. So don’t worry about that *Browse Image* function for now–maybe later.
So just *stop* after you *Select the image file*, and open it in the Macrium Reflect main *Restore* tab screen. Take a screen shot of that page. Then, click *Browse for an image file* again, and select the other image file, and bring it into the *Restore* tab main page. Take a screen shot of that second image file on that page. Post those two screen shot here for us to look at.
Questions?
1 user thanked author for this post.
AskWoody PlusNovember 8, 2019 at 12:38 pm #2001707I’m slightly confused by your directions, likely because my version of Macrium is a little different. Selecting Restore doesn’t show me anything useful until I select Browse for an image file which generates the pop-up previously posted:
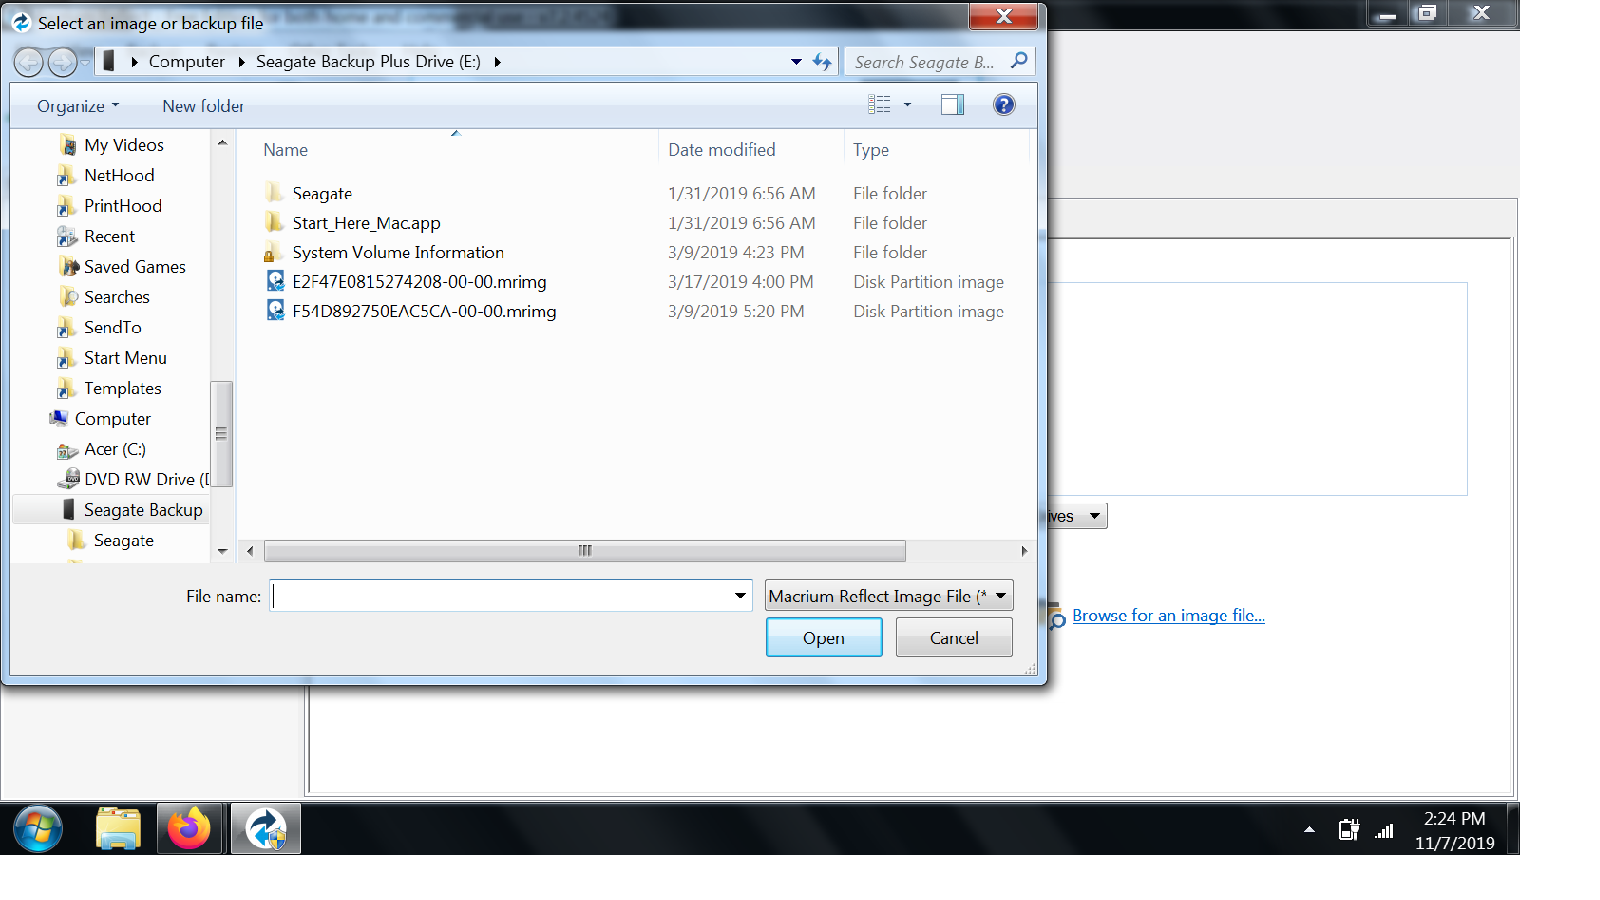
Then, selecting each of the large files in turn displays these screens:


At this point, I’ll wait to hear from you.-
This reply was modified 5 years, 5 months ago by
-
This reply was modified 5 years, 5 months ago by
AskWoody PlusNovember 8, 2019 at 3:15 pm #2001841Looking over the screens above I can see that the third one posted is the current Win7 HDD, not only id’ed by name but I recognize the model number of the Western Digital disk. And the other large file is the Vista OS, again the model number of the disk is the clue. No idea what the two images mean at this point, but there was nothing of value on the Vista disk, since trashed, that wasn’t transferred to 7.
Once I managed to get the w7 OS to boot without the Vista disk connected, I unplugged Vista- and even though it was still in the machine it was not a factor and not in use.
-
This reply was modified 5 years, 5 months ago by
GuestNovember 8, 2019 at 3:33 pm #2001845@ Slowpoke47
This is NightOwl posting from work.
The above posting of the two Image files is exactly what I wanted to see. (There is a small anomaly that I will address later–not critical for now.)
So, next step is to use your *Rescue Media* CD to boot your Win7/Mint system to see if you can access that system using that CD.
Setup:
1. disconnect the Mint hard drive (HDD), keep the Win7 HDD hooked up
2. connect your USB External HDD, with the image files on it, to the Win7/Mint system
3. put the *Rescue Media* CD in the optical drive
4. boot the system from the CD (you might have to hit one of the *F* keys to bring up the option to select where you want to boot from–select the optical drive)
you might have to *hit any key to boot from the CD*–be ready to do this if needed
5. If everything goes as planned, the CD should boot, you will see an indication that Windows or Microsoft is loading files, and then the Macrium Reflect program should eventually be loaded.
You will want to check out if you can use the Macrium program to see and access those image files like you have just been doing. Don’t try to do anything except going to the Restore tab and browsing for image files–see if the external USB HDD shows up, and load the image file into the Macrium program just as you did above.
Then, go to the *Backup* tab that is just to the left of the *Restore* tab. Can you see the Win7 HDD? And the USB external HDD will probably also be listed.
Do not attempt to do any backups or restores for the moment. Once you have done the above, close down the Macrium Reflect program–I think there’s a *Red X* that you can click on. This will probably close down the program and maybe even restart the computer. Remove the CD and shut down the system.
Then, come back here and report the results.
Of course, if there’s a problem anywhere in the sequence–come back here and ask questions.
1 user thanked author for this post.
AskWoody PlusNovember 9, 2019 at 10:34 am #2002276Didn’t know whether I should put the rescue disc into the drive or disconnect the Mint OS with the machine running. So, shut down, unplugged Mint, rebooted and inserted the disc. Not enough time at bootup to do that plus hit F12, but got the “windows is loading files” message after which the Macrium screen appeared. This screen had several options under Restore:
Redeploy restored image to new hardware
Fix Windows boot problems
Browse for image or backup file to restore
Open an image or backup file in Windows Explorer
Detach an image or backup file in Windows Explorer
All the above in a left-pane menu. Elsewhere on the screen, Browse for an image or backup file to restore, this allows me to see the entire OS in tree form. Of course, I can’t save a screenshot of this.
Just to be sure, I x-ed out of that screen, which generated a restart, then had a chance to select the repair disc (via F12) as the boot medium. This move brought me to the same screen as previously. Could be the first instance was generated through the ext. drive.
Only hitch- there was no way to shut down- whole process repeated itself. I once again x-ed out of the Macrium screen, causing a restart, and shut down via the power button on the case while the boot process was just beginning.
GuestNovember 9, 2019 at 12:06 pm #2002307@ Slowpoke 47
This is NightOwl at work again. Very busy schedule so may not be able to respond until later today.
Look at the outline above that I gave you yesterday. You did not do *all* the steps I outlined–or at least you did not report back in your above post if you succeeded in doing all the steps.
Need to know if you can access the external USB HDD and able to bring into the *Restore* tab the backup image files.
Look over that outline and try to complete all the steps and report success or failure.
Looking good so far with ability to boot your Win7/Mint system via the Rescue Media CD!
I will try responding again later….
1 user thanked author for this post.
AskWoody PlusNovember 9, 2019 at 12:38 pm #2002323Look at the outline above that I gave you yesterday. You did not do *all* the steps I outlined–or at least you did not report back in your above post if you succeeded in doing all the steps.
Perhaps my accounting was not clear enough- I deviated from your outline only in arriving at the Macrium screen, for the reasons stated- I didn’t insert the rescue disc with the entire W7-Mint system running for fear that some unwanted process would take over. So, I shut down, unplugged Mint, and connected the ext. HDD. At this point, the pc was still off.
Pressed the power button to boot, and immediately inserted the rescue CD, but not enough time to call up the boot manager (F12) before the windows is loading… message appeared. The Macrium screen next appeared, with the elements mentioned and a few others, not germaine to the issue at hand. At that point, as mentioned, I was able to call up the entire W7 OS in tree form, using the option, Browse for image or backup file to restore. As you warned, I held off from going further with that, but indications were that any item(s) on that tree were available.
I found that x-ing out of that screen triggered a restart, whereupon I was able to get into the boot sequence and choose, Boot from CD. The only difference was that I saw an intermediate screen that advised, Loading… (files, I think) but there was no interrupting the process, which brought me to the identical Macrium screen as before. I think that before I was able to use the CD, the first time around, Macrium started using data on the image disk, and then, with the CD in play, used a one-step-longer sequence to arrive at the same screen.
Don’t try to do anything except going to the Restore tab and browsing for image files
I didn’t go any further than to see that the files were available.
Did I miss something?
AskWoody PlusNovember 9, 2019 at 1:09 pm #2002348Look at the outline above that I gave you yesterday. You did not do *all* the steps I outlined–or at least you did not report back in your above post if you succeeded in doing all the steps. Need to know if you can access the external USB HDD and able to bring into the *Restore* tab the backup image files. Look over that outline and try to complete all the steps and report success or failure.
The only deviation from your instructions was in the sequence that brought me to the Macrium screen. As stated, I feared that inserting the rescue CD with the entire W7/Mint system booted up would trigger some unwanted process, and so I shut down the pc, unplugged Mint, and connected the usb image disk. On restart, inserted the rescue CD but not enough time to also get into the boot sequence before it started, likely using data from the image HDD. From there on, see my previous post, I believe I did just what you advised- restarted and selected the rescue CD as the boot medium. Looks to me that the image files for the entire W7 OS are available.
Did I miss something?
Cybertooth
AskWoody PlusNovember 9, 2019 at 3:51 pm #2002378Look at the outline above that I gave you yesterday. You did not do *all* the steps I outlined–or at least you did not report back in your above post if you succeeded in doing all the steps. Need to know if you can access the external USB HDD and able to bring into the *Restore* tab the backup image files. Look over that outline and try to complete all the steps and report success or failure.
The only deviation from your instructions was in the sequence that brought me to the Macrium screen. As stated, I feared that inserting the rescue CD with the entire W7/Mint system booted up would trigger some unwanted process, and so I shut down the pc, unplugged Mint, and connected the usb image disk. On restart, inserted the rescue CD but not enough time to also get into the boot sequence before it started, likely using data from the image HDD. From there on, see my previous post, I believe I did just what you advised- restarted and selected the rescue CD as the boot medium. Looks to me that the image files for the entire W7 OS are available.
Did I miss something?
@Slowpoke47, for future reference, inserting the Macrium Rescue CD while your system is running should not trigger anything other than (possibly) Windows asking if you want to do something with the CD (such as view files or import data). So it should be safe to insert the disk while the computer is running an operating system.1 user thanked author for this post.
AskWoody PlusNovember 9, 2019 at 4:03 pm #2002383So it should be safe to insert the disk while the computer is running an operating system.
Thanks for that info.
If you ever saw the movie, The Sand Pebbles, years back- my regard for computers is not that far from the scene where the Steve McQueen character is trying to explain the workings of the steam power plant, in the boiler room, to the clueless natives and just winds up telling them something like, there are gremlins in there… (ok, just kidding…)
Does your comment hold true for inserting any CD?
AskWoody PlusNovember 9, 2019 at 4:09 pm #2002384-
ManagerNovember 10, 2019 at 4:28 am #2002545
FYI
If you click Submit/Edit/Submit is too quick a sequence, the post gets caught in the spam filter and disappears into the spam bucket. If you slow down and give the system time to process each action, that will happen less frequently. 🙂(I’ve done it to myself, but I can retrieve mine from oblivion. Everyone else has to wait for one of the moderators to notice the legit post and restore it from the spambucket.)
1 user thanked author for this post.
AskWoody PlusNovember 9, 2019 at 11:17 pm #2002489So it should be safe to insert the disk while the computer is running an operating system.
Thanks for that info.
If you ever saw the movie, The Sand Pebbles, years back- my regard for computers is not that far from the scene where the Steve McQueen character is trying to explain the workings of the steam power plant, in the boiler room, to the clueless natives and just winds up telling them something like, there are gremlins in there… (ok, just kidding…)
Does your comment hold true for inserting any CD?
LOL, I saw that movie when I was a kid and that scene probably went right over my head… just like Steve McQueen’s explanation to the natives. 🙂 I’ll have to find the film to watch the scene again.
But to answer your question–yes, so long as you have Windows set up to ask first when you insert a CD or DVD, that’s what it will do. It will not start running anything on its own. Used to be the case that a CD would start up automatically by default if you inserted one and it contained (for example) a Setup.exe for some software, but then bad guys started exploiting that convenience to infect computers, so the default action was changed to Ask.
1 user thanked author for this post.
AskWoody LoungerNovember 10, 2019 at 3:09 am #2002532@ Slowpoke47
Did I miss something?
Well, sure … to some extent. But it’s my error as well. I did not make the steps I asked you to do as clear and distinct as they needed to be.
And, part of the problem is that I’m not able to *look* over your shoulder and *see* what you see. So, I’m sure you probably have the answers in your head (because you experienced what you saw), but when we try to express what we saw, we leave out the details (because we *know* what we saw–didn’t you see the same thing?)!
So, for example:
You will want to check out if you can use the Macrium program to see and access those image files like you have just been doing.
Selecting Restore doesn’t show me anything useful until I select Browse for an image file which generates the pop-up previously posted:
I wanted you to access the external USB Drive just like you did as indicated in the above reply working on your laptop.
Don’t try to do anything except going to the Restore tab and browsing for image files–see if the external USB HDD shows up, and load the image file into the Macrium program just as you did above.
So, I wanted to know if you saw the external USB drive listed in the dialog box where you were browsing to find your image files. And, I wanted you to click on one of the image files, if you saw them, and load it into the Macrium program from the Rescue Media, just like you had done on your laptop.
I wanted you to report that you had successfully seen the external USB HDD, and that you had successfully loaded at least one of the image files into the *Restore* tab of the Macrium program.
I’m pretty sure you probably saw your external USB HDD in the *Browse for image … * dialog box, and I suspect you also actually saw the image files, but I’m pretty sure you did not load one of those image files into the *Restore* tab like you had done on your laptop.
So, I’m going to ask you to re-boot using your *Rescue Media* on your Win7/Mint system with your external USB HDD hooked up, and go to the *Restore* tab, and *Browse for images…*, and load an image into that *Restore* tab. (I’m asking you to do this to confirm that your USB HDD can be accessed and the image file read and loaded into the program–we need to know that your external USB HDD is correctly communicating with the Rescue Media.)
Then, go to the *Backup* tab that is just to the left of the *Restore* tab. Can you see the Win7 HDD? And the USB external HDD will probably also be listed.
I did not see that you reported that you were able to do the above. Again, we’re testing to see if the Macrium program is accessing and listing the various storage devices the way it is supposed to. Not asking you to do a *Backup*. Just testing to see that the program is working correctly from the *Rescue Media*.
And here’s a helpful hint for loading that CD into the system without the tray closing on your fingers: When you press the *on* button, immediately start hitting your F-12 key. The system will go through a couple booting chores, and then stop–popping up the dialog box with a list of devices you can choose from to use to boot from–and the system will simply wait there for your selection. Well, just press the *eject* button on your optical drive to open the tray, put the CD in, and then close the tray. Now, select the optical drive, and press *enter*, and the system will then continue to boot using the CD disc.
You can use that same technique when you have closed down the *Rescue Media* Macrium program, and the system begins to re-boot–start hitting that F-12 key, after the boot menu dialog box pops up, hit the eject button on the optical drive, remove the CD, close the tray, and either select the HDD to boot from, or hit the power button to shut the system down.
2 users thanked author for this post.
AskWoody PlusNovember 10, 2019 at 8:23 am #2002606Well, sure … to some extent. But it’s my error as well. I did not make the steps I asked you to do as clear and distinct as they needed to be.
Thanks again for your detailed explanation. Working on this now. Part of my reticence is due to fear of making (another) boneheaded move- how I created this problem in the first place. And it doesn’t help that for a while yet I’m typing with one hand.
AskWoody LoungerNovember 10, 2019 at 8:57 am #2002621@ Slowpoke47
Good Morning!
Part of my reticence is due to fear of making (another) boneheaded move- how I created this problem in the first place.
I understand. Sometimes a little *fear* keeps us in a good place!
Rest assured, I’m trying very hard to point you in the right direction with my suggested procedures–trying to avoid *(another) boneheaded move*–either on your part–or mine!
… for a while yet I’m typing with one hand.
Ouch! Sorry if I’m making you type more. We certainly can wait if that’s more appropriate. But, I suspect you want to get access again to your Win7 OS on your Win7/Mint desktop system.
1 user thanked author for this post.
AskWoody PlusNovember 10, 2019 at 9:46 am #2002645Rest assured, I’m trying very hard to point you in the right direction with my suggested procedures–trying to avoid *(another) boneheaded move*–either on your part–or mine!
And I’m greatly appreciative.
Ouch! Sorry if I’m making you type more. We certainly can wait if that’s more appropriate. But, I suspect you want to get access again to your Win7 OS on your Win7/Mint desktop system.
The typing issue just means that it takes me longer, and may include a few (more) typos- yes, access to the Win7 files is approaching a critical deadline- waiting is not an option.
Currently reviewing the thread from the burning of the Macrium rescue CD and in particular your previous post. The problem at this end is largely one of focus, as there are several pressing non-computer issues on my plate as well.
If my recap is correct- I have the Win7 image from last March, and as seen in previous s/shots, there are two large files on that HDD. I can readily see which of the two is the Win7 OS. So, my next step is to connect the image HDD to the pc (Mint/Win7) and boot from the Macrium rescue CD. In an abundance of caution, I will unplug the Mint OS when doing this, which will leave me to communicate via the laptop. I’ll also use the laptop to have your previous post on-screen while I work on the pc.
1 user thanked author for this post.
AskWoody LoungerNovember 10, 2019 at 9:57 am #2002648@ Slowpoke47
If my recap is correct- I have the Win7 image from last March, and as seen in previous s/shots, there are two large files on that HDD. I can readily see which of the two is the Win7 OS. So, my next step is to connect the image HDD to the pc (Mint/Win7) and boot from the Macrium rescue CD. In an abundance of caution, I will unplug the Mint OS when doing this, which will leave me to communicate via the laptop. I’ll also use the laptop to have your previous post on-screen while I work on the pc.
Sounds like you understand what to do.
Report back with the results asked for.
AskWoody PlusNovember 10, 2019 at 11:02 am #2002671OK, hope this helps you to “see what I see.” Booted pc on rescue disc. First screen, “Windows is loading files..” next screen, “Starting Windows” with the familiar 4-color logo. Then, Macrium screen, initializing…loading drivers. Next screen, looks like Restore is pre-selected:

Selected, Browse for an image file:

Then, dropdown from “Look in” box:

Selected Seagate HDD:
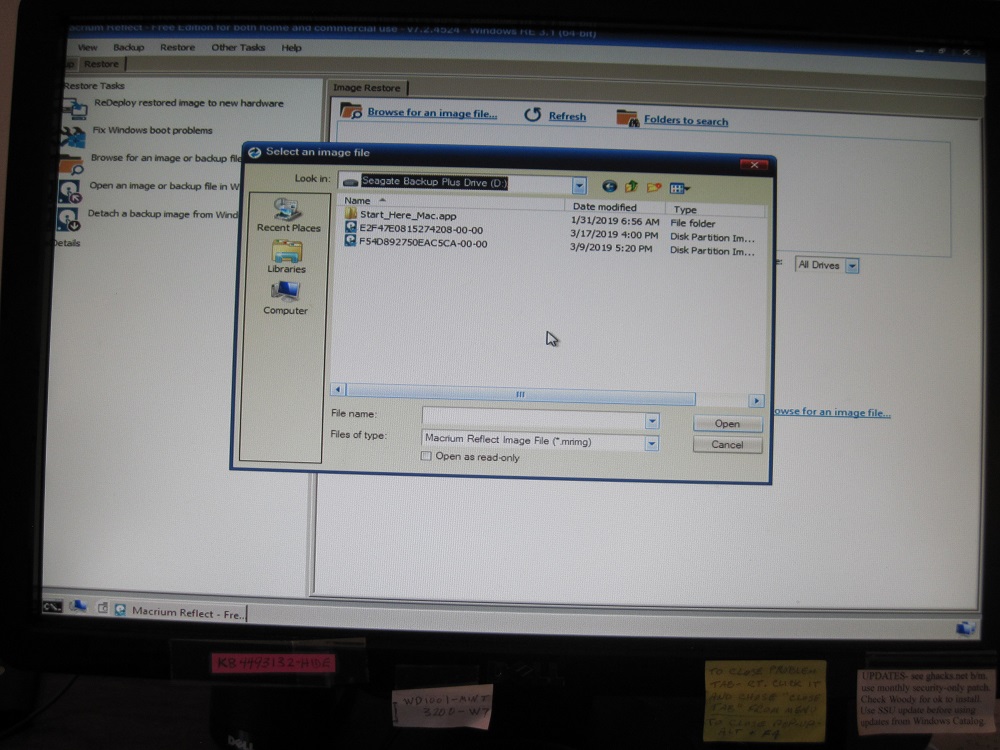
Continued on next post…
1 user thanked author for this post.
AskWoody PlusNovember 10, 2019 at 11:03 am #2002677On selecting the correct file:

I hope this moves the needle…
Off to an offsite appointment. Back later this afternoon.
1 user thanked author for this post.
AskWoody LoungerNovember 10, 2019 at 1:14 pm #2002746@ Slowpoke47
OK, hope this helps you to “see what I see.”
Yes, indeed, a picture is worth a *thousand words*!
I now see where your system is throwing you off a little bit. Your system is not adjusting very well to the Macrium’s program resolution in the *Rescue Media* mode.
Here’s a screen shot of one of your pictures with arrows added to point out what I mean:

See the two arrows on the left–they point to where your Macrium program screen overflows off to the left side of the monitor, and you can not see the whole program screen.
In the upper left, the *Backup* tab is hidden off to the left. Because you could not see that tab, that’s probably why you did not respond to my request that you use that tab to make sure that the Macrium program was seeing the Win7 HDD as being available to be backed up, as well as seeing the external USB HDD being listed too.
In the lower left corner, you can not see that there is a red box with the *power* symbol within it. It’s an alternate way to close out the Macrium program when you are done using it. It’s probably a slightly better way to close it out–it gives you a warning asking you what you want the program to do–*Shut Down* the system, or *Restart* the system.
The upper right hand arrow points to the three Window display function buttons: the (-) minus sign button which puts the Window down in the Task Bar, the *box* button that resizes the Window, and the (X) X button which closes the Window down.
When I click on the *box* button, it resizes the Window to be smaller on my system, and makes it fit within (i.e. it’s smaller than the desktop size) the boundary of the Windows PE desktop which is what you see behind the Macrium program.
I forgot to try to see if once I made the Macrium program Window smaller could I then hover my mouse over one of the corners and expand it to fill the whole available screen without having it be too big and go off the edge of the monitor. I’ll try that next time I boot the *Rescue Media*.
So, on the various screen photos, I could see the *external USB HDD* as being listed. And I could see the *Win7* HDD as listed. And you successfully brought in the Win7 HDD image file into the *Restore* tab–so I think we have answered the questions adequately to move on to the next task.
We will need to cover a very important topic next–stay tuned …
I’m away for the next 4-5 hours. So, will not be available to post the next installment until late this afternoon.
1 user thanked author for this post.
AskWoody LoungerNovember 11, 2019 at 1:43 am #2003153@ Slowpoke47
So, this is the *Very Important Next Topic*!
There’s a very big *Pink Elephant* in the room–and it needs to be addressed! (Actually, there are probably 3 or 4 elephants–but, we need to deal with this big one first!)
You initially stated:
I forget which backup program
we used then, but it wasn’t Macrium.
When we finally saw the screen shot of the files listed on your external USB HDD, the file extension indicated that the image files were in fact Macrium Reflect image files, created in March, 2019:
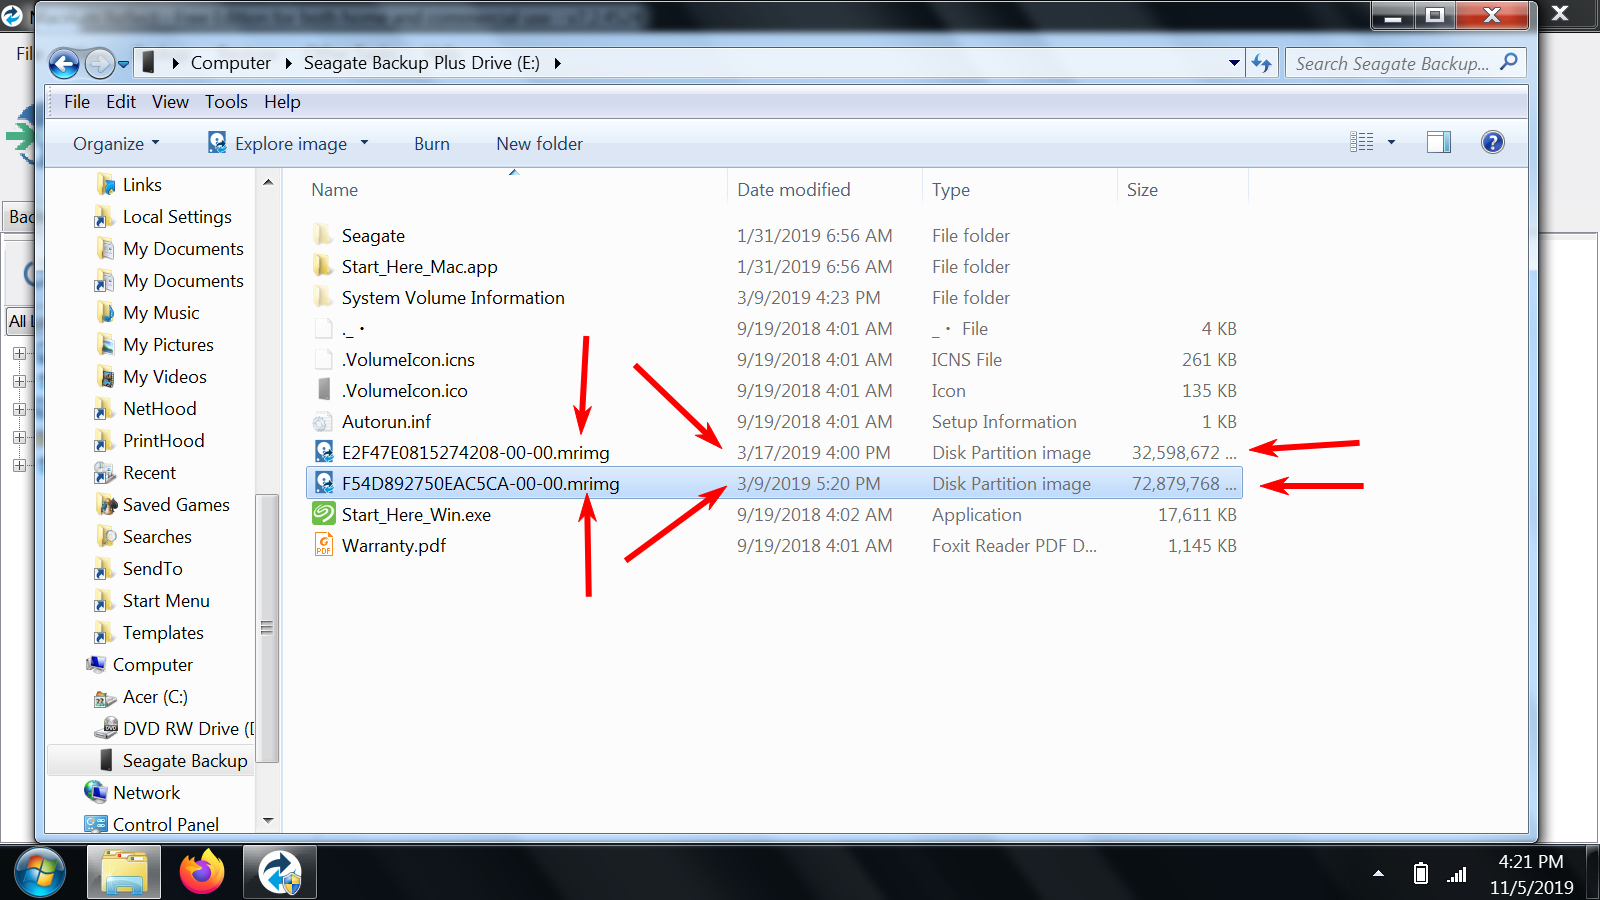
Those are 7-8 months old image files.
But, you have stated on several occasions:
We have scheduled incremental (not sure of term- meaning changes only) backups weekly and full backups monthly.
And, you have stated:
I’m familiar with that
procedure- same as when removing the ext drive for
backups every week.But, your external USB HDD screen shot above does not seem to show additional full monthly backups, nor any weekly backups.
So here are the questions:
1. Do you have one or more *other* External USB HDDs that you are using to save those monthly full backups, and weekly *incremental* backups onto?
2. Are you using the Macrium Reflect program to create those full monthly backups, and the weekly *incremental* backups? Or are you using a different backup program?
I have mentioned at least two times, and probably three times, and maybe even four times–that we need to see a listing of those files in order to determine which, if any may be needed in the restore process that is being set up.
But, for whatever reason(s), you have been totally silent regarding my requests. But, that has to change, now that we are almost ready to attempt restoring your backup image file(s).
It is best to restore the most recent *full* backup in order to avoid loosing information from older image file restores. The current monthly incremental restores will only apply to the most recent full monthly backup. So we have to know about all the full monthly backups, and all the weekly incremental backups in order to set up the proper restore sequence.
So, answer the above two questions.
Once I have those answers, there will probably be additional questions.
And you will probably have questions as to how to provide the needed information.
1 user thanked author for this post.
AskWoody PlusNovember 11, 2019 at 4:55 am #2003247Sorry to confuse the issue.
1. Do you have one or more *other* External USB HDDs that you are using to save those monthly full backups, and weekly *incremental* backups onto? 2. Are you using the Macrium Reflect program to create those full monthly backups, and the weekly *incremental* backups? Or are you using a different backup program?
The answer to both questions is yes. The drive you have seen has only the system image on it, as you have acknowledged. And, of course, that image was done with Macrium. I did refer previously to regular backups, and now that we’ve investigated the image file, it’s clear to me that all the regular backups since then are via Macrium as well.
The history is that for some years previous to that system image’s being taken, I used the Seagate backup program that was pre-installed on the drive I had bought for the purpose, the one you have correctly postulated. But that program developed some glitch, the details of which I don’t recall, and I had to format that drive, and then start over- with Macrium. I didn’t keep good notes, but I can conclude that the image you have seen was my first use of Macrium, and I have used it ever since for regular backups, the most recent being the day before I trashed the Win7 files.
So the full palette of resources consists of the drive with the system image, from last March, weekly incremental backups, described as consisting of those files that had been changed since the previous backup, and monthly “full” backups, although I am not sure if those full backups are the equivalent of a system image- I just followed the prompts in the Macrium program,
A possibly helpful footnote- I have found that the Macrium screens from the rescue disc can indeed by resized by the click-and-drag technique, thus displaying the elements previously not visible. Unknown whether the resizing will “stick” but likely readily repeated.
1 user thanked author for this post.
AskWoody LoungerNovember 11, 2019 at 9:37 am #2003377@ Slowpoke47
Okay–good! Is it only the one other External USB HDD. Or are there more?
… I am not sure if those full backups are the equivalent of a system image …
That’s what we need to find out.
Your screen shot that I used in my last reply I posted above that has the arrows pointing to the various important pieces of information is *perfect* for what we need to see.
So, hook up that other External USB HDD that has those *full monthly backups*, and weekly *incremental* backups to your Win7 laptop. Go to *Computer*, and then find that USB HDD in the list of storage devices shown on the opening screen of *Computer*. Click on that HDD, and find where the files are that represent your full monthly backups, and *incremental* backups.
There might be a lot of image files–eight months times either 3, 4 or maybe even 5 files per month. Take a screen shot like the one you did above. Scroll down and take the next screen shot if you have to, and continue to scroll down and take as many screen shots as needed to show all those backup files. (You can probably resize the *Computer* directory listing in a vertical direction to increase the number of files listed per screen shot. But make sure we can see the file names, dates of creation, and the size of the files.)
Post them here.
1 user thanked author for this post.
AskWoody PlusNovember 11, 2019 at 11:36 am #2003451Is it only the one other External USB HDD. Or are there more?
Yes, those two HDD’s are the only ones.
I won’t be able to do as you are asking here until later today, as the laptop is currently tied up with some business activity. We still have business interests to address, and we are trying to keep things percolating while we also attempt to salvage the pc.
AskWoody PlusNovember 11, 2019 at 2:28 pm #2003545This is everything that is on the backup drive. Macrium is set to delete older backups. Notice by the sizes of the files which ones are full backups and which are incremental.
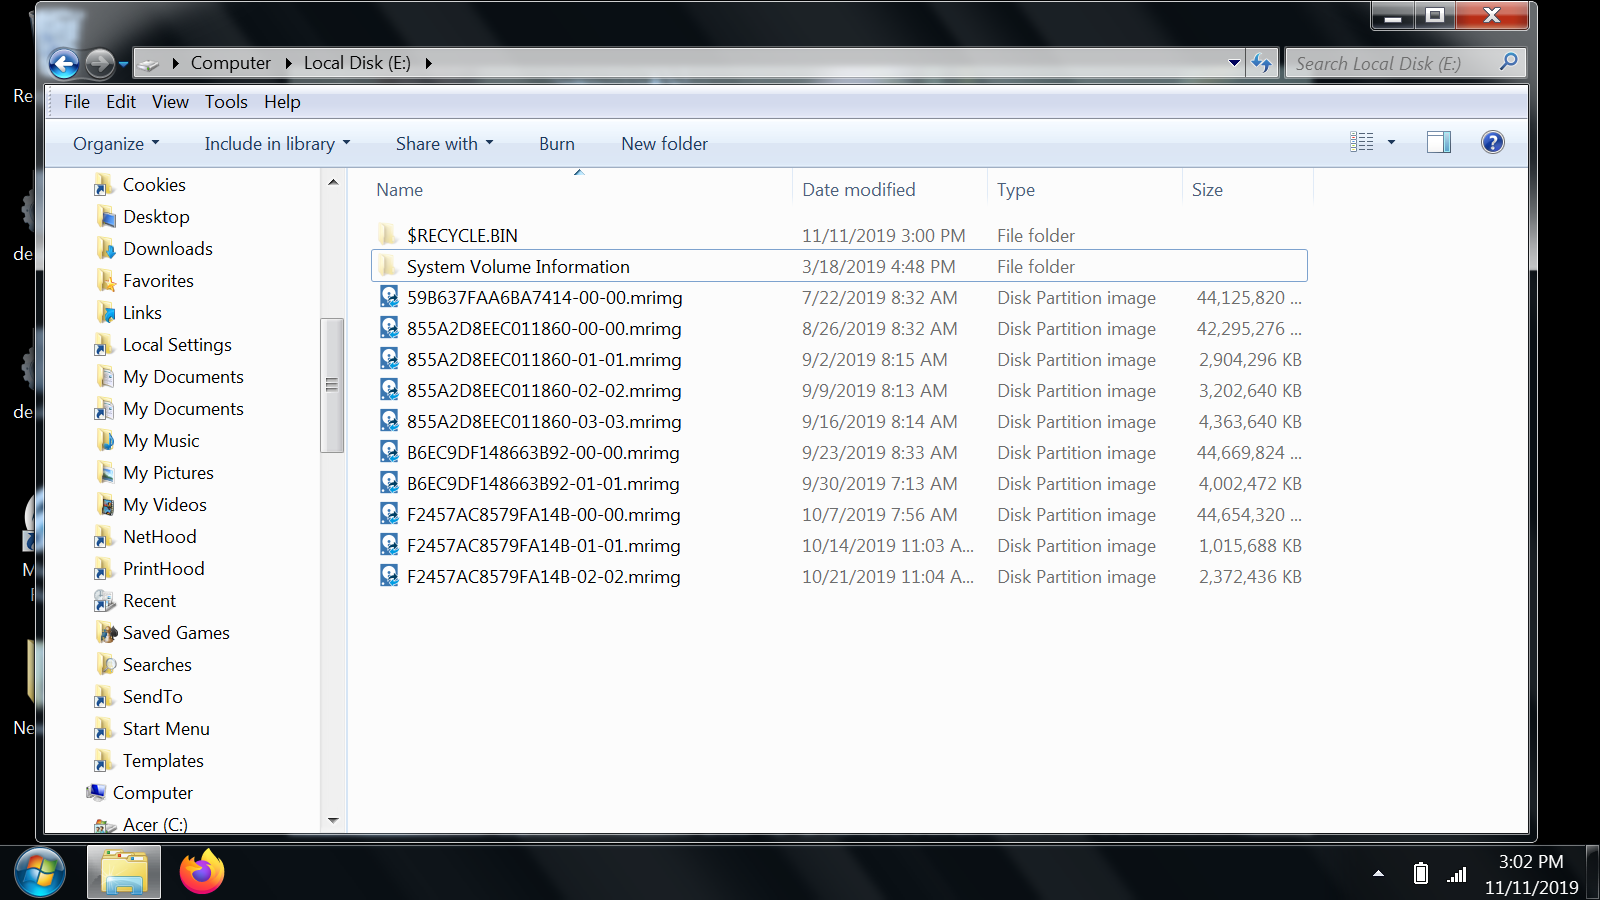
The rest of the s/shots are the items on the full backup dated 10/7/2019. This was the most recent full backup. The pictures will have to be continued in the next post.
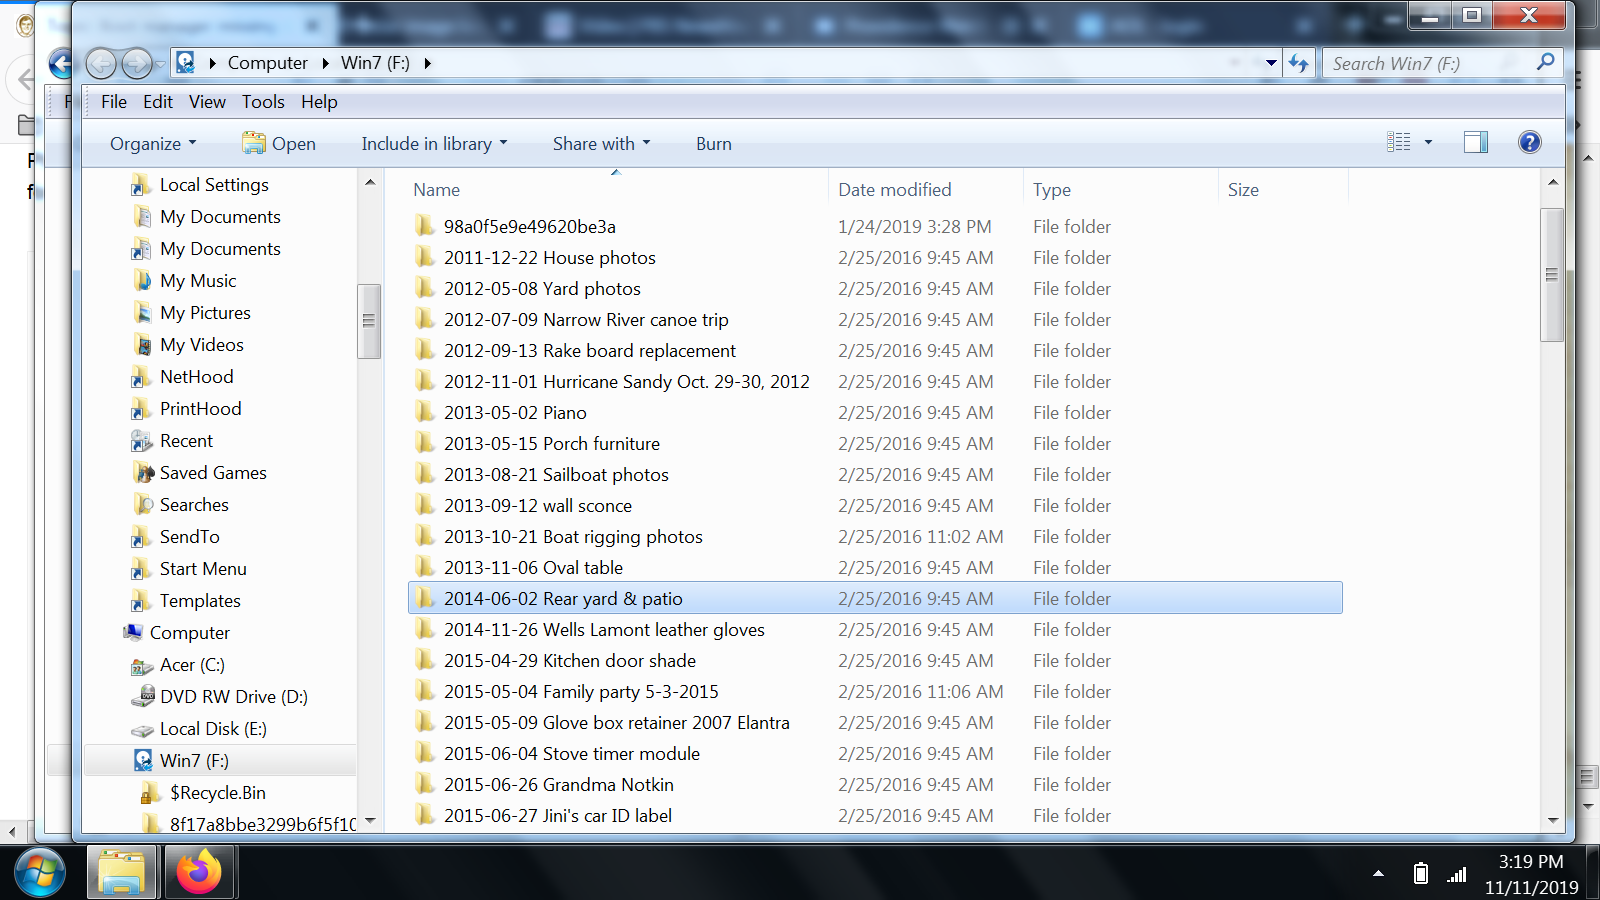

And…

-
This reply was modified 5 years, 5 months ago by
-
This reply was modified 5 years, 5 months ago by
-
This reply was modified 5 years, 5 months ago by
-
This reply was modified 5 years, 5 months ago by
1 user thanked author for this post.
AskWoody PlusNovember 11, 2019 at 2:33 pm #2003552AskWoody LoungerNovember 11, 2019 at 6:46 pm #2003705@ Slowpoke47
The first screen shot tells it all! You have won the Jack Pot…ding, ding,ding,ding, …!
I have to be out for the evening. I will post when I get back.
But, you appear to have a complete backup file set with a recent total backup image, and its associated differential image files. If all goes well (usually it does), you should have a full recovery from your recent misstep.
I will discuss the options for you to proceed in my next post …
1 user thanked author for this post.
AskWoody LoungerNovember 12, 2019 at 3:11 am #2003887@ Slowpoke47
My evening did not go as planned. Home late. Posting will have to wait until tomorrow.
1 user thanked author for this post.
AskWoody LoungerNovember 12, 2019 at 11:22 am #2004133@ Slowpoke47
Okay, some basic housekeeping so you understand what you’re looking at and what to do with the information.
First your Backup File Set. You have a full hard drive (HDD) image. And then you have 2 differential files that belong to that set which contain any changes that have occurred since the full HDD image of the set. These files together represent a *backup file set*, and remain associated with each other.
The next time you elect to do a *full HDD backup*, that resets the saving of a *backup file set*–it starts over, gives the set a new file name based on the new *full HDD backup*, and starts a new group of differential image files when you save those intermediate changes that occur after that new *full HDD backup*.
So some screen shots:
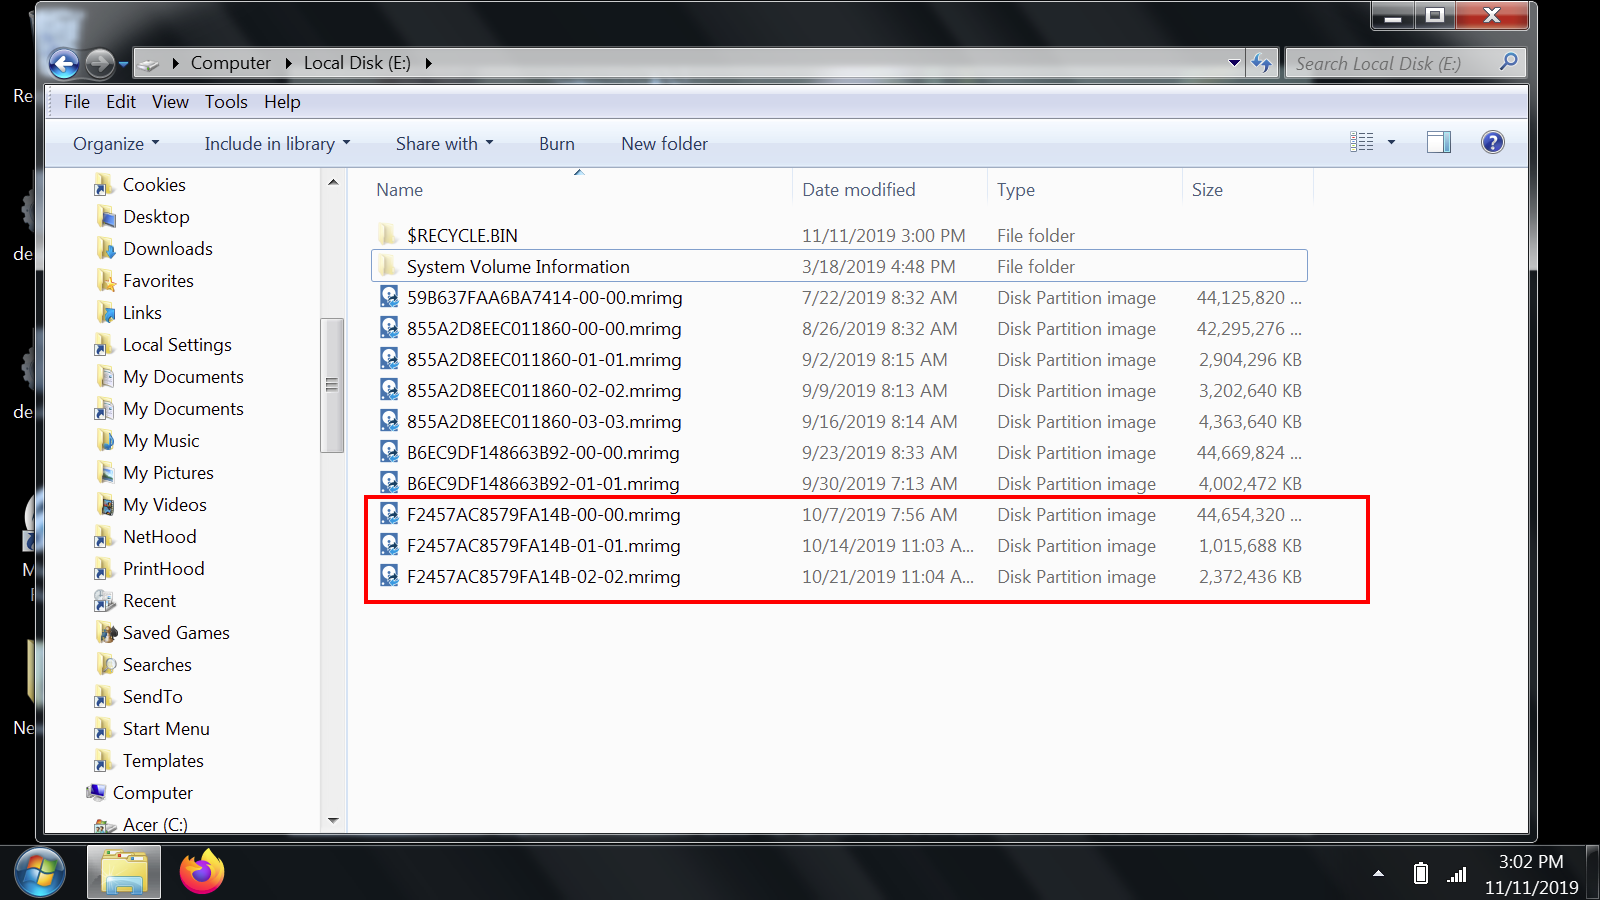
Here’s your most recent *backup file set*.

You know it’s a file set because the base alpha numeric ID is the same for each file–see the above screen shot.
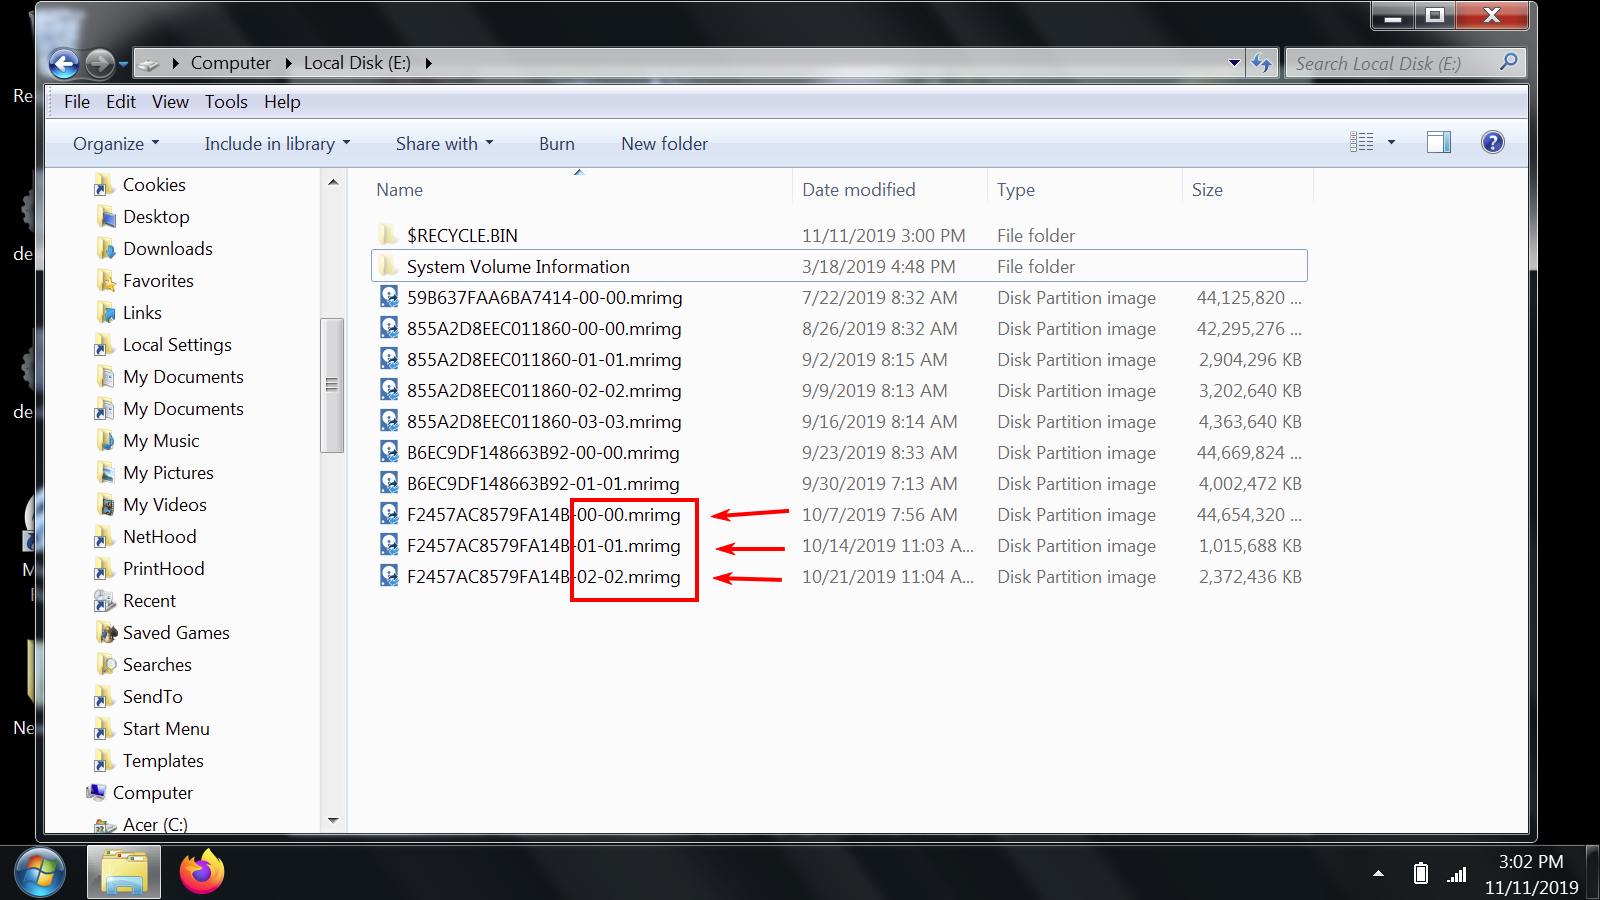
The end of the file name identifies which file is the *full HDD image backup*: it has the *-00-00.mrimg* file ending.
The *differential image files* are identified by having an incremented number: *-01-01.mrimg*, and then *-02-02.mrimg* in the file ending. If there were more *differentials*, then the next one would have *-03-03.mrimg*, and so on.

And then you can see the file dates showing when that file was created. The *full HDD backup image* should be first, then the differentials will be next in the order they were created. The final differential in the file set’s date and time represents the exact moment the restored image file will take your system back to.
And, the file size also helps see which file will be the *full HDD backup image*, and which will be the *differential* files (i.e. smaller sizes).
So, when the time comes, you will select that beginning file, the *full HDD backup* image file when you are in the Macrium Rescue Media program’s Restore tab.
**********************************************************************************
Very important to know: if you made other changes after that last differential time and date, those changes will not exist in your restored system, and will not be included in the restored system–that information will be lost and non-existent.
So, if you know that you have saved important information to your HDD after the last differential date and time, you would need to find and save that information to a different storage device than the HDD you are about to restore your image to. The restore procedure wipes everything off your HDD, and then puts the image file onto the HDD that only restores up to that last differential date and time.
This is an Option Backup if you think it is necessary–a *safety measure* that you could do, would be to make a final *full backup* of your *broken* Win7 HDD that is on the Win7/Mint system before you proceed to do the Restore.
That backup would have any information that was created and stored on your system after that final differential date and time, but before the Restore you are about to do. If you realize that you are missing some important files that were created after that final differential date and time, you can browse that full HDD final backup for those missing files whenever you are ready or need to do so. That information will be preserved in that final *Full backup*. Of course, if you deleted those files when you were deleting files, then they will not exist in that *full backup* image file either.
But, if those file do exist on the *full HDD backup*, then you can *extract* those files whenever you realize you need to find those missing files, and bring them back into your now restored HDD.
Does the above make sense to you?
You would have to have adequate space available on one of your External USB HDDs, or you would have to get an extra External USB HDD. You would boot to the Macrium Rescue Media CD program on the Win7/Mint system with the Mint HDD disconnected, and with the *broken* Win7 HDD connected, and from there setup a full backup of the *broken* Win7 HDD onto the hooked up External USB HDD. Once you have created that full HDD backup of the broken Win7 HDD, you will have preserved any files created between that final differential file date and time, and the date and time you started deleting files. If you create that *full HDD backup*, you need to make sure that you do not cause the Macrium Rescue Media program to *delete* your current *backup set* if the USB HDD is too full and can not hold the files size of the backup! So, I would not save that *full HDD backup image* to the External HDD that you currently have that *backup set* that you need to use for your restore. I would use your other External USB HDD, or a new External USB HDD for this purpose.
So the above suggested full HDD backup of the *broken* Win7 HDD is strictly optional–if you think you need it to find files created after the final differential backup but before the time you started deleting files. We can talk more about this if you think you want to do this backup.
1 user thanked author for this post.
AskWoody PlusNovember 12, 2019 at 12:29 pm #2004173Does the above make sense to you?
Yes. Although I was not familiar with all of the tech terms, I did recognize the significance of what I was seeing. The only question I had was whether the full backups were the equivalent of a system image, which was why I was ready to deploy the image from last March if needed.
There is no need to do another Win7 backup, since, as established, the bloodletting was the day after the most recent backup, and any subsequent entries, if any, will be easily reconstructed. The only Win7 activity since, on the Mint OS, of course, has been that of collating pictures, easily repeated when Win7 is restored.
AskWoody LoungerNovember 12, 2019 at 12:54 pm #2004268@ Slowpoke47
The only question I had was whether the full backups were the equivalent of a system image
Yes, they are.
… which was why I was ready to deploy the image from last March if needed.
Doing that would give you a bootable system again, but, after restoring that March image, you would be missing all the changes that have occurred since March. Your current *differentials would not be associated with that March image. So, you would not be able to bring that information into the system to make it *current*.
You can restore whichever full backup you wish, but each will only be up to date as far as the differentials go–and the differentials must be associated with their respective full backup.
I will put together another post to answer some other issues that have been brought up, and then a plan to get your system restored.
1 user thanked author for this post.
AskWoody PlusNovember 12, 2019 at 1:06 pm #2004278You can restore whichever full backup you wish
Makes sense to me to use the most recent set- can’t think of a reason not to, since you answered my only question re images.
AskWoody LoungerNovember 12, 2019 at 4:15 pm #2004421@ Slowpoke47
A couple more *howsekeeping* chores:
All the above in a left-pane menu. Elsewhere on the screen, Browse for an image or backup file to restore, this allows me to see the entire OS in tree form. Of course, I can’t save a screenshot of this.
Actually, I think you can! I hit the *Print Scrn* key, and got a dialog box asking where to save the file. I could only save a *.bmp* screen shot, and I was able to select my hard drive that has my OS on it, created a directory I could remember, and when I booted back to my WinXP OS, my screen shot was there! Used the MS *Paint* program to convert the *.bmp* file type to the *.jpeg* type file to reduce the size of the file.
I added some arrows, and posted it below:

So, remember your program screen going off the edge of the monitor–well that’s a screen resolution issue. Notice that when I clicked on *Other Tasks*, the bottom item is *Screen Resolutiion …*. Clicking on that item brings up this dialog box:
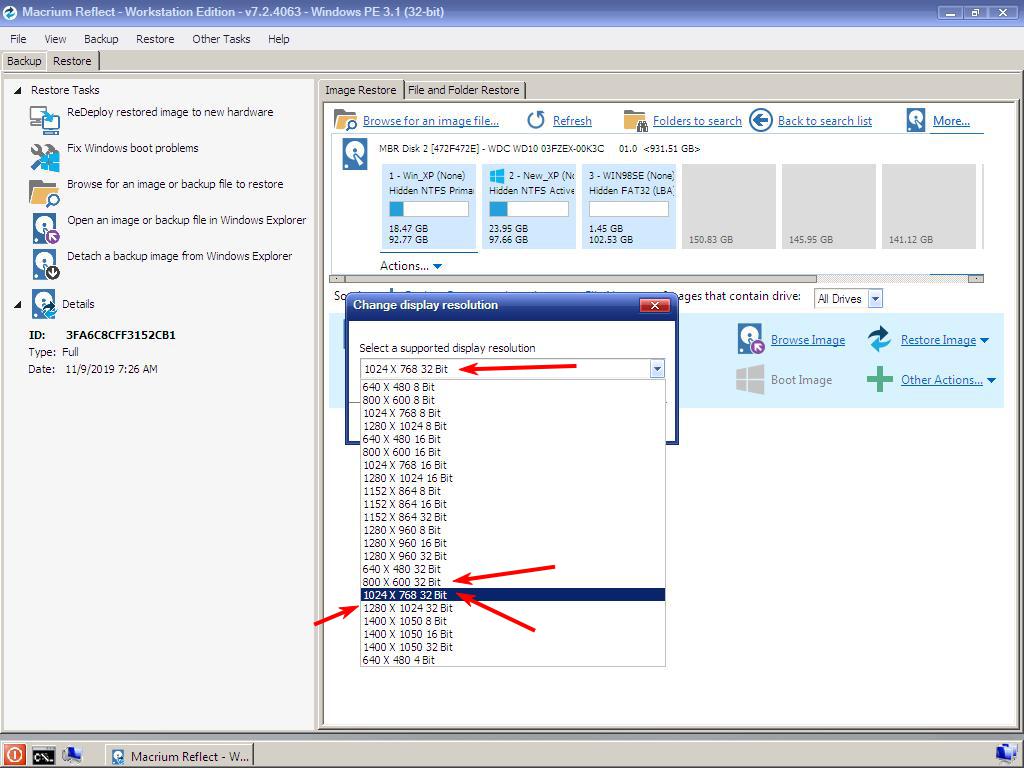
If you choose one of the 32 bit screen resolutions, you should find something that resizes your screen so the whole program fits inside the monitor size.
A possibly helpful footnote- I have found that the Macrium screens from the rescue disc can indeed by resized by the click-and-drag technique, thus displaying the elements previously not visible. Unknown whether the resizing will “stick” but likely readily repeated.
No, it will not *stick*. When booting from a CD, there’s no way to write any changes to the program that’s burned to the disc. So each time you reboot using the CD, you will get the same response. But as you stated, easily adjusted.
Do you recall that Ascaris wanted you to use the Macrium Rescue Media to perform a *Fix Windows boot problems* repair task?
I’d suggest trying the Macrium USB drive’s “Fix Windows boot” function next.
Here’s a link to Macriums Knowledgebase that talks about using that task: https://knowledgebase.macrium.com/display/KNOW72/Fixing+Windows+boot+problems
And, here’s a screen shot showing you where to find it:

Should you need that procedure, it basically does what the *Window 7 Repair Disc* does when you select *Repair Boot* on it.
You could possible need to use that repair task. Usually it only happens when someone is restoring a full backup image to a new HDD. You will be restoring to the original source HDD that created the image. Rarely does that trigger a boot failure. But it’s good to know where that repair item is located if needed.
Next post–an outline to restore your Win7 backup image to your Win7 HDD on your Win7/Mint system.
1 user thanked author for this post.
AskWoody PlusNovember 12, 2019 at 4:37 pm #2004435A couple more *howsekeeping* chores
All very interesting stuff- as you know, I’m skating on the ragged edge of my computer skills, such as they are.
Looking forward to (I hope) a drama-free repair, as I’ve seen entirely enough of that since my blunder. But nice to know these operations are available, should the need arise.
Your assistance greatly appreciated.
AskWoody LoungerNovember 12, 2019 at 5:05 pm #2004451@ Slowpoke47
So, by now you probably know most of the drill:
1. Shut down the Win7/Mint system (yes–always shut down before pulling or connecting hard drive (HDD) comm cords!).
2. Disconnect the Mint HDD.
3. Connect the Win7 HDD.
4. Connect your External USB HDD that has the most recent full Win7 HDD backup image on it:

Make sure you record the file alph-numeric file name so you get it right!
5. Power on the system. Hit the F-12 key until you get the boot menu to select the boot device. Hit the eject button on the optical drive, and put the Macrium Rescue Media CD in the tray, close the tray, and then select the optical drive as the boot device. (If you see the message *Hit any key to boot from the CD …*, be ready to hit a key.)
6. Once the Macrium program loads from the CD, click on the *Other Tasks* menu item and select the *Screen Resolution … * item. Select the screen resolution that makes the entire Macrium program show within the boundaries of the monitor.
7. Click the Restore tab if it is not already selected. Then click the link that says *Browse for image files … *. You should see your External HDD listed. You may have to double click it to make it show the list of all the image file that are available. Click the one listed in the screen shot above. This should bring that image file into the program.
8. Now, click the link that says *Restore Image*–see here:

9. This should bring up this (or similar) dialog box:
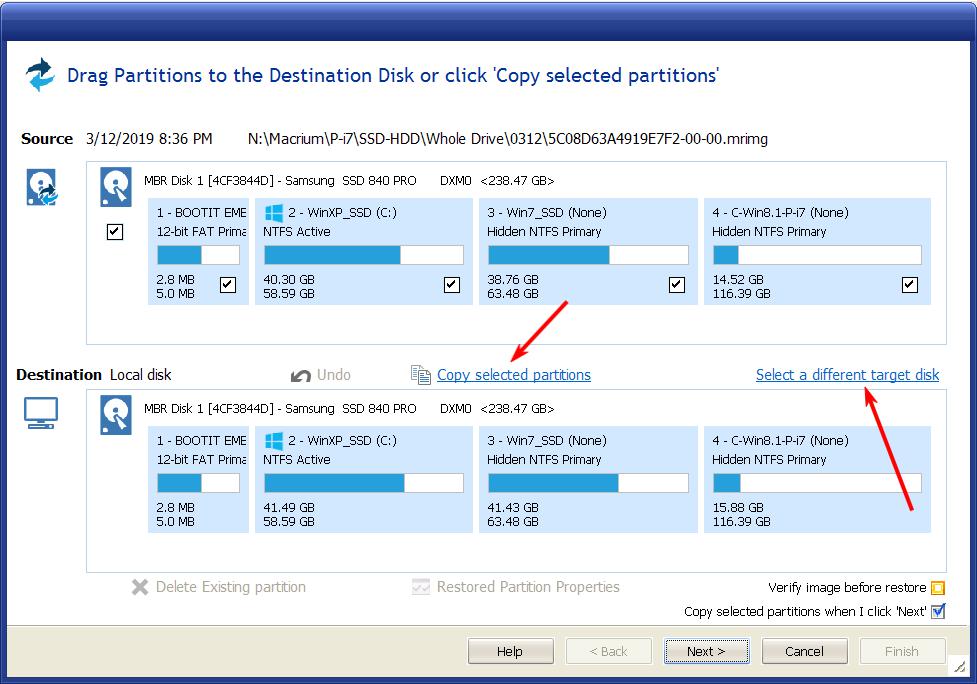
The *Source* file should be the one you selected from your External USB HDD. And the Destination (i.e. Target) HDD should be your Win7 HDD. Your Mint HDD is disconnected so it should not show up. If you did have multiple HDDs, then you might have to select *Select a different target disk.
10. Once you confirm that the Destination HDD is correct, click the link *Copy selected partitions*.
11. When the restore has finished, you can close out the Macrium Rescue Media program electing to *Restart* the system.
12. When the system reboots, start hitting the F-12 key until you get the dialog box to select the boot device. Eject the CD disc. Close the tray. Select your Win7 HDD and press *Enter*. Hopefully this boots to your Win7 OS.
If at any time you do not understand what you are seeing, or are uncomfortable–just stop! Take whatever notes you need to come back here and ask questions. Cancel out of everything and either reboot or shut down.
Hopefully, I didn’t forget any steps above. Let me know if you find a problem.
Questions?
1 user thanked author for this post.
AskWoody PlusNovember 13, 2019 at 1:05 pm #2005028Thanks for the explicit instructions. I am stuck partway through. See first photo- after selecting “Browse for an image file.”

Note source is correct, Local disk (E:). Opened the highlighted entry, see photo: Selected “Restore image” next photo:
This is where I’m stuck- notice that source and destination are both the Win7 HDD and Local disk (E:) does not show. Back and forth over this several times, can’t get the correct source to show.GuestNovember 13, 2019 at 1:53 pm #2005063@ Slowpoke47
This is NightOwl posting from work.
The top *Source* is correct.
The bottom *Destination* is correct.
What you are seeing to the right is the partition you created back in March when you were trying to get the bootloader switched from the Vista HDD to the Win7 HDD.
If you look, both top and bottom have the same partition size of 499.0 MB. The only partition that is *Selected* from the *Source* is the Win7 partition.
Everything should be fine.
Hit the link *Copy selected partitions*–the link is plural, but the *Source* indicates only the one partition is selected with a check in the box–that’s okay.
GuestNovember 13, 2019 at 3:23 pm #2005123Success, Win7 opened (very slowly)!
Still cannot absorb why the screen that I thought was incorrect, wasn’t, but doesn’t matter. While I turned to the laptop to post this message, Macrium automatically started a full backup (several scheduled backups were missed). I let it run, and shortly after starting an error message appeared asking for permission to report back to Macrium, then another error saying that the report could not be sent. However, it appears the backup is running, currently at 16%.
No idea whether the two differential backups taken after the date of the full backup just restored will be absorbed by the full backup now running. What do I have to do to complete the restoration of the system to the differential backup taken the day before my blunder?
1 user thanked author for this post.
AskWoody PlusNovember 13, 2019 at 5:10 pm #2005159A quick update- brief perusal of user files shows nothing dated since the full backup just restored today. I think this means I need to use the two differential backups between that full one and the date of my error, about three weeks later. Cannot go further with this tonight, back tomorrow.
To all who helped me with this, and especially to NightOwl whose patience and effort have been unbelievable, my heartfelt thanks. I could never have gotten this rectified by myself!
1 user thanked author for this post.
AskWoody LoungerNovember 14, 2019 at 1:41 am #2005253@ Slowpoke47
… brief perusal of user files shows nothing dated since the full backup just restored today.
I was going to ask you to do something like this. I was not confident that the Macrium User Guide was giving clear guidance on how to correctly use backups that involved restoring Differential backups. In the end, my best guess was not correct.
I’ve done some more Googling, and now it appears that the appropriate procedure is to click on the Differential image file whose date/time is the time you want to restore to, rather than the Full HDD Backup image file that is associated with that Differential.
So, this is the file you need to select as the *Source* image file:
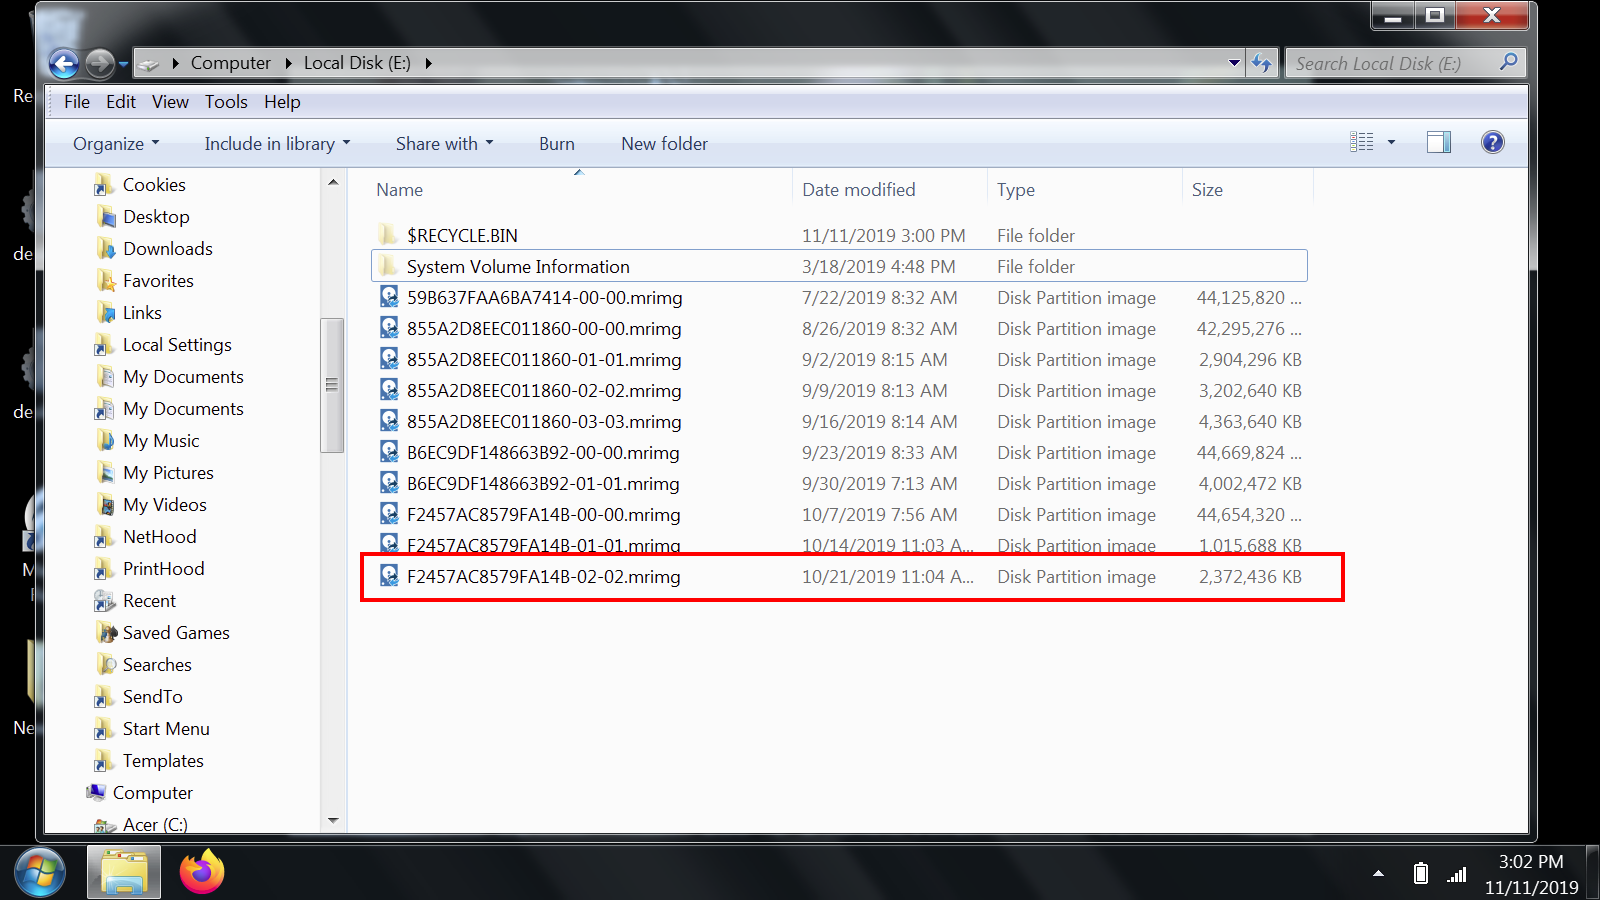
So, go back to my outline, set everything up exactly the same, except when you open your External USB HDD, select that *Differential* image file instead of the *Full HDD Backup* image file. And now you should be in good shape with this restore! When the restore is finished, do the same check you did on the previous restore to see if the dates are now up to the 10/21/2019 date.
No idea whether the two differential backups taken after the date of the full backup just restored will be absorbed by the full backup now running.
Based on my answer at the beginning of this reply, the answer is *No*. The two differentials were not restored–only the *full backup* alone was restored. Once you do the restore above using the 10/21/2019 Differential image file, you should probably do a new full backup to have a fresh Full Backup image starting point that has the Differentials included going forward. (You do not have to worry about that second *middle* Differential image file–because it’s older than the 10/21/2019 Differential, that 10/14/2019 Differential will already be included in the restore process.)
Still cannot absorb why the screen that I thought was incorrect, wasn’t, but doesn’t matter.
It’s not that hard to understand. I’m guessing here a little, and you can confirm my guesses later–I’ll tell you how later. But the gist of the matter is that your Source image file from your External USB HDD only has the main C: partition included in the image file. When you are creating the image files, the little white box that selects a partition to be backed up is probably not checked. But Macrium’s backup procedure has still indicated the partition with a grey box as a *placeholder* to remind you of what was on that HDD when the image was created.
But, the restore procedure is seeing both the Win7 C: partition, and the small unused partition on the Win7 HDD. The Macrium Rescue Media program has mounted that unused partition, and has given it a drive letter, and is making it available for having something restored to it if that’s what you wanted to do.
If you want to check to see if my guesses are correct, on your Win7 OS on the Win7/Mint computer open the Macrium Reflect backup program, click the backup tab, and look at the Win7 HDD. It probably will not have a drive letter assigned, but is that small partition block showing, and is there a little white box without a check in the box. (Now, because this is a fresh look at doing a backup, that box might have a check in the box by default. In which case you might have to try to look at the scheduled backup procedure you have set up to see if that scheduled backup has that white box without a check in it.) In the end, it’s not a critical factor being as that small partition is not in use.
Have you attempted to hook up the Mint HDD and checked to see if you once again have the Grub boot loader working and can select whichever of the two OS’s to boot. To correctly re-set the Mint HDD as the default boot drive, you might have to shut down, disconnect the Win7 HDD, have the Mint HDD hooked up, and boot to the Mint OS. Then shut down, hook up the Win7 HDD, and now reboot. Does everything work again?
… my heartfelt thanks.
You’re most welcome.
3 users thanked author for this post.
AskWoody PlusNovember 14, 2019 at 7:16 am #2005340I’ve done some more Googling, and now it appears that the appropriate procedure is to click on the Differential image file whose date/time is the time you want to restore to, rather than the Full HDD Backup image file that is associated with that Differential.
That was my conclusion as well upon further exploration after my last post. That bit of “tidying up” is on today’s agenda.
(You do not have to worry about that second *middle* Differential image file–because it’s older than the 10/21/2019 Differential, that 10/14/2019 Differential will already be included in the restore process.)
I realized that yesterday as well, when thinking about the process. And now that I know that a full Macrium image is truly “full,” that manual system image from last March is superfluous (old, also) I’ll discard it and re-use that drive when needed.
Have you attempted to hook up the Mint HDD and checked to see if you once again have the Grub boot loader working and can select whichever of the two OS’s to boot. To correctly re-set the Mint HDD as the default boot drive, you might have to shut down, disconnect the Win7 HDD, have the Mint HDD hooked up, and boot to the Mint OS. Then shut down, hook up the Win7 HDD, and now reboot. Does everything work again?
Yes, the grub screen apparently re-generates whenever Mint is connected, no input needed. The Mint OS assumes the default position without help and, as such, boots automatically if nothing is selected on the grub screen.
The timing of this recovery brings to mind those old movies when the hero arrives to save the day in the final reel (no, I wasn’t there)- we now have access to some critical files for business dealings today and tomorrow.
A huge sigh of relief- again, my thanks to all who posted.
1 user thanked author for this post.
AskWoody LoungerNovember 14, 2019 at 10:17 am #2005387@ Slowpoke47
The timing of this recovery brings to mind those old movies when the hero arrives to save the day in the final reel …
You mean like ? :
*Hi-ho Silver, away!* The Lone Ranger rides again!
🙂
If/when you have time, I’d like to hear about how you have Macrium set up to do *automatic* backups–full, and differential. Do you have to remember to hookup your External USB HDD before the event, or does Macrium remind you to do so, or … what are the options being used?
1 user thanked author for this post.
AskWoody PlusNovember 14, 2019 at 10:45 am #2005388*Hi-ho Silver, away!* The Lone Ranger rides again!
Yep- Who was that masked man?
If/when you have time, I’d like to hear about how you have Macrium set up to do *automatic* backups–full, and differential.
Backups are scheduled for Mondays. I typically have the drive connected for the 8 am schedule. Next week I’ll try to remember to leave it unconnected to see if Macrium nags me.
BTW, just finished deploying the most recent differential backup- out the door just now, will report back later re the results.
1 user thanked author for this post.
AskWoody LoungerNovember 14, 2019 at 2:02 pm #2005435@ Slowpoke47
Backups are scheduled for Mondays.
How do you have it set up to do the monthly full backup, and then the weekly differential backups–how is that being specified so they each get done?
AskWoody PlusNovember 14, 2019 at 3:14 pm #2005454@ Slowpoke47
Backups are scheduled for Mondays.
How do you have it set up to do the monthly full backup, and then the weekly differential backups–how is that being specified so they each get done?
Open Macrium- select Backup Destination Files tab:

Then select the backup file in the upper box (note in this case there is only one) and the clock icon seventh from the left across the top:
This gives you the options for setting up the backup schedule.In other developments- I have been cruising the newly reborn Win7 OS, having restored the most recent differential backup, and I can report that everything is A-OK. It was my good luck to have a backup scheduled and completed the day before my catastrophe. Spent the afternoon entering a bunch of data from scraps of paper on my desk into the proper spreadsheets, etc.
This entire incident was ‘way too much excitement for a Slowpoke. Computer education the hard way!
1 user thanked author for this post.
AskWoody LoungerNovember 17, 2019 at 9:54 am #2006729@ Slowpoke47
In other developments- I have been cruising the newly reborn Win7 OS, having restored the most recent differential backup, and I can report that everything is A-OK.
That’s good to hear! I guess we finally got the correct way to use the Differential backups from the Restore function to get the most recent files Restored.
How do you have it set up to do the monthly full backup, and then the weekly differential backups–how is that being specified so they each get done?
The reason I asked that question was because I noticed an irregularity in the available Full Backups, and Differential Backups–see your screen shot below (clicking on the screen shot on my system opens the screen shot in a new browser window and shows an enlarged view so it’s easier to see the details):

So there are no Differentials for the month of Aug. after the late July Full Backup (Red Arrow).
The Full Backup on 8/26 appears to be appropriate with its following Differentials after it.
The the Full Backup on 9/23 appears to be appropriate with the one following Differential.
But the next Full Backup on 10/7 is too soon, based on the schedule you have set. But then the two Differential following that appear to be appropriate.
So, the backups do not seem to follow the schedule you have set up. Any thoughts on what’s going on there to explain the irregular pattern?
1 user thanked author for this post.
AskWoody PlusNovember 18, 2019 at 8:09 am #2007310If/when you have time, I’d like to hear about how you have Macrium set up to do *automatic* backups–full, and differential. Do you have to remember to hookup your External USB HDD before the event, or does Macrium remind you to do so, or … what are the options being used?
I waited to answer until this (Monday) morning and booted Win7 a while before the scheduled 8am backup. There is a pop-up at the designated time warning that the backup is about to start in 18 sec.- Today I left the backup drive unconnected until that box appeared, but IIRC the warning shows whether or not the backup drive is connected. Also, an icon is generated in the tray which, if double-clicked, displays the progress of the backup.
So there are no Differentials for the month of Aug. after the late July Full Backup (Red Arrow). The Full Backup on 8/26 appears to be appropriate with its following Differentials after it. The the Full Backup on 9/23 appears to be appropriate with the one following Differential. But the next Full Backup on 10/7 is too soon, based on the schedule you have set. But then the two Differential following that appear to be appropriate. So, the backups do not seem to follow the schedule you have set up. Any thoughts on what’s going on there to explain the irregular pattern?
During this time frame, I was just getting started with Mint, (dual-boot with Win7) and in due time found that the new OS uses a different time standard than does Windows. And, in that dual-boot configuration, Mint takes over the Windows OS in several respects- bootup process for one- including the time stamp onscreen. Win7 wound up displaying, and presumably using, a time stamp in the tray that was 4 hours different (later, I think) than the actual time, shown in the Mint tray. This upset the Macrium schedule, and I think that such a large discrepancy meant those backups were missed, even with the backup drive connected. The 10/7 backup I initiated manually once I discovered and corrected the time difference.
It didn’t help matters that the non-computer aspects of my life (say, 80%) during that time period were basically chaotic- for example, I was spending 7 long days per week trying to recover from the eviction of a deadbeat slob tenant and get that house ready to put on the market. Plus, I went into the hospital for surgery, and while I was on the way into the OR, the surgeon went postal- histrionics and all- and cancelled the surgery, leaving me to start over with a new doctor. You just can’t make this stuff up.
-
AskWoody LoungerNovember 18, 2019 at 8:39 am #2007318
Plus, I went into the hospital for surgery, and while I was on the way into the OR, the surgeon went postal- histrionics and all- and cancelled the surgery, leaving me to start over with a new doctor.
Poor timing, for certain – but so much better than if your doc had a melt-down during the procedure.
1 user thanked author for this post.
AskWoody PlusNovember 18, 2019 at 10:19 am #2007404Poor timing, for certain – but so much better than if your doc had a melt-down during the procedure.
True that, for certain. The history is that, during the consult, the doctor and his staff badgered me about the size of my feet, of all things, and when I demurred, they doubled down. But I sucked it up, trying to keep the goal, a successful surgery, in mind. In the hospital, the doctor, already gowned up, etc, asked me whether I liked him. When I reminded him about the circumstances during the consult, that’s when he lost it.
I wonder what he did with the money his mother gave him for charm school…
AskWoody LoungerNovember 19, 2019 at 10:29 am #2008012@ Slowppke47
Do you have to remember to hookup your External USB HDD before the event, or does Macrium remind you to do so, …
…but IIRC the warning shows whether or not the backup drive is connected.
That sounds like it’s just the program showing that it is up and running, and preparing to perform a scheduled backup.
There is a pop-up at the designated time warning that the backup is about to start in 18 sec.- Today I left the backup drive unconnected until that box appeared, …
So, it sounds like you were at your computer, and watching for that *pop-up* to show, and then dutifully hooked up the external HDD before the backup event occurred.
What I was really looking for was *what happens if the external HDD is not connected at the time of the scheduled backup*, and the startup time has already passed.
Does Macrium pop-up a message saying something to the effect *Gee, I tried to start your scheduled backup, but I couldn’t find the designated destination HDD to save that backup to. Please hook up that drive, and *click here* so I can perform your backup*? Or, is Macrium *silent*, and nothing happens-no announcement that the scheduled backup was not performed?!
**************************************************************************
For the record, Macrium has a setting buried deep within the bowls of the program that is supposed to help create a *missed scheduled backup*. Here’s the *clicks*:
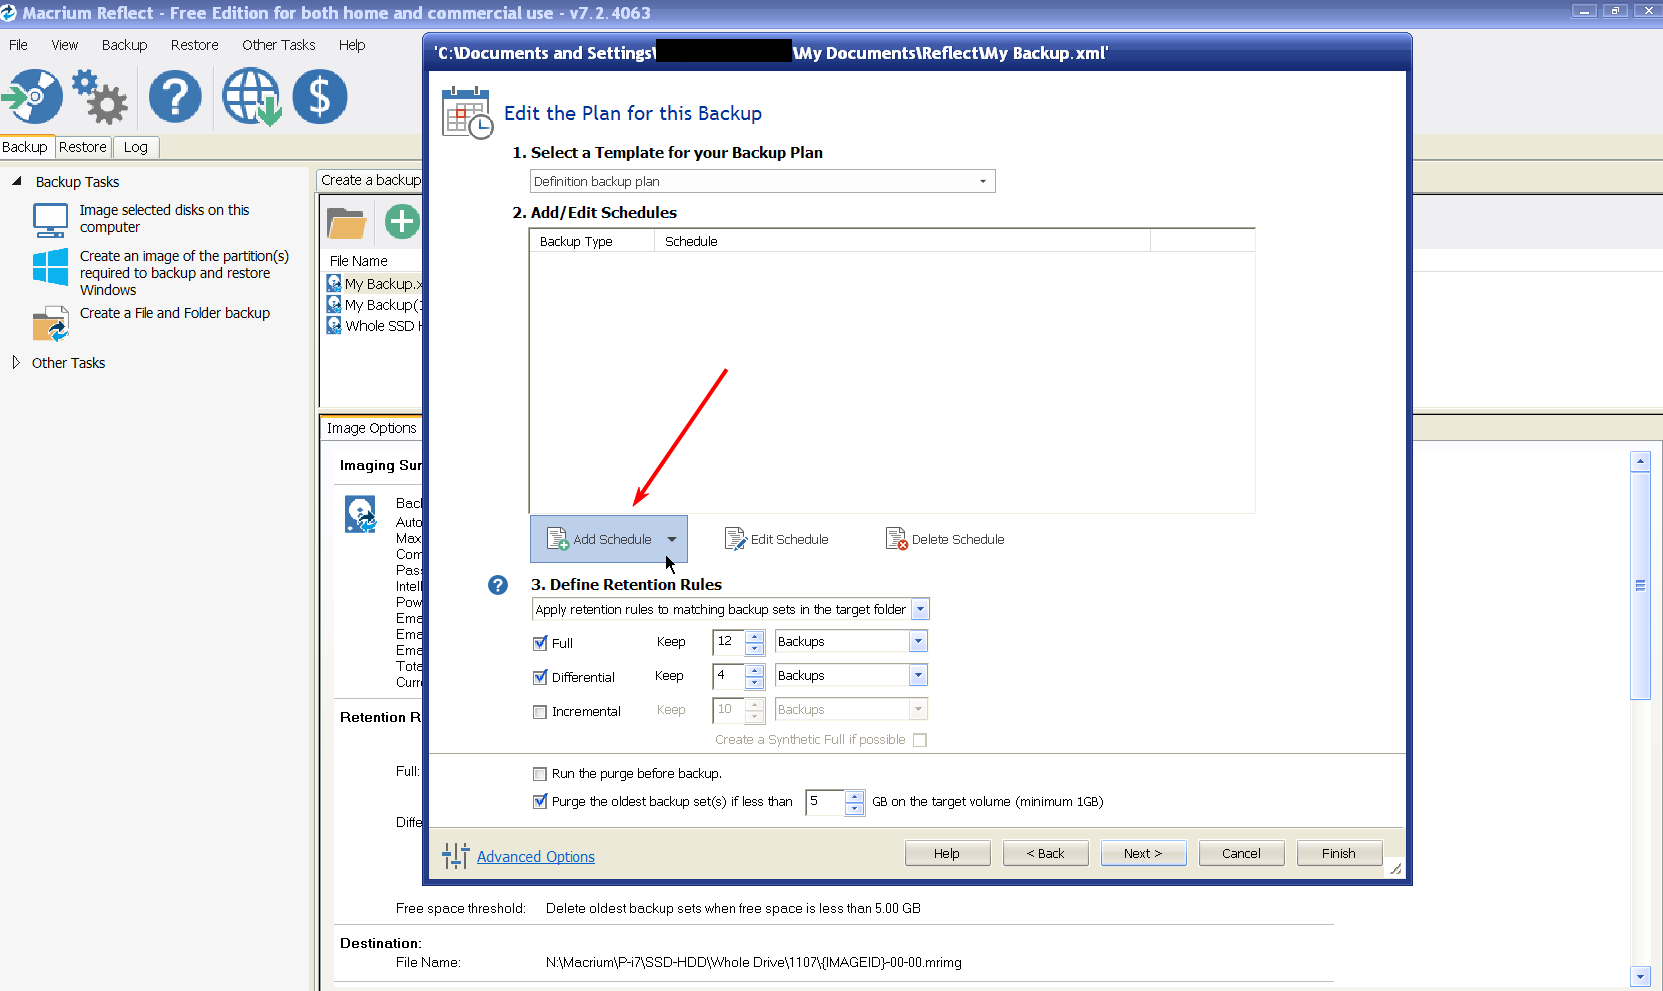
So, when you are creating a scheduled task, or if you already have a scheduled task and you choose to *Edit* that task, get to the screen where you have to option to *Add Schedule* or *Edit Schedule*–in my case I clicked *Add Schedule*, and then select if it is a *Full, Differential, or an Incremental* backup:
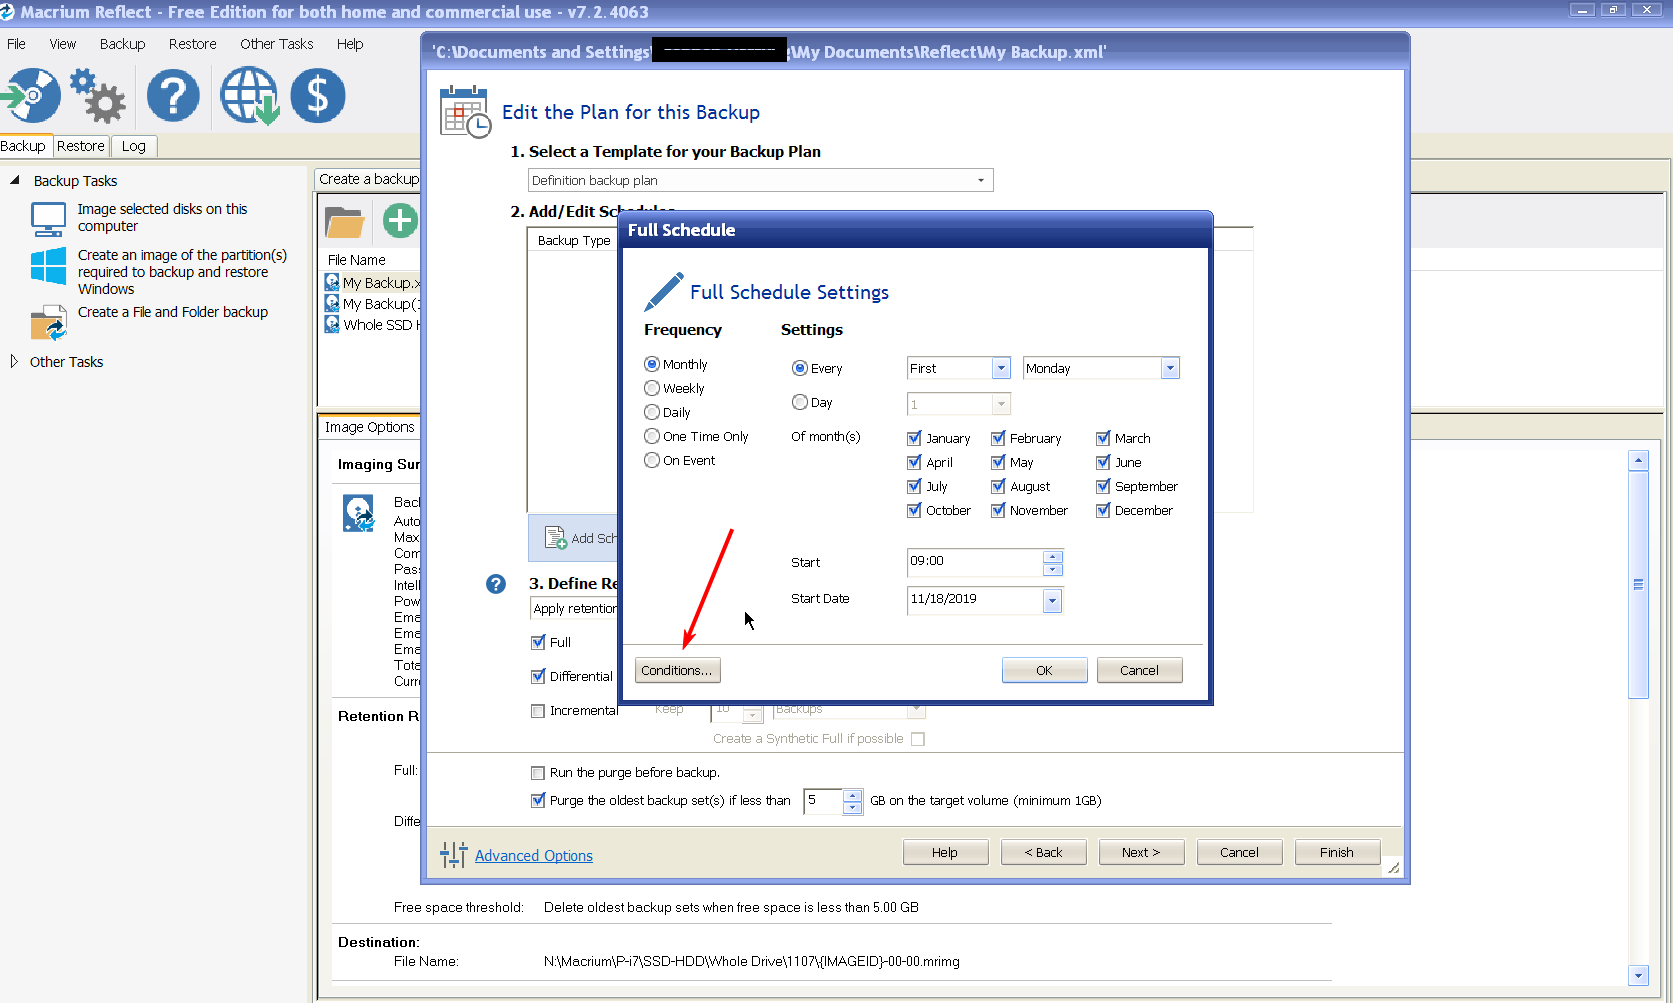
This brought me to the dialog box to set the schedule parameters. Down in the lower left corner is a button–*Conditions … *, clicking on that brought me to:

There, you will see an option with a check box that states: *Run task as soon as possible after a scheduled task is missed*. On my system, that check box was checked by default. If, on your system, that box is not checked by default, or if you have at some point elected to *uncheck* it, then presumably Macrium will not attempt to run your missed backup.
It’s unclear though, under what conditions does this option take effect. The *Help* page suggests that this only applies if the *start time* occurs while the computer is either *Off*, or *Hibernating*. It does not clarify what happens if the system is up and running, but the backup event can not find the specified destination HDD for the backup. And, it’s unclear how often the Macrium program will attempt to run a *missed scheduled backup*–only once, or as many times as it takes to complete the task. It appears that the next attempt to run the task happens upon boot up, or restart from the *Hibernation* state. But, the external USB HDD for the backups would have to be attached, and available before the re-try attempt occurs if it’s going to be successful.
So, this *Run task as soon as possible after a scheduled task is missed* may not apply if the missed event was due to a missing external destination HDD that was simply not hooked up! Meaning that under this condition, there may not be an automatic attempt to run a *missed task*.
And, is there no warning telling you that a scheduled backup has not successfully occurred, or visa versa has a scheduled backup run successfully?
Hmmm … so many options, and so many *unknowns*! Lots of testing to do to find out–the Help files are not that *Helpful*!
1 user thanked author for this post.
AskWoody PlusNovember 19, 2019 at 11:27 am #2008035So, it sounds like you were at your computer, and watching for that *pop-up* to show, and then dutifully hooked up the external HDD before the backup event occurred.
Exactly right.
What I was really looking for was *what happens if the external HDD is not connected at the time of the scheduled backup*, and the startup time has already passed. Does Macrium pop-up a message saying something to the effect *Gee, I tried to start your scheduled backup, but I couldn’t find the designated destination HDD to save that backup to. Please hook up that drive, and *click here* so I can perform your backup*? Or, is Macrium *silent*, and nothing happens-no announcement that the scheduled backup was not performed?!
Can’t recall ever seeing a message like that, and I may well have been remiss in connecting the drive.
And, is there no warning telling you that a scheduled backup has not successfully occurred, or visa versa has a scheduled backup run successfully?
No pop-up messages for either circumstance, but I think there is some mild acknowledgement on the Scheduled Backups page if/when a backup is missed. Can’t check for sure at the moment as I have Mint open, not Win7.
I think my days with Macrium may be numbered, since they don’t have a Linux-compatible version. I’m about to deploy Veeam in Mint: https://www.askwoody.com/forums/topic/setting-up-backup-in-mint-mate-19-2-os/ and first impression is that Veeam backs up all volumes, which would include the Win7 disk. Once I know that this is true, I won’t need Macrium any longer.
1 user thanked author for this post.
AskWoody LoungerNovember 20, 2019 at 9:12 am #2008458@ Slowpoke47
I think my days with Macrium may be numbered, since they don’t have a Linux-compatible version.
I understand–yes, Macrium does not offer a Linux version that you can install on your Mint OS.
I’m about to deploy Veeam in Mint:
Do you remember–
Up to the end of 2018 I’ve done weekly backups using a Seagate 500GB external drive and the backup software that came with it. Now several years on, for some reason that program stopped functioning, could not resuscitate. Started using Veeam Free backup software last January, on that same ext. drive, and weekly backups resumed until this week, when Veeam could no longer find the target drive, even after several attempts. Reloaded the software, no joy.
i actually have not particularly liked that program anyway- it proved difficult to manipulate for this non-tech user. I’m ready to try something else, …
You already have some history with *Veeam*–yes, it was on a Windows OS, and not the Linux OS, but you may find that it has similar characteristics.
first impression is that Veeam backs up all volumes, which would include the Win7 disk.
Actually, Googling indicates that Marium will back up *all volumes*, including the Linux EXT file system–but, yes, you have to do it from Win7, or from the bootable Rescue Media for Macrim.
What I don’t know as yet, is if one can do a Differential backup for the Linux EXT partition (apparently, not so many folks either know about Differentials, or just don’t use), or does it have to be a Full Backup–which is what many on other forums post as being just fine to do.
I work today, again, so I can not go further with this discussion. But, in my next post I will look at what you are currently doing for backups, which appears to be a *hybrid* of per-defined automatic backups, but also *manual backups* because it involves having to remember to hook up the external USB HDD.
So, gone for the day …
1 user thanked author for this post.
AskWoody PlusNovember 20, 2019 at 9:36 am #2008465Actually, Googling indicates that Marium will back up *all volumes*, including the Linux EXT file system–but, yes, you have to do it from Win7, or from the bootable Rescue Media for Macrim.
This hadn’t occurred to me- I’ll keep it in mind in case Veeam jilts me again… but could also have been my fault back then. I do try not to make the same mistake twice, but somehow always find a plethora of new ones…
Our plan at this point is to dual-boot both computers, but I have to say, Win7 functionality and speed compared to Mint is like a turtle compared to a race horse.
al it involves having to remember to hook up the external USB HDD.
That’s not a problem because I keep a weekly planner open on my desk, and write a reminder in for every Monday morning. I’m in the camp that does not leave a backup drive connected 24/7.
AskWoody PlusNovember 20, 2019 at 1:25 pm #2008593(apparently, not so many folks either know about Differentials, or just don’t use)
@nightowl, count me among those who don’t use differential backups! Half a dozen times over the years I’ve tried to absorb the subtleties of “differential” and “incremental” backups vs. full backups; I’ll remember for a couple of hours and then the details fade away.Add to that the (real or perceived) complication of restoring a differential/incremental backup in the midst of an already stressful situation such as a dead-HDD crisis, and I find it much less taxing on my limited mental real-estate to just rely on full backups. 🙂
For me, as they say, KISS.
-
AskWoody LoungerNovember 20, 2019 at 3:13 pm #2008626
Add to that the (real or perceived) complication of restoring a differential/incremental backup in the midst of an already stressful situation such as a dead-HDD crisis, and I find it much less taxing on my limited mental real-estate to just rely on full backups.
Well yeah, now that the capability is there.
Back in the old days, a full backup of any given system had to be taken when the system was quiet (either in reduced-capability mode or just plain offline), took a long time to make, and often required a whole bunch of tapes… backup to disk-type media was just too expensive… meaning a weekly full backup of a server (or multiuser system) may not have been feasible.
AskWoody PlusNovember 20, 2019 at 3:35 pm #2008634I’ll remember for a couple of hours and then the details fade away.
Guess I’m not alone. My memory is as good as ever, just s little shorter.
But in recovering from the mishap that led me to start this thread, I was lucky enough to have had a full backup a couple of weeks before, and two differential backups, the most recent being the day before doomsday. With help here I was able to use all 3 images to restore the Win7 system 100%. I hope I am never faced with that again, but if so, I hope to retain some of that education.
Viewing 164 reply threads -


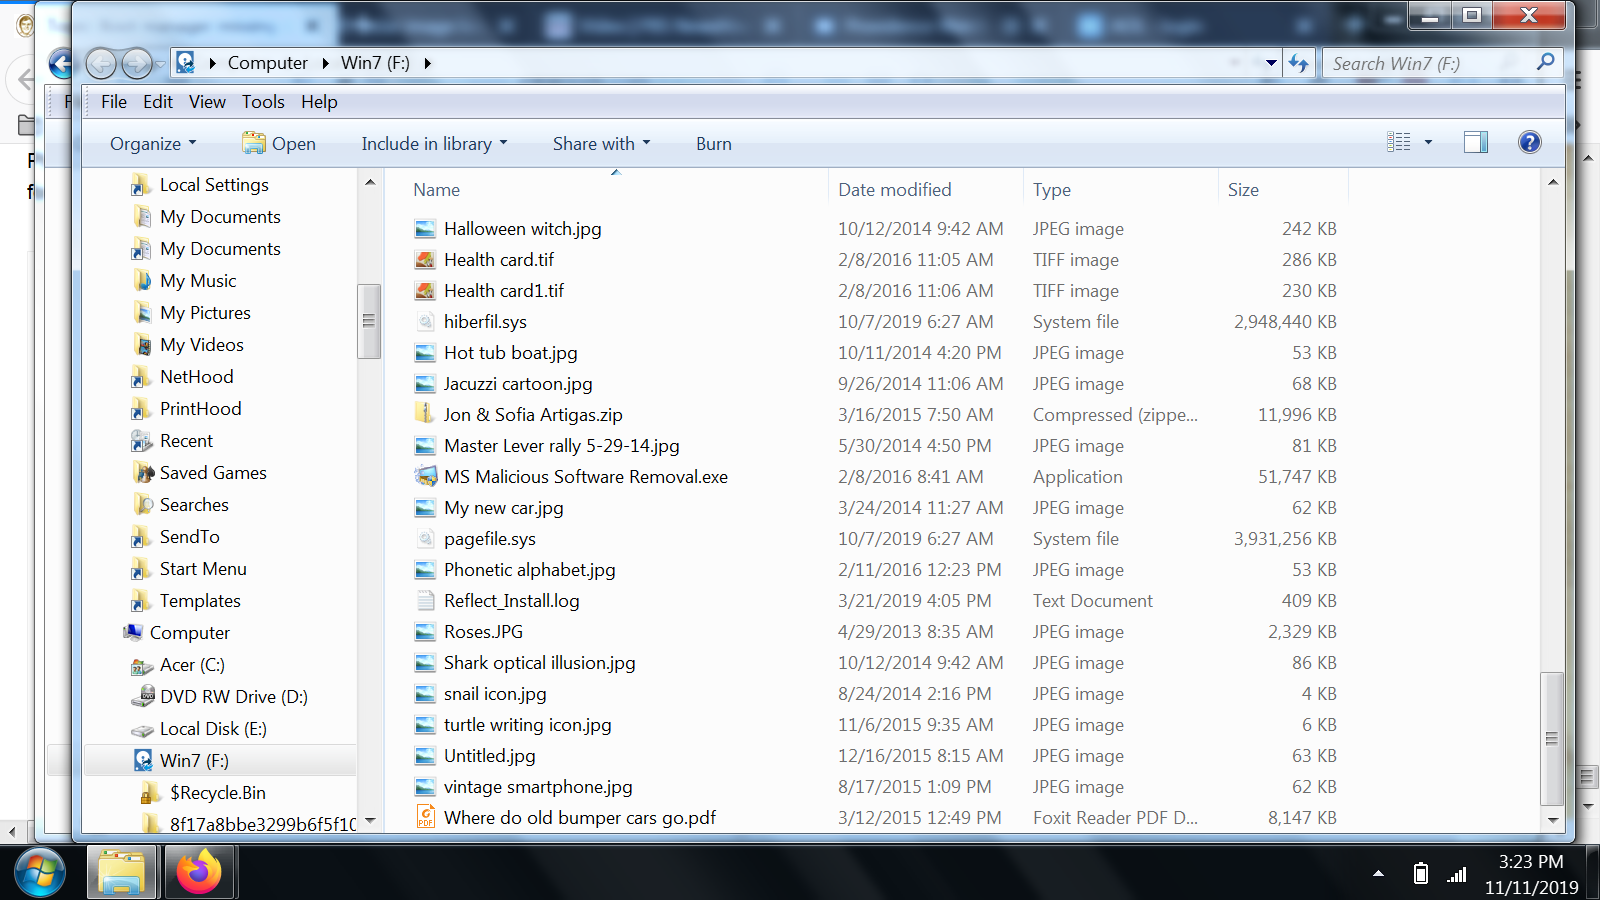
Thanks for subscribing!

Plus Membership
Donations from Plus members keep this site going. You can identify the people who support AskWoody by the Plus badge on their avatars.
AskWoody Plus members not only get access to all of the contents of this site -- including Susan Bradley's frequently updated Patch Watch listing -- they also receive weekly AskWoody Plus Newsletters (formerly Windows Secrets Newsletter) and AskWoody Plus Alerts, emails when there are important breaking developments.
Get Plus!
Welcome to our unique respite from the madness.
It's easy to post questions about Windows 11, Windows 10, Win8.1, Win7, Surface, Office, or browse through our Forums. Post anonymously or register for greater privileges. Keep it civil, please: Decorous Lounge rules strictly enforced. Questions? Contact Customer Support.
Search Newsletters
Search Forums
View the Forum
Search for Topics
Recent Topics
-
AMD Ryzen™ Chipset Driver Release Notes 7.04.09.545
by
Alex5723
1 minute ago -
Win 7 MS Essentials suddenly not showing number of items scanned.
by
Oldtimer
4 hours, 34 minutes ago -
France : A law requiring messaging apps to implement a backdoor ..
by 13 hours, 6 minutes ago
-
Dev runs Windows 11 ARM on an iPad Air M2
by 13 hours, 54 minutes ago
-
MS-DEFCON 3: Cleanup time
by
Susan Bradley
3 hours, 54 minutes ago -
KB5056686 (.NET v8.0.15) Delivered Twice in April 2025
by
lmacri
9 hours, 19 minutes ago -
How to enable Extended Security Maintenance on Ubuntu 20.04 LTS before it dies
by 1 day, 1 hour ago
-
Windows 11 Insider Preview build 26200.5562 released to DEV
by
joep517
1 day, 5 hours ago -
Windows 11 Insider Preview build 26120.3872 (24H2) released to BETA
by 1 day, 5 hours ago
-
Unable to eject external hard drives
by
Robertos42
8 hours, 34 minutes ago -
Saying goodbye to not-so-great technology
by 4 hours, 54 minutes ago
-
Tech I don’t miss, and some I do
by
Will Fastie
10 hours, 11 minutes ago -
Synology limits hard drives
by 2 days, 9 hours ago
-
Links from Microsoft 365 and from WhatsApp not working
by
rog7
1 day, 11 hours ago -
WhatsApp Security Advisories CVE-2025-30401
by 2 days, 15 hours ago
-
Upgrade Sequence
by
doneager
2 days, 8 hours ago -
Chrome extensions with 6 million installs have hidden tracking code
by
Nibbled To Death By Ducks
14 hours, 19 minutes ago -
Uninstall “New Outlook” before installing 2024 Home & Business?
by
Tex265
1 day, 7 hours ago -
The incredible shrinking desktop icons
by
Thumper
3 days, 12 hours ago -
Windows 11 Insider Preview Build 22635.520 (23H2) released to BETA
by 3 days, 14 hours ago
-
Connecting hard drive on USB 3.2 freezes File Explorer & Disk Management
by
WSJMGatehouse
13 hours, 4 minutes ago -
Shellbag Analyser & Cleaner Update
by 6 hours, 35 minutes ago
-
CISA warns of increased breach risks following Oracle Cloud leak
by 3 days, 23 hours ago
-
Outlook 2024 two sent from email addresses
by
Kathy Stevens
3 days, 3 hours ago -
Speeding up 11’s search
by 1 day, 11 hours ago
-
HP Pavilion Will Not Wake Up After Being Idle for Longer Period
by
WSwalterwood44
1 day, 23 hours ago -
Make a Windows 11 Local Account Passwordless
by
Drcard:))
4 days, 13 hours ago -
Ubuntu 25.04 (Plucky Puffin)
by 4 days, 20 hours ago
-
24H2 fixed??
by
CWBillow
3 days, 13 hours ago -
Uninstalr Updates
by
jv16
5 days, 1 hour ago
Recent blog posts
Key Links
Remembering Woody

Want to Advertise in the free newsletter? How about a gift subscription in honor of a birthday? Send an email to sb@askwoody.com to ask how.
Mastodon profile for DefConPatch
Mastodon profile for AskWoody
Home • About • FAQ • Posts & Privacy • Forums • My Account
Register • Free Newsletter • Plus Membership • Gift Certificates • MS-DEFCON Alerts
Copyright ©2004-2025 by AskWoody Tech LLC. All Rights Reserved.