AKB2000016: Guide for Windows Update Settings for Windows 10
By @PKCano
Published Sept 9, 2021 Rev. 2.03
Please add your comments:
Comments on AKB 2000016: Guide for Windows Update settings for Windows 10
The following is not aimed at Business/Enterprise Users who are supported by IT Departments. It is for the Consumers and Small Businesses that are patching their own computers without technical support.
Before you make any major changes to your computer, it is advisable to make a full disk image, a separate backup of your User data, and have a bootable Rescue disk available. Without these things, you do not have a way to recover if the install/update/upgrade renders your computer unbootable or unusable.
Section 1 – Windows Update terminology:
+ Feature Update – the large twice-yearly upgrades that result in different versions of Windows 10.
+ Quality Update – the monthly Security Cumulative Update and other updates released by Microsoft on the second Tuesday of the month (Patch Tuesday).
+ Servicing Stack – the Update for the Windows Update mechanism itself.
+ Optional Install Updates – the non-Security Cumulative Updates (also known as “Previews”) released on C, D, E, and possibly A weeks (and at MS’s whim) between Patch Tuesdays. They are meant for testing (by IT Departments, for example) of the non-security fixes that will be added to the following month’s Patch Tuesday Security updates.
+ Other Updates – the above updates are for the Operating System. “Other Updates” may include updates for .NET, Flash, Office (.msi versions), MSRT, Defender, etc.
+ To get a better idea of how update settings affect patching, see @abbodi86 ‘s explanation in post #2283011 in the “Windows Update’s bifurcated mess” thread.
+ Pause updates – the Pause period begins when you click “Pause” and lasts for as many days as you set, up to a maximum of 35 days. If you Pause updates immediately before they are released by MS, the updates will not be available in Windows Update for that period. If you Pause updates at any other time, for “X” number of days, they will download and install “X” days after you set the Pause time, or when you manually end the Pause period (unless you are using Metered connections).
Also, under “Advanced Settings” there is a pulldown for Pause Updates – this allows you to set an ending calendar date for the “Pause.” Remember, when the “Pause” date arrives, you will get the updates. This can be a convenience if you want the update, say, on the weekend.
You cannot use Pause again until the pending updates have been installed. You will have to manually reset the Pause period after every use. Be especially aware of the when the Pause period ends, counting from when you first clicked “Pause” – mark that day on your Calendar!
+ Defer Updates – the Deferral Period begins when the update(s) is released and lasts for the number of days set, up to a maximum of 30 days for Quality Updates and a maximum of 365 days for Feature Updates. It is automatically reset without intervention at the release of new updates. Deferral of updates is available in the Pro Edition only (not available to Home Users)
+ Setting Target Release Version – This can be used to specify when Preview Builds and Feature Updates are received instead of using feature update deferrals. The process must be done logged in as an Administrator ID (not a Standard ID).
For further reference See Tasks for the weekend – January 30, 2021
The maximum Deferral Period for Feature updates is 365 days, but each version of Win10 can be used for roughly 18 months before it’s EOS.
Beginning with v1803, if you need your devices to remain on their current feature update beyond when deferrals would allow or until the current OS version reaches EOS, then you should specify the version you want the device to use until end of service or until the policy is changed to a newer Windows 10 feature update. This can also be used to move the device to a different, designated version of Windows.
This video explains the the methods for achieving these settings. https://www.youtube.com/watch?v=oLb4uKpvP5I.
The TargetReleaseVersion can be set in several ways. In Win10 Pro, it can be set using Group Policy, which in turn makes the appropriate Registry entries. Alternatively, Win10 Pro can make manual Registry entries or make use of commands. But for Win10 Home, which doesn’t have Group Policy available, the Registry settings must be made manually or by using commands.
**NOTE: According to official sources, these settings are ignored in Home Edition, but at the current time, it appears that settings made in the Policy section of the Registry also work for Home Edition. That may be changed by Microsoft in future versions.
**NOTE: It should also be noted that if the device is not updated before it reaches EOS, the device will automatically be updated once it is 60 days past end of service for its edition. MS documentation.
**NOTE: When delaying version updates, you should choose either Feature Deferrals OR TargetReleaseVersion settings. You should not use both to achieve update control. If you use TargetReleaseVersion, you should also ***set deferrals to 0 0r 1 instead of 365 as shown in the second screenshot in #2275043. They are going to be ignored anyway.
+ wushowhide.diagcab – an MS tool that allows you to check what updates are pending and hide Windows updates you don’t want to install (driver updates, for example). Run wushowhide by double clicking on it, then click on “Advanced” then uncheck the box to “apply changes automatically.” You can hide or unhide updates.
Wushowhide uses the Windows Update Service to search for updates and will not run if the Service is Disabled. When you hide updates, you may have to clear the Windows Update queue in order to prevent hidden upates still appearing in the Windows Update queue from installing. Instructions for clearing the Windows Update queue are found in AKB2000013. After clearing the Update queue, you may have to wait until Windows Update checks for updates again (DO NOT click on “Check for updates”).
Hidden updates (like hidden updates in Win7/8.1) will not show up in the pending updates. You must “unhide” the updates to be able to install them.
+ “Check for Updates” does not mean “Check for updates.” It initiates a download/install of the pending updates. Don’t click “Check for updates” unless you want everything that’s out there.
+ If updates are Paused, Deferred, or hidden, they will not show up in Windows Update.
+ Metered connections – the setting tells MS you have a data cap on your Internet connections and pay extra for an overage (even if you really don’t). The settings for metered connections are in the Settings app under Network.
******************
Section 2 – For Win10 Home Users: You have several means of controlling updates.
+ Pause – You can pause updates up to 35 days in 7-day increments. Remember when you do, they will not show up in Windows Update or wushowhide, so you will not be able to see what is pending. At the end of the Pause period the updates will download and install (unless you have set metered connections). You can increase the “Pause” period at any time by clicking “Pause” again, up to the maximum of 35 days. You can end the “Pause” whenever you want to do so.
The “Pause” period begins when you click “Pause.” If you click “Pause” three times (for example), it will pause updates for 21 days. This should delay updating long enough to see if there any real problems with the patches. Mark the end-of-pause date on your calendar because that’s when your computer will update.
Also, under “Advanced Settings” there is a pulldown for Pause Updates – this allows you to set an ending calendar date for the “Pause.” Remember, when the “Pause” date arrives, you will get the updates. This can be a convenience if you want the update, say, on the weekend.
+ Metered Connections – setting your Internet connections to “Metered” will prevent the large CUs from downloading. You must turn “Metered” off when you want to update.
+ Setting Target Release Version – According to official sources, these settings are ignored in Home Edition, but at the current time, it appears that the settings made in the Policy section of the Registry also work for Home Edition. That may be changed by Microsoft in future versions.
For further reference See Tasks for the weekend – January 30, 2021
This video explains the the methods for achieving these settings. https://www.youtube.com/watch?v=oLb4uKpvP5I.
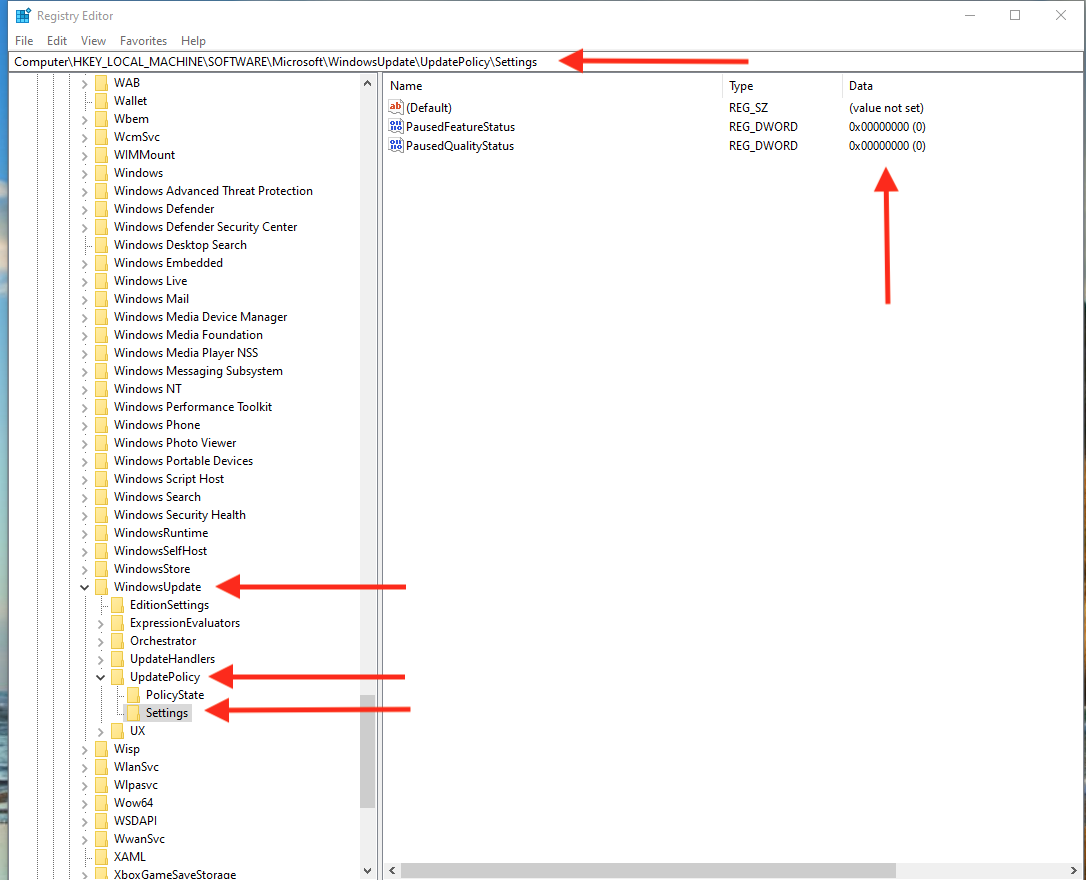
To use this method to stay on your current version of Win10, or to move to a different, designated version, requires making two Registry entries. (See the second screenshot in #2286499 below.)
— To make the Registry entries manually:
1. In the Windows Searchbox type regedit and hit Enter.
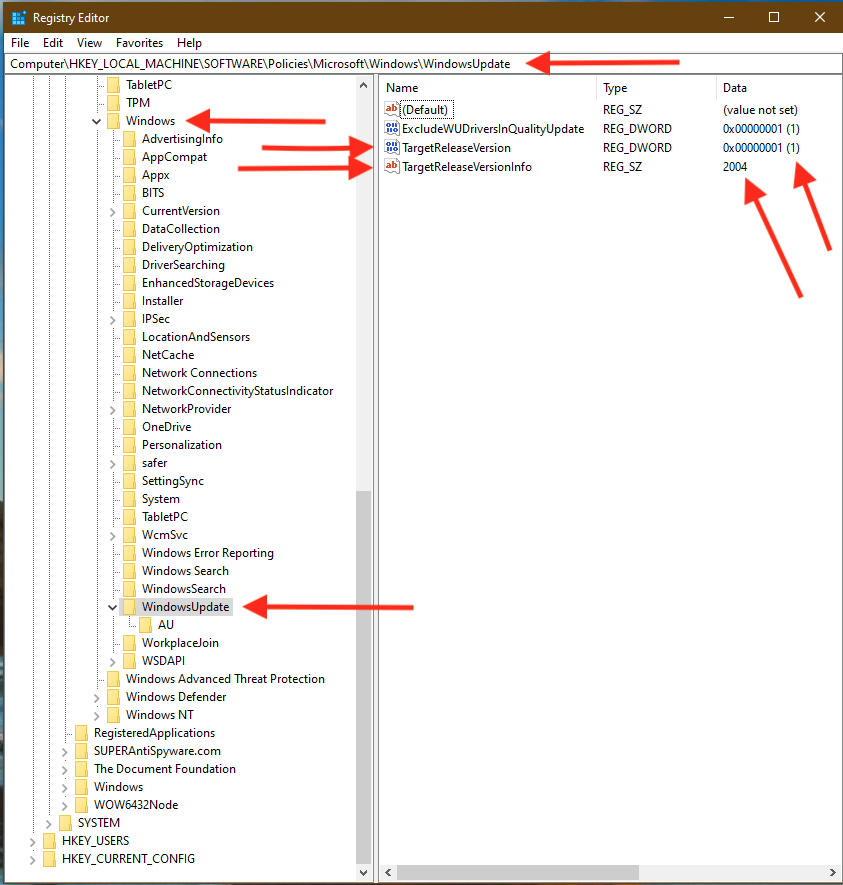
2. Navigate to HKLM\SOFTWARE\Policies\Microsoft\Windows\WindowsUpdate.
3. Create the two Registry as shown in the second screenshot in #2286499.
— To make the Registry entries using Windows PowerShell Commands:
1. In the Start menu, choose Windows PowerShell (Run as Admin)
2. Copy this line into the PowerShell window and press enter:
reg add HKLM\SOFTWARE\Policies\Microsoft\Windows\WindowsUpdate /f /v TargetReleaseVersion /t REG_DWORD /d 1
3. Copy this line into the PowerShell window and press enter:
reg add HKLM\SOFTWARE\Policies\Microsoft\Windows\WindowsUpdate /f /v TargetReleaseVersionInfo /t REG_SZ /d 20H2
In place of “20H2” you can put any of the recent Win10 version numbers, example 21H1. To remain on your current version, use that version’s designation. To upgrade to a newer version, replace it with the newer version, and you will be offered that version through Windows Update.
— To use the Reg File Method:
1. Download the Reg File (.reg) for the appropriate version 2004.reg, 20H2.reg, 21H1.reg, 21H2.reg. To remove the settings, download reset.reg.
2. Double click on the .reg file, click “Yes” at the UAC prompt.
**NOTE: In all cases, you should verify that the Registry entries have been made correctly. (See the second screenshot in #2286499 below.)
**NOTE: It should also be noted that if the device is not updated before it reaches EOS, the device will automatically be updated once it is 60 days past end of service for its edition. MS documentation.
+ wushowhide – this can be used to hide updates. If you hide the updates, be sure to clear the Windows Update queue of the hidden updates, only if they still appear in the queue, before installing. See AKB2000013.
+ The “Download and install now” section – will let you decide when to download and install Optional Updates and Feature Updates (except when MS deems the version you are running is near EOL). See illustration here.
Note: If updates are Paused, Deferred, or hidden, they will not show up in Windows Update. The “Download and install now” section will not be available.
*********************
Section 3 – For Win10 Pro Users: You have the above controls available to Home Users, plus additional ones in the GUI and in Group Policy.
NOTE: References to deferral pulldowns in the Windows Update Advanced Settings of Win10 Pro apply to v1909 and earlier. Microsoft has removed the GUI pulldown settings in Pro v2004 and later. Information has been added in Section 5 for Win10 beginning with Pro v2004.
GUI Settings – In Windows Update (v1909 and earlier), under “Advanced Settings” there are three pulldowns. For v2004 and later, the deferral pulldown settings have been removed.
+ Pause Updates – this allows you to set an ending calendar date for the “Pause.” Remember, when the “Pause” date arrives, you will get the updates. This can be a convenience if you want the update, say, on the weekend.
+ Feature update deferral – This setting allows you to defer Feature Updates (twice-yearly version upgrades) for up to 365 days. The deferral starts from the day a Feature Update is released for general use.
It can apply to several Feature updates at a time. Say, for example, version A was released 220 days ago and version B was released 30 days ago. Setting the deferral to 200 days will allow version A to be available to Windows Update, but not version B. Setting the deferral to 20 days will make version B available. You can choose which version you want to install by setting the appropriate number of deferral days. See Chasing the elusive upgrade for Win10 Pro v 1803 as an example.
A deferral setting of 120 or 180 days will usually take you past the “Beta testing/Guinea Pig” stage of a new version. By then, the version will probably be mostly stable. But you have to be careful with this setting because, if you set Feature deferral at 365 days, for example, you may find that the version you are running is EOL before the deferral period is up.
If you use this setting, Feature Updates and Optional Install updates will not show up in Windows Update for the deferral period.
+ Quality update deferral – This setting allows you to defer Quality updates for up to 30 days. The deferral period begins when the updates are released by Microsoft. Quality updates refer to the Security updates released on Patch Tuesday. Setting Quality updates at 21 days deferral, for example, will give time for problems to be reported with specific patches and will probably get you through the patch Beta testing stage.
+ Setting Target Release Version – This can be used to specify when Preview Builds and Feature Updates are received instead of using feature update deferrals. The settings can be made in several ways in Win10 Pro. (See screenshots in #2286499 below.)
You can make manual entries in the Registry, run PowerShell commands, or use the Reg File method, as described in Section 2 for Win10 Home.
But an easier way in Win10 Pro is using Group Policies. In Group Policy use these settings:
Computer Configuration\Administrative Templates\Windows Components\Windows Update for Business
Select the target Feature Update version = Enabled, Target Version for Feature Updates = 1909 (or whatever version you want to stay on, or upgrade to)
Making the settings in Group Policy will set the corresponding Registry settings in the proper location. So you do not need to use any of the other methods.
**NOTE: It should also be noted that if the device is not updated before it reaches EOS, the device will automatically be updated once it is 60 days past end of service for its edition. MS documentation.
**NOTE: When delaying version updates, you should choose either Feature Deferrals OR TargetReleaseVersion settings. You should not use both to achieve update control. If you use TargetReleaseVersion, you should also ***set deferrals to 0 0r 1 instead of 365 as shown in the second screenshot in #2275043. They are going to be ignored anyway.
Group Policy Setting to prevent unplanned download/install – using gpedit.msc
In general, the use of Group Policy settings for Windows Update and Windows Update for Business are not recommended for the average user for v1909 and earlier. If you use these settings, the settings in the GUI may become grayed out and unavailable. There is only one setting that is recommended:
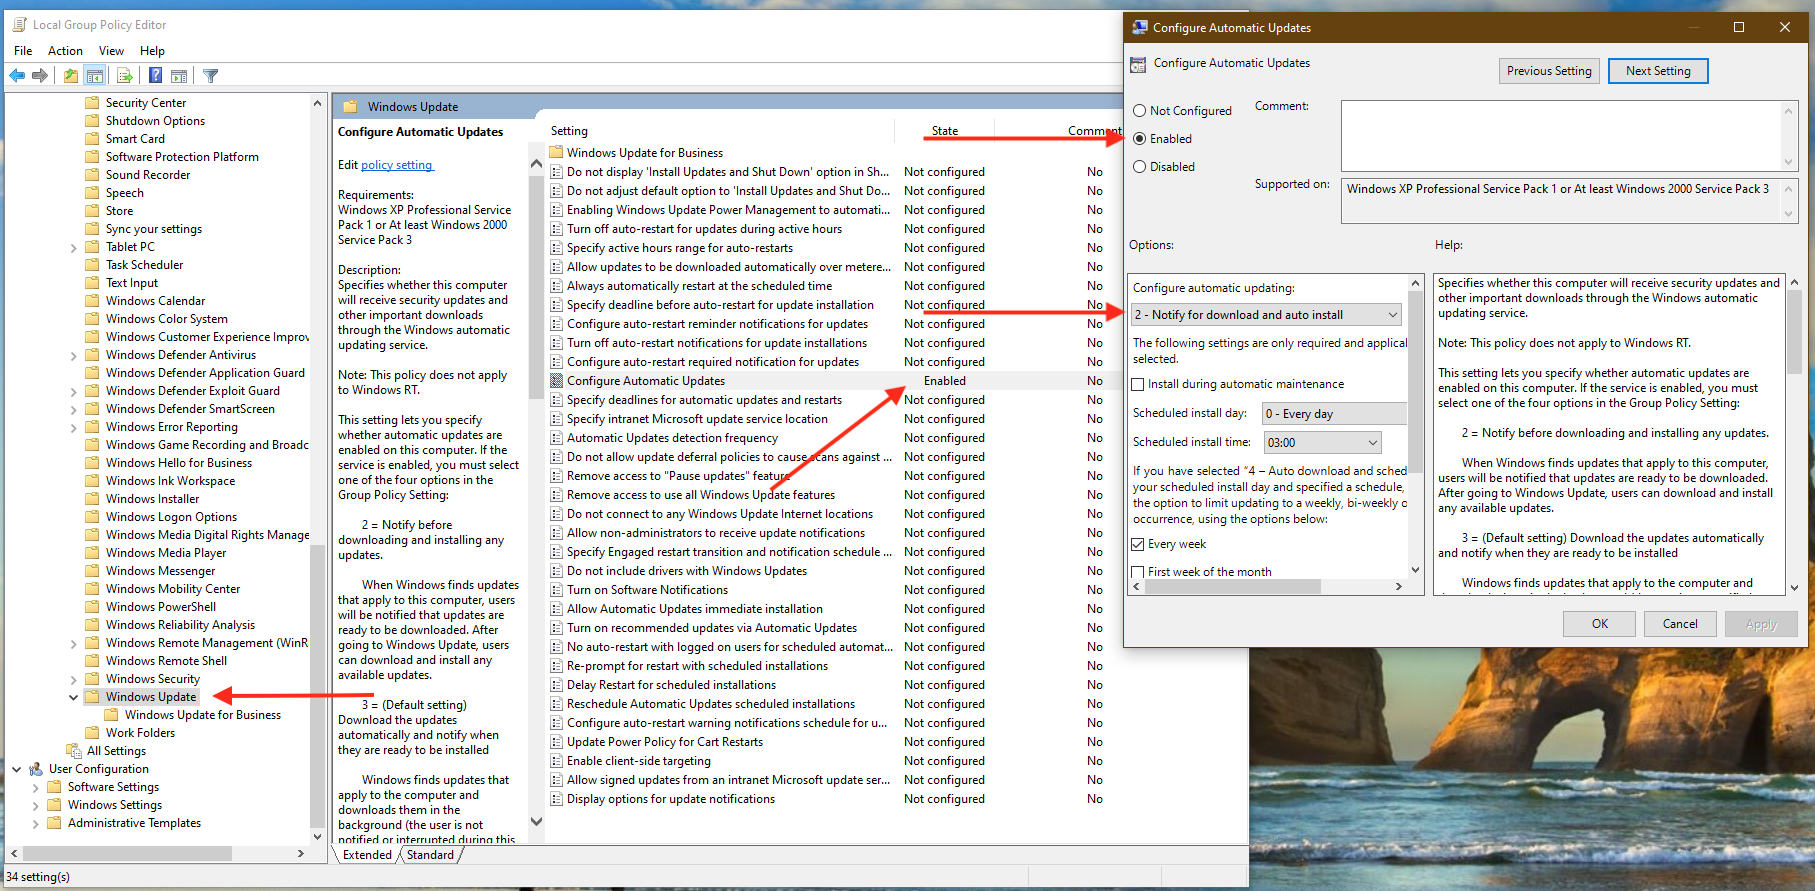
Computer Configuration\Administrative Templates\Windows Components\Windows Update
Configure Automatic Updates = Enabled, value = 2 (notify download/install)
With this setting, updates show up in the Windows Update queue the day they are released. But the setting prevents the updates from downloading/installing until you click on the “Download” button. If the updates are not on your computer, they can’t be installed.
Beginning with v2004, the GUI pulldown settings for Quality and Feature Updates have been removed.
To achieve the same deferral periods, beginning with v2004, Users will need to use settings in Windows Update for Business.
*********************
Section 4 – These are the settings I use for Win10 v1909 and earlier.
I recommend these GUI settings and this (only ONE associated with Windows Update) Group Policy setting. Semi-Annual channel setting is no longer available.
Feature Update deferral = 365 days. To upgrade to a new version, with the settings I use, the only thing required is to lower the deferral deferral number and wait for the system to check for updates on its own. See Chasing the elusive upgrade for Win10 Pro v 1803. I always move to the next version when I want to, but if you use this, you have to keep in mind that you need to upgrade to a newer version before the current version is EOL. At 365 days your version could become EOL.
Quality Update deferral = 0 days. This has to be coupled with the Group Policy setting below to be effective. If you set Quality Update deferral to zero, the updates are immediately available and pending. They will show up in the Windows Update queue on Patch Tuesday, so you KNOW immediately what is being offered to the computer. But they DO NOT download until you click the “Download” button.
If there are updates you do not want to install, you can use wushowhide to hide them. If they still appear in the update queue after hiding, you should clear the update queue before updating. Instructions in AKB2000013.
Group Policy setting under Windows Update – Configure automatic updates = Enabled, value 2 (notify download/install).
What this does is hold the updates in the queue until you click the “Download” button. Since the Quality updates are not deferred, they will show up in the queue immediately after release but will not download. If there are updates you do not want to install (MS drivers, microcode), you will SEE them. You can then use wushowhide to hide them. If they still appear in the queue after hiding, clear them from the update queue using the method in AKB2000013.
This is the ONLY Group Policy setting related to Windows Update I recommend for v1909 and earlier. All others should be set to the default. Other settings under Windows Update and Windows Update for Business can cause the GUI settings to become grayed out and unusable.
**NOTE: If you use the above “2” setting, and then set Metered connections ON too, there may be a caveat. After using this, when I later went back an turned Metered connections to OFF, without FIRST running wushowhide and hiding anything, the pending updates downloaded/installed without respecting the “2” (notify download/install) setting. I do not recommend using Metered connections if you are using deferrals and GP “2.”
Pause – I do not use the Pause settings in Win10 Pro because the other controls are more trouble-free (are less of a hassle).
**NOTE: If you use the above setting, and you then Pause any updates pending in the queue afterward, the paused updates will disappear from (are not available in) the Windows Update queue, as expected. Since wushowhide uses the Windows Update Service, if the updates are not available to Windows Update, they will not be available to be hidden by wushowhide, and any hidden updates will disappear from the hidden updates as well.
If you then Resume updates, or the pause period ends, the paused updates may download/install. Under these conditions, they may not respect the “2” (notify download/install) setting. But pre-pause hidden updates will again be visible in the wushowhide hidden update list.
With these settings you do not have to keep fiddling with Windows Update. Deferrals are automatically reset. You can see what updates are pending, but they don’t download without your intervention. You can choose which upgrade you want and when to install it by simply lowering the deferral days appropriately.
*********************
Section 5 – Settings for Win10 Pro beginning with v2004.
NOTE: Beginning in Win10 Pro v2004, Microsoft has removed the deferral setting pulldowns from Windows Update\Advanced Settings. I have done some preliminary testing on how to maintain the same control of updates. There are two methods available. Method 1 uses Registry settings to emulate the GUI settings that have been removed. Method 2 uses the Policies under Windows Update for Business in Group Policies.
**NOTE: You should not try to use both methods. It is my understanding that Group Policy settings take precedence over GUI (probably emulated as well)) settings. So choose one or the other method. And be aware that the use of “Pause” in addition may cause unexpected results (see notes on Pause in Section 4).
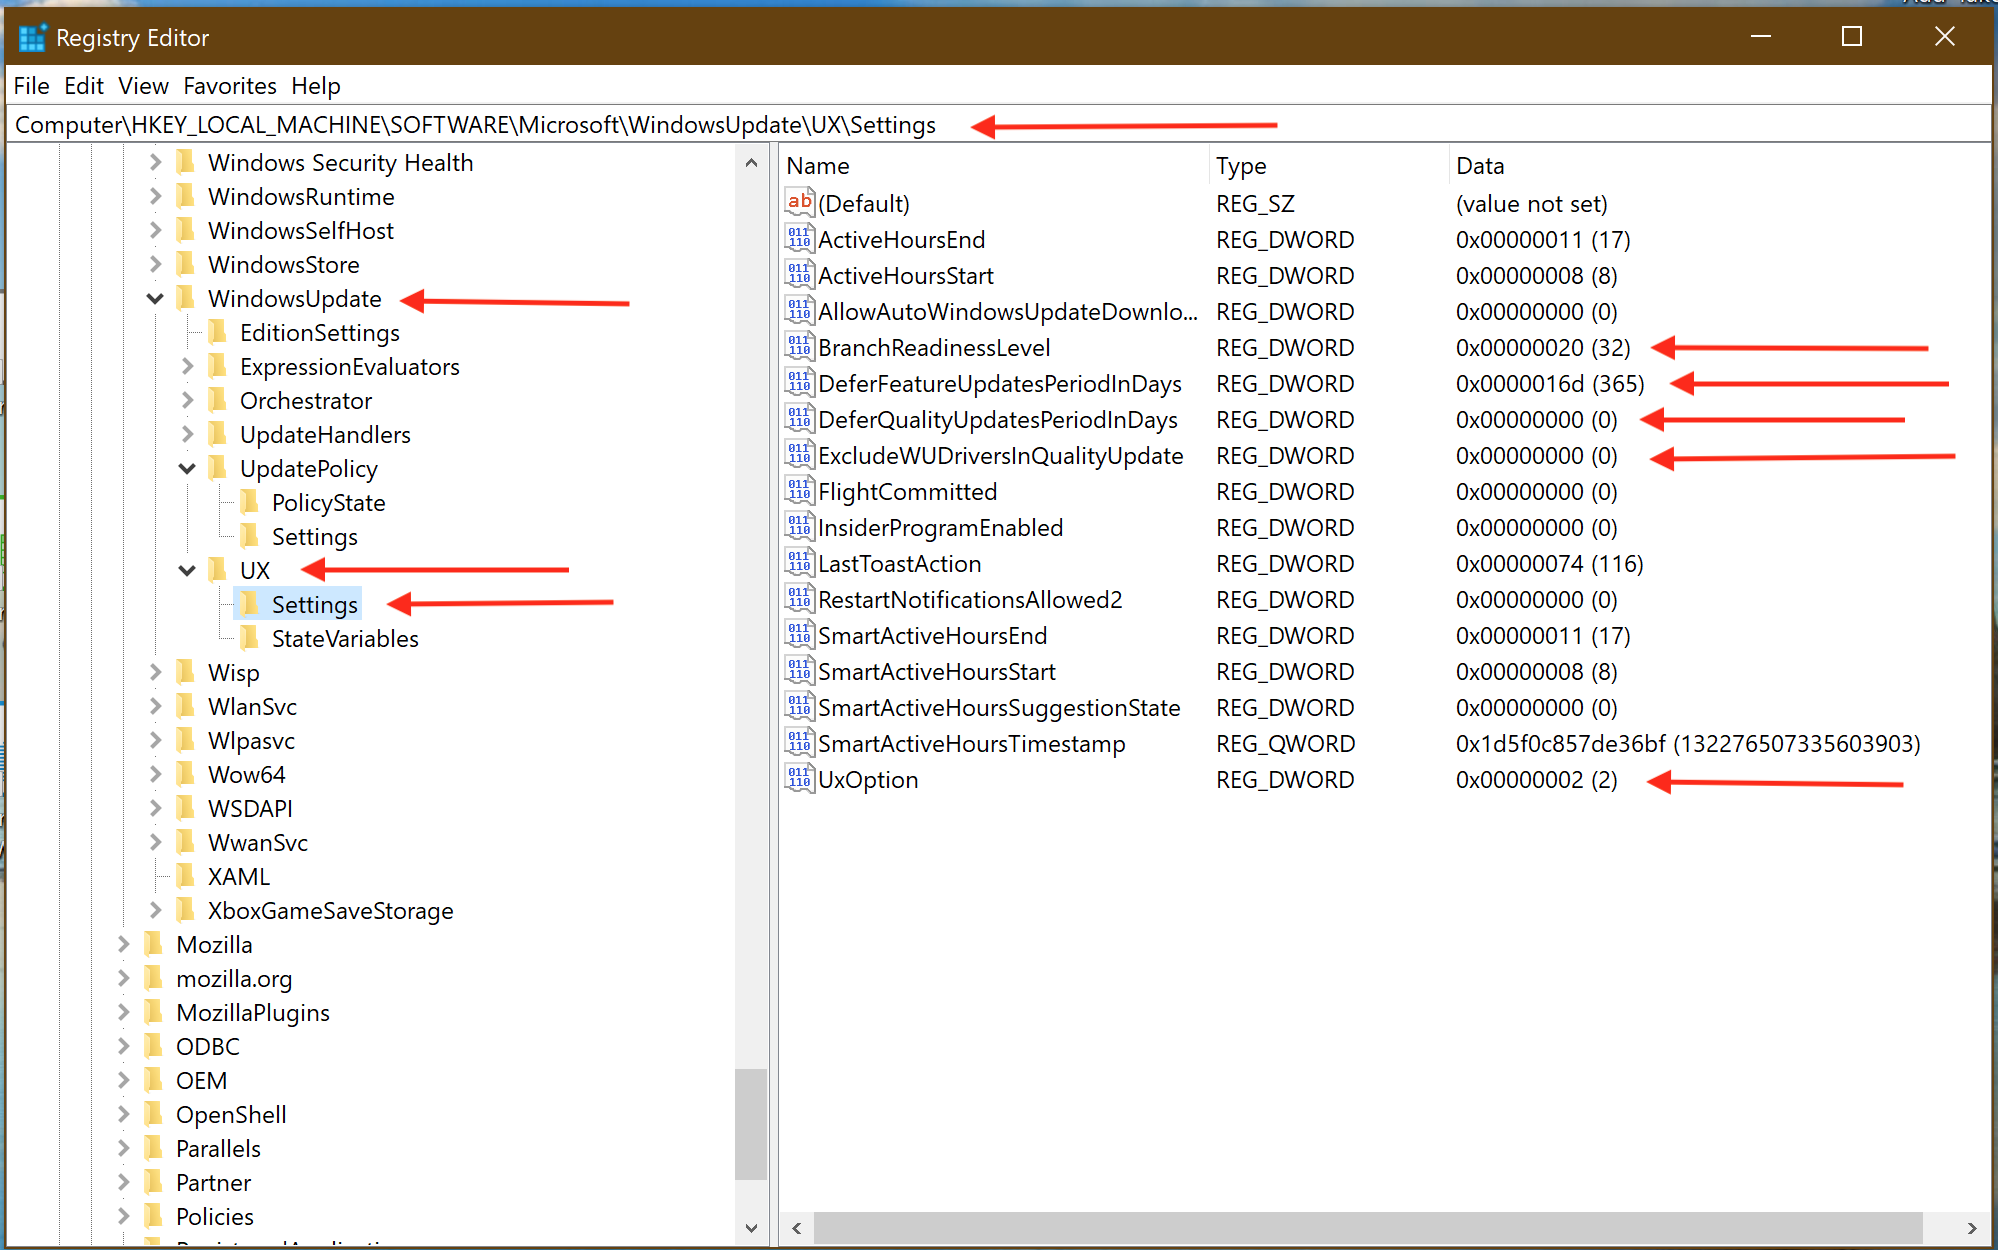
Method 1 – Using the Registry settings equivalent to the removed GUI settings.
Disclaimer: If you are unfamiliar with editing the Registry, be advised that incorrect changes to the Registry can make your computer unusable. If you use this method, beside the system and data backups mentioned at the beginning of this Topic, you should also make a backup of the Registry and a backup of the area you intend to change.
The install of (upgrade to) Win10 Pro v2004 removed the Registry settings that represented the GUI pulldown deferral settings for Quality and Feature updates. So my question was, if I replaced those Registry keys, would they work?
Using Win10 Pro v1909, with the GUI settings stated in Section 4, I added the keys that were missing in v2004.
Normally, I do not have Quality Updates deferred, ie, value of 0 (zero). But for testing purposes, I changed the deferral to value to 5 days to verify it worked. It has been through one update cycle (June 2020). And, sure enough, the updates did not show up in the Windows Update queue for five days after release, and they obeyed the Group Policy setting for “notify download/install” by remaining in the queue and not downloading until the “Download” button was clicked. But more important, the added keys were not removed by the June 2020 updates.
So one way is to emulate to the GUI pulldown settings for deferrals (at least as long as Microsoft leaves them alone with future installs). See #2275038.
Method 2 – Using Group Policy under Windows Update\Windows Update for Business.
Group Policy setting under Windows Update – Configure automatic updates = Enabled, value 2 (notify download/install).
What this does is hold the updates in the queue until you click the “Download” button. Since the Quality updates are not deferred, they will show up in the queue immediately after release but will not download. If there are updates you do not want to install (MS drivers, microcode), you will SEE them. You can then use wushowhide to hide them. If they still appear in the queue after hiding, clear them from the update queue using the method in AKB2000013.
Group Policy settings under Windows Update for Business.
I do not configure to receive C-week, D-week, and E-week (or any “Previews”) released other than the Security Updates released on Patch Tuesday (=B-week = second Tuesday).
Care must also be taken here. “Preview Builds” refer to Insider Releases which are also not configured.
For deferrals:
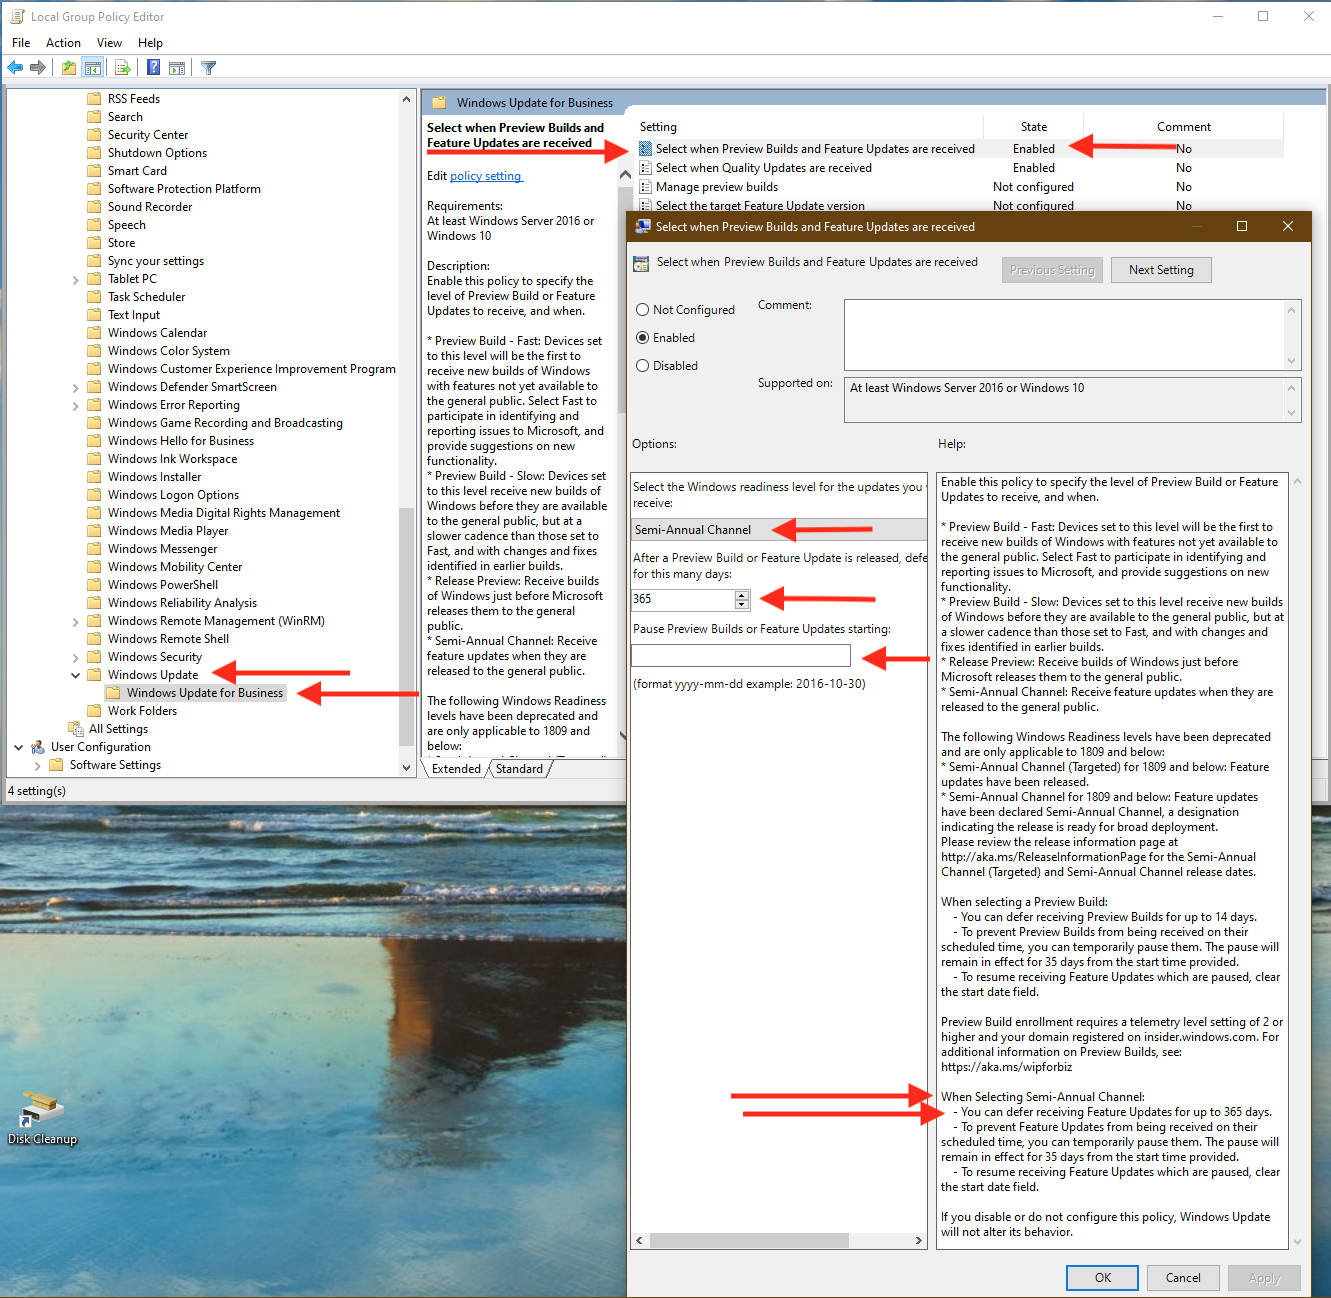
“Select when Preview Builds and Feature Updates are received” should be Enabled. Selecting Semi Annual Channel – allows deferring Feature Updates up to 365 days. I do not use any Pause settings here.
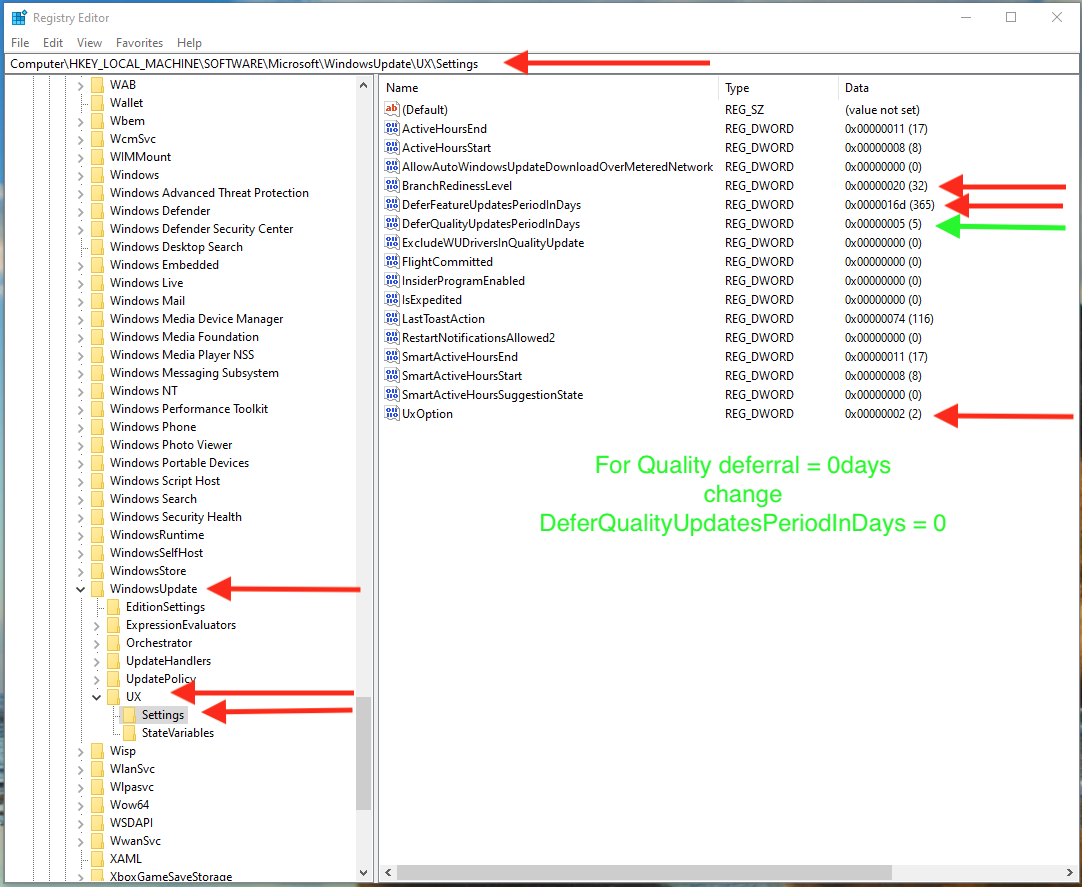
“Select when Quality Updates are received” if Enabled, I recommend using a deferral = o(zero) or just leave whole the setting “not configured.” That way, the updates show up in the Windows Update queue immediately so you know what is available, but they do not download if you use the “2”(notify download/install) setting until you click the “Download” button. If you use a deferral greater than zero, the updates won’t show up for the number of deferral days. The screenshot shows deferrals = 5 days. I do not use any Pause settings here either.
See #2275043.
+ Setting Target Release Version – This can be used to specify when Preview Builds and Feature Updates are received instead of using feature update deferrals. The settings can be made in several ways in Win10 Pro. (See screenshots in #2286499 below.)
You can make manual entries in the Registry, run PowerShell commands, or use the Reg File method, as described in Section 2 for Win10 Home.
But an easier way in Win10 Pro is using Group Policies. In Group Policy use these settings:
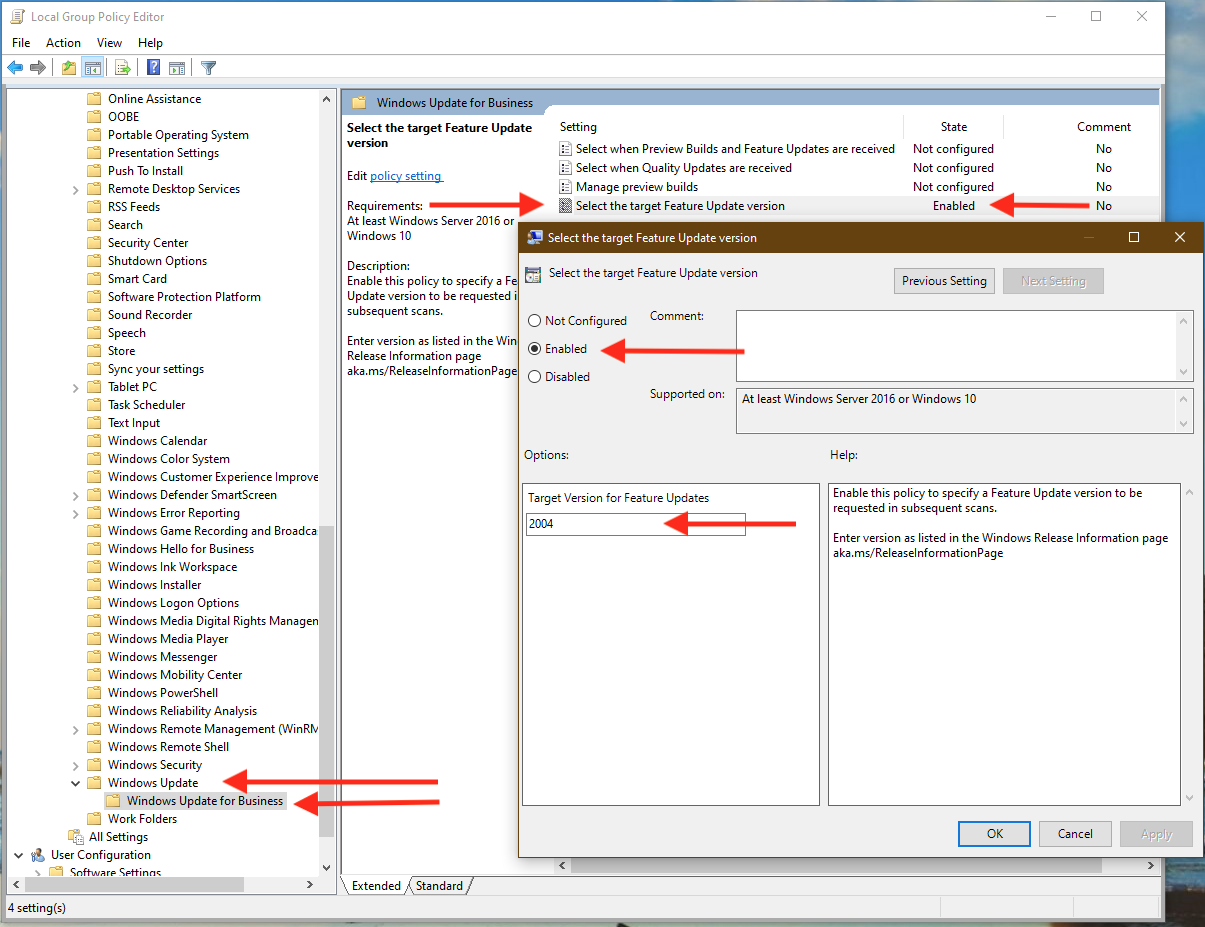
Computer Configuration\Administrative Templates\Windows Components\Windows Update for Business
Select the target Feature Update version = Enabled, Target Version for Feature Updates = 1909 (or whatever version you want to stay on, or upgrade to)
Making the settings in Group Policy will set the corresponding Registry settings in the proper location. So you do not need to use any of the other methods.
**NOTE: It should also be noted that if the device is not updated before it reaches EOS, the device will automatically be updated once it is 60 days past end of service for its edition. MS documentation.
**NOTE: When delaying version updates, you should choose either Feature Deferrals OR TargetReleaseVersion settings. You should not use both to achieve update control. If you use TargetReleaseVersion, you should also ***set deferrals to 0 0r 1 instead of 365 as shown in the second screenshot in #2275043. They are going to be ignored anyway.
Please read through the **NOTEd comments in Section 3 and 4 for some of caveats. They apply here too.
With these settings you do not have to keep fiddling with Windows Update. Deferrals are automatically reset. You can see what updates are pending, but they don’t download without your intervention. You can choose which upgrade you want and when to install it by simply lowering the deferral days appropriately. Or you can set the Target Release Version.
Please add your comments:
Comments on AKB 2000016: Guide for Windows Update settings for Windows 10
-
This topic was modified 5 years, 2 months ago by
.
-
This topic was modified 5 years, 2 months ago by
-
This topic was modified 5 years, 2 months ago by
-
This topic was modified 5 years, 2 months ago by
-
This topic was modified 5 years, 2 months ago by
-
This topic was modified 5 years, 2 months ago by
-
This topic was modified 5 years, 2 months ago by
-
This topic was modified 5 years, 2 months ago by
-
This topic was modified 5 years, 2 months ago by
-
This topic was modified 5 years, 2 months ago by
-
This topic was modified 5 years, 2 months ago by
-
This topic was modified 5 years, 2 months ago by
-
This topic was modified 5 years, 2 months ago by
-
This topic was modified 5 years, 2 months ago by
-
This topic was modified 5 years, 2 months ago by
-
This topic was modified 5 years, 2 months ago by
-
This topic was modified 5 years, 1 month ago by
-
This topic was modified 5 years, 1 month ago by
-
This topic was modified 5 years, 1 month ago by
-
This topic was modified 5 years ago by
-
This topic was modified 5 years ago by
-
This topic was modified 5 years ago by
-
This topic was modified 4 years, 11 months ago by
-
This topic was modified 4 years, 11 months ago by
-
This topic was modified 4 years, 9 months ago by
-
This topic was modified 4 years, 9 months ago by
-
This topic was modified 4 years, 9 months ago by
-
This topic was modified 4 years, 9 months ago by
-
This topic was modified 4 years, 9 months ago by
-
This topic was modified 4 years, 9 months ago by
-
This topic was modified 4 years, 9 months ago by
-
This topic was modified 4 years, 8 months ago by
-
This topic was modified 4 years, 8 months ago by
-
This topic was modified 4 years, 8 months ago by
-
This topic was modified 4 years, 8 months ago by
-
This topic was modified 4 years, 8 months ago by
-
This topic was modified 4 years, 8 months ago by
-
This topic was modified 4 years, 7 months ago by
-
This topic was modified 4 years, 5 months ago by
-
This topic was modified 4 years, 5 months ago by
-
This topic was modified 4 years, 5 months ago by
-
This topic was modified 4 years, 5 months ago by
-
This topic was modified 4 years, 2 months ago by
-
This topic was modified 4 years, 2 months ago by
-
This topic was modified 4 years, 2 months ago by
-
This topic was modified 4 years, 2 months ago by
-
This topic was modified 4 years, 2 months ago by
-
This topic was modified 4 years, 2 months ago by
-
This topic was modified 4 years, 2 months ago by
-
This topic was modified 4 years, 2 months ago by
-
This topic was modified 4 years, 2 months ago by
-
This topic was modified 4 years, 2 months ago by
-
This topic was modified 4 years ago by
-
This topic was modified 3 years, 11 months ago by
-
This topic was modified 3 years, 11 months ago by
-
This topic was modified 3 years, 9 months ago by
-
This topic was modified 3 years, 7 months ago by
-
This topic was modified 3 years, 7 months ago by
-
This topic was modified 3 years, 7 months ago by
-
This topic was modified 2 years, 8 months ago by
.