-
Don’t put all your admin eggs in one basket!
ISSUE 16.9.0 • 2019-03-11
 The AskWoody Plus Newsletter
In this issue
LANGALIST: Don’t put all your admin eggs in one basket!
OFFICE: One new Office app to rule them all
QUICK TIP: Quick fix for a broken Default apps list
WINDOWS 10: Making sense of Win10’s Storage Sense
BEST UTILITIES: Freeware Spotlight — DeviceTool
LANGALIST
Don’t put all your admin eggs in one basket!By Fred Langa

Losing administrator privileges to your PC will, among other things, leave you stranded — unable to make the repairs needed to restore full access.
But a few fixes — including a 20+-year-old hack! — might save the day. Plus: Easy steps you can take to prevent this from happening to you!
Lost all admin access; now what do I do?A common and innocent error made during Windows setup left this reader facing a potentially difficult repair.
- “How can I recover the lone administrator account on my Windows 10 PC? My account somehow lost its administrative privileges, and now I can’t even enter safe mode because I don’t have an admin password.”
Ouch. Unless you’re prepared for this kind of problem, recovery can be a tough slog. But, even in the worst cases, you should still be able to get your PC working again. Here are a few things to try.
Start with this ancient, deep-geek hackBelieve it or not, every version of Windows since Win95 has contained a curious back door that you can use to gain full administrator access — even if a PC’s accounts and passwords are mangled, unknown, or blocked!
(For earlier coverage of the origin, background, and use of this hack, see my Langa.com column, “How to hack a ‘back door’ into Win10, 8, and 7,” reprinted from Windows Secrets.)
The hack involves tricking Windows’ Recovery Environment (Microsoft info) into launching an admin-level command processor. From there, you can create a new, from-scratch admin-level account and then sign in to perform any admin-level task — including elevating a standard user account to full admin privileges. Here’s how:
First, working within your current, non-admin user account, make a backup of all your current data. Don’t do anything else until all your important user files are safely stored somewhere off the PC (e.g., in a cloud account, on an external drive, etc.).
Next, start your PC from an up-to-date Windows-installation drive or DVD. (If you need to create one, click over to Microsoft’s official Win10 download site and follow the instructions under “Create Windows 10 installation media.”)
On the first setup/installation screen, select your language, time, currency, and keyboard type. On the next screen, click Repair your computer to open the Windows Recovery Environment. Select Troubleshoot/Advanced options/Command Prompt.
OK, strap in — I’ll go fast in the next few steps. (If you need more-detailed help, see my Langa.com column, “Using Windows’ powerful ‘Recovery Environment,'” reprinted from Windows Secrets.)
- Typically, the Recovery Environment will temporarily change the system’s drive letters. So you’ll have to do some spelunking to locate what would normally be the C: drive.
- Navigate to the system’s original \Windows\System32 folder. For example, if the Recovery Environment has temporarily labeled the original C: drive as E:, you’ll go to E:\Windows\System32. (I’ll stick with E: for the following steps.)
- Type in ren sethc.exe sethc.bak to temporarily rename Windows’ built-in Sticky Keys ease-of-access app. (You’ll restore this renamed file later, when you return the PC to its original configuration.)
- Still in E:\Windows\System32, enter copy cmd.exe sethc.exe to create a copy of the standard command-window app (cmd.exe) with the name sethc.exe. (See Figure 1.) This way, when Windows thinks it’s launching Sticky Keys, it’ll actually be launching the command processor.

Figure 1. These simple commands are the heart of the hack. - Enter Exit to leave the command portion of the Recovery Environment.
- Reboot or select Exit and continue to Windows 10 to restart the system.
- Back at the Windows sign-in screen, press the Shift key five times in rapid succession (which would normally launch Sticky Keys). This time, however, a command window will open (because sethc.exe is now a renamed copy of cmd.exe).
At this point, you should be in a command window, mapped to the \Windows\System32 folder, and signed in as System — the highest possible privilege level — with full access to the machine.
- In the same command window, enter the following commands (see Figure 2) to create a new, full-featured, administrator account:
net user tempadmin /add
net localgroup administrators tempadmin /add
net user tempadmin 123456
The above commands create a new administrator account with the username tempadmin and the password 123456. Of course you’re free to substitute any username, and you should use a more-secure password than this simple example.
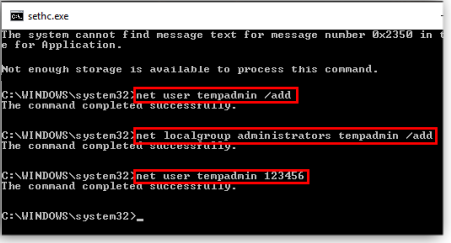
Figure 2. These commands create an unrestricted admin-level account with your choice of username/password (tempadmin/123456, in this example). - Reboot the system.
- When Windows starts, there’ll be a new account — called tempadmin in this example — on the sign-in page. It’s an utterly normal administrator-level user account with all the usual admin privileges.
- Select the new account and sign in with the password you created. When Windows is finished setting up the new account, carry out your repair/recovery/restoration activity — such as elevating your standard user account to administrator.
When you’re done, it’s time to clean up. Delete the bogus sethc.exe file you created and rename sethc.bak to sethc.exe. You can also delete the admin account you created to make your system repairs. But you don’t have to.
If the hack fails, don’t give up!There are other ways to try to restore your admin-level access.
If you have a Win10 Recovery Drive: Do you have a previously created, formal Win10 Recovery Drive (MS info)? If so, boot your PC from that drive (not from the C: drive), and follow the on-screen prompts to try restoring your system. The Recovery Drive may ask for your admin password; supply the password you used when creating the Recovery Drive.
The drive should then be able to restore your system to its earlier, working condition. You can then bring your user files up to date using the backups you just made — and update or reinstall any apps that the Recovery Drive didn’t restore for you.
If you have a complete system image/backup available: Use whatever means your imaging/backup tool requires to restore your PC to the condition it was in when the image/backup was made. If you’re asked for an admin or app password, enter the password in use when you created the image/backup. The imaging/backup software should then be able to restore your system to a previously working condition. You can then restore your user files from the backups you just made, and update/reinstall apps as needed.
If you have bupkis: Many users still don’t keep complete or recent backups, and they never get around to making an up-to-date Recovery Drive. If that’s you, and if the aforementioned hack didn’t work, all that’s left is this last and rather ugly option: reinstall Windows and still protect your user files from deletion.
Done properly, and using fresh installation media (from the official Win10 download site, as described above), you won’t need an admin password. And Windows will automatically try to preserve and carry over your user files from the current, broken setup. Here’s how you do it:
- Boot your PC from the installation media. Eventually, the Windows Setup app will open.
- Select the Install option when it’s offered (usually the second screen after boot).
- Follow Setup’s on-screen prompts, making sure the proposed new setup mimics the setup you previously had. In particular, on the Where do you want to install Windows page, make sure Setup re-uses the same disk/partition that contains your broken Windows installation (see Figure 3). That way, Setup will move your old files to a new folder called windows.old.
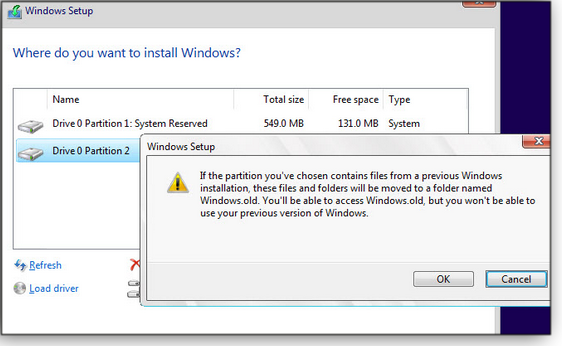
Figure 3. Reinstalling the new Windows on top of the old should automatically preserve files from the previous setup.
When you’re asked to sign in, try using your previous name and password. But don’t worry if it doesn’t work: just create any new user account — maybe call it NewAdmin, for clarity. Once Setup is finished, you can sign in to and use this new admin account to set up whatever other user accounts you wish — in any way you desire.
When the new Windows setup is complete, and you’re back in an admin-level account, open File Explorer and navigate to the windows.old folder. From there, you can access (or move/copy/whatever) your old files, as desired. (If there’s any problem with the files in windows.old, you can restore from the backups you made earlier.) You can also update/reinstall any apps, as needed.
Prevent this problem from happening on your PCThe best prevention for getting locked out of your system is to create a non-administrator, standard user account that you use as a “daily driver.” Sign in to your original, admin-level account only for maintenance and repairs. (Using a standard account for most of your activities can also help reduce your exposure to malicious attacks.)
Also, if you created a new emergency admin account, leave it in place — or activate and un-hide Windows’ hidden master Administrator account (see references, below); you’ll then always have at least two admin-level accounts available.
And you’ll no longer have all your administrator eggs in one basket!
Additional resources:
- “Activate Windows’ hidden, master admin account” — reprinted from the original May 14, 2015, Windows Secrets article, here you’ll learn how to activate, access, and use Windows’ built-in and separate Administrator account to give you unfettered access to virtually all parts of your system setup.
- In a pinch, also try the steps described in an old Windows Secrets reprint, “Exploring Windows’ Administrative Tools: Part 1,” and this MakeUseOf.com article, “3 Ways to Reset a Forgotten Windows Administrator Password.”
Send your questions and topic suggestions to Fred at fred@askwoody.com. Feedback is also always welcome in the AskWoody Lounge! Fred Langa has been writing about tech — and, specifically, about personal computing — for as long as there have been PCs. And he is one of the founding members of the original Windows Secrets newsletter. Check out Langa.com for all Fred’s current projects.
OFFICE
One new Office app to rule them all
By Lance WhitneyMicrosoft has a new app in town that can help you track down, access, and manage your Office applications and documents.
Known simply as Office, the app is an updated version of the old My Office utility. It’s a useful tool — especially if you rely on OneDrive for file storage and sharing.
Whether you use Office 365, Office 2019 and earlier versions, or the free Office Online, the new Office offers one location for launching other programs in the suite (Excel, Word, Access, etc.), opening recent documents, uploading files to OneDrive, and more.
Off to a bit of a rough startOffice debuted this past February but immediately ran into a glitch — it wouldn’t always install properly. In my case, it worked on one Win10 computer but failed on two others. I kept getting the My Office version instead.
Fortunately, Microsoft seems to have quickly fixed the problem; I was eventually able to get the updated version working on all my PCs.
If you still have My Office installed, it should update automatically to the Office app. If you want to snag it online, click the app’s Microsoft Store link to download and install a copy. (There doesn’t appear to be a version for Office on the Mac.) To open the app, click the Start menu and look for “Office” in the Recently added section, or down in the “O”s in the All apps list.
A more useful control panelRight off the bat, I noticed that Office‘s home screen looks cleaner and friendlier than the old version’s. At the top are icons for the entire Office suite — Word, Excel, PowerPoint, OneNote, Outlook, Access, and the others. Just click an icon to launch its application.
It’s handy that Office works for any flavor of Office suite. Whether you have the one-time-purchase version of Office (e.g., Office 2016 or Office 2019) or the subscription-based Office 365, Office first tries to launch any locally installed suite app. If one isn’t installed, Office will grab the appropriate program from the Web. Below the application icons is a Documents section, where you can quickly access recently opened files (see Figure 1).

Figure 1. Office lets you quickly open specific suite apps and recently opened documents.Office‘s biggest flaw is its myopic focus on OneDrive for document storage. And related to that, the app doesn’t like being disconnected from the Internet. By default, it really wants to open documents from — and save documents to — OneDrive. However, files that are on the “Recent” list but not stored in OneDrive can be saved anywhere you like.
To open a file that’s not on the list, you scroll down and click either the “Show more” or “More in OneDrive” link. Those are your only options; there’s no File Explorer window you can open to navigate elsewhere on your hard drive. Clicking “More in OneDrive” will typically take you to the online version of OneDrive — and clicking, say, a Word doc could open the online edition of Word. Once again, Microsoft seems obsessed with pushing everyone to use online OneDrive as the default file location for Office.
Moreover, on at least one PC, when Office was launched while the machine was offline, the suite icons repeatedly failed to appear. And popup boxes warned that the app needed the Internet. You may still be able to use certain features in the app, but the document shortcuts might not work or even appear in the list.
To access a file — a spreadsheet, for example — that’s not on the Recent list and not in OneDrive, you need to open the suite app (e.g., Excel) and use its Open dialog box. Clearly, Microsoft needs to tune Office to work better offline.
The official Office way of opening a file that’s not in OneDrive is to click “Upload and open.” But that puts (and thereafter saves) the active version of the file in OneDrive. You can’t then save it elsewhere, except as a copy.
You do have some control over opening recent documents. Right-click on any file, and a popup menu (see Figure 2) gives you a few choices. You can opt to open the file with the local Office application or with the online version. You can also remove a file from the Recent document list or pin it for quicker access. (Note that files stored outside of OneDrive cannot be pinned!) Some files show an additional option: “Open file location.”
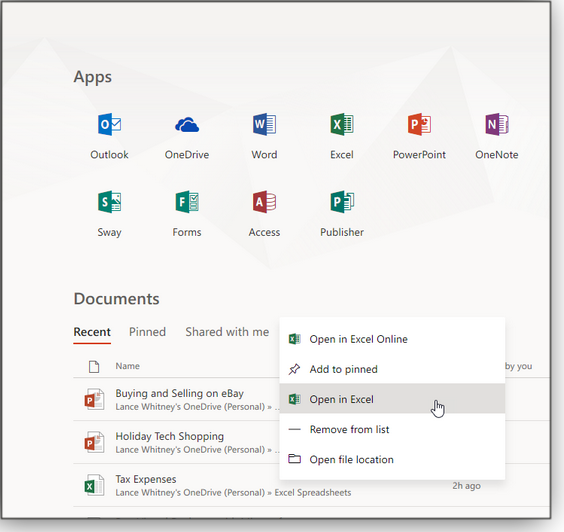
Figure 2. Right-clicking a Recent file gives additional options.Pinned files will show up in the “Pinned” list, next to Recent (see Figure 3). This gives you a handy way to quickly access files you open often. As its name suggests, the third “Shared with me” section displays Office documents that other people have shared with you. But, again, this all assumes that files are stored in OneDrive.
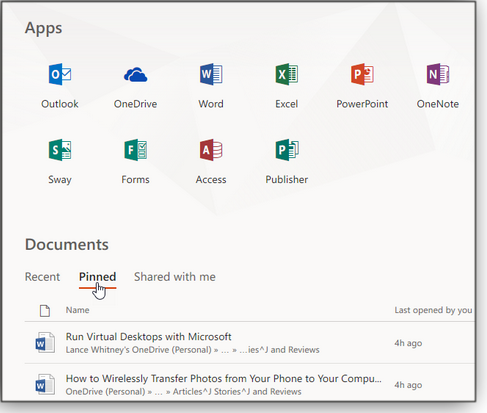
Figure 3. Pinning provides a fast way to access frequently used files.You can create a new document from Office. Click the New button, and you can start a new Word document, Excel workbook, PowerPoint presentation, Forms survey, or Sway page (see Figure 4). It’s a quick way to launch a suite app and open a blank doc. And from there, you can save the file anywhere you like — as long as the app’s AutoSave option is turned off. The file will then show up on Office‘s Recent list, where you can open it again, regardless of whether it’s in OneDrive.
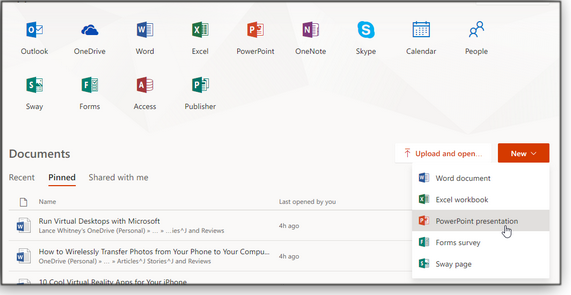
Figure 4. The New button pops up a new blank document.As we know, Microsoft is pushing hard to move all users to Office 365. So it’s not surprising that there’s an Install Office link (see Figure 5). That might be handy when adding the suite to a machine that doesn’t yet have it. Clicking the button takes you to your online MS Account/Office 365 page. If you don’t have Office 365, a “Buy Office 365 button” appears, which takes you to an online page to purchase a subscription.
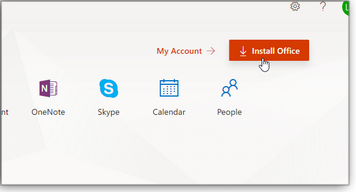
Figure 5. Office includes a button to install Office 365 on the local system.Finally, if you do have an Office 365 subscription, you can easily access your online account page from the app — simply click the link “My Account.” There you can view and manage your Office subscription as well as your Windows devices, payment and billing options, security, privacy, and other settings.
The Office app certainly isn’t perfect. Foremost, Microsoft needs to give it less of a OneDrive focus. You should be able to find and load any Office documents from your PC, whether they’re in OneDrive or not and whether you’re connected to the Web or offline. Still, it’s an improvement over the old My Office app and a helpful way to access your Office programs and documents.
Questions or comments? Feedback is also always welcome in the AskWoody Lounge! Lance Whitney is a freelance technology reporter and former IT professional. He’s written for CNET, TechRepublic, PC Magazine, and other publications. He’s authored a book on Windows and another about LinkedIn.
QUICK TIP
Quick fix for a broken Default apps list By TB Capen
For most Windows users, Microsoft’s choice of default apps for different file types isn’t our choice.
For example, many of us want Chrome or Firefox as our default browser(s) — not Internet Explorer or Edge. Unfortunately, it often seems that Microsoft is trying to impose Edge upon us.
I won’t go so far as to say it was intentional, but recently I had a problem with Edge popping up to display HTML files, when I wanted them to show up in Firefox.
Usually, you can fix that relatively easily by clicking Start/Settings/Apps/Default apps. You then select the category, click the displayed app, and choose the new default from a drop-down list (see Figure 1).
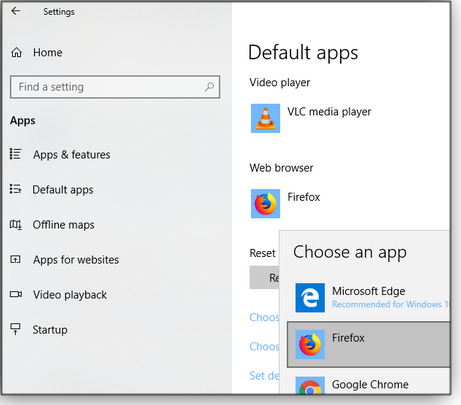
Figure 1. It usually takes just a few steps to set your default apps in Win10.So it was quite surprising — and frustrating — when Windows refused to accept my changes. Edge was set as my default browser, and after I selected Firefox, Edge was still my default browser. Almost none of the other categories would change, either. I couldn’t change Mail to Outlook, for example. Something was seriously and annoyingly broken.
Fortunately, after a bit of online research, I found the easy — though extremely unintuitive — solution:
You click the Reset button (see Figure 2).
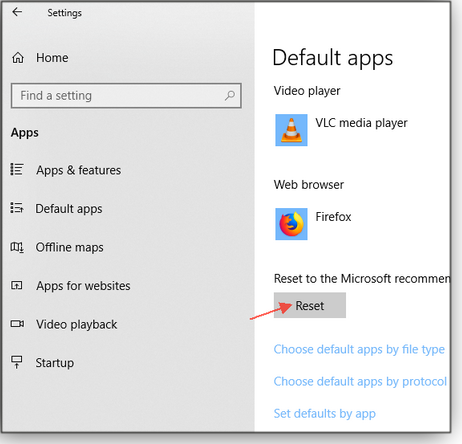
Figure 2. Clicking Reset can quickly fix a broken Default apps list.Reset is designed to return all defaults to Microsoft’s recommendations. So clicking it to fix the Default apps function defies logic. But apparently it repairs a broken list. Yes, even though all the apps switched to those Microsoft wants you to use, I was then able to change each category to what I wanted. Case solved.
Questions or comments? Feedback is also always welcome in the AskWoody Lounge! TB Capen is the editor in chief of Windows Secrets.
Windows 10
Making sense of Win10’s Storage Sense By Michael Lasky
There’s an old saw that nature abhors a vacuum. Which might explain why you’re inevitably going to run out of hard-drive storage space.
A better explanation is that we’re just storing more stuff on our PCs, and files are getting bigger. How much space is consumed by your music, photos, and videos? Undoubtedly, more than you think.
Apps are also getting more bloated by the year, and, ironically, the storage outfitted on new PCs — especially laptops — is actually shrinking, as we move from terabyte hard drives to gigabyte-sized SSDs.
And then there’s all the stuff that’s long forgotten or seldom accessed.
Microsoft should know of this problem better than anyone; its applications have a well-deserved reputation for being in serious need of a bit diet. [Word 2016, anyone?]
Perhaps that’s why, in a moment of self-awareness, the company gave the latest versions of Windows 10 a feature named Storage Sense. It’s a tool that can automatically remove loads of unneeded files that soak up precious storage space.
Storage Sense is the most recent addition to a group of data-space-maintenance facilities built into Win10. Longtime Windows users will, of course, have utilized the classic Disk Cleanup tool, accessed by right-clicking a drive in File Explorer and then selecting Properties/General.
In Windows 10, that tool has been largely supplanted by the Free up space now link in Settings/System/Storage. Old-school, new-school: it’s your choice.
What sets Storage Sense apart from the other tools is automation — it operates mostly in the background, without user intervention.
Start with Win10’s storage road mapBefore applying Storage Sense, let’s get a visual inventory — or map — of what’s consuming space on your hard drives. You’ll then be forearmed as to what can be moved off or eliminated completely when switching on and configuring Storage Sense.
On the Settings/System/Storage window, you’ll first see a familiar list of local drives with bar graphs of usage and overall capacity, as shown in Figure 1 — similar to what you see when you double-click This PC in File Explorer.
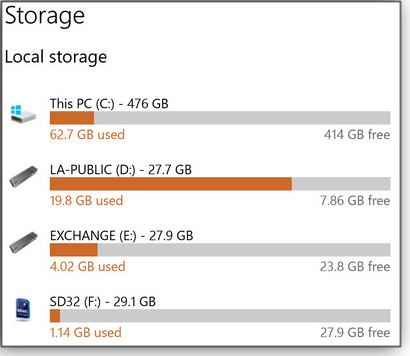
Figure 1. In Storage, the Local storage section shows the storage status of attached drives.Click any of the listed drives, and you get a detailed breakdown of the space consumed by various file types. Figure 2 shows an example of one Win10 system’s C: drive.
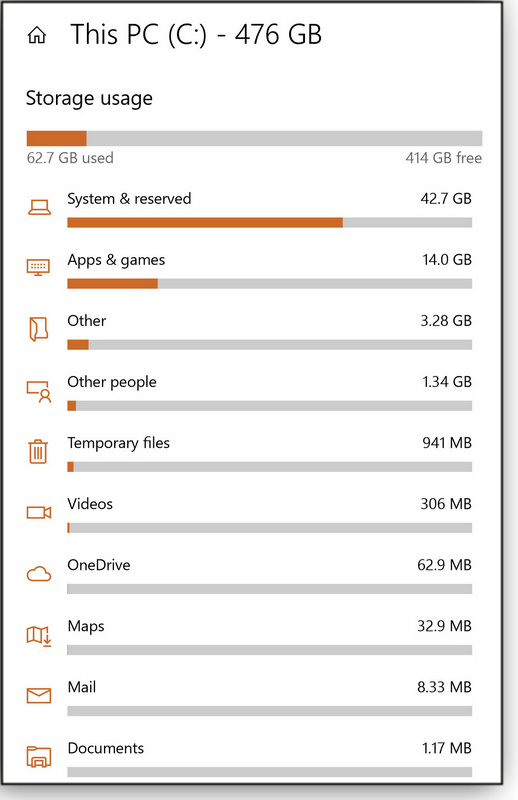
Figure 2. Windows 10 can quickly show you what types of files are using the most space.With this information in hand, you’ll have a good idea of what files are taking up too much space — and what can safely be dumped when you switch on Storage Sense.
How to master Storage SenseTurning on Storage Sense isn’t complicated — you just flip a switch in the Storage window. But you can proactively customize what it would otherwise delete by default. Storage Sense will usually seek out and remove temporary files, most of which are stored in hidden nooks and crannies on your drive. And by default, it goes after files left in the recycle bin more than a month.
But you can instruct Storage Sense to automatically delete these obsolete files every day or after 14 days or even 60 days (see Figure 3). Then there are those moldering downloads. It will automatically eighty-six these when they have been around for 30 days. Or you can change this interval from one day to 60 days.
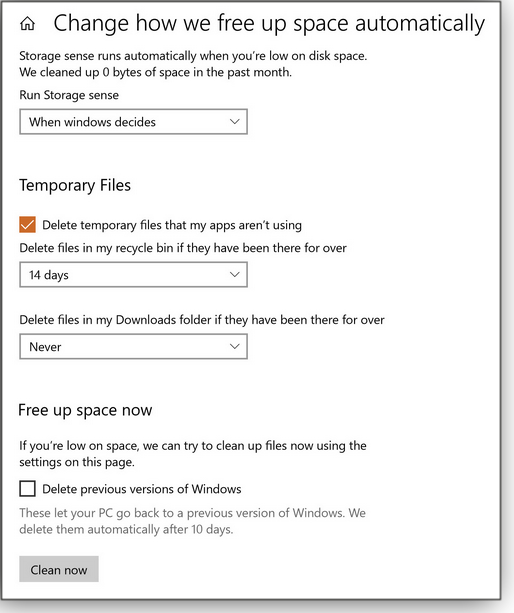
Figure 3. Storage sense lets you set how often the recycle bin is emptied.You might be surprised that bulky old versions of Windows can remain on your PC long after you’ve upgraded. Storage Sense will automatically dump older versions when a new one is found and in use. Just check the box in the “Free up space now” section. (Note: Reinstalled Win10 can create a windows.old folder, which can hold data files. You might want to keep that folder around for a while.)
Again, Storage Sense is designed to run automatically and in the background. But you do have some control over when it runs. The default is “When Windows decides,” though you can change that to every day, week, or month.
Tell Windows where to stuff itTo prevent future storage crunches, Windows lets you customize where specified file types should be saved. That’s particularly useful when you have external drives attached, be they Flash drives, external hard drives, or SD cards.
In Settings/Storage, click the “Change where new content is saved” link, in the More storage settings section. Redirected file types include apps, documents, music, photos/videos, movies/TV shows, and offline maps (see Figure 4).
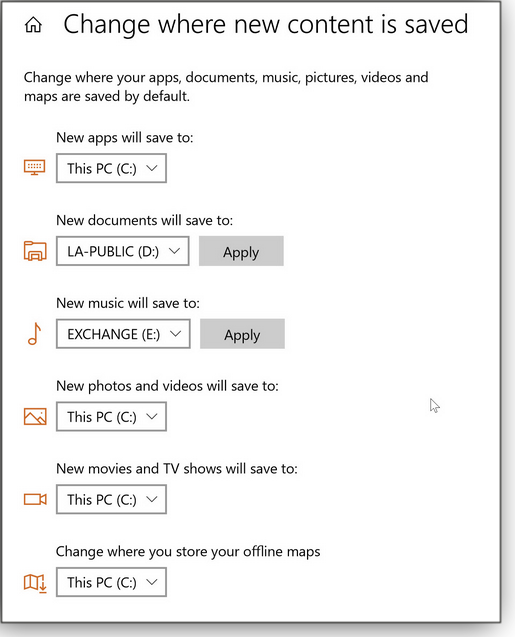
Figure 4. The Change where new content is saved window lets you better manage storage across drives.Under each of these categories is a drop-down menu of locations, though the choices are limited to the drives currently available.
This feature can be handy in that it prevents data accumulation on your PC’s main drive. And it’s particularly convenient for managing the limited storage on laptops. Note, however, that files are sent only to the root directory of each drive, and not to particular folders on the drives. So you’ll probably have to move them later to the folders you really want to save in.
The photo finish: Phone to PC storageYes, photos are often one of the biggest space hogs on smartphones — and on your local hard drive. One of the handiest solutions for photo storage is a dual USB/Lightning-port flash drive, of which there are now many. Since these drives work in either direction, it’s easy to offload phone images to your PC drive or vice-versa.
The Kingston Bolt (Amazon info, see Figure 4), for example, is a dependable choice and comes in various capacities from 32GB to 128GB. Its associated iPhone app can automatically save all photos off a phone; you can then move the images to a PC or other storage device via USB. Prices for these dual drives start at around U.S. $30.
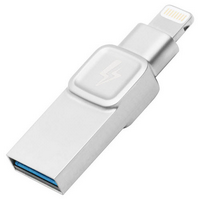
Figure 4. The Kingston Bolt flash drive has both Lightning and USB connectors.I’ve found it convenient to send documents and other files to the Bolt as well, especially with the larger-capacity drives. But again, the Bolt is just one example of many similar drives, some designed for Android phones as well. Even if you aren’t transferring files from device to device, keeping any type of external USB drive attached to your PC is a smart way to archive off infrequently used files and keep your PC hard drive less cluttered.
Questions or comments? Feedback is also always welcome in the AskWoody Lounge! Michael Lasky is a freelance writer based in Oakland, California. He has over 20 years of computer-magazine experience, most recently as senior editor at PC World.
Best Utilities
Freeware Spotlight — DeviceTool
By Deanna McElveenAnyone who’s tinkered with the backend of Windows knows that Device Manager is a key troubleshooting and maintenance tool.
But it’s only local. How about a Device Manager that works on remote systems?
Let’s say you’re a sys admin who needs to disable certain devices on a group of remote machines. Or maybe you’re a parent who wants to disable a Wi-Fi adapter to bring the late-night YouTube session upstairs to an abrupt halt. Now there’s some unchecked power!
There’s an app for that. Lugrain Software’s Bjoern Schmidt has published DeviceTool, a device manager you can use on networked computers. It’s totally free for personal or commercial use.
Not plug-and-playReady to download and run DeviceTool? No! You’re not. There’s some setup you need to apply before you can access remote systems — more specifically, you must open a few ports first. It’d be a scary day at the office if anyone could download this tool and start messing with each others’ machines without doing some admin-level stuff first.
To start, download the app from its OlderGeeks.com page and unzip it. The utility runs on Windows Versions 7, 8, and 10 and Windows Server 2008/2012/2016 (32- and 64-bit). Your computer will also need at least .NET Framework 4, which is included on Win8.1 and Win10 machines and found on most Win7 PCs. (If the program doesn’t start, it’s most likely because you don’t have .NET 4 or higher installed.)
Next, grab Microsoft’s PsTools from the Sysinternals download page. You’ll need only the PsExec.exe file from the downloaded ZIP file. Place it in the DeviceTool folder.
Here’s where we get a bit into the weeds. You’ll need to use Microsoft’s Windows Management Instrumentation (WMI, more info) to manage the remote systems. And to do that, you need to have port 135 open on the client system you want to control. Use these online instructions to manually create an “Inbound (only) port rule” for opening port 135 on the remote system’s firewall.
If all you want to do is view the devices, you’re done! To actually enable or disable devices remotely, you must also open port 445 or port 139.
To have access via your entire domain, configure the following Group Policy setting on the domain server:
Computer Configuration / Policies / Administrative Templates / Network / Network Connections / Windows Firewall / Domain Profile / Windows Firewall: Allow inbound remote administration exception
Naturally, you’ll probably want to restrict this change to just a single machine or subnet using the options box.
Now you’re ready to fire up DeviceTool. Right-click DeviceTool.exe and run it as an administrator. Don’t skip the admin part, or you won’t be able to do much of anything. (Note that DeviceTool is simply a graphical interface for running WMI scripts.)
You’ll notice that DeviceTool looks much like the classic Windows Device Manager (see Figure 1) — but with a bit more info about each device.
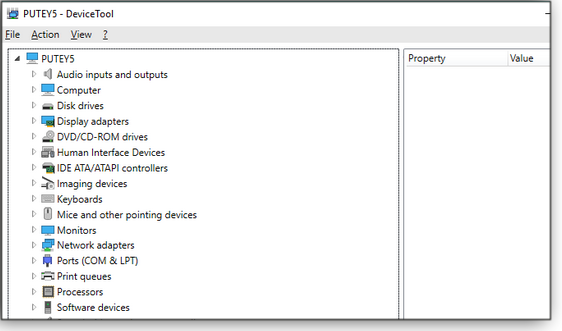
Figure 1. DeviceTool should look familiar to any experienced Windows user.Type in the name of the remote computer and hit the Start button (see Figure 2). Clicking View and then checking “Advanced view” will display not just the machine’s Windows edition but also the build-and-release version. (It works for both local and remote systems.)

Figure 2. DeviceTool provides detailed info about local and remote PCs.When you’re connected to a remote system, you can find a device and right-click to disable/enable it (see Figure 3) — just as you would using Windows’ Device Manager locally.

Figure 3. DeviceTool’s options for installed devices are similar to Device Manager’s.That’s it. It’s a handy tool — once you get through the port setup. And a fine way to avoid leaving your chair!
Questions or comments? Feedback is also always welcome in the AskWoody Lounge! Deanna and Randy McElveen are celebrating 20 years in the computer business, seven years running OlderGeeks.com and 26 years of putting up with each other. Their computer store is in a small town in the Missouri Ozarks. Believing that happy customers are always the best advertisement, they hope to do it for another 20 years.
Publisher: AskWoody LLC (woody@askwoody.com); editor: Tracey Capen (editor@askwoody.com).
Trademarks: Microsoft and Windows are registered trademarks of Microsoft Corporation. AskWoody, Windows Secrets Newsletter, WindowsSecrets.com, WinFind, Windows Gizmos, Security Baseline, Perimeter Scan, Wacky Web Week, the Windows Secrets Logo Design (W, S or road, and Star), and the slogan Everything Microsoft Forgot to Mention all are trademarks and service marks of AskWoody LLC. All other marks are the trademarks or service marks of their respective owners.
Your email subscription:
- Subscription help: customersupport@askwoody.com
Copyright © 2019 AskWoody LLC, All rights reserved.


