-
Why can’t Microsoft reliably patch its own hardware?
ISSUE 16.27.0 • 2019-07-22
 The AskWoody Plus Newsletter
In this issue
WOODY’S WINDOWS WATCH: Why can’t Microsoft reliably patch its own hardware?
LANGALIST: Decoding a vague “Unknown Device” error
WIN10 TUTORIAL: Deciphering Task Manager’s App History
CONQUERING WINDOWS 10: Taking control of default apps in Win10
WOODY’S WINDOWS WATCH
Why can’t Microsoft reliably patch its own hardware?
By Woody Leonhard
You don’t need me to tell you that Windows patches are too often of, uh, questionable quality.
But the latest screw-up with Win10 Version 1903 and top-of-the-line Microsoft Surface Book 2 PCs really takes the cake.
In case you haven’t heard, Microsoft has announced that it is now blocking the upgrade to Win10 Version 1903 (released four months ago) … on its own hardware: the high-end Surface Book 2 machines. The explanation goes like this:
“The dGPU may occasionally disappear from device manager on Surface Book 2 with dGPU
“Microsoft has identified a compatibility issue on some Surface Book 2 devices configured with Nvidia discrete graphics processing units (dGPU). After updating to Windows 10 Version 1903 (May 2019 Feature Update), some apps or games that need to perform graphics-intensive operations may close or fail to open.”
“To safeguard your update experience, we have applied a compatibility hold on Surface Book 2 devices with Nvidia dGPUs from being offered Windows 10 Version 1903, until this issue is resolved.”
The Surface Book 2 with a separate graphics processor is the highest end of the high end of the product line. The least expensive model with a dGPU (located in the keyboard) lists for U.S. $2,000. If you’re plunking down that kind of cash for a fancy new notebook, you might expect that Microsoft would oblige by making its latest operating system, you know, work with the high-end machine. But no.
This isn’t a new problemA year ago, I posted an article in Computerworld about disappearing dGPUs on the Surface Book 2. At that time, it was unclear whether the failure was hardware- or software-related — but in either case, it was an all-Microsoft problem. Several people even threatened to sue.
It also wasn’t related to the new Win10 1903 release, which obviously wasn’t even around a year ago. To this day, I don’t know what caused the failures, nor is it clear to me how, or whether, the problem was actually solved. All I know for sure is that on March 19, 2018, a Microsoft agent named Greg posted this:
“We have completed our investigation and have published a set of drivers and system updates which includes a fix for this issue. This is now available in Windows Update.”
Except the problem has returned — and many users feel it was never fixed in the first place. There’s an MS Feedback Hub post (opens as an app) that’s now up to 4,055 upvotes. But there’s no indication how many of those upvotes were cast by users running Win10 1903.
But it is a big problemA month ago, complaints started pouring in again. For example, a Reddit thread includes dozens of recent and direct complaints. More complaints appeared in this thread — and this thread, and this thread. There’s a long tale of woe on the Microsoft Feedback Hub; just try searching for 1060 or 1050.
It all reminds me of the Surface Pro 4 debacle, where Microsoft steadfastly denied that the device’s screen constantly flickered — until more than two years later, when the company suddenly admitted that there was a problem.
Microsoft’s advice for owners of Surface Book 2s with a dGPU? Use this workaround:
“To mitigate the issue if you are already on Windows 10 Version 1903, you can restart the device or select the Scan for hardware changes button in the Action menu or on the toolbar in Device Manager.”
Just one problem. The fix apparently doesn’t work for many (dare I say most?) customers. The only way to truly fix it is to get rid of Win10 1903 by rolling back to or reinstalling Version 1809. If you upgraded to 1903 with the past 10 days, click Settings/Update & Security/Recovery and see whether “Go back to the previous version of Windows 10” is still available.
Microsoft took more than a month to block the upgrade to Version 1903 on Surface Book 2s, causing far more pain than was necessary.
Left hand, right hand, and Windows UpdateMicrosoft’s Surface business brings in more than $1 billion in revenue per quarter. You’d think it would have a few extra shekels to test its flagship hardware with its flagship software.
In particular, you’d figure MS would exhaustively test for a known bug that’s been declared “fixed” but which obviously is still for the dogs. Looks like they relied on their unpaid beta testers — again!
All the more reason to wait to install version upgrades, wouldn’t you say?
Questions? Comments? Thinly veiled prognostications of impending doom? Join the discussion about this article on the AskWoody Lounge. Bring your sense of humor. Eponymous factotum Woody Leonhard writes lots of books about Windows and Office, creates the Woody on Windows columns for Computerworld, and raises copious red flags in sporadic AskWoody Plus Alerts.
LANGALIST
Decoding a vague “Unknown Device” error
By Fred Langa
When device problems arise, Windows often produces frustratingly vague error messages.
That makes it difficult to know which device is actually causing trouble. But a little experimentation can usually isolate the problem and point toward a solution.
Plus: Why does Windows hide file extensions by default?
How to find a malfunctioning “Unknown Device”AskWoody subscriber Ray Dashner writes to ask about a chronic and hard-to-track problem that causes an error on every PC boot-up. He’s using Windows 7, but the same issue — and its resolution — can apply to other Windows versions as well.
- “When I boot my desktop (Win7 Home Premium), I always end up with an ‘Unknown Device’ in Devices and Printers. Properties tells me the Type is a Universal Serial Bus controller, and the error is ‘Port_#0003 Hub_#0010, Status: Windows has stopped the device because it has reported problems (Code 43).’ Can you tell me how to identify the problem and how to correct it?”
Don’t you hate error messages like that? How the heck are you supposed to know which of your PC’s ports is #0003 or which hub is #0010?
Even if your PC’s ports and hubs are clearly labeled externally, it might not help you because Windows can “remember” past USB connections. Depending on how things are set up, if you plug the same USB device into different ports at different times, Windows can create two separate records for it. (This is one way you can end up with a “Hub 10” when your PC probably doesn’t actually have that many.)
And a “Code 43” error message is almost a joke. According to this Microsoft support page, Code 43 is one of numerous Device Manager errors. All it means is — and I’m not making this up! — “the device failed in some manner.”
You likely won’t get help from Device Manager itself; Windows is notorious for using vague internal-naming conventions within the USB subsystem. For example, Figure 1 shows my PC’s Device Manager’s USB listings — chock-full of vague, duplicated, and minimally informative device names.
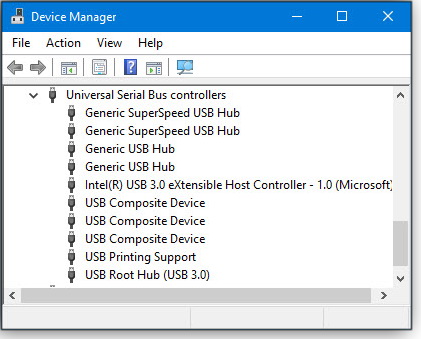
Figure 1. Device Manager provides almost no information on individual USB devices — just vague and generic names.When Windows can’t help, you have to resort to some manual troubleshooting. Fortunately, for this kind of unknown-device error, it’s not hard.
First, see if it’s simply a driver issue. Visit the support site for your PC and download/install the latest or last-available Win7 drivers for your USB hardware. If your OEM doesn’t offer a USB driver package separately, the drivers are probably in a “chipset” or “mainboard” driver package.
Next, update any available drivers and related software for your USB-based plug-in devices — e.g., printer, mouse, keyboard, external drives, and so forth.
Now reboot. If your PC starts without error, then it was just a driver issue, and you’re done.
OK … it’s probably not that simple. If there’s still trouble, unplug all your external USB devices and reboot the PC with no USB peripherals connected.
If the PC now starts error-free, one of your disconnected devices was the culprit. Try plugging them in one by one, with a reboot after each. You should then be able to identify which device is causing the problem — then take steps to upgrade or replace it.
But if the “unknown device” error still persists with no external USB devices attached, it suggests a serious mainboard, firmware, or other inside-the-case issue.
This isn’t good news, but it wouldn’t be all that unusual for a Windows7-era PC. Entropy always wins in the end; all PCs eventually wear out or fall out of support and need replacement or major refurbishment.
Of course, if your PC otherwise works to your satisfaction, you can always choose to live with the boot-time error for now. Not all problems demand immediate resolution.
But again, it’s way late in the game for Win7-era hardware — and for Win7 itself. If your experiments suggest an inside-the-case hardware problem, your best bet may be a full-on upgrade. In short: It may simply be time for a new PC!
The deep roots of a minor Windows annoyanceAskWoody Plus subscriber Henry Winokur asked an interesting question:
- “Hi Fred: How come — in all versions of Windows — the setting to show file extensions in Windows/File Explorer is turned off by default? I cannot for the life of me understand why MS does that. Shouldn’t it be hard-wired on, especially today?”
That setting reflects a user-friendliness convention that’s much older than Windows itself!
It actually dates back to some of the very first computer graphical interfaces developed at Xerox PARC (more info) back in the 1970s. Xerox’s early PCs (such as the Alto and Star) used interfaces you’d find somewhat familiar today, with a bitmapped display containing windows, icons, menus, and pointers. But even in those early graphical user interfaces, file extensions were generally not shown.
Key concepts from the Xerox interface — including “friendly” suppression of filename extensions — later appeared in succeeding systems such as Apple’s Lisa, the Mac, Windows, and Linux.
The whole idea of graphical interfaces was, and is, to make computers easy to use while requiring minimal knowledge or training. So then, as now, hiding extensions mostly made sense. Casual users almost never need to know about or manipulate file extensions, and they might even find them confusing. Why present information that most users don’t need or want?
That said, I’m with you, Henry! Like perhaps most advanced PC users, I prefer to always see file extensions. In File Explorer, it’s a one-time and extremely easy change for those users who want it (see Figure 2).

Figure 2. To show or not show file extensions in Win10’s File Explorer, simply click View; then tick or untick the box next to File name extensions.The setting is a bit harder to find in Windows 7. In Windows Explorer, select Organize in the toolbar and then click Folder and search options. Under the View tab, check or uncheck Hide extensions for known file types. There you go — your history lesson for the week.
Send your questions and topic suggestions to Fred at fred@askwoody.com. Feedback on this article is always welcome in the AskWoody Lounge! Fred Langa has been writing about tech — and, specifically, about personal computing — for as long as there have been PCs. And he is one of the founding members of the original Windows Secrets newsletter. Check out Langa.com for all Fred’s current projects.
Win10 Tutorial
Deciphering Task Manager’s App History By TB Capen
The most recent versions of Windows 10 feature a Task Manager with new capabilities.
But some of these new features are, unfortunately, poorly documented. One example is the App History tab, which provides interesting and potentially useful information about system-resource use.
When you open App History, you see a column of apps and rows of data on CPU time, Network use, Tile updates and more. You’ll also notice that all the data fields are empty. Give the utility a few seconds, and it will quickly fill in the blanks.
Another item to note is the start date for displayed information. At the top of the window, check out “Resource usage since [date] for current user and system accounts.” Below that is the link: Delete usage history. Pressing that link clears all the collected data, resets the fields to zero, and restarts the recording clock. You’ll notice that the “since” date is now today.
To get a better look at resource usage, click one of the column heads — CPU time, for example. You can change the display from lowest to highest or vice versa by clicking the column head again.
Selecting highest to lowest CPU time might give you a surprise. For example, why is Microsoft Photos seemingly consuming big chunks of the CPU’s work load on my system (see Figure 1)?
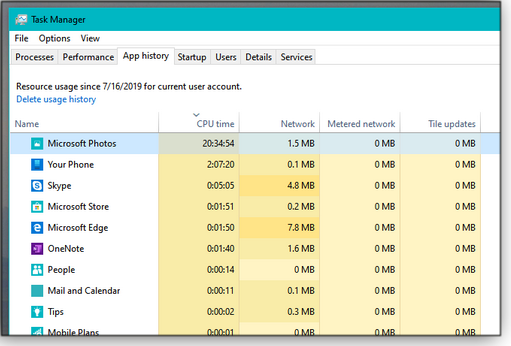
Figure 1. The basic App history window is limited to native Win10 apps.That puzzle might have been solved by a recent Win10 notification reporting that Photos had prepared new albums for my viewing pleasure (or words to that effect). Following a link to the app’s user settings (three-dot menu icon/Settings), I discovered that Photos was scanning images I’d stashed in OneDrive — and then automatically creating albums. I don’t use Photos; I use a more professional image editor. (Album creation was probably turned on by default — as was the People facial-recognition option.)
Another puzzle was the relatively high CPU number for the Your Phone app — something I will have to investigate. In any case, those are just two examples of Windows apps that can soak up system resources — probably unnecessarily.
Customizing App historyTwo fields that seemed rather useless on my system are Metered network and Tile updates, both of which showed little or no activity. The former might be useful if you’re using a cellular connection to the Internet; the latter might be helpful if you have a lot of live tiles running 24/7.
Fortunately, you can customize the displayed categories — somewhat. Right-clicking any column head opens a dropdown box of available titles. There, you can uncheck and check the topics you prefer (see Figure 2).
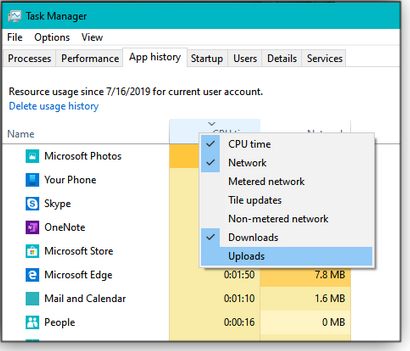
Figure 2. In this example, I’ve removed Metered networks and Tile updates, and added the more useful Downloads and Uploads.Another change makes App history considerably more useful. By default, the tool shows only native-windows programs, as shown in Figure 1. To include Windows services and third-party apps such as Firefox and Dropbox, click Options at the top of Task Manager and enable Show history for all processes.
What you’ll now see in App history might raise more questions than it answers. For instance, you’ll get numerous generically named stats for internal Windows processes, typically starting with “Host Process for Windows.” There’s really no apparent way to break down this information into something useful — e.g., time taken by search-indexing services and anti-malware scanning.
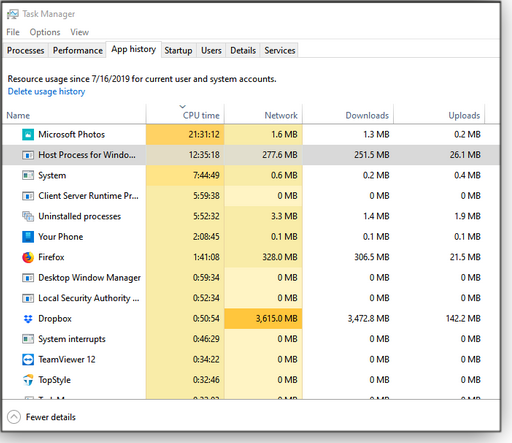
Figure 3. App history set to show resource usage by all apps and servicesStill, there is interesting data to be mined. On my system, TeamViewer is using a significant amount of CPU time. Yes, I have the app installed, but I’ve not used it for over a year. Probably time to uninstall it.
Another interesting data point: My installation of Dropbox is taking an extraordinary amount of network capacity. I’ve often worried that Dropbox has become a networking-resource hog — I might now have proof.
App history offers some flexibility on how quickly it gathers stats. At the top of Task Manager, click View and then Update speed. Your choices include High, Normal (the default), Low, and Paused. (This setting applies to the Process and Performance tabs, too.)
One of App history’s more confusing options arises when you right-click a particular service or application. In some cases, a small box labeled Switch to opens. Clicking it simply pops up the app on your desktop.
In other cases, you get two options: Search online and Properties. The first does just as you’d expect; it opens a search of the service/app on your browser. The second opens the Properties box shown in Figure 4. (For Windows services, the search and properties options are mostly of interest to advanced users and IT pros.)
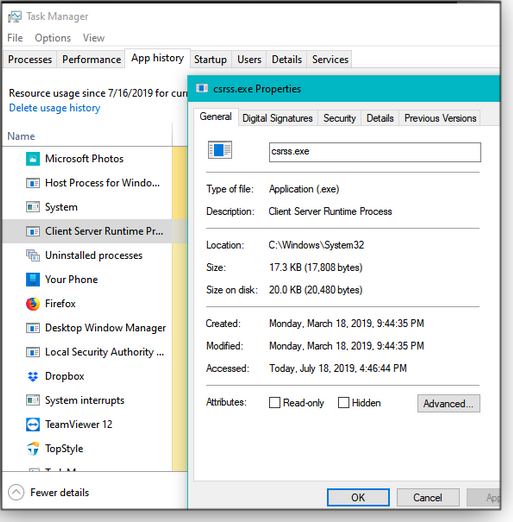
Figure 4. Only some of the listed services and apps in App history offer a link to their properties.Somewhat annoyingly, there’s no real explanation for why some apps/services get the simple “Switch to” box and others get the Search/Properties options. Even more imponderable, the Search/Properties options are, in some cases, grayed out.
App history is a useful tool to experiment with. Other Task Manager tools such as Processes and Performance give an immediate snapshot of system activity. App history can provide a longer-term view, showing those apps that are consuming significant system resources over days, weeks, or months.
Questions or comments? Feedback on this article is always welcome in the AskWoody Lounge! Capen is editor in chief of the AskWoody Plus Newsletter. He’s a veteran of InfoWorld, PCWorld, Corporate Computing, and the Windows Secrets newsletter. He lives on Winter Creek Farm.
CONQUERING WINDOWS 10
Taking control of default apps in Win10 By Lance Whitney
As with most things Windows, there’s more than one way to control or customize something — your preferred default applications, for example.
It’s also true that some Windows settings can be less than intuitive — or occasionally downright annoying. Here’s how to take full control over Win10’s default applications — or, when needed, select the best app for the task.
We’ve all been there: You double-click a file, but it doesn’t open with the application you want. Maybe it’s an audio or video file that you want to launch with Windows Media Player, but it opens with Groove Music instead. Or perhaps you click a link and Microsoft Edge opens, rather than Firefox or Chrome.
You can usually change that unwanted behavior via Win10 Settings — or in many cases, directly from File Explorer. And for more-complex situations, you can dig deep into Settings’ more-advanced options for fine-tuning which file types are assigned to particular applications.
With a bit of time and tweaking, opening any file will launch the right app.
Let’s start with the basics. In File Explorer, double-click a file to open it. If the association is set properly, the file will appear in the application of your choice. Sometimes, though, the associations for certain apps get corrupted or erased.
I’ve noticed that problem popping up occasionally after Office 365 updates; the file associations for Word, Excel, and the other programs get wiped out and have to be reset. When, say, you double-click on an .xlsx document, Windows asks how you want to open the file. If you’re in luck, the right application will be listed among the choices. Check the box Always use this app to open [file-type] files, select the app, and click OK (see Figure 1).
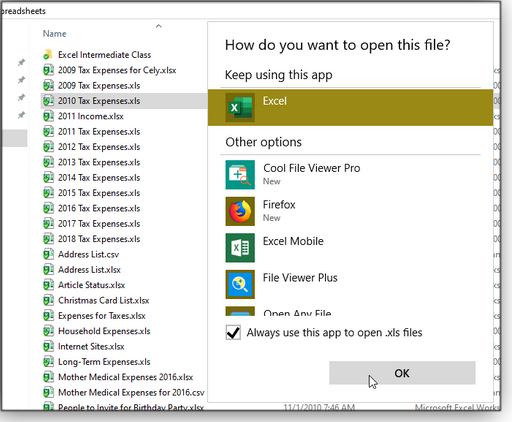
Figure 1. Windows 10 can occasionally lose track of common default apps, forcing you to reset them — in this example, Excel.If the right app is not listed, you’ll have to look at more choices. Scroll down the Other options list and click the More apps link. If you still can’t find the appropriate app, click the link Look for another app on this PC. That opens the Program Files folder in File Explorer, where you’ll have to search for the .exe file that launches the program you want to use.
If someone sends you a file in a type you’ve never used before, and a suitable app doesn’t live on your PC, another option offered here is to go to the Microsoft Store. With luck, you will find a suitable app there.
Another scenario: From time to time, you need to open a file with a different application than its default. For example, I typically open PDFs with Adobe Reader. But sometimes I need to edit a particular PDF, which requires opening it with the full Acrobat program. To do this, right-click on the file in File Explorer and select Open with … from the context menu. Then simply choose the preferred one-time application from the list of candidates (Figure 1). If Windows can’t offer a list of apps, it’ll open the How do you want to open this file? window.
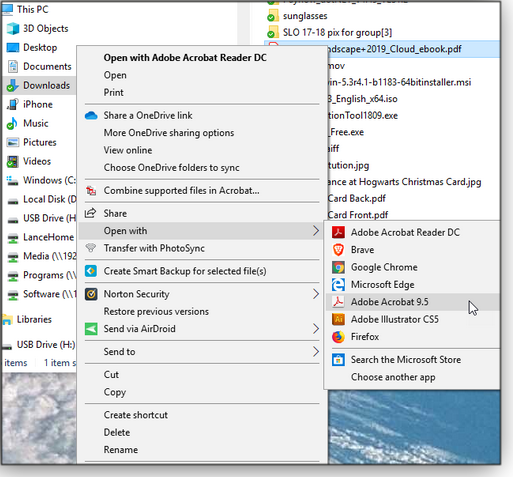
Figure 2. You can quickly choose an app other than the default by right-clicking a file and selecting Open with ….As you add new software, you might want to permanently change the default application for a certain file type. For example, I changed the default association for JPG images from Win10’s native Photos to Adobe Fireworks, since I frequently need to edit the photos. You can make that change in Settings, but you can also do so in File Explorer.
Right-click on the file and select the Open with option. Now, instead of choosing one of the listed apps, scroll down to the bottom of the list and click Choose another app. That takes you to the “How do you want to open this file?” window. There, you select the new default app and check the Always use this app to open [file type] files box.
You should be able to handle most file association changes through File Explorer. But there are times you’ll need to venture into the Settings screen to control your options. For example, maybe you want to change your default browser or music player. You can’t easily do that from File Explorer with a single file, because you want the app to manage multiple file types (e.g., PNG, JPG, RAW, etc.).
Instead of using File Explorer, go into Win10’s Settings and select Apps. Click the category for Default apps; Windows presents a short list of certain common app categories such as Email, Maps, Music player, Photo viewer, Video player, and Web browser (see Figure 3).
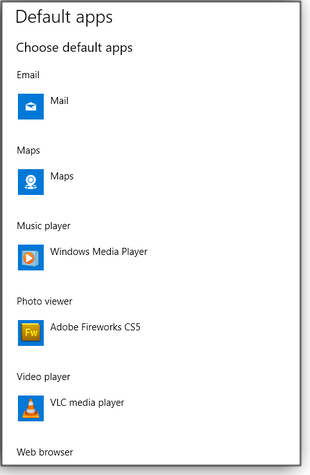
Figure 3. The Settings/Apps/Default apps window lets you set commonly used applications.Click the entry for Web browser. Windows presents a list of candidates, starting, of course, with MS Edge. But you should be able to choose any other installed browser, including Chrome, Firefox, and even Internet Explorer. (Yes, there are still people wedded to IE — you probably know a few.) You can also check out the Microsoft Store for more programs. If you see the program you want, just select it to make it the default (see Figure 4).
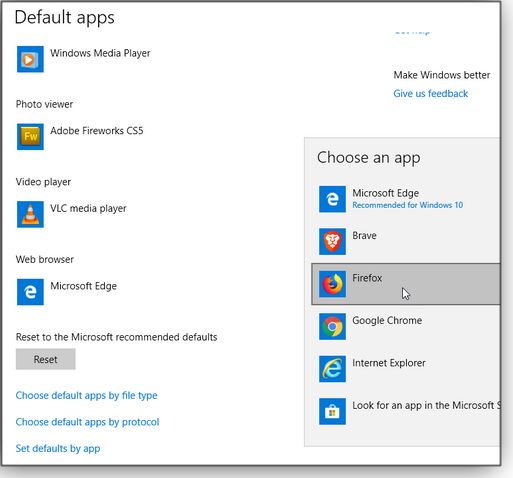
Figure 4. In this example, the Default apps windows lets you choose from a list of all installed browsers.Most apps handle a variety of file types. Photo viewers/editors, for example, can tackle JPGs, PNGs, TIFs, GIFs, and others. Media players can typically play AVIs, MOVs, MP4s, and so on. Windows often defaults to the same application for similar media or document types, but you might, for instance, want one app to open JPGs and another to open PNGs or RAW files. In that case, scroll down the “Default apps” window and click the Choose default apps by file type link. Find the extension you want to associate with a particular app in the list, click the currently associated program, and then change it to the new default (see Figure 5).
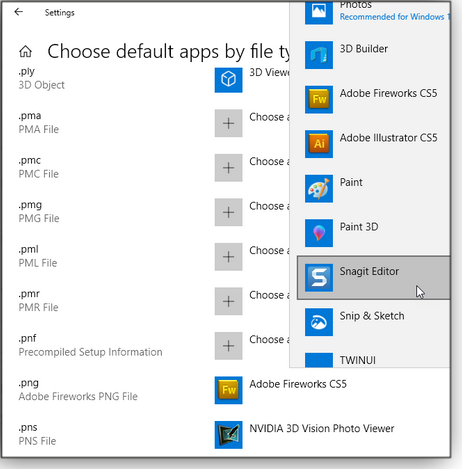
Figure 5. Use the Choose default apps by file type windows to associate specific file extensions with specific applications.You can also change an association based on something called its URL scheme. For example, you could change the MAILTO protocol in webpages to always use your default email app. Or set the HTTPS protocol to always open webpages in your default Web browser (see Figure 6). (I find little need to delve into this screen, as the other settings usually get the job done.)
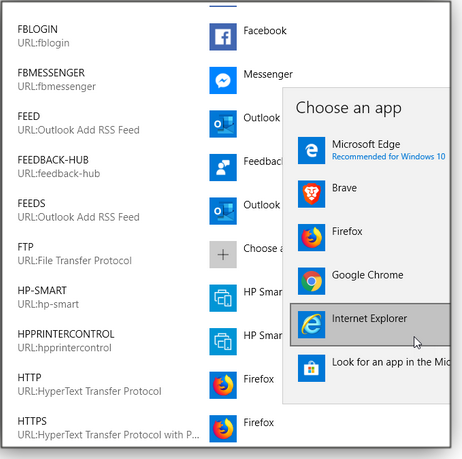
Figure 6. The Choose default apps by protocol window gets a bit deep into the default-app weeds.Finally, click the Set defaults by app link. As the title states, this window lets you focus on associations based on the app rather than the extension. Click the target app — Windows Media Player, for example — and then click the Manage button. You can now fine-tune the defaults for all associated video and audio files (see Figure 7), choosing Media Player for some file types and another program for others, as you wish.
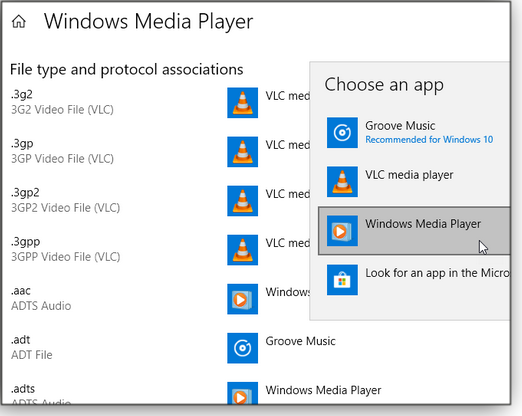
Figure 7. The Set defaults by app window lets you focus on file associations for a particular application.Like to go old-school? Win10’s legacy Control Panel still has a Default Programs section. However, most of the choices send you right back to Win10’s Settings. The exception is AutoPlay — clicking that link opens an extensive and detailed AutoPlay settings screen.
Troubleshooting tip: We mentioned this before in the newsletter, but it bears repeating. You might run into a situation where something gets corrupted and the Default apps window won’t let you make changes. One solution is to click the Reset button, which changes all defaults to Microsoft’s recommendations. But then you can go back and change the defaults to those of your choosing.
Questions or comments? Feedback on this article is always welcome in the AskWoody Lounge! Lance Whitney is a freelance technology reporter and former IT professional. He’s written for CNET, TechRepublic, PC Magazine, and other publications. He’s authored a book on Windows and another about LinkedIn.
Publisher: AskWoody LLC (woody@askwoody.com); editor: Tracey Capen (editor@askwoody.com).
Trademarks: Microsoft and Windows are registered trademarks of Microsoft Corporation. AskWoody, Windows Secrets Newsletter, WindowsSecrets.com, WinFind, Windows Gizmos, Security Baseline, Perimeter Scan, Wacky Web Week, the Windows Secrets Logo Design (W, S or road, and Star), and the slogan Everything Microsoft Forgot to Mention all are trademarks and service marks of AskWoody LLC. All other marks are the trademarks or service marks of their respective owners.
Your email subscription:
- Subscription help: customersupport@askwoody.com
Copyright © 2019 AskWoody LLC, All rights reserved.


