
|
Patch reliability is unclear. Unless you have an immediate, pressing need to install a specific patch, don't do it. |
-
Sticking with Win7? You aren’t alone
ISSUE 16.17.0 • 2019-05-13
 The AskWoody Plus Newsletter
In this issue
WOODY’S WINDOWS WATCH: Sticking with Win7? You aren’t alone
LANGALIST: How to safely remove vendor-installed junkware
BEST UTILITIES: Freeware Spotlight — USBFlashCopy
TROUBLESHOOTING: Use system images to fix major PC hassles
WOODY’S WINDOWS WATCH
Sticking with Win7? You aren’t alone
By Woody Leonhard
According to a new survey, a large percentage of responding enterprises won’t finish their Win10 rollouts by next January — the month Win7 hits the big bit bucket.
The study comes from a company with skin in the game — they sell security software — but the results ring true.
Adaptiva’s 2019 Windows 10 Enterprise Impact Survey received responses from 450 IT professionals, two-thirds of whom work in companies that each control more than 1,000 devices. The survey results are heavily skewed toward technology companies, but health, manufacturing, government, and educational organizations are also represented.
Adaptiva isn’t an unbiased observer; it sells “endpoint management and security solutions for enterprise IT,” and its flagship product is OneSite, a peer-to-peer updating tool. So take the results with, as they say, a grain of salt. Still, the results are interesting; highlights include:
- The big sites are moving to Win10 in part because it’s more secure (72 percent agreed), but also because it’s the only Microsoft-supported option (89 percent).
- However, only 14 percent say they’ve moved all their machines to Win10 already.
- An astounding 78 percent of the respondents said their companies will still be running Win7 machines after the January 2020 end-of-support date.
That’s a very big slice of a very large pie.
I’ve made it something of a hobby to ask businesses I deal with how well they’re handling the Win10 migration. Short answer: “You gotta be kidding!” Here’s a summary of what I’ve been told:
- There’s a large, multi-hospital/clinic/health professional organization near where I live that’s still relying heavily on Win7. Their plans call for a full migration in October, but everyone I talked to at the organization is dreading the day.
- There’s a large local retailer that can hardly keep its current systems working. Mention Win10 to their employees, and eyes start bulging.
- A big, nearby car dealership has switched its sales staff to Win10, but the back office remains staunchly tied to Win7.
- I was shocked to discover that even T-Mobile, the company that prides itself on technological innovation, is still running on Win7.
And so it goes. Many big companies will no doubt spring for one year of Extended Security Updates for Windows 7 (U.S. $50 per machine for Win7 Pro and $25 per unit for Enterprise). But that offer’s good only for organizations with volume licensing agreements. You and I need not apply. By year three, the price goes up to $200/machine for Pro and $100/machine for Enterprise. Ka-ching!
This is all happening in an environment where the quality of security patches keeps declining. I’m sure most of you are well aware of the antivirus debacle last month (Computerworld article), where six different Win7/8.1/Server patches conflicted with four different antivirus products, leading to bluescreens, slow-as-molasses starts, and general mayhem. As I said at the time:
“We can point the finger in a dozen different directions, but there’s one sad fact: Whoever decided to release these six patches either a) didn’t know or b) didn’t care that they’d brick millions of machines.”
It’s hard to say which of those two possibilities is worse.
Perhaps Microsoft’s only incentive to keep Win7 going a while longer is to cash in on corporations who were slow to migrate up. But Redmond has all sorts of reasons to move you and me to Win10 — reducing its unrecouped support costs for one, and getting a return in its Win10 investment for another.
If you’re still running Windows 7, there’s no reason to panic. Microsoft will continue to deliver patches (such as they are) through January 14 — that month’s regular Patch Tuesday.
More important, follow the MS-DEFCON guide on AskWoody.com and install your patches intelligently. Yes, you need to patch — but no, you don’t need to install patches as soon as they slide out the chute. It’s a continuing game of “Let’s wait and see what comes.”
My Seven Semper Fi machine is humming right along because I’m taking the obvious precautions: I don’t use Internet Explorer — it’s Chrome and Firefox for me. I have Microsoft Security Essentials running full time, with weekly (or so) manual scans with Malwarebytes. I use Chrome to work with PDF files, LastPass for my passwords, Gmail for mail, and 7-Zip for compressing/uncompressing files.
Java was banished from Seven Semper Fi long ago. If I must open an Office file from someone else, I never enable editing — and I’ve largely switched to using Google Docs and Sheets anyway. And I don’t click on anything dumb.
That last point is the most important, so I’ll repeat it: Don’t click on anything you don’t completely trust.
Hang in there. In six months, the patches will end but Win7 will keep on chugging. And remember: You’ll always have lots of support in the AskWoody forums.
Questions? Comments? Thinly veiled prognostications of impending doom? Join our discussion about this article on the AskWoody Lounge. Bring your sense of humor. Eponymous factotum Woody Leonhard writes lots of books about Windows and Office, creates the Woody on Windows columns for Computerworld, and raises copious red flags in sporadic AskWoody Plus Alerts.
LANGALIST
How to safely remove vendor-installed junkware
By Fred Langa
PCs almost always ship loaded with software you don’t want or need: apps, trialware, games, ads, and so on.
Here are several ways to root out the junk without losing anything important. Plus: How can you tell whether an “Update needed” warning is real? And is a virtual PC a bootable device?
Wants to be rid of pre-installed crapwareReader Vincent Pisano asks:
- “How do I uninstall a pre-installed program on a [major brand] computer running Windows 10?”
Vincent, I’ve just completed that annoying task for myself! I recently bought a new PC and spent some time stripping out all the junk software that came with it.
It’s not hard to do, but you must be somewhat careful about what you blow away. Some vendor-installed software is actually useful. For example, a vendor-specific video driver and its associated control-panel utility will often provide more options and finer control than Windows’ generic/built-in equivalents. In cases like that, it makes sense to retain and use the vendor-supplied software, so you’ll have access to all your hardware’s features.
That said, new PCs do include lots of nonessential “crapware” — unasked-for trialware, games, branded do-little utilities, ads, and other software that mainly waste space and get in your way.
It’s perfectly fine to whack away at that stuff!
There are two main approaches to cleaning out the junk, though they start the same way — with a system backup.
Make a full, just-in-case backup of your existing setup. Optionally (but strongly recommended), also visit your PC vendor’s support pages and download spare copies of all current drivers, manuals, utilities, and so forth. Store those copies somewhere safe — off your main hard drive — in case your cleanup accidentally deletes something important.
Now you’re ready to sweep away.
Begin with Win10’s two uninstall tools. Win10’s native Apps & features uninstall process focuses mostly on applications from the Windows store and other Win10-aware/optimized third-party software. The classic Control Panel Programs and Features uninstall handles legacy apps plus some drivers and other low-level software and components.
To uninstall via Apps & features: Click Start/Settings/Apps/Apps & features, and then review the list of apps on that page. Click any app you want to remove, then click the Uninstall button that will appear (see Figure 1).

Figure 1. Here, I’ve arbitrarily selected the Windows Store’s Amazon app for uninstalling, via Win10’s Start/Settings/Apps/Apps & features.To uninstall via Control Panel: Enter “control panel” into the Cortana/Search box and pick the app from the results list. In the Control Panel, click Programs and Features, then click on any app you wish to uninstall. Next, click the Uninstall button that will appear above the list, as shown in Figure 2 (or go old-school: right-click an app and then click the Uninstall box that appears next to it).
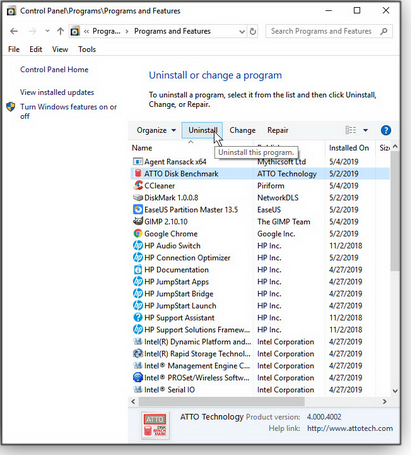
Figure 2. Here, an Atto Disk Benchmark tool is about to be uninstalled via the classic and familiar Control Panel\Programs\Programs and Features.If those methods let you uninstall all the apps that are in your way, great! You’re done — simple as that!
Unfortunately, not all crapware plays by Windows rules. If you want to really scrub your system clean — getting as close as possible to a fully native, baseline Windows — you can use Win10’s built-in Reset function.
Again, you’ll need a current, full, just-in-case backup plus spare copies of all current drivers, manuals, utilities, etc., downloaded from your vendor’s site.
When you’re ready, click Start/Settings/Update & security/Recovery. Next, click the Get started button under “Reset this PC” and then choose Keep my files. Once launched, this process will leave your user data intact but remove the third-party desktop apps and drivers that the vendor — or you! — installed. Windows will then re–set up your PC in a nearly default condition, using fresh files automatically downloaded from the Microsoft servers.
When the new, clean Windows setup is running, you can then reinstall whatever drivers and apps you need or wish. (For more info on the Reset process, see the LangaList article “Win7 upgrader seeks ‘no-reformat reinstall’ for Win10” in the 2019-04-15 AskWoody Plus issue.)
How can you tell whether an “Update needed” warning is real?Reader Ken Sandale asks:
- “Sometimes a box pops up on my computer screen asking me to get a security update. How do I know whether it’s real or malware?”
Excellent question, Ken. In fact, there are Trojan/malware attacks using that exact method to dupe the incautious. The dialog shows a message that appears to be from a trusted source (your PC maker or Microsoft or your bank, etc.) and invites you to click a handy link — which then activates the malware!
But it’s easy to avoid being duped. If you have even the slightest doubt about the legitimacy of any dialog box you see, dismiss/close the suspect dialog and go directly to the site of the company involved — or manually launch the appropriate support tool yourself. (If you can’t close the notification, you know it’s malware. If the box has a link, try hovering over it to see the full URL.)
For example, if you get a notice ostensibly from “Microsoft,” telling you that you need a security update, close the dialog and launch Windows Update, which should give you a legitimate answer.
Or, if you get an unexpected security alert from, say, your bank, dismiss the alert and manually click over to the bank’s site to see what, if anything, is really going on.
Or, if you get a notice from, say, your PC vendor stating your system needs an update, dismiss the notice and manually launch the support app that came with your system. Or go to the brand’s support site and use the tools there.
You get the idea. In no case should you blindly trust and click an unexpected dialog box or popup notification — especially one containing an external link! There’s almost always a direct way to see for yourself whether your PC (or OS or bank account or whatever) really needs updating or attention.
Is a virtual PC (VPC) a bootable device?VPCs take some getting used to — some of the concepts seem strange at first. For example, reader Tanzin asked:
- “Is it possible to make VirtualBox work as a bootable device, so as to have a second or multiple OSes? If so, then how?”
Nope. A virtual PC can boot only its own virtual hardware. By itself, it can’t do anything with a PC’s real, physical hardware.
Think of it this way: A VPC is really just an application. Yes, it’s a big, specialized, complex app that can emulate an entire PC — but it’s still just an app. Like all applications, a VPC is entirely dependent on the underpinnings provided by a host system — your real, physical PC and its operating system. A VPC can run only when the host hardware and OS are already fully up and running.
In short: A VPC, by itself, cannot boot an actual, physical PC.
Questions or comments? Feedback on this article is always welcome in the AskWoody Lounge! Send your topic suggestions to Fred at fred@askwoody.com. Fred Langa has been writing about tech — and, specifically, about personal computing — for as long as there have been PCs. And he is one of the founding members of the original Windows Secrets newsletter. Check out Langa.com for all Fred’s current projects.
Best Utilities
Freeware Spotlight — USBFlashCopy By Deanna McElveen
These days, it’s not hard to have desk-drawerfuls of USB flash drives and memory cards.
So many QuickBooks backups, too many favorite Win10 builds (the ones that didn’t crash!), and piles of wedding and birthday photos — all stashed on easily lost removable media.
And then there were those hundreds of vacation pics that inexplicably disappeared from that fancy camera’s massive memory card. Ouch!
Quick and easy memory-card backupsIt would sure be nice if you could just plug your flash drives and memory card into your computer and have them backed up automatically.
Well, you can!
USBFlashCopy is an awesome, portable utility from Imposant that automatically backs up flash drives and memory cards whenever they’re plugged into your PC.
To start the program, simply run usbflashcopy.exe, and it’ll show up on the taskbar/notification area (see Figure 1).

Figure 1. USBFlashCopy is a simple utility that loads onto the taskbar/notification area.When you plug in a drive or card for the first time, you get USBFlashCopy’s New media found dialog box (see Figure 2), where you give the device a profile so the utility will know what to do with it.

Figure 2. The New media found window lets you manage how USBFlashCopy handles flash drives and memory cards it sees.Choosing “New Profile” pops up the Create new profile window (see Figure 3). There, you give the new profile a name and set options. It also grabs the device’s serial number, so backups from identical devices remain separate. You can also designate a specific destination for the backup or leave it at the default setting: …Documents\Removable Media Backups\ …. Setting a cloud folder such as Dropbox or One Drive as the destination is an excellent option.
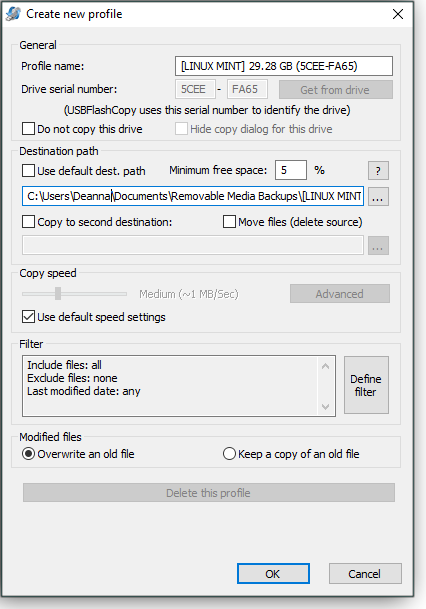
Figure 3. Use the Create new profile window to uniquely define each flash drive or memory card.There’s also a copy-speed setting to minimize the utility’s impact on system performance during backups. The default setting seemed pretty fast, with only a small hit to system speed on my PC. But feel free to experiment.
Filter settings let you exclude files by date, type, and other options. You can also choose to automatically write over files with the same name or make a second copy.
When the profile is complete, click OK. The next time you insert the device, it’ll be backed up automatically (see Figure 4), as set in the profile. (You can also right-click the tray icon to back up the device at any time.)

Figure 4. A USBFlashCopy in progress, based on the device’s profileRight-clicking the tray icon also lets you select Settings, where you can change the milliseconds the program waits before checking for a newly inserted device — or how often it checks the device again after a successful copy. There’s also an option to have USBFlashCopy ignore inserted media when you hold down the Shift key.
Settings also contains the Media Drives section, shown in Figure 5, which gives you backup control by drive letter. That’s handy if you have network or external hard drives with assigned drive letters.

Figure 5. Use the Media Drives section to control USBFlashCopy backups by drive letter.One last option: At the bottom of all settings screens is a user-rights control. At system startup, you can have USBFlashCopy …
- Don’t Run
- Just for this user
- For all users (admin rights required)
Note that USBFlashCopy is free for non-commercial use — you’ll have to pay U.S. $9.95 for a commercial license (link in settings) or if you want to use its “Silent Mode” (you sneaky devil; look back at Figure 2).
Go grab the program from OlderGeeks.com from its download page.
Questions or comments? Feedback on this article is always welcome in the AskWoody Lounge! Deanna and Randy McElveen are celebrating 20 years in the computer business, seven years running OlderGeeks.com and 26 years of putting up with each other. Their computer store is in a small town in the Missouri Ozarks. Believing that happy customers are always the best advertisement, they hope to do it for another 20 years.
TROUBLESHOOTING
Use system images to fix major PC hassles By Michael Lasky
As legendary screen siren Mae West once quipped: “Keep a diary, dearie, and someday it will keep you.”
Today, that advice could apply to regularly saving images of your PC’s hard drive. Here’s a refresher on a classic backup tool — and some others available in Windows 10.
Working with Win10’s built-in, legacy imaging utilityUnlike other backup and restore tools, Win10’s System Images app takes a single snapshot of your entire hard drive (or SSD), bit for bit. Should you have a fatal drive failure, a disk image will let you return your PC to exactly the same state it was in on the day and time the image was saved.
For example, when the hard drive on my five-year-old laptop bit the dust, I didn’t immediately panic; I knew I could easily restore my documents, photos, and other data via daily incremental backups, stored on a cloud server. But the crash didn’t just wipe out my locally stored data, it also took down all my programs, settings, and my installed version of Windows 10.
Those critical bits weren’t part of my regular backups. More annoying, most of my apps were downloads — they didn’t come with actual media such as CDs or DVDs. I should have heeded Mae West’s advice — and so should you. Keep a system image, and someday it’ll keep you.
As you know, your hard drive is continually changing as you add and delete files. So it’s a good idea to create images on a regular schedule. Should your drive crash or become badly corrupted, restoring the most recent image should take about an hour or so — depending, of course, on your PC’s CPU speed and the size of your hard drive.
Beware of Win10 system-imaging gotchasFor the most part, creating a system image takes just a couple of clicks. But there are a few things you need to keep in mind, depending on your particular setup and the Win10 version installed. Also remember that a system image is an all-or-nothing proposition; you can’t use it to restore just a few files — you’ll be restoring everything that was on the disk.
Gotcha #1: Windows 10 has all but forsaken the classic Control Panel, so you first need to locate CP in order to use the System Image creation tool. In Win10, it’s somewhat hidden; the fastest method is to enter “control panel” into the Win10 Cortana/search box. (You can also find it under Windows System in the Start menu’s app list.)
Gotcha #2: You’re actually using a holdover from previous Windows versions. In Control Panel, open Backup and Restore (Windows 7). Yes, it refers to the soon-to-be-obsolete Win7, but it still works with Win 10 — at least through Version 1809. (Why it’s still there is something of a mystery. And we’ll have to see whether it’s in the soon-to-be-released Version 1903.)
Once you’ve found your way to Backup and Restore (Windows 7), select Create a system image, located on the left side of the backup/restore options box (see Figure 1).

Figure 1. In Windows 10, it takes a bit of hunting to find the OS’s built-in, legacy drive-image-creation tool.Gotcha #3: After clicking Create a system image, the next screen lets you choose where to save the image: hard drive, DVD, or a network drive (see Figure 2). If you pick a hard drive, make sure it’s formatted correctly and has free storage space equal in size to the space used on the drive you’re imaging.
You also don’t want to store the image on the same physical drive you’re imaging — even if it’s in a different partition. If the drive craps out, you’ll probably lose the all-important backup image.
If you choose a network location, be ready to provide your network-access username and password. Note: You can choose OneDrive as a network location, if you have an account with sufficient free storage.

Figure 2. System images can be saved to an attached hard drive, to DVD, or to a network-based storage location.Once you’ve selected a suitable place to store the image, click Next. If you selected DVDs, you’ll be alerted when an additional disc is needed during the backup process.
Restoring the image: How to get your system back up and runningNote: The process of restoring an image will reformat the target hard drive. Everything on that drive will be wiped clean. If possible, back up your personal data before starting the restore.
Gotcha #4: If you’re planning to restore a system image on a new or another data-free PC, the process will work only if the new PC’s hard drive is equal to or larger than the drive the image was created from. It doesn’t matter that the image might be significantly smaller than the old drive’s storage capacity. (Regardless, restoring an image to a new PC isn’t advised. There will likely be issues with the old system’s drivers.)
Okay, let’s assume the worst: your hard drive appears dead. What’s next, knowing you have the CYA system-image backup? Start by booting your PC with a Windows DVD, flash drive, or system-repair disk. When the Windows Setup screen appears, select Next and then Repair your computer.
From the Choose an option screen, click Troubleshoot, followed by Advanced options. Now select System Image Recovery. Enter an administrator account and its password, then select Continue.
On the next screen, select Use the latest available system image (recommended) and then click Next. When prompted, enter the drive or disc on which you saved your most recent image. It should come up automatically, but if it doesn’t, you can enter the needed information manually. Click Next. The questions that follow are self-explanatory. When prompted, click Finish and then Yes.
If all goes well, you’ll soon have your PC back to its state when the image was saved. How long the process will take depends on the speed of your drives, the amount of backed-up data, and some time for reformatting the drive.
Also, depending on the age of your system image, you might have to spend time installing Windows and application updates after the restore completes. So it behooves you to make backup images on a regular basis. (You can save multiple images, but you’ll want to rename older versions or move them to another drive so they’re not overwritten by newer images.)
Keep in mind that the system-image tool is a legacy app — a holdover from Windows 7. As such, it’s not foolproof on Win10 systems, especially if you’re restoring to a drive that’s larger than the original. For some additional tips on using Win10’s system imaging, see this Microsoft Community post.
System Restore: An easier, quicker backup methodThere are times when a problem with your PC doesn’t rise to a full image restore. The machine is working, but not well. Faults of this sort can typically appear after installing new drivers, apps, or other software.
The solution might be another classic: System Restore, also known as restore points. It can take your system back to a time before the problem showed up. It won’t affect your data, but it will remove any drivers, updates, and applications installed after a specific restore point. It can also undo registry changes.
Earlier versions of Windows created restore points automatically, by default. But you’ll probably have to turn it on for Windows 10. You can also manually create them as needed. For example, it’s a good idea to make a restore point before installing new software.
Accessing System Restore requires another trip to the classic Control Panel. Once there, click System and then System Protection in the left column. In the System Protection tab (under System Properties; see Figure 3), click the Configure button; a new dialog box will open with an option for turning System Protection (restore points) on and off (see Figure 4).

Figure 3. The System Protection tab is where you configure, create, and evoke restore points.
Figure 4. Use the configuration windows to switch System Protection on and off — and manage disk-space allocation.Back under the System Protection tab, click Create to save a restore point manually. Or click the System Restore button to select a saved restore point.
The third option: ResetIf Windows 10 is behaving badly, or you just want a really fresh copy, the built-in Reset function might be your best solution. You can reset Windows without affecting your data, but you might have to reinstall third-party apps. For more info on Reset, see the article “Win7 upgrader seeks ‘no-reformat reinstall’ for Win10” in the 2019-04-15 AskWoody Plus issue.
Windows offers various other tools for protecting your system and data — Win10’s File History, for example. Make sure you’re comfortable with all your options.
Questions or comments? Feedback on this article is always welcome in the AskWoody Lounge! Michael Lasky is a freelance writer based in Oakland, California. He has over 20 years of computer-magazine experience, most recently as senior editor at PC World.
Publisher: AskWoody LLC (woody@askwoody.com); editor: Tracey Capen (editor@askwoody.com).
Trademarks: Microsoft and Windows are registered trademarks of Microsoft Corporation. AskWoody, Windows Secrets Newsletter, WindowsSecrets.com, WinFind, Windows Gizmos, Security Baseline, Perimeter Scan, Wacky Web Week, the Windows Secrets Logo Design (W, S or road, and Star), and the slogan Everything Microsoft Forgot to Mention all are trademarks and service marks of AskWoody LLC. All other marks are the trademarks or service marks of their respective owners.
Your email subscription:
- Subscription help: customersupport@askwoody.com
Copyright © 2019 AskWoody LLC, All rights reserved.

Plus Membership
Donations from Plus members keep this site going. You can identify the people who support AskWoody by the Plus badge on their avatars.
AskWoody Plus members not only get access to all of the contents of this site -- including Susan Bradley's frequently updated Patch Watch listing -- they also receive weekly AskWoody Plus Newsletters (formerly Windows Secrets Newsletter) and AskWoody Plus Alerts, emails when there are important breaking developments.
Get Plus!
Recent Topics
-
TUT For Private Llama LLM, Local Installation and Isolated from the Internet.
by 30 minutes ago
-
Upgrade from Windows 10 to 11
by 2 hours, 53 minutes ago
-
Microsoft : AI-powered deception: Emerging fraud threats and countermeasures
by 5 hours, 44 minutes ago
-
0patch
by 2 hours, 12 minutes ago
-
Devices might encounter blue screen exception with the recent Windows updates
by 2 hours, 50 minutes ago
-
Windows 11 Insider Preview Build 22631.5261 (23H2) released to Release Preview
by 8 hours, 43 minutes ago
-
Problem opening image attachments
by 10 hours, 17 minutes ago
-
advice for setting up a new windows computer
by 1 day, 1 hour ago
-
It’s Identity Theft Day!
by 5 hours, 19 minutes ago
-
Android 15 require minimum 32GB of storage
by 1 day, 5 hours ago
-
Mac Mini 2018, iPhone 6s 2015 Are Now Vintage
by 1 day, 6 hours ago
-
Hertz says hackers stole customer credit card and driver’s license data
by 1 day, 6 hours ago
-
Firefox became sluggish
by 1 day, 3 hours ago
-
Windows 10 Build 19045.5794 (22H2) to Release Preview Channel
by 1 day, 10 hours ago
-
Windows 11 Insider Preview Build 22635.5235 (23H2) released to BETA
by 1 day, 10 hours ago
-
A Funny Thing Happened on the Way to the Forum
by 8 hours, 10 minutes ago
-
Download speeds only 0.3Mbps after 24H2 upgrade on WiFi and Ethernet
by 2 hours, 44 minutes ago
-
T-Mobile 5G Wireless Internet
by 8 hours, 51 minutes ago
-
Clock missing above calendar in Windows 10
by 10 hours, 3 minutes ago
-
Formula to Calculate Q1, Q2, Q3, or Q4 of the Year?
by 2 days, 1 hour ago
-
The time has come for AI-generated art
by 1 day, 5 hours ago
-
Hackers are using two-factor authentication to infect you
by 1 day, 15 hours ago
-
23 and you
by 1 day, 22 hours ago
-
April’s deluge of patches
by 2 hours, 36 minutes ago
-
Windows 11 Windows Updater question
by 2 hours, 57 minutes ago
-
Key, Key, my kingdom for a Key!
by 3 days, 7 hours ago
-
Registry Patches for Windows 10
by 3 days, 12 hours ago
-
Cannot get line length to NOT wrap in Outlining in Word 365
by 2 days, 18 hours ago
-
DDU (Display Driver Uninstaller) updates
by 2 days, 3 hours ago
-
Align objects on a OneNote page
by 3 days, 17 hours ago
Remembering Woody
