
|
Patch reliability is unclear. Unless you have an immediate, pressing need to install a specific patch, don't do it. |
-
Office 365: The trendy new phishing target
ISSUE 16.11.0 • 2019-03-25
 The AskWoody Plus Newsletter
In this issue
ON SECURITY: Office 365: The trendy new phishing target
LANGALIST: Win8/10’s secure-boot process still causing trouble
BEST UTILITIES: Freeware Spotlight — Folder Monitor
THE INTERNET: How to find and change DNS Settings
On Security
Office 365: The trendy new phishing target By Susan Bradley
What’s the leading source of attacks on cloud platforms? Other cloud platforms.
The U.S. Secret Service warns that Office 365 is now a prime target. Even more worrisome, the attacks can come from within Office 365 itself.
Here’s how to not be a statisticAttacking Windows 10 is so yesterday. Malicious hackers have known for some time that phishing is a fruitful and cheap method for stealing data. And the bigger the mark, the better the returns. So it should be no surprise that Office 365 has become a tempting target.
Microsoft’s subscription-based productivity suite has been a major success for the company. According to a Petri report, there were 155 million active Office 365 users in the fall of 2018, and the number was still growing rapidly. That, and the suite’s reliance on an Internet connection, make it a fat, low-hanging plum for attackers.
A recent Trend Micro article noted that a U.S. Secret Service bulletin warned of phishing attacks specifically targeting organizations using Office 365.
Trend Micro also claimed that in 2018 its “Cloud App Security caught 8.9 million high-risk email threats missed by Office 365 security. Those threats included “a million malware, 7.7 million phishing attempts, and 103,955 Business Email Compromise attempts.” That’s a serious threat to both businesses and individual users.
Moreover, attackers are creating and sharing tools that specifically target both Microsoft Exchange and Office 365. The malicious code can, for example, be used to steal email addresses and to access business systems via misconfigured mailbox permissions.
For example, attackers might use the open-source MailSniper tool to acquire security information from Office 365 and on-premise Exchange configurations. (Officially, MailSniper is a security tool used to test the ability to penetrate Exchange systems.)
However, to effectively exploit systems with MailSniper, the attacker must first steal a valid Exchange user’s plain-text credentials — especially those of an admin-level account.
Run remotely, MailSniper can then spray common and weak passwords across a company’s accounts and look for matches that will let a hacker access Exchange Server. It does this in a slow and measured process so as to avoid triggering detection thresholds and automated account lockouts. Once hackers gain access, they can do the following:
- Collect user data from the Global Address List,
- Collect lists of folders from specific mailboxes,
- Harvest valid domains and usernames from Outlook Web Access (OWA),
- Harvest valid Active Directory usernames from Exchange Web Services (EWS),
- Test access to specific mailboxes, and
- Mount password-spraying attacks against OWA and EWS portals.
With a foothold in an Exchange server, attackers can get inside Office 365 and, even worse, access Office 365 assets.
What makes Office 365 a good target?It’s a numbers game — again, the number of potential victims relying on Microsoft’s hosted-email system is large and still growing at a healthy pace. To that expanding target, add inherent vulnerabilities in Microsoft’s mail system.
Microsoft could give all Office 365 users stronger protection by including Advanced Threat Protection (ATP; more info) on every version of the suite. Currently, it’s enabled by default on Office 365 Enterprise E5, Office 365 Education A5, and Microsoft 365 Business.
A component of that defense, ATP Safe Attachments, can protect you from malicious email attachments.
ATP can be added to all Office 365 installations for as little as U.S. $2 per mailbox. But I think it should be the default across the board. (Phishing and other forms of malicious social engineering will continue to be a major threat to all email users — essentially everyone connected to the Internet.)
Want proof? This past August (2018), Computer Business Review reported that an estimated 10 percent of Office 365 customers had been targeted by phishing attacks.
The malicious enticements are well developed and highly successful. An attacker sends an email that appears to be sent by a trusted sender. In some cases, the goal is to steal personal information, such as your sign-in credentials to a bank account; in other cases, the attacker installs a silent back door into your system. Either one can have devastating consequences.
Phishing with the right tackleSurprisingly, malicious hackers can use Office 365 itself to launch more attacks. As noted in a recent Blaze post, exploits tend to take similar actions, as outlined below:
- “An attacker sends an Office 365 spear-phishing [targeted] email [more info], likely from a spoofed or fake email address.
- “The user is enticed to click on the link or open an attachment that includes a link.
- “The user will then unknowingly enter their credentials on the fake Office 365 page.
- “The credentials get sent back to the attacker.
- “Attacker will access the now compromised user’s mailbox.
- “The cycle repeats: The attacker will send spear-phish emails to all of the compromised user’s contacts, but with this difference: it’s coming from a legitimate address.”
Blaze adds: “This is exactly what happened to a friend of mine: He got sent an email from a legitimate email address, which was a contact in his address book — only the sender never intentionally sent this email!”
I’ve seen attacks coming from other cloud services, and it’s often very difficult to tell a valid email from a bogus one. In many cases, the only thing keeping you and your email inbox safe is a savvy end user.
Office 365 needs adjustmentsNow, before you decide to stop emailing completely and move back to paper cups and string, keep this in mind: Any cloud service can be made as secure as — or more secure than — any on-premises counterpart. The key is to not take any cloud service as is — you’ll need to make some adjustments.
Start with strong and unique passphrases. Next, enable multi-factor authentication to prevent stolen passwords from being successfully applied by remote attackers.
Add Advanced Threat Protection to your existing Office 365 subscription. Prefiltering of links that end up in your inbox is key to staying out of harm’s way.
That’s a good start to securing Office 365 and your email, but there’s much more you can do to secure this and other cloud services. Stay tuned for future articles about ways to keep from being a cyber-crime statistic.
Questions or comments? Feedback is also always welcome in the AskWoody Lounge! Susan Bradley has been the one and only Windows Secrets Patch Watch diva for many years. In real life, Susan is a Microsoft Security MVP and IT wrangler at a California accounting firm, where she manages a fleet of servers, virtual machines, workstations, iPhones, and other digital devices. She also does forensic investigations of computer systems for the firm.
LANGALIST
Win8/10’s secure-boot process still causing trouble
By Fred Langa
Here’s what to do when Windows’ complex boot-time security enhancements prevent you from using legitimate repair, recovery, and backup tools.
Plus: No joke — check your Windows version now! Also, easy and free ways to mirror a smartphone’s screen on a laptop or TV.
Boot-time glitch blocks needed repair toolAskWoody Plus reader Jensenius ran into a classic problem when Windows 8.1’s boot-time security prevented him from running needed software! (The same problem could show up in Windows 10.)
- “Hi Fred! I need to boot to DOS from a CD/DVD in order to repair and extract data from a portable Iomega disk drive.
“I used the Gibson Research Spinrite application to create a bootable ISO file, which I burned onto both a CD-R and DVD+R.
“The UEFI boot order setup is:
- 1. System CD/DVD drive
- 2. USB drive
- 3. System HDD
“Secure boot is disabled, as is the Compatibility Support Module (grayed out, with no option of enabling it).
“Problem: When I turn on the PC, the CD/DVD drive spins up. But after 10 to 15 seconds the system boots to the HDD as normal.
“I tried using a USB memory key, but the same thing happens — normal boot-up. I have, of course, asked Gibson Research support for help, but they’re also in the dark.
“I have a Win8.1, 64-bit system, fully updated and working flawlessly. Why can’t I boot up from the CD/DVD drive?”
I think a subtle boot-time interdependency is tripping you up, Jensenius. The same thing has happened to me, too!
Let’s start with the Fast Boot option in your PC’s UEFI/BIOS.
Fast Boot (aka Quick Boot and other vendor-specific names) significantly shortens a PC’s startup process by overriding and/or skipping many optional settings that would otherwise pertain. A Win8/10 PC that has Fast Boot enabled will always boot from the hard drive, regardless of other boot-order settings!
Most of us — myself included — don’t spend enough time poking around in the UEFI startup settings. It’s easy to forget little gotchas such as Fast Boot, especially when there are so many! On current hardware running Windows 10 and 8.1, there’s a whole range of startup technologies: hardware/firmware tech such as UEFI/CSM boot (info) along with Windows features such as Secure Boot, Trusted Boot, Early Launch Anti-Malware (ELAM), Measured Boot (info), and more.
Keeping it all straight ain’t easy!
Jensenius, you didn’t mention Fast Boot. Your problem might be easily solved by simply disabling that feature, which should then allow your PC to boot from a relatively slow optical drive.
I also suggest booting to a genuine copy of MS-DOS, rather than a third-party version. For example, you can download a free and bootable ISO of authentic MS-DOS 6.22 (and many other boot disks) from the AllBootDisks site.
If disabling Fast Boot doesn’t work, you’ll almost surely find a fix in a Langa.com column, “How to solve UEFI boot and startup problems” — a free re-post of a step-by-step Windows Secrets article.
(Windows 10 was only in prerelease/preview when that article was written, but most of the Win8 instructions also apply to Win10.)
The article also contains links to about a dozen other sources to help you track down just about any UEFI/Secure Boot issue you may encounter — including weird and hard-to-remember interdependencies!
Seriously: Check your Windows version now!In my column “Windows Update errors cause OS-version problems” (AskWoody Plus Newsletter 16.8.0), I described how Microsoft’s recent four-month-long series of Windows updating problems left some readers’ PCs in the weeds.
Specifically, affected PCs appear to be fully up to date but are actually running older versions of Windows!
Reader Bob Guzik decided to check his PC, and sure enough — his was one of the affected machines!
- “Hi, I just finished reading your column about the Windows update. Out of curiosity I checked mine — and I’m still on Version 1803! According to Windows Update, last checked a couple of days ago, my version is current. Now I’m wondering whether Microsoft has forgotten about me or I should continue waiting for the update to Version 1809. My PC is less than two years old. Regards, Bob”
Yup, I’d say your PC might have missed the boat on the Fall 2018/Version 1809 update! Or, Microsoft might have delayed sending the latest version to your PC due to possible compatibility issues — though that should not be the case on a relatively new machine.
Some elements of Windows 1809 are no big deal — few people’s lives will change because they don’t have the new Explorer Dark Mode, or the Snip & Sketch screenshot tool, or the Edge improvements.
But surely the security enhancements (more info) are sufficient to make downloading Version 1809 worthwhile — if Windows Update didn’t do it for you, as it should’ve.
The aforementioned article, “Windows Update errors cause OS-version problems,” has how-to instructions for safely forcing the upgrade to Win 1809.
Free ways to mirror smartphone screens on PCs and TVsReader Jeremy L. asks:
-
“Is it possible to mirror my smartphone on my laptop? If so, how?”
Sure! And it’s easy!
You might even already have the app you need. For example, most newer Samsung phones ship with (or let you install) the free Smart View app (info; download). It can mirror your phone’s screen to almost any brand of laptop, PC, or smart TV that’s equipped with Google’s Chromecast technology (info; see Figure 1).

Figure 1: From small screen to big screen: My Samsung phone’s screen mirrored, via Smart View/Chromecast, to a non-Samsung smart TV.No Samsung? No problem: There are many, many other apps — free and paid — that allow screen mirroring to, from, and among Android and Apple phones; Windows, Mac, Linux, and ChromeOS PCs; and various cast-enabled smart TVs.
Don’t have Chromecast or the related Miracast (more info)? Also no problem! Different apps allow for different connection types, too, including Wi-Fi, Bluetooth, 3G/4G/LTE, and USB cable.
Many apps (especially paid versions) go beyond simple screen mirroring, offering remote control, file transfer, keyboard sharing, and/or other features.
So whatever digital devices you have, it’s almost never hard to mirror what’s on your phone’s screen to a laptop, PC, or smart TV!
Some sample apps (all with free and paid versions):
Send your questions and topic suggestions to Fred at fred@askwoody.com. Feedback is also always welcome in the AskWoody Lounge! Fred Langa has been writing about tech — and, specifically, about personal computing — for as long as there have been PCs. He’s also one of the founding members of the original Windows Secrets newsletter. Check out Langa.com for all Fred’s current projects.
Best Utilities
Freeware Spotlight — Folder Monitor By Deanna McElveen
There are plenty of folder-monitoring programs out there, but if you’re like me, you prefer simple, no-frills, just-get-it-done programs. When they are also free and portable to boot — well, that’s just great!
What do you use folder monitoring for? It could be a great tool for enhancing collaboration. By monitoring, say, Dropbox or Google Drive folders, you can be sure to never miss changes in important files. Yes, both of those cloud apps will give you a quick notification when something is added or changed, but what if you’re at lunch or in a meeting? Folder Monitor will leave the notification on your desktop — or you can also view the utility’s notification history, so you never miss a thing.
That’s just one example; there are many more, some of which I’ll mention at the end of this article. But first, let’s talk about one of our favorites.
Nodesoft’s Folder Monitor (did I mention I also like simple names?) is one of those basic but very useful utilities. Simply put, it monitors any folders you select and then alerts you to any changes. The specified folders can be anywhere: locally, in the Cloud, or on a remote server or workstation.
Want to play with Folder Monitor while you read this review? Start by grabbing a copy on its OlderGeeks webpage.
To launch Folder Monitor quickly and easily, unzip the download and open (double-click) the FolderMonitor.exe file.
Folder Monitor didn’t appear on your desktop? You’re looking in the wrong place. Check for the app’s icon down in the notification area of the task bar (see Figure 1). Still can’t find it? Click on the “Show hidden icons” symbol.

Figure 1. After launch, File Monitor will be found in the notification area of the task bar.Now, right-click the Folder Monitor icon to add folders, select options, and otherwise manage the app.
Note: If the utility truly won’t run, it’s most likely because you don’t have Microsoft’s .NET Framework installed. Not to worry: the extracted Folder Monitor files include one called “Download .NET Framework.” Click it, and it’ll send you to the appropriate download site.
Start the process of monitoring folders in the app’s main menu. Select Add folder to pick items you want to monitor, or manually input a path (see Figure 2.)
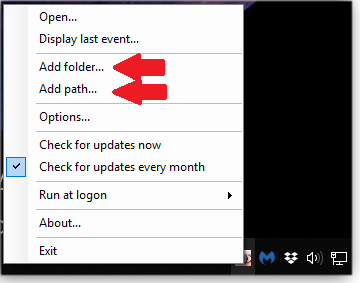
Figure 2. Select Add folder and Add path to define folders you want to monitor.Next, click Options to define visual and audible settings (Figures 3 and 4, respectively) for global notifications.
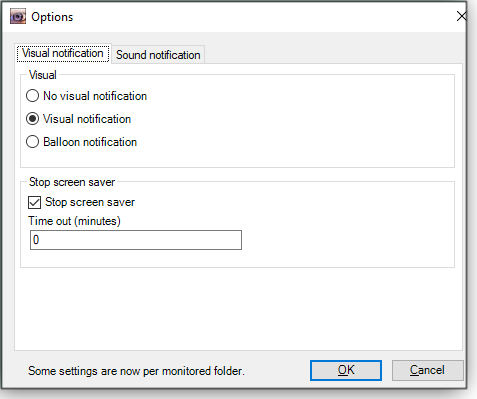
Figure 3. Under Options, Visual notification lets you select whether and how alerts are popped up on the screen.
Figure 4. You can use various sound cues for notifications — or turn them off.To manage selected folders, click Open from the main menu, as shown in Figure 5. You can then right-click each item and select Options to configure specific settings such as filtering, the events you want to be notified about, and the ability to execute commands when events occur (see Figure 6).

Figure 5. Clicking Open from the main menu displays a list of monitored files.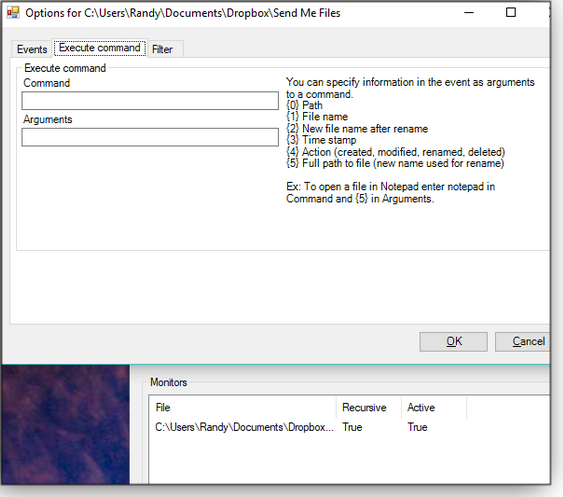
Figure 6. Right-clicking a listed folder and selecting Options opens various folder-monitoring settings.When you’ve finished options and settings, close all Folder Monitor windows — you’re all set. Depending on how you have configured the app, you’ll get popup notifications whenever the content of the folders changes, such as when subfolders or files are added, renamed, updated, and so forth (see Figure 7).
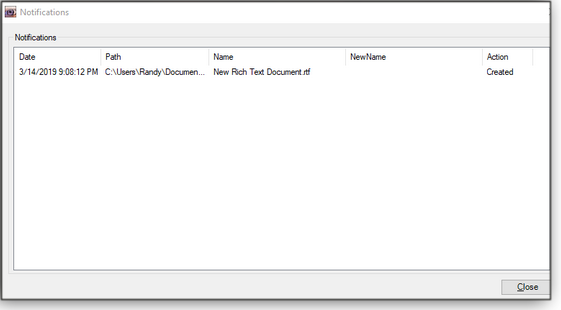
Figure 7. With Folder Monitor, you’ll always know when there’s activity in a specific folder or folders.What else can you do with Folder Monitor? It’s limited only by your imagination. For example, by monitoring certain system folders, it could help alert you when malware is installed on your system. It could also warn of changes to log files in program folders. If you’re developing an application, Folder Monitor could tell you what’s changing and where output goes.
At home, you might use it to see what little Jimmy downloads to the family computer at night. At the office, key people can be notified when a PDF-based invoice is added to a shared folder.
You might even use the app to alert yourself when new security footage is added to storage. You’ll be notified every time that squirrel trips the camera!
Nodesoft has other useful and free apps. You might, for example, like Folder Usage (more info) to help see what’s soaking up your hard-drive space.
Questions or comments? Feedback is also always welcome in the AskWoody Lounge! Deanna and Randy McElveen are celebrating 20 years in the computer business, seven years running OlderGeeks.com and 26 years of putting up with each other. Their computer store is in a small town in the Missouri Ozarks. Believing that happy customers are always the best advertisement, they hope to do it for another 20 years.
THE INTERNET
How to find and change DNS Settings By Lance Whitney
Domain Name System (DNS) servers have the important job of matching numeric IP addresses with common website names.
Your personal computer is probably connected to your Internet service provider’s DNS. But switching to a third-party service might give you better speed and tighter security.
Thanks to DNS, you don’t have to enter a website’s formal IP address into your browser; you simply type in a familiar and simple name — for example, www.google.com instead of 172.217.3.10. Everything on the Net has an IP address, and the address for the DNS server you’re connected to was likely set automatically. That means Windows is probably using the servers preferred by your Internet service provider (ISP).
But that’s not necessarily your best bet. Third-party DNS services might offer advantages such as faster address resolving and optional website blocking. You might also get better protection from security and privacy threats.
Of the numerous DNS services available to consumer-PC users, some of the more popular offerings include Google Public DNS, OpenDNS, Cloudflare DNS, and Comodo SecureDNS. I’ll discuss how to change DNS services, and I’ll give brief summaries of each below.
First, however, you should know that this recommendation to change DNS settings applies only to your personal computers. On company-owned or public machines, the selected DNS servers are typically fixed by an administrator
How to change DNS-address settings in WindowsTo get started in Windows 10, open Settings/Network & Internet. Under “Change your network settings,” click Change adapter options. For older versions of Windows, open Control Panel and double-click the icon for “Network and Sharing Center,” then click the Change adapter settings link.
The rest of the process is the same on all current versions of Windows. Right-click the default connection type that your computer uses. For example, on a desktop computer plugged into an Ethernet port, right-click the Ethernet connection; on a laptop or other computer using Wi-Fi, right-click the connection for Wi-Fi. Then select Properties from the popup menu, as shown in Figure 1.
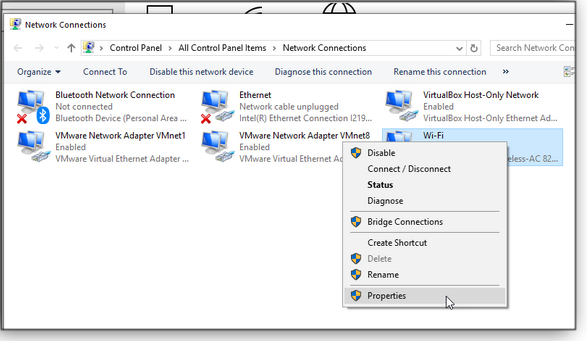
Figure 1. To change DNS settings, start by clicking the Properties option for a PC’s default network connection.Next, in the Properties dialog box, look for Internet Protocol Version 4 (TCP/IPv4) in the list of properties and double-click it. Unless you or someone else manually changed the DNS servers, the enabled setting should be set “Obtain DNS server address automatically.” To modify the server addresses, change the selection to Use the following DNS server addresses (see Figure 2). You’ll see two server-address entry fields: Preferred and Alternate. The alternate DNS address kicks in if the preferred one ever fails to respond — so be sure to use both.
For this example, we’re going to enter two Google Public DNS servers. Their addresses are 8.8.8.8 and 8.8.4.4. According to Google, you can use either one as your primary and the other as your alternate. Enter the first address. (Hint: After you type the first 8, press the right-arrow key on your keyboard to move to the next field.) Then enter the second address. Check the box to Validate settings upon exit to confirm you have the correct addresses. Click OK.
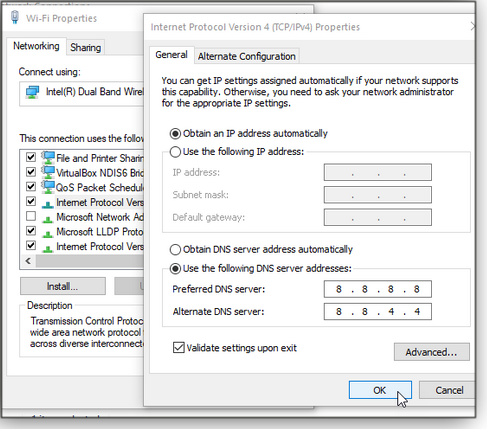
Figure 2. In this example, I’ve entered the address for two Google Public DNS servers.Before we move on, take a look in the networking properties list for “Internet Protocol Version 6 (TCP/IPv6).”
Because the world has run out of IPv4 address blocks, we’re slowly transitioning to IPv6, which provides a much larger range of addresses. Should you modify the DNS-server addresses for the IPv6 setting? That depends on your Internet-service provider. Most ISPs haven’t yet made the full leap to IPv6, but many are in the process.
To check your ISP’s status, browse to the Test IPv6 website. The test runs automatically and will tell you whether your ISP currently supports IPv6. If it does, you’ll want to change those settings as well. For Google’s Public DNS, the IPv6 DNS servers are 2001:4860:4860::8888 and 2001:4860:4860::8844 (see Figure 3).
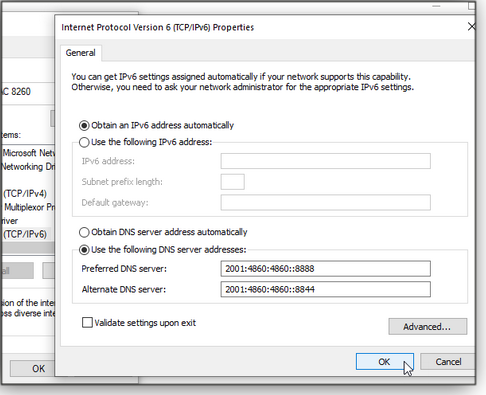
Figure 3. Check that your ISP supports IPv6 before entering DNS server addresses.When you’re done entering DNS server addresses, click OK to exit the networking-properties window. If you chose the option to validate settings upon exit, Windows runs a troubleshooter to make sure the settings are correct. If you made a mistake in the addressing, Windows will tell you that the DNS server isn’t responding — in which case, you’ll need to re-check the settings.
Once you’re good to go, exit all settings windows and open your browser. Type in any website — google.com, for example — to make sure it’s working correctly.
Addresses for popular DNS servicesLet’s look at a few third-party DNS services you can try:
- Google Public DNS is perhaps the most popular consumer, third-party DNS service. It’s also rated as one of the fastest, meaning it handles name and IP address resolution requests more quickly than many competing services. Google also claims that its service guards against spoofing attacks that try to direct you to malicious websites and that it protects you from denial-of-service (DoS) attacks that can overwhelm DNS servers. See Google’s Security Benefits webpage for more information.
Use the following addresses for Google Public DNS:
IPv4 – 8.8.8.8 and 8.8.4.4
IPv6 – 2001:4860:4860::8888 and 2001:4860:4860::8844
- OpenDNS is owned and operated by Cisco. It offers two free and two paid packages for consumers. The most basic package is the free OpenDNS Home; also free, OpenDNS Family Shield can automatically block adult content — a good option if you have children at home.
For U.S. $19.95 a year, OpenDNS VIP can lock down Web browsing by limiting access to specific, white-listed domains. Priced at $20 per person for up to five users, OpenDNS Prosumer is designed for either homes or small businesses. It adds protection against malicious domains.
All four packages block phishing websites and offer parental controls. Server addresses for free versions of OpenDNS are:
OpenDNS Home:
IPv4 – 208.67.222.222 and 208.67.220.220
IPv6 – 2620:119:35::35 and 2620:119:53::53
OpenDNS Family Shield
IPv4 – 208.67.222.123 and 208.67.220.123
- Cloudflare DNS touts itself as being faster than other DNS services. Plus, the company promises to never log your IP address — which ISPs and other DNS services might do to track your online activities.
IPv4 – 1.1.1.1 and 1.0.0.1
IPv6 – 2606:4700:4700::1111 and 2606:4700:4700::1001
- Comodo SecureDNS is offered by a top cybersecurity provider. It’s a good choice if you’re seriously concerned about phishing, malware, and other online threats. SecureDNS maintains a real-time list of harmful websites and alerts you if you try to access one of them.
IPv4 – 8.26.56.26 and 8.20.247.20
Finally, if you want to change the DNS server settings for multiple computers and other devices, you can do so more easily through your router. Sign in to your router’s admin account and look for the Domain Name Server Address setting. Add the primary and alternate addresses for the service you want to use. The manual DNS server settings on your router will then override your ISP’s automatic DNS settings on all your computers and devices.
Questions or comments? Feedback is also always welcome in the AskWoody Lounge! Lance Whitney is a freelance technology reporter and former IT professional. He’s written for CNET, TechRepublic, PC Magazine, and other publications. He’s authored a book on Windows and another about LinkedIn.
Publisher: AskWoody LLC (woody@askwoody.com); editor: Tracey Capen (editor@askwoody.com).
Trademarks: Microsoft and Windows are registered trademarks of Microsoft Corporation. AskWoody, Windows Secrets Newsletter, WindowsSecrets.com, WinFind, Windows Gizmos, Security Baseline, Perimeter Scan, Wacky Web Week, the Windows Secrets Logo Design (W, S or road, and Star), and the slogan Everything Microsoft Forgot to Mention all are trademarks and service marks of AskWoody LLC. All other marks are the trademarks or service marks of their respective owners.
Your email subscription:
- Subscription help: customersupport@askwoody.com
Copyright © 2019 AskWoody LLC, All rights reserved.

Plus Membership
Donations from Plus members keep this site going. You can identify the people who support AskWoody by the Plus badge on their avatars.
AskWoody Plus members not only get access to all of the contents of this site -- including Susan Bradley's frequently updated Patch Watch listing -- they also receive weekly AskWoody Plus Newsletters (formerly Windows Secrets Newsletter) and AskWoody Plus Alerts, emails when there are important breaking developments.
Get Plus!
Recent Topics
-
WU help needed with “Some settings are managed by your organization”
by 15 minutes ago
-
No Newsletters since 27 January
by 2 hours, 42 minutes ago
-
Linux Mint Debian Edition 7 gets OEM support, death of Ubuntu-based Mint ?
by 3 hours, 3 minutes ago
-
Windows Update “Areca Technology Corporation – System – 6.20.0.41”
by 6 minutes ago
-
Google One Storage Questions
by 5 hours, 23 minutes ago
-
Button Missing for Automatic Apps Updates
by 39 minutes ago
-
Ancient SSD thinks it’s new
by 9 hours, 21 minutes ago
-
Washington State lab testing provider exposed health data of 1.6 million people
by 13 hours, 22 minutes ago
-
WinRE KB5057589 fake out
by 6 hours, 41 minutes ago
-
The April 2025 Windows RE update might show as unsuccessful in Windows Update
by 19 hours, 33 minutes ago
-
Firefox 137
by 4 hours, 10 minutes ago
-
Whisky, a popular Wine frontend for Mac gamers, is no more
by 1 day, 1 hour ago
-
Windows 11 Insider Preview build 26120.3863 (24H2) released to BETA
by 1 day, 1 hour ago
-
Windows 11 Insider Preview build 26200.5551 released to DEV
by 1 day, 1 hour ago
-
New Windows 11 PC setup — can I start over in the middle to set up a local id?
by 2 hours ago
-
Windows 11 Insider Preview Build 26100.3902 (24H2) released to Release Preview
by 1 day, 5 hours ago
-
Oracle kinda-sorta tells customers it was pwned
by 1 day, 11 hours ago
-
Global data centers (AI) are driving a big increase in electricity demand
by 1 day, 21 hours ago
-
Office apps read-only for family members
by 2 days ago
-
Defunct domain for Microsoft account
by 1 day, 21 hours ago
-
24H2??
by 3 hours, 54 minutes ago
-
W11 23H2 April Updates threw ‘class not registered’
by 1 day, 5 hours ago
-
Master patch listing for April 8th, 2025
by 10 hours, 14 minutes ago
-
TotalAV safety warning popup
by 20 hours, 47 minutes ago
-
two pages side by side land scape
by 3 days, 22 hours ago
-
Deleting obsolete OneNote notebooks
by 4 days ago
-
Word/Outlook 2024 vs Dragon Professional 16
by 3 days, 3 hours ago
-
Security Essentials or Defender?
by 3 days, 6 hours ago
-
April 2025 updates out
by 3 hours, 28 minutes ago
-
Framework to stop selling some PCs in the US due to new tariffs
by 2 days, 23 hours ago
Remembering Woody
