
|
There are isolated problems with current patches, but they are well-known and documented on this site. |
-
How do you know if File History is really working?
ISSUE 16.25.0 • 2019-07-08
 The AskWoody Plus Newsletter
In this issue
LANGALIST: How do you know if File History is really working?
BEST OF THE LOUNGE: Windows 10 cumulative update failed
BEST UTILITIES: Freeware Spotlight — CipherShed
From the editor:Due to last week’s holiday, this issue is a bit shorter than usual. Like many of you, the AskWoody Plus Newsletter editorial department took a few days off to be with family and friends.
We hope everyone in the U.S. had an excellent — and safe — Independence Day. Except for neighbors setting off ear-busting explosions until 1:30 am, my family and I had a fun day on Washington State’s Olympic Peninsula. The city of Port Townsend threw an old-fashion celebration that included tug-of-wars and sack races — but no fireworks.
Thanks for your continuing support.
– Tracey Capen, editor in chief
LANGALIST
How do you know if File History is really working?
By Fred Langa
For that matter, how do you know if any of your backups are working?
The best proof is a nondestructive, no-overwrite, test-restore of one or more of your backed-up files. Here’s how, using Windows’ File History as the example.
Plus: Full and partial fixes to a recurring and seemingly patternless boot failure.
Confirming that File History is workingTo ensure the recovery of lost or damaged files, all backup systems need to be tested from time to time.
File History, a feature native to Windows 8.1 and Windows 10, is no exception. Like most good backup systems, File History can create automatic and unattended backups of user files, saving them to safe, off-PC locations such as external USB drives or network drives (MS info).
However, the problem with any “automatic, unattended” backup is that it can malfunction without warning, and completely out of sight.
And that leads to questions similar to this one sent in anonymously.
- “I set up File History a year ago to back up my Windows 10 PC. All it shows me is when a backup was created. How do I know it’s actually working?”
Excellent question — and one that could apply to any backup tool.
The best way to know for sure is to restore one or more backed-up files or folders. The trick is to do so without overwriting or otherwise interfering with active and more-current files.
These file-restore tests typically aren’t difficult, and File History makes it especially easy: Simply use your backup tool’s Restore to …, Save as …, Extract to …, or similarly named option to restore the test file to a safe and obvious location — one that won’t accidentally overwrite anything. For example, if you’re test-restoring a file from somewhere in Documents, you could try restoring it to Desktop.
Here’s how easy it is in File History: Type “restore file history” into the Win8/10 search box and select Restore your files with File History.
(The old-school method of getting there also still works. Click Control Panel/System and Security/File History/Restore personal files. Or, in Win10 only, click Settings/Backup/Back up using File History/More options; then, at the bottom of the next page, click Restore files from a current backup.)
No matter how you get there, you’ll see a File History restoration window that looks similar to Figure 1.

Figure 1. File History lets you restore a file back to its original location — or a location of your choice.You can navigate the File History window as if it were a kind of mini–File Explorer, even to the point of opening backed-up folders and previewing backed-up files at will. Use the left arrow at the bottom of the window to scroll back in time to any previous backup you wish; then select any file to test-restore.
Normally, to restore a File History item to its original location, you’d simply click the green button at the bottom of the File History window. But for this test, you don’t want to restore to the original location because you’d risk mingling old and new files — or even possibly overwriting a current file with an old copy.
Instead, right-click File History’s green button and then select Restore to (see Figure 1). When the file-tree dialog box opens, select a safe and obvious location for the test restoration.
Once the file is restored, try opening/accessing it with whatever app you normally use for that file. If everything looks and acts normally, then your backups have worked as they should.
For more certainty, try several other spot-check restores, using different types of files from various dates and locations within your backups.
When you’re done with your test-restorations, immediately delete the test files to prevent any possibility of getting them mixed in with your current files.
Odds are, your tests will prove your backups are fine. But it never hurts to test all your backup systems once in a while — just to make sure they’re really doing what you think they are!
Sleuthing patternless boot failuresErratic or irregular PC problems can be a bear to diagnose. How can you track down a malfunction that comes and goes, seemingly at random?
That’s the problem AskWoody subscriber Jeff Miller faced.
- “Hi, Fred. Glad you’re back! I’d like to ask your advice. I have a 2009 ASUS 2.5GHz, quad-core PC with 8GB RAM and Win10 Home 1809. It has start-up problems I just can’t put a finger on.
“Sometimes, it powers on but doesn’t get to the start-up window — it just shows a black screen. It also freezes at different times during start-up. However, I never get a blue screen, so I have no identifiable event to trace.
“Other times, it’ll go a few weeks or months and start every time (like right now).
“When the problems occur, I usually keep restarting the machine until, for some unknown reason, the start-up sequence begins. At that point, I can get the recovery CD or USB key to run chkdsk, then diskpart, and finally bcdboot — which usually then gets it up and running. Many times, I must also remove the battery and reset the BIOS to get it started!
“But it keeps coming back, which makes me determined to try to figure out why it doesn’t fail completely. I’ve looked at the dump files, but I never seem to get anything specific that will heal this baby.
“Could you point me to something that makes sense? Any suggestions would be greatly appreciated.”
My sympathies! Intermittent problems can be among the most difficult to trace.
But in this case, you have three major clues:
- The problem always happens early in system startup — before the OS is awake enough to generate an error code.
- You’re eventually able to get things going, after the system has been on for a while.
- Your hardware is from 2009; now a full decade old.
Those three facts lead me to suspect your hard drive is suffering from a different manifestation of the same purely mechanical problem discussed in “Tracking down ominous noises in your PC” (AskWoody Plus, 2019-05-27).
In that article, I described how degraded lubricant in an old hard drive’s bearings led to excessive wear and noise. In your case, I suspect your 10-year-old drive’s lubricant has slowly cooked, oxidizing into something that’s too viscous and sticky.
When your drive is cold, either from environmental factors (e.g., wintertime room temperatures) or because it hasn’t been used in a while, the platters spin and the head actuators move poorly and slowly, leading to boot failures.
But when the drive isn’t cold — e.g., the room is warmer or the PC has run for a while as you try to get it started — the lubricant warms and thins out enough for the drive to temporarily respond, more or less normally.
There’s no practical way to rejuvenate a 10-year-old hard drive. And I caution against simply replacing the old drive with a new HDD or SSD. Even though that would almost surely solve the erratic-boot problem, you’ll soon face issues with other aged components — fans, keyboard, power supply, and so forth. And even if you do add some replacement parts, you’ll still have a system designed for 2009.
For example, your 2009 PC almost surely lacks the Trusted Platform Module (TPM; aka “security processor”) chip that’s in most newer PCs. When Win10 can access a TPM chip, the OS can employ a variety of hardware-based security, encryption, and authentication services that are very hard to beat. It makes Windows 10 impressively resistant to malware and hacking. On systems that lack the chip, Win10 has to rely on far weaker security services. (For more on TPM, see its Wikipedia and Microsoft pages.)
Today’s PCs also offer other improvements over your 2009 model: faster drives (e.g., PCIe instead of vanilla SATA), faster peripherals (USB 3+ instead of 1.0 or 2.0), much faster Wi-Fi (802.11ac instead of g), faster and more secure Bluetooth (versions 4 or 5+ instead of 1 or 2), much higher screen resolutions and graphics, and so on.
In short: I think your best option is to replace the whole PC with a new one.
If that’s not possible, then fall back to replacing your hard drive — a new HDD or SDD should solve your erratic-boot issues.
Send your questions and topic suggestions to Fred at fred@askwoody.com. Feedback on this article is always welcome in the AskWoody Lounge! Fred Langa has been writing about tech — and, specifically, about personal computing — for as long as there have been PCs. And he is one of the founding members of the original Windows Secrets newsletter. Check out Langa.com for all Fred’s current projects.
BEST OF THE LOUNGE
Many of us are trying to avoid being Microsoft beta-testers by delaying Windows 10 updates, but WSstarvinmarvin is trying to figure out how to successfully update his Acer.
After making sure the servicing-stack patch was added, PKCano steps him through some Windows Update fixes. Will they be successful? We’re keeping our fingers crossed.
Fun Stuff
After years of delighting us with his tech humor, Cartoonist Aaron has decided to end his LABs cartoons as of July 24. There’s still time to get some good laughs, so check it out!
Windows 10
Ever try to get one problem fixed and end up finding problems with something else? Barcud is in just such a pickle — and he wants to know if he is on the right track in his diagnosis and fix.
USB Hardware
LHiggins has an inaccessible SanDisk Cruzer Blade thumb drive, and he wants to know what files are on it before going forward with reformatting. Do you have a favorite way to recover files on a USB drive?
Browsers
MrJimPhelps has used a series of YouTube downloaders that have quit working — and there are no error messages. He wants to know why this is happening … or at least find a solution that works.
PC Hardware
While the fallback is to back up his data, Martin77 would like to make some hard-drive changes without unduly risking the present install.
Operating Systems
The number of Win7 machines in use falls just below that of Windows 10. If you doubt that there is any controversy over moving to Win10, check out the responses when Woody posts a graph from NetMarketShares … and then quietly tiptoes away as Loungers interpret the changes and how they relate to their favorite OS!
If you’re not already a Lounge member, use the quick registration form to sign up for free.
Best Utilities
Freeware Spotlight — CipherShed By Deanna McElveen
In a digital world that’s becoming increasingly less safe, data encryption is one of the better tools for keeping cyber thieves at bay.
That’s especially true if you travel with a laptop or a flash drive — just imagine the damage you might incur if your device were lost or stolen. But keeping sensitive files, folders, and/or entire disks encrypted will make your files inaccessible to the device’s “new owner.”
There are various apps for personal encryption, but our favorite is the free and open-source CipherShed, maintained by The CipherShed Project. This app (and the related VeraCrypt) is a fork of the once beloved but now defunct TrueCrypt Project (Wikipedia info). CipherShed currently runs only on Windows, but there are reports that it’ll soon be available for MacOS and Linux.
CipherShed is relatively easy to use and can quickly encrypt a single folder or an entire drive (including removable drives used to move data between different OSes — once the Mac and Linux versions are ready).
Let’s take a look.
Setting up CipherShed encryptionBelow, I’ll take you through creating an encrypted folder or drive, step by step. If you want to follow along on your own PC, start by downloading CipherShed from our OlderGeeks page. Don’t worry about bundleware: there’s none, and the program has all green indicators on VirusTotal.
Setup starts with choosing between a full or portable (Extract) installation (see Figure 1). If you plan on encrypting an entire Windows boot drive with CipherShed, you must choose the full-install option. (On Windows 10, encrypting the C:\ drive can be hazardous; it’s a technique we’d recommend only for Windows experts.) For all other uses, the portable option is fine. (In this exercise, I’ll do a full install to show some CipherShed steps and features.)

Figure 1. Select the Install option to fully set up CipherShed on your PC — use Extract for its portable option.After making your installation choice, you’ll probably get the warning shown in Figure 2. It’s no big deal; if you are using HiberBoot (aka Fast Startup), you’ll want to disable it before encrypting a boot drive. To do so, open Control Panel/Power Options and click “Choose what the power buttons do.” Next, select “Change settings that are currently unavailable” and uncheck “Turn on fast startup.” Save your changes.

Figure 2. Unless you are encrypting a boot drive, ignore the above warning.CipherShed’s main screen (Figure 3) is where you create and manage encrypted volumes. If you click Help in the toolbar, you can choose either the “User’s Guide” or the “Beginner’s Tutorial.” Oddly, the ladder didn’t function on my setup, but the User’s Guide includes the beginner’s tutorial — so no biggie.

Figure 3. CipherShed’s main window for managing your encrypted filesTo start a new encryption, click the “Create Volume” button in the main window. (If you still have HiberBoot/Fast Startup enabled, you’ll get the warning again. Also note that CipherShed uses terms such as “Volume,” “Container,” and “Drive” somewhat interchangeably for the places you put encrypted data.)
Next, you’ll run through the Volume Creation Wizard screens, the first of which gives you three choices. (See Figure 4.)
- Create an encrypted file container sets up a virtual disk that lives as a single file — somewhat like a ZIP file. Use this option if you want to create a container you can easily move from PC to PC or save in the cloud.
- Encrypt a non-system partition/drive lets you secure an existing drive — any connected, physical hard drive or flash media that does not contain your Windows OS.
- Encrypt the system partition or entire system drive is for users who think they see suspicious black SUVs parked down the block. If you want to fully encrypt your entire system, this option might be your cup of tea — or glass of vodka.
For this exercise, I’m choosing the first option — as I assume most AskWoody Plus readers will.

Figure 4. The simplest and more versatile encryption is to create a file container.In the next window, you’ll need to decide whether you want to create a visible virtual drive or a hidden one (see Figure 5). Why use a hidden volume? Well, the people in the SUV won’t make you give up the password to a volume they don’t know is there. In other words, even if a cyber thief obtains your password, they still won’t see the related encrypted volume. Since I’m not seeing any black SUVs outside my window, I’m choosing the standard (unhidden) volume option.

Figure 5. For most applications, the Standard CipherShed volume option is the best choice.Next, enter the new volume’s name and location or click Select File (see Figure 6). Note the warning about overwriting an existing file.

Figure 6. Setting volume locationThe next screen lets you choose the type of encryption used (Figure 7; more info). For most common applications, the default AES is sufficient.

Figure 7. Encryption optionsThe last two tasks are setting the size of the new volume (Figure 8) and giving it a robust password (a mix of uppercase and lowercase letters, some numbers, and a symbol or two; Figure 9). Most important: Choose a password you won’t easily forget; otherwise you could lose a lot of important files.

Figure 8. Select the size of the volume (a single encrypted file).
Figure 9. Remember: There’s no way to recover from a lost password for encrypted data.In the next screen, note the instructions at the bottom (see Figure 10). It might sound weird, but moving your mouse around in the window for a bit will strengthen the encryption key. When you’re done, click Format — after about a minute, your new volume is ready to use (see Figure 11).

Figure 10. The Volume Format screen creates the encryption key and formats the new volume.
Figure 11. When the volume-creation task is done, press OK.Next, you need to mount the new volume. Back at the main screen (Figure 3), choose a drive letter from the list and then click Select File to access the volume you created earlier. Next, click the big Mount button and enter the volume’s password. Also, check out the various mounting options while you’re at it. (See Figure 12.)
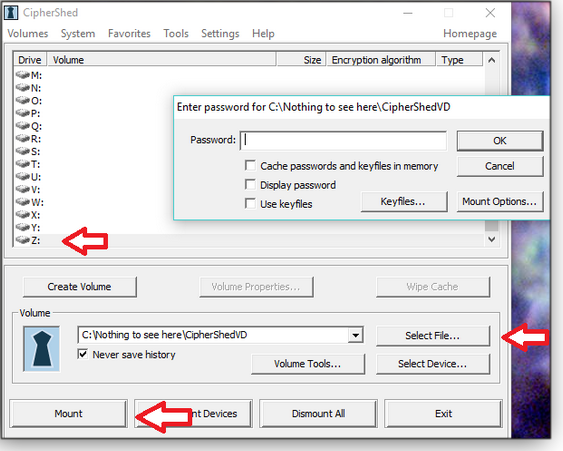
Figure 12. To access an encrypted volume, it must be mounted as a virtual drive.In this exercised, I now have a Z: drive, where I can manage my most sensitive files via File Explorer and apps (see Figure 13). To secure the volume when it’s not needed, select its virtural drive in the main CipherShed screen and click Dismount — the virtual drive will then simply disappear from File Explorer.
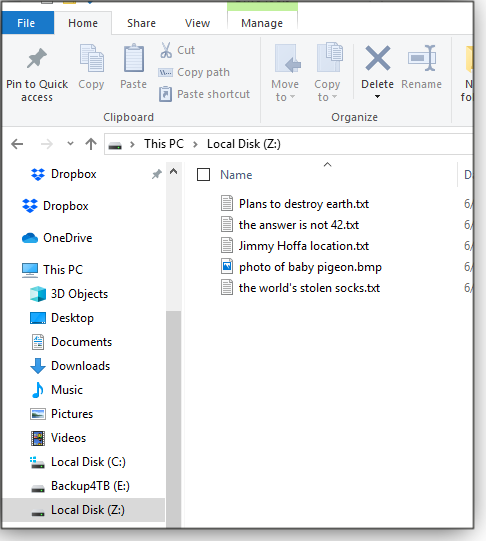
Figure 13. Active encrypted volumes are mounted as virtual drives, which lets you access and manage sensitive files in the normal ways.There are, of course, many other options and features in CipherShed I have not mentioned. Take some time to go through them. And create a few practice files before encrypting anything important. Happy computing!
Questions or comments? Feedback on this article is always welcome in the AskWoody Lounge! Deanna and Randy McElveen are celebrating 20 years in the computer business, seven years running OlderGeeks.com and 26 years of putting up with each other. Their computer store is in a small town in the Missouri Ozarks. Believing that happy customers are always the best advertisement, they hope to do it for another 20 years.
Publisher: AskWoody LLC (woody@askwoody.com); editor: Tracey Capen (editor@askwoody.com).
Trademarks: Microsoft and Windows are registered trademarks of Microsoft Corporation. AskWoody, Windows Secrets Newsletter, WindowsSecrets.com, WinFind, Windows Gizmos, Security Baseline, Perimeter Scan, Wacky Web Week, the Windows Secrets Logo Design (W, S or road, and Star), and the slogan Everything Microsoft Forgot to Mention all are trademarks and service marks of AskWoody LLC. All other marks are the trademarks or service marks of their respective owners.
Your email subscription:
- Subscription help: customersupport@askwoody.com
Copyright © 2019 AskWoody LLC, All rights reserved.

Plus Membership
Donations from Plus members keep this site going. You can identify the people who support AskWoody by the Plus badge on their avatars.
AskWoody Plus members not only get access to all of the contents of this site -- including Susan Bradley's frequently updated Patch Watch listing -- they also receive weekly AskWoody Plus Newsletters (formerly Windows Secrets Newsletter) and AskWoody Plus Alerts, emails when there are important breaking developments.
Get Plus!
Recent Topics
-
Firefox Red Panda Fun Stuff
by 1 hour, 29 minutes ago
-
How start headers and page numbers on page 3?
by 5 hours, 1 minute ago
-
Attack on LexisNexis Risk Solutions exposes data on 300k +
by 2 hours, 31 minutes ago
-
Windows 11 Insider Preview build 26200.5622 released to DEV
by 13 hours, 42 minutes ago
-
Windows 11 Insider Preview build 26120.4230 (24H2) released to BETA
by 13 hours, 44 minutes ago
-
MS Excel 2019 Now Prompts to Back Up With OneDrive
by 3 hours, 25 minutes ago
-
Firefox 139
by 16 hours, 6 minutes ago
-
Who knows what?
by 8 hours, 49 minutes ago
-
My top ten underappreciated features in Office
by 14 hours, 27 minutes ago
-
WAU Manager — It’s your computer, you are in charge!
by 8 hours, 51 minutes ago
-
Misbehaving devices
by 16 hours, 35 minutes ago
-
.NET 8.0 Desktop Runtime (v8.0.16) – Windows x86 Installer
by 1 day, 20 hours ago
-
Neowin poll : What do you plan to do on Windows 10 EOS
by 1 hour, 43 minutes ago
-
May 31, 2025—KB5062170 (OS Builds 22621.5415 and 22631.5415 Out-of-band
by 1 day, 18 hours ago
-
Discover the Best AI Tools for Everything
by 18 hours, 10 minutes ago
-
Edge Seems To Be Gaining Weight
by 1 day, 9 hours ago
-
Rufus is available from the MSFT Store
by 1 day, 17 hours ago
-
Microsoft : Ending USB-C® Port Confusion
by 2 days, 20 hours ago
-
KB5061768 update for Intel vPro processor
by 19 hours, 57 minutes ago
-
Outlook 365 classic has exhausted all shared resources
by 18 hours, 39 minutes ago
-
My Simple Word 2010 Macro Is Not Working
by 2 days, 15 hours ago
-
Office gets current release
by 2 days, 18 hours ago
-
FBI: Still Using One of These Old Routers? It’s Vulnerable to Hackers
by 4 days, 8 hours ago
-
Windows AI Local Only no NPU required!
by 3 days, 17 hours ago
-
Stop the OneDrive defaults
by 4 days, 9 hours ago
-
Windows 11 Insider Preview build 27868 released to Canary
by 4 days, 19 hours ago
-
X Suspends Encrypted DMs
by 4 days, 21 hours ago
-
WSJ : My Robot and Me AI generated movie
by 4 days, 21 hours ago
-
Botnet hacks 9,000+ ASUS routers to add persistent SSH backdoor
by 4 days, 22 hours ago
-
OpenAI model sabotages shutdown code
by 4 days, 23 hours ago
Remembering Woody
