
|
Patch reliability is unclear. Unless you have an immediate, pressing need to install a specific patch, don't do it. |
-
Why I recommend pausing Windows updates every month
ISSUE 16.23.0 • 2019-06-24
 The AskWoody Plus Newsletter
In this issue
WOODY’S WINDOWS WATCH: Why I recommend pausing Windows updates every month
BEST OF THE LOUNGE: Customize the initial Windows 10 installation
LANGALIST: Optane disappointment leads to a ‘Plan B’
BEST UTILITIES: Freeware Spotlight — System Information Viewer
WINDOWS 10: How to maximize your battery charge in Win10
WOODY’S WINDOWS WATCH
Why I recommend pausing Windows updates every month
By Woody Leonhard
Yeah, I know I sound like a broken record. But the simple fact is that you have much to lose and little to gain by opening your system up to Windows’ automatic updating system.
Rather than installing Microsoft’s patches as soon as they’re released, I believe it’s much safer to hold off, let the screams of pain die down, wait for MS to fix its problems, and patch a few weeks later.
Think of automatic updating as crowdsourced beta testing for Microsoft’s often-buggy patches.
Pausing updates isn’t for everyoneTo be sure, there are variations and exceptions to our standard “get off the patch treadmill” advice. For example:
- If you’re in charge of a high-security site, you aren’t installing the patches as soon as they’re rolled out anyway. As an IT pro, you learned long ago that you need to test, test, and test again before committing any changes to your systems. Which means it could be weeks or months before you add a specific update. Susan Bradley’s Master Patch List should help you keep track of released patches and their status.
- If you (or someone you support) are scared to go into Windows settings and change things — I offer my sainted Aunt Martha as an example — it’s better to leave your/their PC set to automatically update. (As an AskWoody Plus reader, you might well know that providing long-distance IT support to family can be both challenging and time-consuming.)
These systems will have to get patched sooner or later (although there are some on the Lounge who disagree), and automatic updating will reduce your fear factor. Just keep in mind that you’ll probably need to find help if a patch impacts your machine — or you’ll simply have to wait for Microsoft to install a fix.
- Sometimes — about once every year or two, at the current rate — there’s a patch that really, genuinely, needs to be installed right away. We saw that with the WannaCry-related patch in April 2017, and the BlueKeep “wormable” patch this past month (May 2019). Even so, with WannaCry, you had well over a month to get patched before the exploits began; with BlueKeep, we still haven’t seen a credible in-the-wild BlueKeep attack. So an exploit that’s truly an immediate threat is extremely rare.
The origins of AskWoody.com’s MS-DEFCONI’ve been reporting on bad Windows and Office patches on my AskWoody site since July 2004. I started a green light/red light recommendation system in 2005 — back in the XP and Office 2003 days — and by 2006, it had evolved into the MS-DEFCON system you can see today.
The concept’s pretty simple: Every month, I send out a warning when patches appear imminent — usually on the Monday preceding Patch Tuesday. Then I wait and watch. There’s a team of savvy patchers on AskWoody.com who note any problems they (or other forum members) encounter. If a problem seems widespread or particularly galling, I write it up for Computerworld and for AskWoody.
When the coast is clear, I explain precisely how to apply the latest patches without getting clobbered. Sometimes that’s easy; other times, not so much. You can see notifications about these MS-DEFCON changes in AskWoody Plus Alerts, on the AskWoody.com website, or in my Computerworld articles. And, yes, I do this every month.
(For those new to AskWoody.com, MS-DEFCON 1 is our highest level of patch alert; MS-DEFCON 5 is the lowest. In a typical patch cycle, we’re at MS-DEFCON 2 around Patch Tuesday — dropping to MS-DEFCON 4 toward the end of the month.)
How does this differ from Susan Bradley’s Patch Watch posts and frequently updated Master Patch Lists? I’m looking at the big picture — changes to the MS-DEFCON level are a nuanced red-light/green-light system designed to keep most Windows and Office customers safe. Susan’s Patch Watch takes a detailed look at each patch, logging problems as they’re encountered. It also has patch-by-patch recommendations on whether to install or wait, with special emphasis on enterprise patching.
Why you should block updates every monthPut simply, in my experience, you have a much greater chance of getting zapped by a bad patch than by an emerging malware episode. I can’t think of a single just-patched vulnerability that’s turned into a working-class exploit within a few weeks of the patch’s release. I can name hundreds of bad patches that bit right off the bat. Typically, the most problematic updates get fixed within a week or two — hence our recommendation to defer updates by two to three weeks.
Again, if you’re in charge of a high-security site, or a site that’s a favorite target of nefarious professional hacking groups, there’s greater pressure to get patched quickly. But then you should have the staff and the tools to thoroughly test new patches yourself. For most people, most of the time, a skeptical wait-and-see approach makes a whole lot of sense.
In short: Yes, you must install patches to eliminate vulnerabilities. No, you don’t need to install them as soon as they’re available.
I have a more detailed explanation in my Computerworld column, “The case against knee-jerk installation of Windows patches.”
For those of you who really want to get the latest patches as soon as they’re released — I salute you! Just be sure to tell us about your successes and failures on the AskWoody forum. Just like Microsoft, we, too, need all the cannon fodder we can find.
PS: Click over to the AskWoody site for an update post on out-of-band patches for Windows 7 and Windows 8.1!
Questions? Comments? Thinly veiled prognostications of impending doom? Join the discussion about this article on the AskWoody Lounge. Bring your sense of humor. Eponymous factotum Woody Leonhard writes lots of books about Windows and Office, creates the Woody on Windows columns for Computerworld, and raises copious red flags in sporadic AskWoody Plus Alerts.
Best of the Lounge
Rick Corbett gives step-by-step instructions on how to access and customize Windows’ default account template.
He notes that every new account created will be based on the amended default account template, so you don’t have to make changes to each account individually. That will automatically get rid of the unwanted apps, set preferred privacy settings, and add your favorite browsers. He also reviews how to use registry files, AutoHotKey, and PowerShell scripts to make setting up the fresh install easier.
Windows Patches
Woody’s manifesto on patching; it’s possibly heretical but eminently sensible.
Windows 7
In March, AJ42 shared his chosen path to prepare for the end of Win7 support. Having successfully finished implementing his plans, he reviews just what it took to succeed.
Windows 10 Updating
PKCano managed the upgrade to 1809 — even with BitDefender Free! Check out the details on how it was done.
Security
Great question from noblame no gain. Want to confirm your computer is safely patched? Loungers share a variety of ways to double-check.
Windows 10
Get your sticks out, folks, and use them to install windows — hopefully without breaking any.
Windows Licensing
Moving faster than the speed it takes to smash atoms, the underground wonder of the world splits from Microsoft.
If you’re not already a Lounge member, use the quick registration form to sign up for free.
LANGALIST
Optane disappointment leads to a ‘Plan B’
By Fred Langa
I was in a bit of a pickle: The performance of my brand-new PC was awful — it simply couldn’t handle my peak workloads!
Worse, it was my own fault: I’d spec’d the wrong drive setup for my particular computing needs!
Here’s how I got back on track with a hardware/software combination that’s blazingly quick on both hard-drive reads and writes!
The new PC was great — except for the hard-drive system!Quick recap: My old, primary-use PC could no longer keep up with my workload — it had become frustratingly slow during routinely heavy use.
I decided to become my own test case; I’d try to identify and solve the performance problem. And for the benefit of AskWoody readers, I’d document the process. This three-part series of articles is the result.
In Part One, “Taking the plunge with a new PC” (AskWoody Plus newsletter 2019-06-03), I discussed used Windows’ built-in performance tools to identify system bottlenecks, weighed the options for upgrading, and ultimately decided that a whole new PC was the best solution.
In Part Two, “Test-driving Intel’s Optane in a new PC” (AskWoody Plus 2019-06-10), I showed you the initial rough specs for my new PC. I also noted how a vendor’s unexpected inducement sent me in an unexpected but interesting direction. In place of my planned solid-state drive (SSD), I was offered an enhanced drive system: a 1TB Seagate Barracuda hard drive combined with a 16GB Intel Optane drive accelerator.
As I explained, the Optane system is a little weird; it’s an aggressive, non-volatile, self-managing disk cache that’s built with proprietary, special-purpose memory chips. And in my initial tests, it looked really promising. After some initial tweaking, benchmarks showed that my new PC’s Optane system was about twice as fast as my old SSD in cached-read operations!
Unfortunately, I soon discovered that those early numbers weren’t matched by my real-world tasks. In fact, the new Optane system was my new PC’s single and worst performance bottleneck, causing major slowdowns during peak workloads.
After the expense and hassle of getting a new PC, I really was no better off than before!
What was Optane’s problem?I suspected Optane’s relatively slow data-writes were partly to blame (see Part Two for details). But I found an even larger problem after a few days of monitoring the new PC via Task Manager’s Performance graphs.
When I was doing normal office-type work, using more or less the same software over and over, Optane really did help. It launched already cached software lightning-fast — even faster than my old SSD!
But much of what I do involves testing different software in different configurations. Optane really doesn’t shine when you’re using an irregular or non-repeating suite of tools or when your software and data sets routinely exceed the size of the Optane cache. Whenever data must be loaded (or re-loaded) into the cache, it sinks to the speed of a spinning-platter drive — which is to say, slooooowly, compared to the SSD speeds I was used to on the old PC.
Worse, running multiple virtual PCs (VPCs) simultaneously (an essential tool for my work) became a nightmare on the new machine. Because VPCs exist entirely as software, all their separate elements — the launcher/management tool, hardware emulators, the OS and associated drivers, and any apps running inside the VPC — must be initially loaded from the host system’s hard drive — at the drive’s native speed.
And once the VPCs are all up and running, they read and write to their virtual hard drives, which are actually just large files that reside on the host PC’s real hard drive. It all adds up to a mountain of slow (HDD-speed) first-time reads — and equally massive batches of relatively slow Optane writes.
You can imagine my disappointment when, during my first full-on use of multiple VPCs, the new PC completely bogged down. A check on Task Manager showed that the Optane drive system was 100 percent maxed out.
In short, Optane was excellent at accelerating cached-data reads. It forestalled access to the slow HDD — but only when there was plenty of repeatedly used data and tasks that stayed in the buffer.
On the other hand, the PC chugged along in first gear (at the speed of a conventional hard drive) when mostly new tasks were called up or were repeated only in large cycles that exceeded the capacity of the cache.
Performance-wise, Optane was absolutely the wrong tech for me.
Adding salt to the wound: Optane blocks some maintenance toolsPerformance aside, Optane has other potential liabilities. As noted in Part Two, it completely takes over a hard drive’s routine operations. To the OS, Optane and the hard drive appear as a single device.
My Optane system included an utterly conventional, spinning-platter hard drive. Standard drives need defragmentation from time to time, right? (See the Microsoft support page on Win10 defragging.)
But Win10’s Disk Optimizer thought Optane was an SSD (it’s not). For that reason, it couldn’t “see” the actual HDD and simply pronounced the whole setup as un-optimizable! Check out Figure 1.
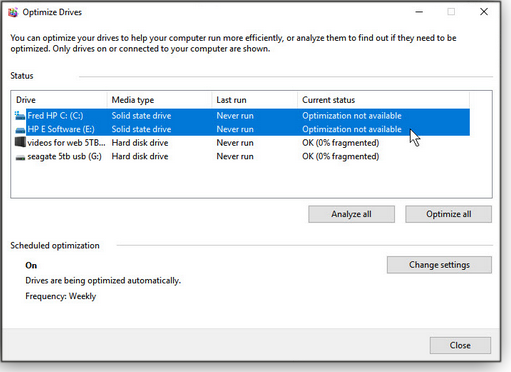
Figure 1: Optane blocks normal maintenance of the conventional hard drive’s partitions.An Intel support page unhelpfully says that defrag simply isn’t available. So it’s not a mistake or a bug — it’s just how Optane works.
In poking around Optane support forums, I found that some users discovered an unofficial and unsupported workaround that’s a colossal PITA: First, you manually disable Optane — a long process that involves zeroing out the full cache to erase any retained data. Next, you manually trigger normal optimization/defragmentation of the now revealed HDD. And finally, you manually re-enable Optane — which requires reloading the cache from scratch. And all of that happens at the slow pace of the raw, unaccelerated HDD.
No thanks! For me, Optane was a total bust. I was just glad I’d not paid extra for it.
That also meant returning to my original plans for an SSD in the new PC.
Fortunately for me (and for anyone thinking about data-storage options), SSD prices are in free fall. For example, you can buy a 1TB SSD for around $100 — and sometimes less. (In hindsight, that’s probably why my PC’s vendor was effectively giving away Optane+HDD setups!)
So, using the money I’d previously saved in getting the “free” Optane-enhanced drive system plus the balance of my unspent new-PC budget, I bought a 1TB SSD — and in a what-the-heck moment, splurged on a second 16GB of RAM.
Giving Optane one last chanceOptane can work with almost any drive, including SSDs. So I considered leaving the Optane board in place and using it with the new SSD. After all, the original Optane setup was roughly twice as fast for data-reads as was my old PC’s SSD. Could I get the best of both worlds: Optane read speeds and SSD write speeds?
To find out, I re-ran the ATTO disk benchmarks, with and without Optane enabled.
Figure 2 shows the comparative results; here’s what the labels mean. The Raw HDD numbers refer to the new PC’s original spinning-platter hard drive, with the Optane system disabled. The Optane+HDD is the best-case performance I could get from the original Optane system, using the tweaks discussed in Part 2. Optane+SSD shows the Optane system’s performance after replacing the 1TB HDD with a 1TB SSD. And Raw SSD shows the SSD alone, with Optane disabled.

Figure 2. Optane’s fast data-read speeds are impressive; but its write speeds are definitely not!As with the HDD, Optane significantly boosted the SSD’s data-read performance. But data-write speeds remained slow — surprisingly at near-HDD speeds, even with the SSD installed! Clearly, relatively slow writes are simply how Optane works.
That, plus all the other Optane negatives outlined earlier, was too much: I disabled Optane for good.
Final tweaks — and a last, major surpriseMy new SSD, a Micron/Crucial brand, came with Crucial Storage Executive (info), a small suite of tools to monitor and adjust the SSD. It also offered options for setting up a RAM-based cache and for overprovisioning the SSD (info).
RAM-based cache is inherently fast; it benefits from the superior speed of the RAM chips and from the RAM’s high-speed data circuitry (“bus”). It’s far faster than the hard-drive data circuitry used by a SATA bus-based cache, such as Optane’s.
Called “Momentum,” Crucial’s cache app installs a custom software driver to intercept and manage the data flow between the OS and the drive. The cache is self-adjusting, and it limits itself to 4GB or no more than 25 percent of available RAM, whichever is smaller. A Micron technical white paper (free PDF download) explains many additional details of the cache’s design and operation.
The overprovisioning app reserves some of the SSD’s capacity for internal use by its own firmware. This extra elbow room helps extend the life of the SSD by allowing some housekeeping activities to be spread over a greater number of memory cells. It can also slightly boost the speed of some buffer-related operations.
With Optane out of the picture, I ran new benchmarks on the overprovisioned, cache-assisted SSD. I expected to see good results — but nothing like this!
The graph in Figure 3 is similar to Figure 2’s but adds the SSD+cache+OP column, representing the performance of the SSD with the cache and overprovisioning (“OP”) enabled. Note, however, the difference in vertical scale between the two figures.
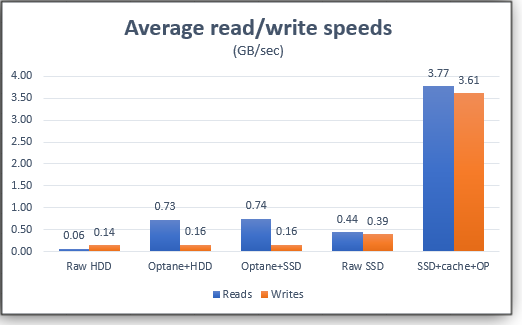
Figure 3. With a RAM-based cache and overprovisioning enabled, SSD performance left Optane — and all other options — in the dust.The performance difference is astounding! The final SSD-based setup is over five times faster than Optane on average read speeds. For average write speeds, it’s 22 times faster than the original Optane setup!
The SSD’s peak speeds are equally impressive (see Figure 4): almost eight times faster in reads and — holy smokes! — 35 times faster on writes!
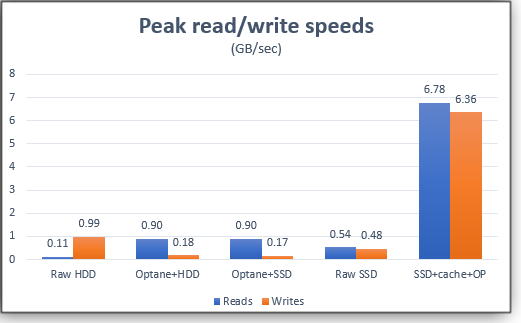
Figure 4. Peak read/write speeds showed an even wider disparity between drive configurations. Clearly, the cache-augmented, overprovisioned SSD is in a speed class of its own.Impressive, yes — but would these benchmarks translate into real-world performance?
Whole-system, real-life testsI next ran a number of additional synthetic and real-life tests, starting with PassMark Software’s benchmarks (info), which combine PC subsystem tests (CPU, RAM, disk, 2-D and 3-D graphics) to produce a single, higher-is-better score that represents the system’s overall performance.
Figure 5 shows the PassMark results for just the disk system, comparing the as-delivered setup (Optane+HDD) to the final cache-assisted, overprovisioned, and Optane-free SSD setup. As you can see, the PassMark benchmarks generally agree with the previous ATTO benchmarks.
Figure 6 shows the overall, whole-system PassMark scores for the original Optane-based drive setup, the raw SSD, and the fully configured SSD setup.
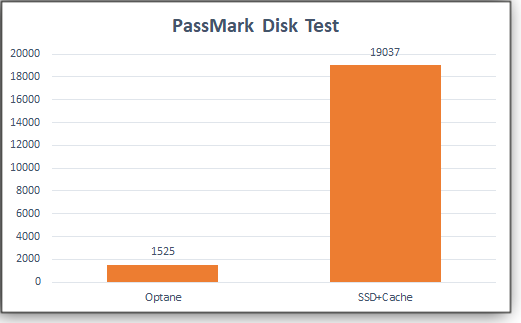
Figure 5: The PassMark Disk Test scores for (left) the Optane-based system as delivered and (right) the final SSD configuration.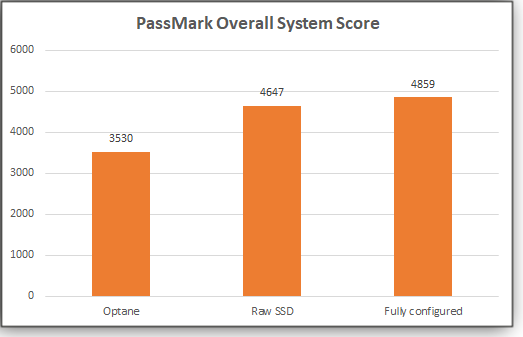
Figure 6: The overall PassMark whole-system scores with Optane; the raw SSD; and the cache-enabled, overprovisioned SSD.That all looked good, but benchmarks can be misleading. The final test was to see what would happen under the same conditions that previously drove my old PC to its knees: simultaneously running the multiple, full-blown virtual machines that contain the current and past Windows versions I need for reference.
I started by launching a 4GB VPC running Win10 Pro 64 (release 1903) — the same version of Windows installed on the real PC. That went fine, as expected, so I loaded a second 4GB VPC, this one running Win10 Home 64 (also 1903). Also good; no problems with two VPCs running.
Next, I added a third VPC running Win10 1809 Pro plus another VPC with Win10 1809 Home. The new PC was still breezing along, so I added a Win7 Ultimate 64 VPC.
This was new territory for me: In the past, to get this far, I would have had to pare back the RAM allotted to each VPC, slowing their performance and further bogging down the host system. But the new PC was still fully responsive and not showing any serious strain.
For the helluvit, I started up separate VPCs running Win8.1, WinXP Pro, and even Win98SE. That’s eight VPCs simultaneously up and running.
Even with that massive load, the new PC still responded normally to user input. You can see why in the performance graphs shown in Figure 7. The system RAM was the only subsystem near capacity. As additional memory resources were needed, data was swapping between RAM and the Windows pagefile, which lives on the speedy SSD, backed up by a very fast disk cache. That effectively removed any bottlenecks that might impact the PC’s respond time — even under extreme load.

Figure 7. As an extreme stress test, I loaded, updated, and ran simultaneously eight separate, fully functional virtual Windows PCs. It worked!Success! I finally had a fast, capacious system that should be able to sustain my workload now and for some time to come.
Don’t make the mistakes I madeIt had been a while since I had bought a new PC, and my rustiness showed in some of the errors I made.
Drive systems: I re-learned that there’s simply no substitute for an SSD. Nothing else offers the same intrinsically fast, balanced, and sustained read/write performance. And now that SSDs are becoming price-competitive with spinning-platter hard drives, there’s really no reason to stick with the older tech — except perhaps for very large external drives, where sheer capacity matters more than speed. But for normal-sized internal/primary drives? SSD all the way!
Optane feels like a stopgap technology. It really can improve repetitive data-read performance on a spinning-platter drive, and it can even boost an SSD’s read speeds — some. But Optane has some serious drawbacks, as detailed above. Those problems might have been easier to excuse when SSDs were quite expensive.
I can imagine some niche cases where Optane and other hybrid-drive options (info) might still be worth considering, but for normal use in offices and homes, I think an affordable SSD will almost always be a better choice.
Disk cache: I hadn’t used a RAM-based disk cache in years: I was blown away by the improvement it made, even to an already-fast SSD. I’m now adding “disk cache” to my list of must-have software add-ons for any PCs I own!
And note: You can probably grab yourself a RAM-based cache right now, if you wish. Many drive brands and models — conventional and SSD — either come with their own caches or have one available for download (check your vendor’s support site). Some caches are brand-specific; others are not. For example, Micron/Crucial’s Storage Executive (free; info) works optimally on Crucial SSDs, but some functions can also work on other brands of SSD. If your vendor doesn’t offer a cache, there also are third-party caches, free and paid, that can work with any kind of drive. Simply search for “disk cache software.”
RAM: I still believe that 8 to 12GB is the sweet spot for general-purpose Win10 machines. It’s typically sufficient for good performance, without going overboard. (More RAM is beneficial if you set up disk caching.) My PC sees heavy use, so I’d originally planned on 16GB. But finding prices low enough to get a second 16GB bank — 32GB total — not only let me completely eliminate a performance bottleneck but also gave me enough RAM to spare for a very speedy disk cache, with plenty left over for some as-yet-unknown, RAM-hungry apps of the future. The lesson? If you can, go big on your RAM upgrades.
Worth the hassle? Absolutely!It took a while and involved some odd detours, but I now have the PC I wish I’d spec’d at the start — fast, capacious, and bottleneck-free! It’s a pleasure to use.
Here’s hoping this information helps you get the right PC for your needs, when it’s your time to upgrade!
Send your questions and topic suggestions to Fred at fred@askwoody.com. Feedback on this article is always welcome in the AskWoody Lounge! Fred Langa has been writing about tech — and, specifically, about personal computing — for as long as there have been PCs. And he is one of the founding members of the original Windows Secrets newsletter. Check out Langa.com for all Fred’s current projects.
Best Utilities
Freeware Spotlight — System Information Viewer By Deanna McElveen
They say that information is power, and this holds true with computer diagnostics. The more you know about your system, the more likely you’ll find solutions to problems.
Windows provides a good amount of system data, but to dive deep you need third-party tools. One of our favorites is Ray Hinchliffe’s System Information Viewer (SIV). It’s not a thing of beauty, but there’s little it can’t reveal about your PC’s stats — whether you’re running Windows 2000 or current versions of Windows 10.
Ray just emailed us his latest release of SIV — Version 5.39 — which adds support for a wider range of hardware (more info). For us, it’s always nerd’s Christmas when we get something new from Ray. Naturally, this latest release is fully portable, completely free, and unencumbered by crapware.
SIV approach to system information? Show you everything you could want to know about a Windows computer. It doesn’t matter whether you’re running a slotted Pentium 1 machine or an AMD Threadripper, SIV has you covered.
The utility is so extensive, I can cover only a fraction of what’s included; it’d take a sizable book to review everything. In fact, if the app has a fault, it’s the sheer density of the information — it can be daunting. With that said, here’s a taste.
Start by downloading SIV’s ZIP file from our OlderGeeks site. Create an SIV folder on any media you like — a flash drive, for example — and extract the zipped files to the folder. With that done, open the 64-bit or 32-bit version of the program (SIV64X.exe or SIV32X.exe), depending on the bittedness of your system.
The first screen (see Figure 1) gives a quick summary of the system. (Note: If you minimize the app, don’t look for it on the main taskbar, along with other running apps. You should find it in the hidden icons box [up arrow] in the notification area.)
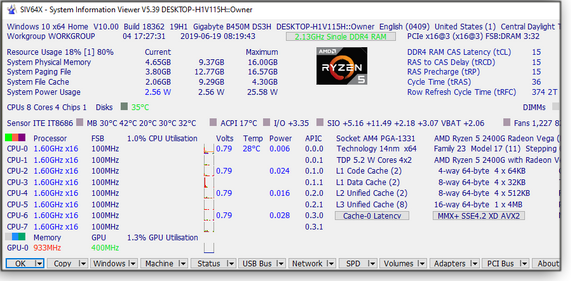
Figure 1. SIV’s main menu shows an extensive summary of system status.But that’s just the tip of the proverbial iceberg. Note the buttons across the bottom. This is where you dig deep into your system’s features, capabilities, configuration, and status. Want to see all the menu options? Click the down-arrow icon on the Copy button, select View Menus, and then check out the massive list shown in Figure 2. Go ahead and peruse it … I’ll wait.

Figure 2. To get a feeling for SIV’s depth, look at the full list of menus.Next, click the down-arrow icon in the Windows button and select S/W Name. This shows all the programs installed on your computer (see Figure 3). S/W Date shows when they were installed, and S/W Keys might show you license keys. (Most keys are now encrypted or otherwise hidden.) Look at the other buttons under this window, and their own dropdown menus. See what I mean? It seems endless.
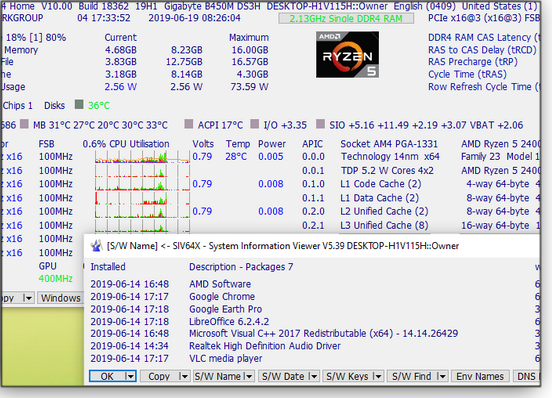
Figure 3. SIV can give you a quick snapshot of programs installed on your machine.Clicking the Machine button gives a wealth of data about your hardware (see Figure 4). The info is so detailed, we’ve had no need to use another system-information utility — free or paid.

Figure 4. The Machine window shows virtually everything you might want to know about your hardware.The Status button provides current information on items such as fan speed, temps, voltages, and so forth and so on (see Figure 5). However, what it doesn’t tell you is the acceptable ranges for those components. For example, you’ll have to go online and hunt down suitable hard-drive temps. As with the other categories, Status has even more detailed data in the menus along the bottom.
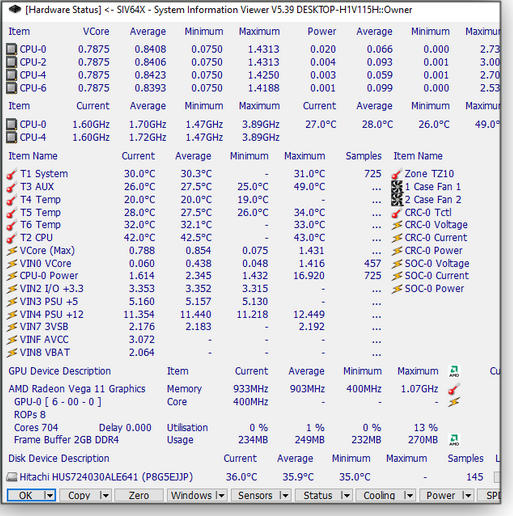
Figure 5. The Status window is a good place to check system temperatures and other variables.Figure 6 shows the system’s USB Bus status — info about your USB ports and the devices using them. (As you’ve probably concluded by now, you’ll have to spend some time online researching what all this information means.)

Figure 6. There are times when you need detailed information on your USB connections.I’ve saved my favorite item for last. The Network button is where this program might astonish you, primarily if you’re attached to a domain. I made sure to show the sub-menus on this section because … well … holy cow! SIV can dig deep for data about your network. There’s so much in the Network submenus, you’re just going to have to play with them to see what I mean.
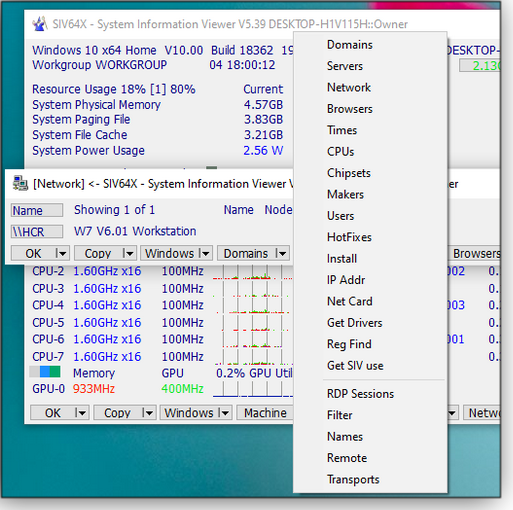
Figure 7. The submenus for the Network section allow deep diving into networks.Oh, I left six main buttons unexplored? Yes, I did — you’ll just have to look through them on your own. Again, you can download System Information Viewer from our OlderGeeks.com website. And I will see if Ray wants to join the discussion about SIV on AskWoody.com. (Use the link below.)
Questions or comments? Feedback for this article is always welcome in the AskWoody Lounge! Deanna and Randy McElveen are celebrating 20 years in the computer business, seven years running OlderGeeks.com and 26 years of putting up with each other. Their computer store is in a small town in the Missouri Ozarks. Believing that happy customers are always the best advertisement, they hope to do it for another 20 years.
Windows 10
How to maximize your battery charge in Win10 By Lance Whitney
It always seems that your portable PC runs out of juice at some highly inopportune moment — such as when you’re about to email that must-deliver report, and there’s nowhere to plug in.
Your notebook’s power settings can have a huge impact on battery life. Age is also an important factor — a three- or four-year-old battery might not last an hour. (Time to replace it!) Fortunately, Windows 10 offers several tools and techniques to keep your battery alive for as long as possible.
You can, of course, set how quickly the screen turns off and the PC goes to sleep when the notebook is idle. But you can also save power by disabling certain background apps and tasks when the battery is getting low. Windows can even suggest options for extending battery life.
Note: Some of the settings I’ll discuss are available only if you’re running on battery power. So unplug your computer from the wall outlet before you read further.
Ready? Go to Win10’s Settings window, select System, and then click Battery. Assuming you’re currently running on battery power, the bar at the top of the Battery section shows the percentage of battery life and estimated time left on your present charge (see Figure 1).
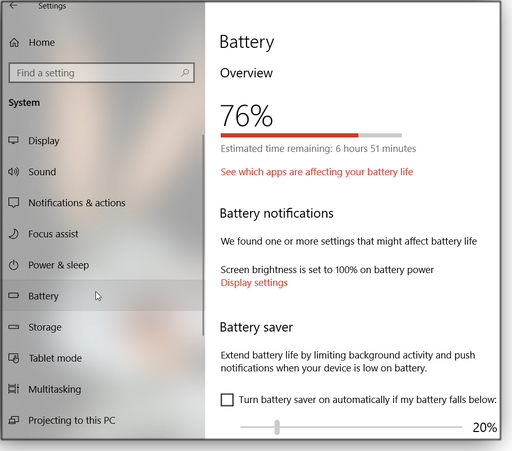
Figure 1. The Battery section in Settings prominently displays your notebook’s charge status.To wrangle more battery life on a per-app basis, click on the “See which apps are affecting your battery life” link just below the charge status. The next screen shows you a list of Windows apps that are consuming power — both when in use and when running in the background. (Background apps might be updating Win10’s “live tiles,” fetching new data, and so forth — all the while, chewing up battery life.)
Click on a specific app or feature to see the percentage of battery life used when it’s open or in the background. By default, Windows controls behind-the-scenes activity, but for greater user control, uncheck the box “Let Windows decide when this app can run in the background.” Leave checked “Reduce the work the app can do when it’s in the background,” as shown in Figure 2. Remember that some apps still need full resources at all times, so if you’re not sure, leave the setting as is.
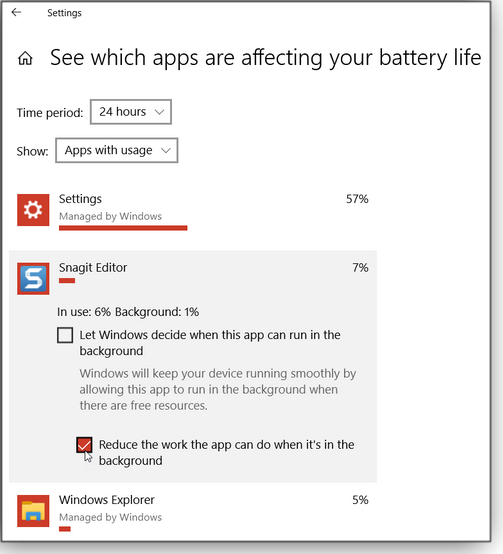
Figure 2. Win10 lets you reduce or cut an application’s background power use.Next, return to the main battery-settings screen and look for the Battery saver section. There, you can limit pushed notifications and background activity for all apps when your PC’s battery charge is getting low. To set this, check the Turn battery saver on automatically if my battery falls below: box. Then select the percentage of battery life below which the battery saver kicks in (Figure 3, for example, shows it set to 20 percent). To further preserve the battery life, check the box Lower screen brightness while in battery saver. If you want to enable battery-saver mode immediately — even before it reaches the set threshold — turn on the switch Battery saver status until next charge.
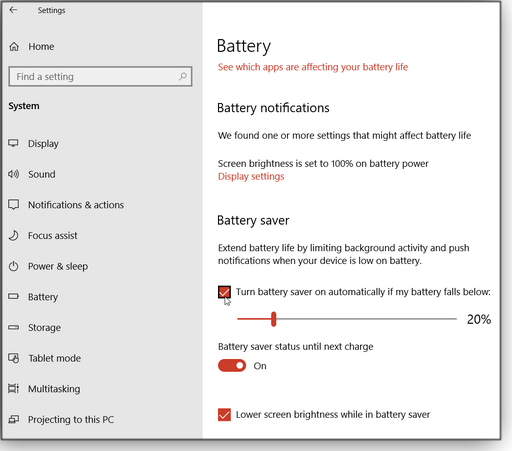
Figure 3. Win10 lets you set when its Battery saver mode kicks in.Scroll back up the screen a bit. Under Battery notifications, Windows might suggest tips for preserving battery life. For example, your screen’s brightness could be set to 100 percent when you’re on battery power. Lowering the brightness when not plugged in to AC will help stretch out battery time. In Figure 4, Battery notifications displays the link Display settings — click it to go to another screen where you can lower the brightness.

Figure 4. The Battery notifications section might suggest other ways to extend battery life.Now return to the Battery settings screen and scroll down to the Battery saving tips link. This takes you to a Microsoft support page that provides advice on things you can do to extend your time on battery power.
Further down the Battery settings screen is Change battery settings for playing video. Click it to open the Video playback screen, then scroll down to the Battery options section. Click on the dropdown menu for watching movies and videos on battery power. To preserve battery life, make sure the option is set to Optimize for battery life. To further preserve battery power, check the box I prefer video to play at a lower resolution when on battery (see Figure 5).
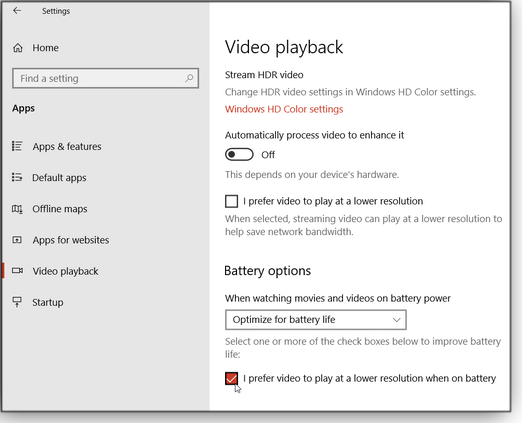
Figure 5. Playing videos at a lower resolution can save battery life.You can also tweak your current power mode to wrestle out more battery life. Click on the Battery icon on the taskbar/notification area. Depending on your current battery charge, you should see a slider for Power mode (on battery). Moving the slider to the right delivers better performance, though at the expense of battery life. Moving it to the left will dim the screen and reduce background tasks but lengthen battery time. The trick is to find the right balance for your current tasks.
Finally, right-click the Battery icon and select Power Options. This takes you to the legacy Control Panel, where you can modify the default Balanced power plan — and other plans as well. Click the Change plan settings link to choose when to turn off the display and when to put the computer to sleep — both on battery power and on AC (see Figure 6). Save your changes. (You might also take a moment to tweak the settings for other power plans, as you wish.)
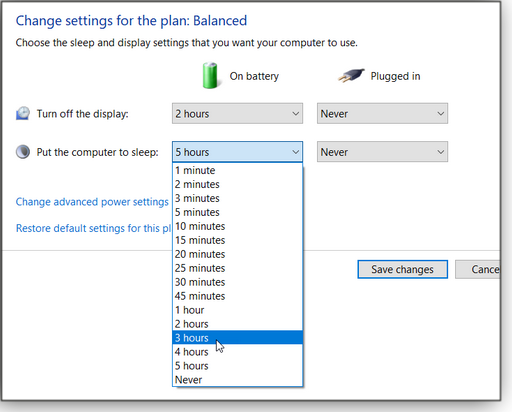
Figure 6. You can change power plans and their settings in Control Panel.Again, none of these tips will help much if your battery is in poor health. To check it with Windows’ hidden battery-report tool, follow How-To Geek’s online instructions.
Questions or comments? Feedback on this article is always welcome in the AskWoody Lounge! Lance Whitney is a freelance technology reporter and former IT professional. He’s written for CNET, TechRepublic, PC Magazine, and other publications. He’s authored a book on Windows and another about LinkedIn.
Publisher: AskWoody LLC (woody@askwoody.com); editor: Tracey Capen (editor@askwoody.com).
Trademarks: Microsoft and Windows are registered trademarks of Microsoft Corporation. AskWoody, Windows Secrets Newsletter, WindowsSecrets.com, WinFind, Windows Gizmos, Security Baseline, Perimeter Scan, Wacky Web Week, the Windows Secrets Logo Design (W, S or road, and Star), and the slogan Everything Microsoft Forgot to Mention all are trademarks and service marks of AskWoody LLC. All other marks are the trademarks or service marks of their respective owners.
Your email subscription:
- Subscription help: customersupport@askwoody.com
Copyright © 2019 AskWoody LLC, All rights reserved.

Plus Membership
Donations from Plus members keep this site going. You can identify the people who support AskWoody by the Plus badge on their avatars.
AskWoody Plus members not only get access to all of the contents of this site -- including Susan Bradley's frequently updated Patch Watch listing -- they also receive weekly AskWoody Plus Newsletters (formerly Windows Secrets Newsletter) and AskWoody Plus Alerts, emails when there are important breaking developments.
Get Plus!
Recent Topics
-
How Much Daylight have YOU Saved?
by 49 minutes ago
-
A brief history of Windows Settings
by 33 minutes ago
-
Thunderbolt is not just for monitors
by 8 minutes ago
-
Password Generators — Your first line of defense
by 1 hour, 21 minutes ago
-
AskWoody at the computer museum
by 6 hours, 33 minutes ago
-
Planning for the unexpected
by 3 minutes ago
-
Which printer type is the better one to buy?
by 10 hours, 4 minutes ago
-
Upgrading the web server
by 21 minutes ago
-
New Windows 11 24H2 Setup – Initial Win Update prevention settings?
by 15 hours, 35 minutes ago
-
Creating a Google account
by 14 hours, 21 minutes ago
-
Undocumented “backdoor” found in Bluetooth chip used by a billion devices
by 20 hours, 45 minutes ago
-
Microsoft Considering AI Models to Replace OpenAI’s in Copilot
by 1 day, 7 hours ago
-
AI *emergent misalignment*
by 1 day, 9 hours ago
-
Windows 11 Disk Encryption/ Bitlocker/ Recovery Key
by 7 hours, 16 minutes ago
-
Trouble signing out and restarting
by 9 hours, 38 minutes ago
-
Windows 7 MSE Manual Updating
by 1 day, 17 hours ago
-
Problem running LMC 22 flash drive
by 16 hours, 14 minutes ago
-
Outlook Email Problem
by 16 hours, 20 minutes ago
-
“Microsoft 365 Office All-in-One For Dummies, 3rd Edition FREE
by 23 hours, 58 minutes ago
-
Cant use Office 2013 – Getting error message about Office 2013
by 1 day, 16 hours ago
-
Nearly 1 million Windows devices targeted in advanced “malvertising” spree
by 1 day, 16 hours ago
-
Windows 11 Insider Preview build 27808 released to Canary
by 2 days, 17 hours ago
-
Windows 11 Insider Preview Build 22635.5025 (23H2) released to BETA
by 2 days, 17 hours ago
-
Sysprep issue
by 2 days, 17 hours ago
-
Android Security Bulletin—March 2025
by 2 days, 20 hours ago
-
23h2: PIN TO START randomly available on right-click
by 2 days, 20 hours ago
-
Microsoft Defender
by 3 days, 1 hour ago
-
New Laptop-Another ?
by 2 days, 19 hours ago
-
Global USB power controls
by 2 days, 6 hours ago
-
Not you too Bro?
by 17 hours, 1 minute ago